How to Export Contacts from iPhone to Google Contacts: 4 Easy Methods

Aug 27, 2025 • Filed to: Data Transfer Solutions • Proven solutions

Do you wish to transfer your contacts from an old phone? Just got that shiny new phone, but your address book looks like a ghost town. Don't worry, we've all been there. Moving your contacts, especially from iPhone to Google Contacts, can feel like deciphering hieroglyphics. Fear not! This guide equips you with 4 easy methods to export your contacts from iPhone to Gmail. Whether you're a seasoned iPhone user or a curious Android convert, this guide will have you conquering your contact transfer like a boss! Read on to learn more.
- Part 1. How to Export iPhone Contacts to Gmail
- Part 2. [BONUS] How to Export iPhone Contacts to Gmail with Dr.Fone
- Part 3. How to Export Contacts from Gmail to iPhone
Part 1. How to Export iPhone Contacts to Gmail
No more staring at a blank address book on your new device! Exporting your iPhone contacts to Gmail might seem complex, but it is not! Here are several ways to migrate your iPhone contacts, depending on your preference:
Method 1: Directly on Your iPhone (Quick & Easy)
This method is ideal for those who want a swift and effortless solution. No need to connect any wires or fire up your computer! Just follow these simple steps, and your contacts will be magically whisked away to Gmail:


Method 2: Exporting via iCloud (For Those Who Like Cloud Solutions)
This method is perfect for those who already embrace the power of cloud storage. If you're an iCloud pro, you can use it to transfer your contacts to Gmail:

Method 3: Exporting via iTunes (For Older iPhones)
This method caters to users with older iPhones or those comfortable using iTunes. While newer iTunes versions might not support this method, it's still a valuable option for some:

Method 4: Exporting via Google Drive (Multi-Step But Flexible)
This method offers more flexibility but involves a few extra steps. It's ideal for those who like a bit more control over the process:

With these four methods, transferring your iPhone contacts to Gmail should be a breeze. Choose the method best suits your comfort level and tech expertise, and say goodbye to the blank address book blues!
Part 2. [BONUS] How to Export iPhone Contacts to Gmail with Dr.Fone
While the methods above provide solid options, Dr.Fone by Wondershare offers a comprehensive solution for advanced users seeking more control over their data transfer. Dr.Fone streamlines the process and ensures a secure, reliable transfer of your iPhone contacts to your Gmail account, often in just a few clicks!
Key Features
- Universal Compatibility:Fone works with all iPhone models, including the latest iOS versions. No matter what iPhone you have, Dr.Fone has you covered.
- 3 Powerful Recovery Modes:Fone empowers you to recover contacts from various sources. You can recover them directly from your iPhone, extract them from encrypted iTunes backups, or access them from your iCloud storage—the choice is yours!
- Preview Before You Transfer:Unlike some methods, Dr.Fone lets you preview your contacts before transferring them. This ensures you only transfer the information you need and avoids any unwanted duplicates.
- Flexible Export Formats:Fone offers a variety of export formats for your recovered contacts. Choose from CSV, HTML, vCard, or VCF – the format that best suits your needs.
- Data Security First:Fone prioritizes data security. Your contacts are transferred securely, ensuring your information remains protected.
- Multi-Purpose Functionality:Fone goes beyond just contacts. It can recover and transfer a wide range of data types, including call history, messages, photos, videos, and more – a one-stop shop for all your data management needs.
Step-by-step Guide


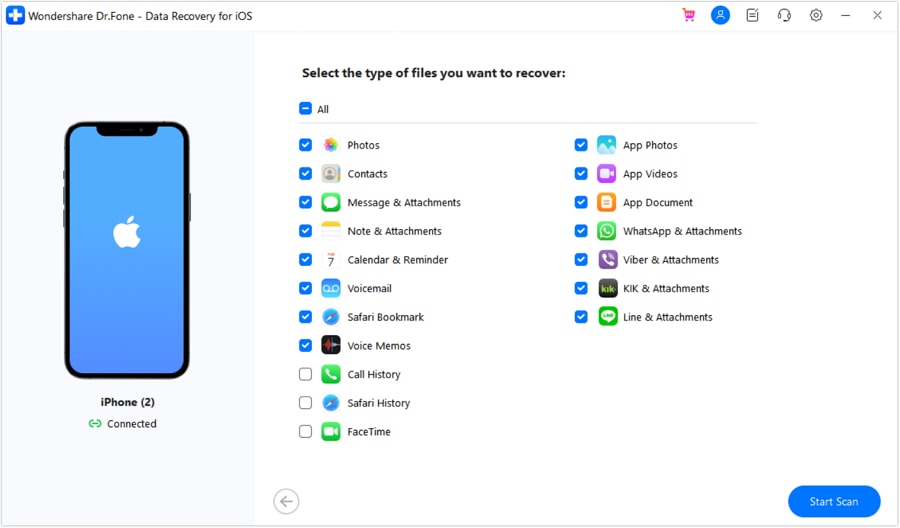
- Export to Device:If you want to keep the contacts on your iPhone, choose your iPhone from the list and click "Continue."
- Export to Computer:For exporting to your computer for further use (like importing to Gmail), select the desired location on your computer and click "Recover."
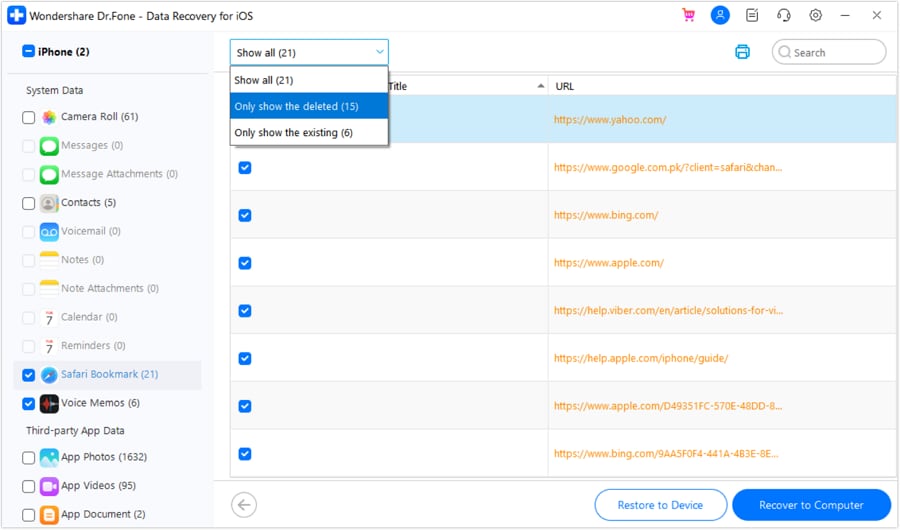
- Disable Find My Service (if applicable):In some cases, you might need to disable the "Find My" service on your iPhone to restore data to the device. If prompted, follow the on-screen instructions to disable it.
- Confirmation and Restore:Once "Find My" is disabled (if needed), click "OK" to proceed with restoring the contacts to your iPhone.
- Choose a Save Location:A window will appear asking you to specify a location on your computer to save the exported contacts file. Choose the desired location and click "Recover" to initiate the export process.
Part 3. How to Export Contacts from Gmail to iPhone
Congratulations! You've mastered the art of transferring contacts from iPhone to Gmail. But what if you switch back to your iPhone or need your Gmail contacts accessible on your iPhone too? Fear not, tech adventurer! This guide wouldn't be complete without exploring how to export your contacts from Gmail to your iPhone. There are two simple methods that you can do:
Method 1: Syncing with Google Account
This method leverages the syncing capabilities of your iPhone and Google account. Here's how to seamlessly keep your contacts in sync:
Step 3: Choose "Google" and enter your Gmail login details. This allows your iPhone to communicate with your Google account and exchange information.
Method 2: Exporting as vCard (For One-Time Transfer)
This method is useful if you only need to transfer your contacts once or if you prefer a manual approach:
Step 2: Select all or desired contacts. Choose the specific contacts you want to transfer to your iPhone.


Conclusion
With these methods, you can effortlessly transfer your iPhone contacts to Google Contacts, ensuring your valuable information stays organized and readily accessible across all your devices. For a smooth and secure experience, consider exploring Dr.Fone by Wondershare - your iPhone's ultimate data management toolkit! Visit the official website to learn more and download a free trial today!


iPhone Transfer
- Data Transfer
- 1. Video from iPhone to External Drive
- 2. Transfer MP4 to iPhone
- 3. Put Wallpapers on iPhone
- 4. Move Photos to SD Card
- 5. Best Apps to Transfer from iPhone to Android
- iPhone to PC
- 1. Transfer Pictures From iPhone to PC
- 2. Transfer From iPhone to Computer
- 3. Transfer Album from iPhone to PC
- 4. Transfer Data from iPhone to PC
- 5. Copy Voice Memo from iPhone to PC
- 6. iPhone Camera Roll to Computer
- 7. Podcasts from iPhone to Computer
- 8. Transfer Notes from iPhone
- 9. Techniques Used in Mobile Phone Forensics
- 10. Facing Please Unlock iPhone Photos Error
- iPhone to Mac
- 1. Voice memos from iPhone to Mac
- 2. Synce Notes from iPhone to Mac
- 3. Export iBooks to PC and Mac
- 4. Transfer Photos from iPhone to Mac
- 5. Transfer Music from iPhone to Mac
- Computer to iPhone
- 1. AirDrop From Mac to iPhone
- 2. Use AirDrop from Mac to iPhone
- 3. Transfer Data from PC to iPhone
- 4. Transfer Videos from PC to iPhone
- 5. Unsync iPhone from Computer
- 6. Sync iPhone with Multiple Computers
- Transfer to iPhone
- 1. Switch Cards Between iPhones
- 2. Facetime for Android to iPhone
- 3. Transfer Data from Motorola to iPhone
- 4. Samsung to iPhone Transfer
- 5. Transfer iPhone Apps to iPhone
- 6. Clone iPhone/iPad to iPhone
- Transfer from iPhone
- 1. Transfer Video from iPhone to Laptop
- 2. Transfer Data from iPhone to Laptop
- 3. Transfer Notes from iPhone to iPad
- 4. Transfer Data from iPhone to Android
- 5. Switch from iPhone to Google Pixel
- 6. Switch from iPhone to Samsung S10
- 7. Switch from iPhone to Samsung
- 8. Transfer from iPhone to Samsung S20
- iPhone Transfer Tips
- 1. Ford Sync iPhone
- 2. Sync iCal with iPhone
- 3. iPhone Calendar Not Syncing
- 4. iPhone Transfer Software
- WhatsApp Transfer
- 1. WhatsApp from iPhone to iPhone
- 2. WhatsApp from iPhone to Android
- 3. WhatsApp from iPhone to Samsung S10
- 4. WhatsApp Messages to iPhone
- 5. WhatsApp from iPhone to Samsung S9
- iTunes Transfer
- ● Manage/transfer/recover data
- ● Unlock screen/activate/FRP lock
- ● Fix most iOS and Android issues
- Transfer Now Transfer Now Transfer Now

Daisy Raines
staff Editor