Everything You Need to Know About iPhone Video Recovery
Aug 27, 2025 • Filed to: Data Recovery Solutions • Proven solutions
It’s not that hard to see why many people prefer to use iPhones for video taking. First and foremost, the quality of iPhone videos is extraordinarily incomparable. You can shoot in 1080p HD or 4K resolution up to 60 and 30 FPS, respectively. In terms of storage, these Apple devices have immense capacity to keep as many videos as you want. At maximum, most iPhone models nowadays can offer up to 1 terabyte of storage to the users. That is more than enough to make the most of these smartphones. Therefore, iPhones become extremely popular in today’s modern world.
There is no doubt that iPhones can do many things when it comes to video recording and storage. They are equipped with highly advanced tools that give users the most optimized outputs. However, we cannot know for sure what is waiting ahead of us. Problems may suddenly arise out of nowhere and give us a hard time. Let’s say the videos on your iPhones suddenly vanish into thin air. That’s a nightmare, indeed. But don’t worry. There are tons of iPhone video recovery techniques that can help you in this kind of situation. Just choose the method that perfectly matches your specific needs.
In this article, we will discuss the major points of the iPhone video recovery process. We will also provide some effective ways how to recover permanently deleted videos on iPhone. Continue reading below to learn more.
Part 1: Aspects That Influence the iPhone Video Recovery Process
Losing video files on iPhones is actually not uncommon. It happens all the time to many users around the world. But as mentioned earlier, such unfortunate encounters are not a big deal because iPhone video recovery is very easy. You just need to choose the perfect method that works best in your situation and then initiate the instructions accordingly. Yes. It’s just as simple as that. However, it’s important to point out that the solutions to this kind problem come in many forms. That’s why you need to assess all the available iPhone video recovery methods before you choose one. In line with this, there are some aspects that greatly influence the iPhone video recovery process. Check out the list provided below and understand each item indicated. Later on, it will surely help you pick the best solution in case you experience the same problem.
File Type and Size of the Deleted Video
The format and the size of the video you want to recover are major components of iPhone video recovery. Why so? Simply because the speed and the overall success rate of the process heavily rely on them. For instance, the iPhone video recovery process takes more time if the video size is quite larger than usual. The same thing goes if the format of the video contains high-resolution settings. That being said, you have to take these aspects into consideration when choosing an iPhone video recovery method. Make sure that it’s capable of running the specific size and type of your files to ensure promising results.
Encryption Protocol
Take note that iPhones implement certain encryption protocols to make sure that your files are safe and secure. Well, there is no problem with that because such measures are designed for the benefit of the users. However, in some instances, encryption protocols affect the success of the iPhone video recovery process. Certain sections of the device’s internal storage are sometimes inaccessible to a few iPhone video recovery apps. That’s why you should be careful when choosing the iPhone video recovery technique you want to initiate. Ensure that it is capable of passing through these security measures to allow the smooth facilitation of the recovery process.
Specific File Location
The original location of the missing video file also plays a huge part in iPhone video recovery. Why so? Simply because there are different recovery measures for videos stored in local and Cloud storage. The recovery methods for missing videos on local storage may not work for the missing files on the cloud. Therefore, you have to choose the best way to recover permanently deleted videos on iPhone based on their original location. Use the accurate technique in order to prevent unwanted delays on your end.
Time Interval Between the Deletion and Recovery
To a certain degree, we can safely say that deleted videos on iPhones are not gone forever. They are still there somewhere around the corner. But in a way, the time interval between the deletion and recovery of the video may have some effect. If it’s been a long time already, the iPhone video recovery app may find it hard to retrieve the file. That’s why you should take time choosing the best tutorial on how to recover permanently deleted videos on your iPhone. Pick a specific method that works best in restoring videos deleted a long time ago. There are many of them online. Explore each option at your disposal and see how it can help you in this kind of situation.
Part 2: How to Recover Permanently Deleted Videos on iPhone?
For sure, you will not run out of choices when it comes to iPhone video recovery techniques. There are tons of options you can try to recover permanently deleted videos on iPhone. Just make sure that you’re going to initiate the recovery method tailored to your specific situation. Do you want to try them on your end? If so, check out the provided tutorials below on how to recover permanently deleted videos on iPhone. Check out the descriptions very well and find the best option that suits your current needs.
Method 1: Recover permanently deleted videos on iPhone via Recently Deleted.
Most iOS apps that deal with user data have a feature called Recently Deleted. It’s generally a special folder that temporarily holds deleted files on your mobile device. The iPhone’s Photos app is also equipped with this tool. If you mistakenly delete a video, you can access this folder and try to retrieve it from there. Don’t worry. It’s a piece of cake. If you want to try it on your end, follow the provided tutorial below for this iPhone video recovery technique.
- Step 1: Launch Photos on your iPhone.
- Step 2: Go to the Albums tab afterward.

- Step 3: Find Recently Deleted under the Utilities section and then click on it.
- Step 4: Browse the content of the folder. Select the videos you want to restore.
- Step 5: Click Recover. Confirm the request to proceed. Tap Recover Photos. Immediately, the deleted videos will be moved back to your main library. Check them there and make sure that all the selected videos have been recovered.

NOTE: The iPhone video recovery via Recently Deleted is the fastest way to restore deleted videos on iPhone. However, don’t forget that Recently Deleted folders only store the deleted files for 30 days at maximum. After the given timeframe, the videos will be deleted permanently on the Photos app. At this point, you may need to try other ways to recover permanently deleted videos on your iPhone.
Method 2: Reset and restore your iPhone from iCloud backup.
Do you back up your iPhone to iCloud regularly? If so, then this iPhone video recovery technique might be the best option for you. Basically, you have to reset your iPhone and restore it from a specific iCloud backup containing the deleted video. Do you want to try this iPhone video recovery method on your end? Then so, check out the tutorial below and follow the instructions in the proper order.
- Step 1: Run Settings on your iPhone.
- Step 2: Tap on General.
- Step 3: Find and click Transfer or Reset iPhone at the bottom section of the dashboard.
- Step 4: Select Erase All Content and Settings.

- Step 5: Read the details of your reset request and make sure you understand them clearly. After that, click Continue to proceed. When prompted, type in your iPhone passcode and tap Erase iPhone to confirm your request.

- Step 6: Wait while the process is ongoing. Don’t tap anything on your iPhone to avoid unwanted interruptions.
- Step 7: Once done, your iPhone will restart automatically. Set up your iPhone afterward. Configure your preferred language, country, and other necessary settings. On the Apps & Data page, select Restore From iCloud Backup.

- Step 8: Log in to your Apple ID. Make sure that it is the specific account you use to back up your videos to iCloud.
- Step 9: After that, choose the iCloud backup you want to restore to your iPhone. Again, make sure that it contains the missing videos you want to recover. Click on it to verify your choice. Once done, the recovery process will then begin immediately. Wait until it’s completed.
Method 3: Recover permanently deleted videos on iPhone from iTunes backup.
Let’s say you regularly back up your iPhone to iTunes. If that is so, then you can also restore deleted files from there very easily. All you have to do is connect your iPhone to the computer and initiate the data recovery procedure on the iTunes app. Yes. It’s just as simple as that. Do you think it’s the perfect iPhone video recovery method for you? If so, check out the tutorial below on how to recover permanently deleted videos on iPhone. Follow the indicated instructions very carefully to get promising results.
- Step 1: Launch the iTunes application on your computer. Once it completely loads up, connect your iPhone to the computer using a data cable. Make sure that the connection between your iPhone and the computer is stable and well-established to avoid unnecessary interruptions.
- Step 2: Click on the iPhone icon below the top menu bar to access your mobile device from the iTunes platform. After that, navigate to the left-side panel and then click Summary.

- Step 3: Access the main dashboard and go to the Backups section. From there, click Restore Backup.

- Step 4: Choose a specific iTunes backup from the provided list. Make sure that it contains the deleted video files you want to restore to your iPhone. Once done, click Restore to confirm your request.
- Step 5: Wait until the iPhone video recovery process is done. Don’t use your iPhone or your computer while it is ongoing to avoid any form of delay on your part. Once the process has concluded, get your iPhone and check if the video files have already been restored.
Method 4: Recover permanently deleted videos on iPhone using Google Photos.
Google Photos is among the greatest digital storage providers out there for photos and videos. Aside from being free, Google Photos is also very accessible for iPhone users. You can conveniently back up and restore your media files from there whenever needed. Can you use it to recover permanently deleted videos on your iPhone? Well, it depends on the user. If you enable its auto backup feature, then you can absolutely restore missing files from there. Do you want to know how? Check out the tutorial below on how to recover permanently deleted videos on iPhone via Google Photos.
- Step 1: Open the Google Photos application on your iPhone.
- Step 2: Browse the library and find the videos you want to restore to your mobile device. Click on them to select the files.
- Step 3: Once done, click the Share button at the top section of the dashboard.
- Step 4: Click Save To Device.
- Step 5: Wait until the process is done. After that, go to the Photos app and locate the videos you have downloaded from Google Photos.
NOTE: Take note that Google Photos offers limited storage capacity for free accounts. But don’t worry. You may buy more storage if you prefer to use it as your primary backup service provider.
Method 5: Recover permanently deleted videos on iPhone via Wondershare Dr.Fone.
What if you don’t have any backup copies of the missing videos on your iPhone? Is it still possible to recover them? Well, the short answer to that question is absolutely yes. You can use a reliable iPhone video recovery app to assist you in this kind of situation. One of the best tools you can use is Wondershare Dr.Fone. It has a powerful data recovery feature capable of restoring various types of files with or without backups. Do you want to try it on your end? If so, check out the tutorial below on how to recover permanently deleted videos on iPhone via Wondershare Dr.Fone.
- Step 1: Download Wondershare Dr.Fone from its official website. Right after, install it on your computer.
- Step 2: Launch the newly installed data recovery software on your desktop afterward. Once its dashboard fully loads up and becomes visible on your computer screen, connect your iPhone to the computer using a data cable. Follow the on-screen instructions and perform the steps accordingly to make sure that the connection between the two devices is stable enough to facilitate the succeeding operations.
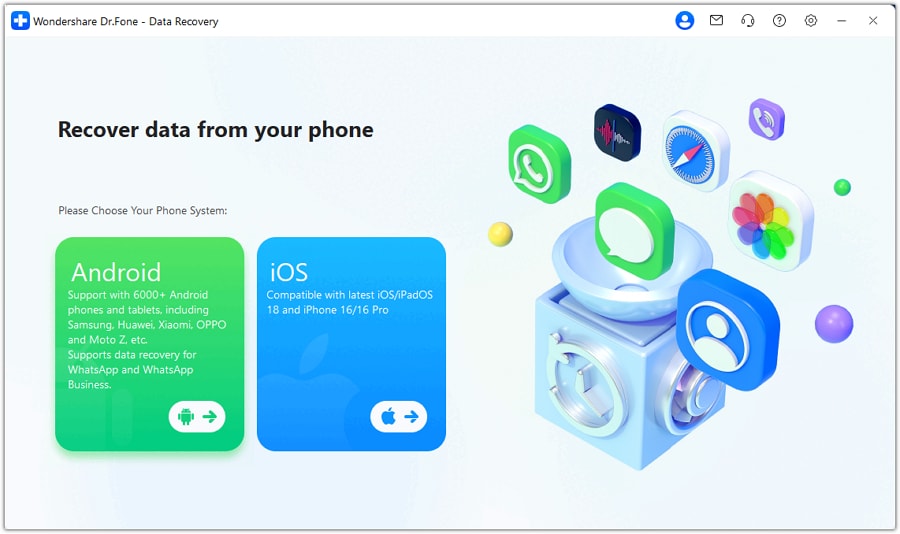
- Step 3: Access the left-side panel and then click Toolbox. Subsequently, head over to the main dashboard and select Data Recovery.

- Step 4: Since you’re trying to recover permanently deleted videos on your iPhone, click on iOS.
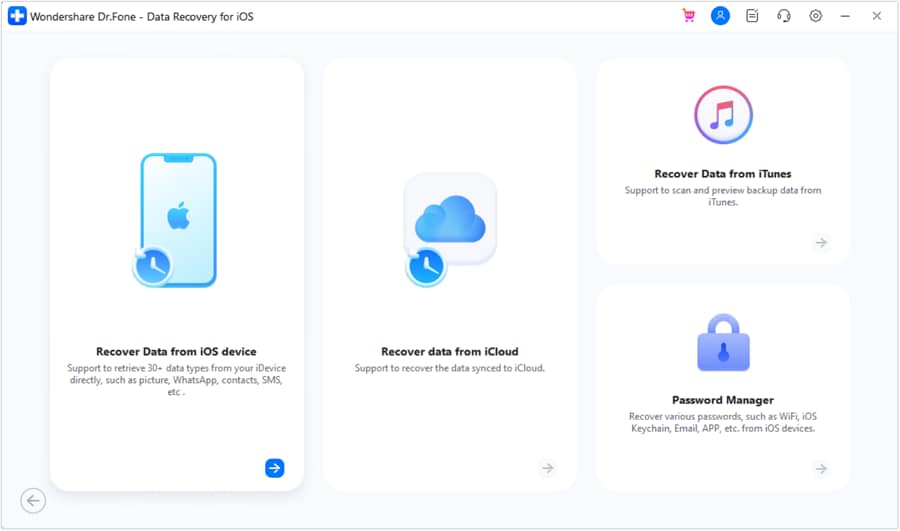
- Step 5: Select Recover Data From An iOS Device among the given options. It is the specific data recovery feature of Wondershare Dr.Fone that allows you to restore missing files without a backup.
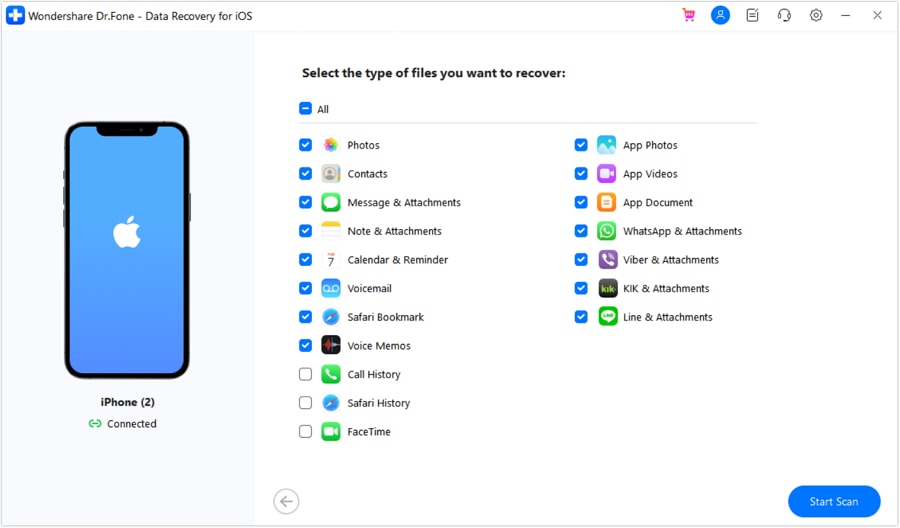
- Step 6: Wondershare Dr.Fone will then list down the specific file types that can be recovered from your iPhone. Check the tickbox next to App Videos. If there are other types of files you want to include in the data recovery procedure you’re about to initiate, select them as well. Once you’re done, click Start Scan.
- Step 7: The scanning process will begin immediately. While it is ongoing, refrain from using your iPhone and computer to avoid unnecessary disruptions. Don’t worry. It will only take a few minutes to complete.
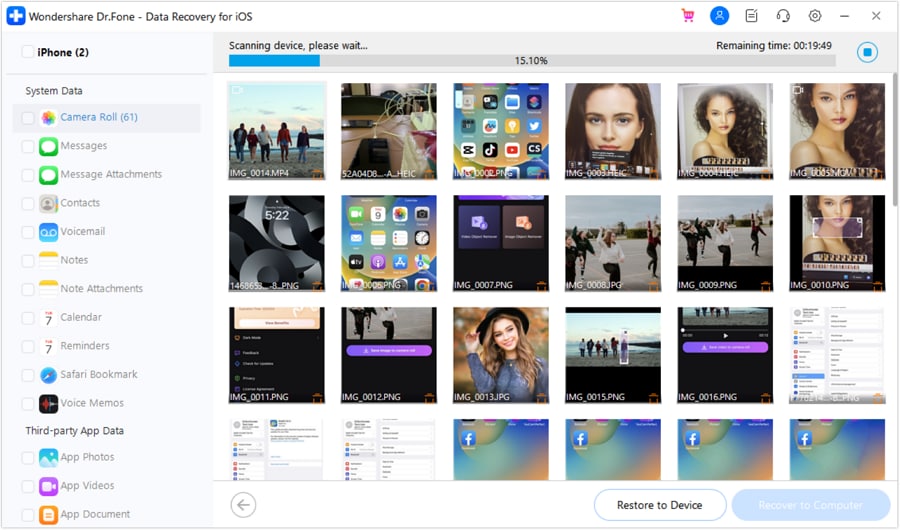
- Step 8: Once done, Wondershare Dr.Fone will display the recoverable videos and other files fetched from your iPhone. Browse the list very carefully and select the videos you want to restore. Tick the checkbox next to them. After that, tap Restore to Device to proceed with the next phase of the iPhone video recovery.
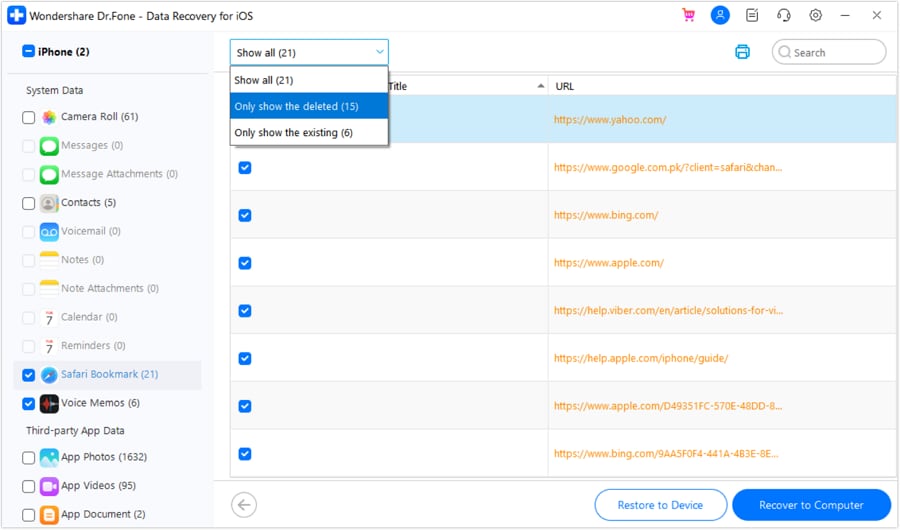
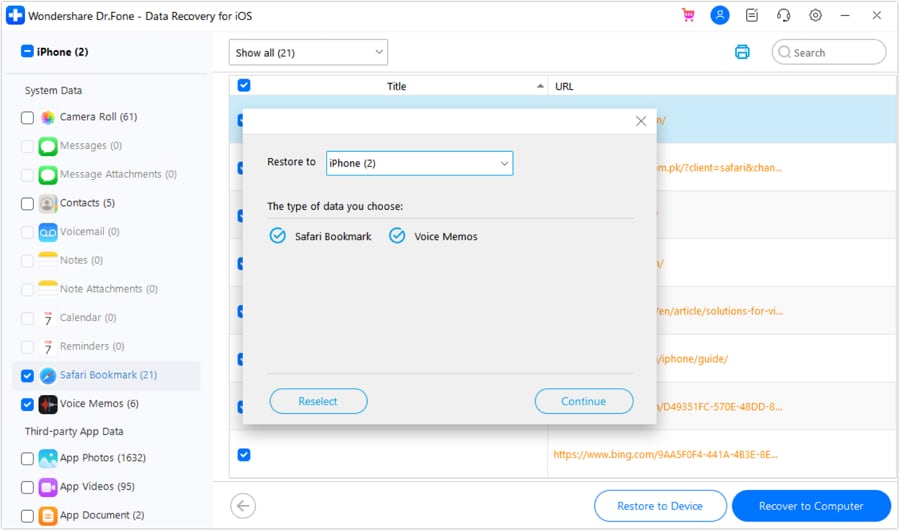
- Step 9: At this point, you need to specify the model of your iPhone. Tap on the drop-down menu beside Restore To and select your iPhone model from the given list. After that, check out the list of files that will be included in the data recovery procedure you’re about to initiate. Once done, click Continue. Meanwhile, click Reselect if you want to modify the list of the selected files.
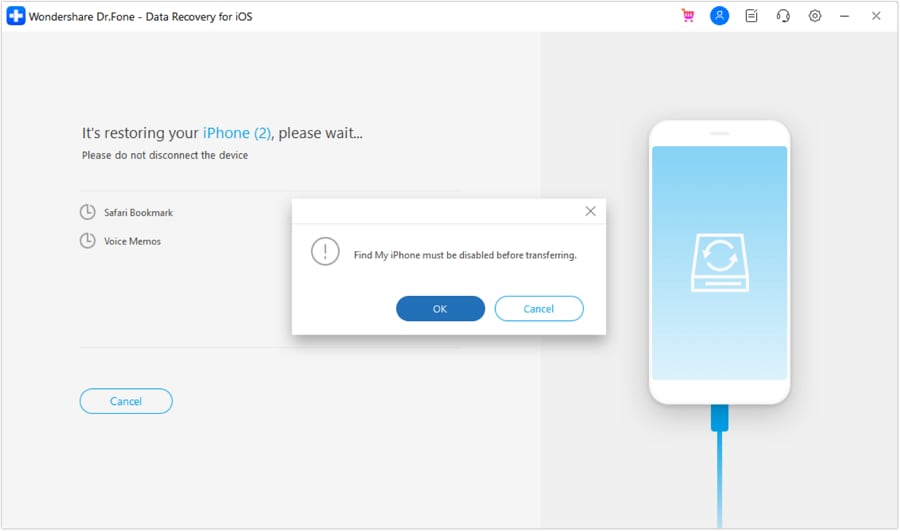
- Step 10: The data recovery procedure will not push through if the Find My feature on your iPhone is currently enabled. Don’t worry. It’s no big deal. If notice is prompted, all you have to do is turn off Find My on your mobile device and then click OK on your computer to continue.
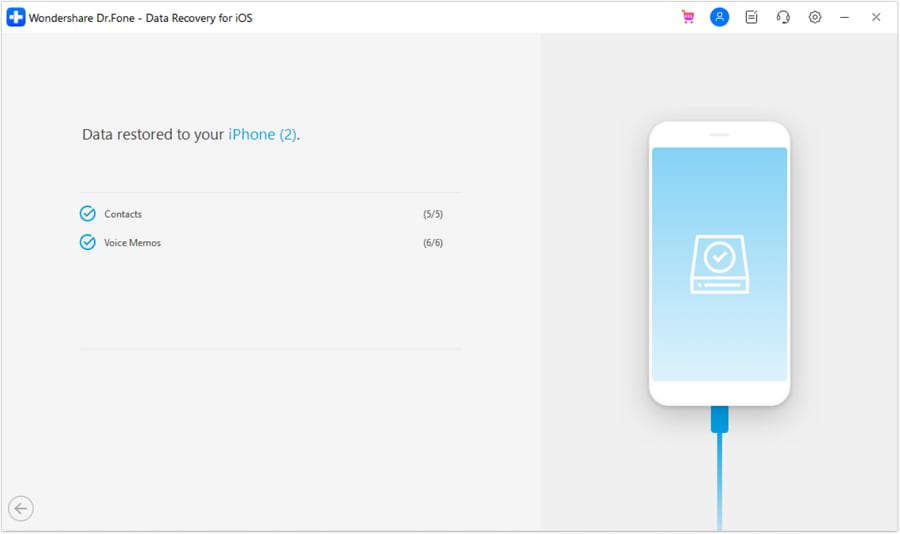
- Step 11: Once the process is completed, don’t forget to check the media library on your iPhone and find the newly restored videos.
Conclusion
The video-taking and storage features of modern iPhones can help you a lot in many aspects. That is one thing for sure. But as implied earlier, keep in mind that unexpected problems may still get in the way. Refer to the iPhone video recovery techniques above in case you encounter the same issue on your end. For easily accessible assistance, download Wondershare Dr.Fone on your computer. It has a robust data recovery feature that can be of great help to you in this kind of situation. Explore this software and take advantage of the benefits it has to offer.
iPhone Recovery
- Deleted Data Recover
- 1. Recover HEIC Photos on iPhone
- 2. Recover Deleted Calendar Event
- 3. Retrieve iPhone Deleted Reminders
- 4. Retrieve iPhone Deleted Voicemail
- 5. Recover iPhone Deleted Photos
- 6. Recover iPhone Deleted Note
- 7. Recover Call History from iPhone
- 8. Recover iPhone Deleted Contacts
- 9. Recover iPhone Voice Memos
- 10. Recover Deleted iOS Files
- iPhone Passwords Recover
- 1. Retrieve iPhone Email Password
- 2. See iPhone Saved Password
- 3. Access iPhone Password
- 4. Get iPhone Password Back
- 5. iPhone Passcode Requriement Pops
- 6. Find iPhone Wi-Fi Password
- iPhone WhatsApp Recover
- 1. Recover WhatsApp Messages Apps
- 2. Recover Deleted WhatsApp Messages
- 3. Recover WhatsApp Messages Online
- 4. Retrieve Deleted WhatsApp
- Recover from Stolen iPhone
- Recover from Broken iPhone
- 1. Recover Data from Broken iPhone
- 2. Fix iPhone Fell in Water
- 3. Water Damaged iPhone Data Recovery
- 4. Recover Data from Dead iPhone
- 5. Recover Photos From Broken iPhone
- iPhone Recovery Tips
- 1. GT Recovery Undelete Restore
- 2. Recover Data from Memory Card
- 3. Recover iPhone Lost Data
- 4. SD Card Recovery for Mac
- 5. Clear Safari History
- 6. Recover from iPhone in DFU Mode
- 7. iTunes Data Recovery
- 8. Recover iPhone Data Without iTunes
- iPhone Recovery Tools
- ● Manage/transfer/recover data
- ● Unlock screen/activate/FRP lock
- ● Fix most iOS and Android issues
- Recover Now Recover Now Recover Now




Daisy Raines
staff Editor