7 Best Dr.Fone Alternatives for Linux
(Free & Paid Options in 2026)

Jun 30, 2026 • Filed to: Data Recovery Solutions • Proven solutions
 TL;DR:
Since Wondershare Dr.Fone lacks a native Linux installer, resolving data loss requires choosing between open-source disk recovery tools, a direct Android mobile app, or running the desktop software through a Virtual Machine for deep mobile scans.
● For hard drives, external USBs, and SD cards, use native command-line utilities like TestDisk to repair broken partition tables or PhotoRec for media file carving, keeping in mind these open-source tools cannot perform deep scans on encrypted mobile device storage.
● Android users can install the Dr.Fone Mobile App directly on their devices for immediate recovery of cached photos and videos, though this on-device method lacks the proprietary system-level access needed for complex data extraction.
● Recovering deeply deleted iOS or Android files, encrypted WhatsApp chats, and fixing system boot loops requires running the desktop version of Dr.Fone inside VirtualBox or VMware with a Windows guest OS, as using the Wine compatibility layer is highly discouraged due to USB driver instability that risks permanent drive damage.
Ask AI for a summary
 ChatGPT
 Perplexity
 Gemini
 Claude
 Grok
Grok
Picture this: You are working on your Ubuntu setup or managing files on Linux Mint, and you accidentally hit rm -rf on the wrong directory. Or worse, your Android phone crashes, trapping your photos and WhatsApp chats, and you realize your desktop OS doesn’t natively support the popular recovery tools your Windows friends use.
If you’ve searched for "Dr.Fone for Linux," you’ve likely hit a wall. While Wondershare Dr.Fone is the industry standard for Android and iOS data recovery on Windows and Mac, there is currently no official native installer for Linux distributions.
But don't panic. As a Linux user, you are used to finding clever workarounds. Whether you are in Bangalore using an Android or in Berlin with an iPhone, this guide covers the best Dr.Fone alternatives for Linux, ranging from powerful command-line tools to virtualization tricks that let you run Dr.Fone right on your penguin-powered machine. Crucially, we also introduce a direct mobile solution that cuts out the desktop middleman entirely. We will break down the latest 2025 features, pros, cons, and simple steps for each solution.
- Part 1. The Elephant in the Room: Is There a Dr.Fone for Linux?
- Part 2. Top Native Linux Alternatives for Disk Recovery (Hard Drive/SD Card)
- Part 3. Best Dr.Fone Alternatives for Linux (Mobile Focus)
- Part 4. The Hybrid Solution: When Only Desktop Dr.Fone Will Do
- Part 5. Comparison: When to Use Native Tools vs. Dr.Fone
The Elephant in the Room: Is There a Dr.Fone for Linux?
Let’s rip the bandage off immediately: No, there is no native .deb or .rpm installer for Wondershare Dr.Fone.
This is a significant pain point for the community. Dr.Fone is renowned for its specific ability to dig into the proprietary file systems of iOS and Android, recover lost WhatsApp messages, and unbrick phones. Most native Linux tools are fantastic at recovering data from hard drives (ext4, NTFS, FAT32), but they often struggle to communicate with a locked iPhone or a modern Android device without complex configuration.
However, that doesn't mean you're out of options. You now have three paths:
- Use native Linux desktop alternatives (best for disk/SD card recovery).
- Use the Dr.Fone Mobile App (best for direct, on-device Android recovery).
- Use virtualization to run Dr.Fone (best for advanced mobile recovery).
Let’s explore the native tools first.
Top Native Linux Alternatives for Disk Recovery (Hard Drive/SD Card)
If you lost data on your Linux hard drive, external USB, or an SD card mounted to your system, you don't need Dr.Fone. You need these open-source powerhouses.
1. TestDisk (The Command Line King)
TestDisk is a robust command-line utility primarily designed to recover lost partitions and repair damaged file systems. It is the gold standard for recovering a system that refuses to boot.
- Best for: Recovering lost partitions and making non-booting disks bootable again.
- Note: TestDisk primarily works on partition structure, not individual deleted files (that's PhotoRec's job).
How to Use TestDisk (Simplified):
- Install: Open Terminal and type
sudo apt-get install testdisk. - Run: Execute
sudo testdiskand select "No Log." - Select Drive: Choose the drive you need to repair.
- Analyze & Search: Select "Analyse" and then "Quick Search" to find missing partitions.
- Write: Follow the prompts to write the recovered partition structure back to the disk.
2. PhotoRec (Best for Media)
Created by the same developers as TestDisk, PhotoRec ignores the file system and performs "file carving," searching for files based on their internal signatures. Even if your file system is severely damaged, PhotoRec can often pull out photos and videos.
- Best for: Recovering deleted files on Ubuntu or Mint, specifically images (JPG, PNG) and video files from SD cards.
- Note: It will recover files with generic names (e.g., f001.jpg), so you will need to rename them later.
How to Use PhotoRec (Simplified):
- Install: It comes bundled with TestDisk (see above).
- Run: Execute
sudo photorecand select your drive. - File Types: Select "File Opt" to restrict the search to specific types (e.g., JPEG, MP4) for faster results.
- Destination: Crucially, choose a separate location (a different disk) to save the recovered files.
3. DDrescue (For Failing Drives)
DDrescue (Data Duplication Rescue) is a tool specifically designed to copy data from one file or block device to another, intelligently handling read errors on damaged drives by iterating over bad sectors.
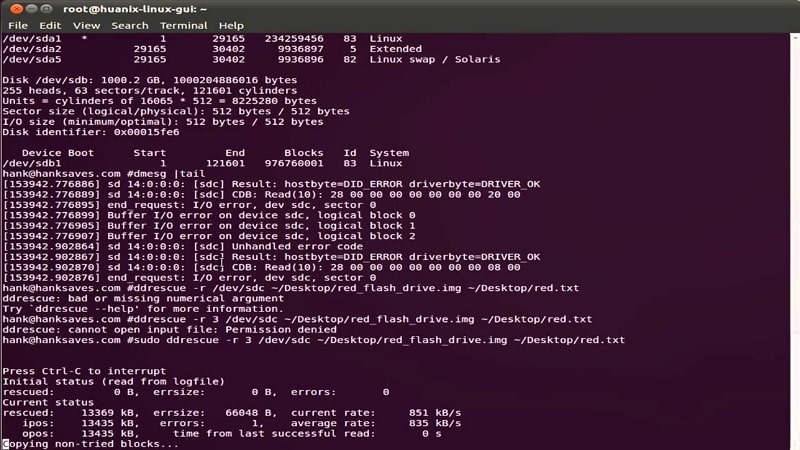
- Best for: Creating a reliable image of a physically failing hard drive before attempting any file recovery.
- Note: This tool copies the drive block-by-block. You must then use PhotoRec or other tools on the resulting image file.
How to Use DDrescue (Simplified):
- Install:
sudo apt-get install gddrescue(or simplyddrescueon some distros). - Run Rescue:
sudo ddrescue /dev/sdb1 /home/user/disk_image.img /home/user/rescue_log.log(Rescue from the failing device to an image file).
Best Dr.Fone Alternatives for Linux (Mobile Focus)
This section details how to manage or recover data from mobile devices without relying on a Windows desktop—a major advantage for the Android data recovery Linux users seek.
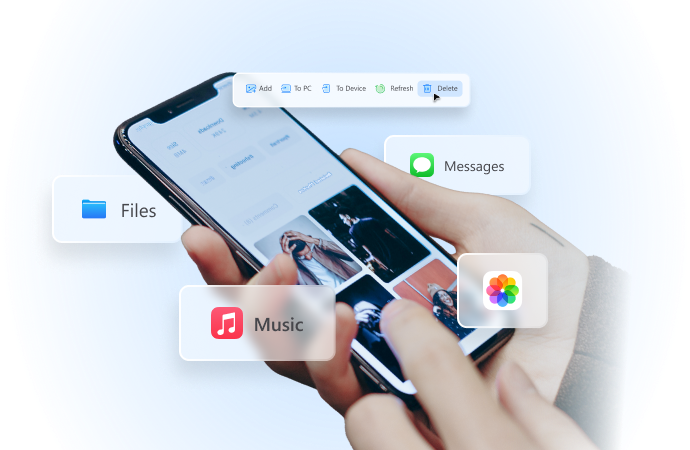
4. The Direct Solution: Dr.Fone Mobile App (Android Only)
The official Dr.Fone Mobile App is a game-changer for Linux users with Android phones. It allows you to bypass the desktop OS entirely and initiate certain data recovery and transfer functions directly on the mobile device.
Dr.Fone App - Android Data Recovery
Get Back Your Valuable Data from Android Devices with Ease.
- Supports multiple data types: contacts, photos, videos, audios, and files.
- Compatible with over 6000+ Android brands.
- Recovery history available for review.
- High efficiency and success rate.


- Best for: Quick, easy recovery of photos and videos from the Android system cache and clipboard on the device itself.
- Note: The mobile app's deep scan capability is limited compared to the desktop version (which uses specialized drivers). For deep WhatsApp recovery, the desktop version is still superior.
How to Use Dr.Fone Mobile App (Simplified):

- Install: Download the Dr.Fone App from the Google Play Store or Wondershare website.
- Grant Permissions: Launch the app and grant necessary access to internal storage.
- Scan: Select the type of media (Photos, Videos) you wish to scan and recover directly on the phone.
- Save: Save the recovered files to a safe location on the phone or cloud.
5. ADB (Android Debug Bridge) – The Manual Way
ADB is the official, command-line bridge used for communication between your Linux machine and your Android device. It's an essential tool for any advanced recovery effort.
- Best for: Backup, transferring files, and troubleshooting if USB Debugging is enabled.
- Note: It cannot scan for deleted data unless you have advanced root access and dump the memory block manually.
How to Use ADB (Simplified):
- Install:
sudo apt install android-tools-adb. - Connect: Enable USB Debugging on your phone.
- Verify:
adb devices(Must show your device ID). - Pull Files:
adb pull /sdcard/DCIM /home/user/backup/(Pulls the entire directory).
6. Libimobiledevice (The iOS Linux Solution)
iOS on Linux is notoriously difficult. However, libimobiledevice is a cross-platform protocol library that talks to iOS devices natively, allowing for device interaction and standard local backups.
- Best for: Mounting an iPhone’s file system and performing full local backups on Linux without relying on iTunes/Windows/Mac.
- Note: It only manages existing files and backups. It cannot perform a deep scan for deleted files or proprietary app data.
How to Use Libimobiledevice (Simplified):
- Install:
sudo apt install libimobiledevice-utils(or similar package name). - Trust: Connect the iPhone and confirm "Trust This Computer."
- List Files: Use the
ideviceinfocommand to verify connection. - Backup: Use
idevicebackup2 backup --full /path/to/backup/to create a local backup.
The Hybrid Solution: When Only Desktop Dr.Fone Will Do
If the Dr.Fone mobile app doesn't find your lost data, it means the files are deeply deleted or encrypted. In this scenario, you must use the desktop version of Dr.Fone via virtualization to access its specialized algorithms.
7. Wondershare Dr.Fone (Via VirtualBox/VMware)
Running Dr.Fone inside a Virtual Machine (VM) is the only way to gain full access to its deep-scan capabilities for complex mobile recovery while remaining on your Linux host.
- Best for: Any scenario requiring deep scans, encrypted data recovery (like deleted chats), or system fixes on Android and iOS devices, which the native tools and the mobile app cannot handle.
- Note: This method is necessary because Dr.Fone - Data Recovery (Android) and Dr.Fone - Data Recovery (iOS) rely on proprietary drivers and algorithms that only function within Windows or macOS environments.
How to Use Wondershare Dr.Fone (Simplified):
- Install VirtualBox:
sudo apt install virtualboxand the VirtualBox Extension Pack (for better USB support). - Create VM: Install a guest Windows OS (e.g., Windows 10) inside the VM.
- Enable USB Pass-through: In the VM settings, enable USB 3.0 and ensure your connected phone is selected to "pass" its connection through to Windows.
- Run Dr.Fone: Download and launch the Dr.Fone software inside the Windows VM to begin the scan.
Dr.Fone - Data Recovery (Android)
The World's 1st Certified Android Data Recovery Software
- Highest Data Recovery Success Rate currently available in the market.
- Retrieve data from ALL broken Android phones without Root or USB Debugging.
- Recover WhatsApp & Business data instantly, even View Once media.
- Access 14+ file types (Photos, Videos, Contacts) across over 6000 Android models.
8. Wine (For Advanced Users, Use Caution)
Wine is a compatibility layer that allows some Windows applications to run directly on Linux. While tempting, it is inherently unstable for applications that require direct, low-level access to USB devices like data recovery software.
- Best for: Very basic, non-critical Windows tools that do not require USB or deep system access.
- Note: Highly discouraged for data recovery due to instability; connection loss during recovery can permanently damage the drive.
How to Use Wine (Simplified):
- Install:
sudo apt install wineand Winetricks. - Configure: Use Winetricks to install necessary libraries (e.g., required .NET components).
- Run: Right-click the Dr.Fone
.exefile and select "Open with Wine Windows Program Loader." (Use with caution!)
Dr.Fone - Data Recovery (iOS)
World's 1st iPhone Data Recovery Software
- Top-rated iPhone data recovery with the highest success rate.
- Recover data directly from iOS devices without backup.
- Restore from iTunes & iCloud backups quickly and securely.
- Recover 35+ data types: photos, messages, WhatsApp, iWork files & more.
- Retrieve WhatsApp View Once messages & restore social app data.
Comparison: When to Use Native Tools vs. Dr.Fone
| Recovery Need | Recommended Tool | Why? |
|---|---|---|
| Lost Partitions | TestDisk | Excellent, free, and designed for partition table repair. |
| Deleted Photos/Videos (SD Card) | PhotoRec | File carving ignores file system damage and is highly effective on media. |
| Quick Photo/Video Recovery (Android) | Dr.Fone Mobile App | Bypasses the desktop; quick and easy on-device solution. |
| Corrupted WhatsApp/WeChat Messages | Dr.Fone (via VM) | Requires proprietary deep scan algorithms not available in open-source tools. |
| Brick/Boot Loop on Samsung/iPhone | Dr.Fone (via VM) | Accesses advanced system repair features and proprietary driver stacks. |
| Simple File Transfer (Android) | ADB | Free, fast, and the most stable official Android communication tool. |
Conclusion: Which Tool Should You Choose?
Data recovery on Linux is a tale of three paths.
- If you have lost files on your computer’s hard drive, USB stick, or SD card, stick to the native power of **TestDisk** or **PhotoRec**.
- If you need **quick recovery on your Android phone**, download the **Dr.Fone Mobile App to try to salvage files directly.
- However, if your crisis involves **deeply deleted data**—specifically recovering encrypted messages, contacts, or photos from an Android or iPhone—the **Dr.Fone desktop version** remains the industry standard.
Using Wondershare Dr.Fone inside a VirtualBox container gives you the best of both worlds: you keep your beloved Linux operating system while accessing the industry-leading mobile recovery algorithms required to save your data.
Ready to try the virtualization method or the mobile app? Explore Wondershare Dr.Fone Solutions Here and ensure your valuable data isn't lost forever.
❓ Frequently Asked Questions (FAQ)
Q1: Can I run Dr.Fone on Ubuntu without Windows?
Not directly. Dr.Fone does not have a native Linux version. You must use a compatibility layer like Wine (which is unstable for USB drivers) or, preferably, a Virtual Machine (like VirtualBox) running Windows.
Q2: Is PhotoRec better than Dr.Fone?
Not directly. Dr.Fone does not have a native Linux version. You must use a compatibility layer like Wine (which is unstable for USB drivers) or, preferably, a Virtual Machine (like VirtualBox) running Windows.
Q3: How do I recover data from an Android phone on Linux for free?
You can try using ADB (Android Debug Bridge) to pull files if USB debugging was previously enabled. If the files were deleted, free Linux tools struggle to access the internal memory blocks of modern Androids; professional software is usually required.


iPhone Recovery
- Deleted Data Recover
- 1. Recover HEIC Photos on iPhone
- 2. Recover Deleted Calendar Event
- 3. Retrieve iPhone Deleted Reminders
- 4. Retrieve iPhone Deleted Voicemail
- 5. Recover iPhone Deleted Photos
- 6. Recover iPhone Deleted Note
- 7. Recover Call History from iPhone
- 8. Recover iPhone Deleted Contacts
- 9. Play GamePigeon 8 Ball on iMessage
- 10. Recover Deleted iOS Files
- iPhone Passwords Recover
- 1. Retrieve iPhone Email Password
- 2. See iPhone Saved Password
- 3. Access iPhone Password
- 4. Get iPhone Password Back
- 5. iPhone Passcode Requriement Pops
- 6. Find iPhone Wi-Fi Password
- iPhone WhatsApp Recover
- 1. Recover WhatsApp Messages Apps
- 2. Recover Deleted WhatsApp Messages
- 3. Recover WhatsApp Messages Online
- 4. Retrieve Deleted WhatsApp
- Recover from Stolen iPhone
- Recover from Broken iPhone
- 1. Recover Data from Broken iPhone
- 2. Fix iPhone Fell in Water
- 3. Water Damaged iPhone Data Recovery
- 4. Recover Data from Dead iPhone
- 5. Recover Photos From Broken iPhone
- iPhone Recovery Tips
- 1. GT Recovery Undelete Restore
- 2. Recover Data from Memory Card
- 3. Recover iPhone Lost Data
- 4. SD Card Recovery for Mac
- 5. Clear Safari History
- 6. Recover from iPhone in DFU Mode
- 7. iTunes Data Recovery
- 8. Recover iPhone Data Without iTunes
- iPhone Recovery Tools
- ● Manage/transfer/recover data
- ● Unlock screen/activate/FRP lock
- ● Fix most iOS and Android issues
- Free Download Free Download Free Download
(Free & Paid Options in 2026)

James Davis
staff Editor