'Passcode Requirement' Pops on iPhone and How to Fix It
Oct 24, 2025 • Filed to: Password Recovery Solutions • Proven solutions
Dr.Fone Basic:
Better Control for Your Phone
Manage, transfer, back up, restore, and mirror your device
Are you frustrated about receiving the iPhone “Passcode Requirement” pop-up on your iPhone? Even though your device has a passcode, you are constantly directed to change it. It happens for multiple reasons, which are usually unknown to the user. To know more about the passcode requirement pop-up, this article provides a comprehensive overview of the problem.
Along with the reasons for the problem, its solutions are also presented in detail. Look through all the provided discussions to find out how to avoid the passcode requirement pop-up in every way possible.

Part 1: Why Passcode Requirement Will Pop Up
The first thing that you will need to dissect to understand more about the iPhone passcode requirement pop-up is the reasons why it happens. Being an iPhone user, such problems can confuse you and can even halt you from using the device with ease. As it leads directly to device security concerns, it is essential for you to have knowledge about why this problem occurs on your iPhone:
1. Simple Passcode
If you are using a simple passcode combination for your iPhone, such a prompt will appear on your device. Apple will detect the simple usage of the passcode, and its robust security protocols will alert the user to change the passcode. Using passcodes like "0000" and "1234" are referred to as straightforward passcode combinations.
2. Safari History
The consistent use of a web browser leads to an accumulation of cookies and cache. Whenever you visit a website, its respective cookies and caches are saved on a prompt. However, when this reaches a certain level, it is important to have it removed. Failure to deal with this problem leads to multiple problems, including the Passcode Requirement pop-up.
3. Under MDM
If your device is registered under a business, it may be a part of the MDM system. Being a part of a Mobile Device Management system can consistently cause such a problem. You will have to remove the MDM lock and even change the passcode to remove this pop-up.
4. Email Accounts or Configuration Profile
There is a specific policy involving Apple that explains the passcode policies of configuration profiles and emails based on Microsoft Exchange. With these passcode policies, the problems of iPhone passcode requirement pop-ups consistently arise. There is a need to remove the configuration profiles or change the passcode to get to a proper resolution.
5. System Bug
Instead of having a proper reason for the iPhone passcode requirement prompt, the problem can also involve system bugs. If your device is not updated properly or contains some bugs, it will lead to such problems. At times, if you have not updated the security patch of your iOS, you can also face such issues. The best-case scenario is to update the device to the latest version or take other steps to resolve the system bugs.
What If Users Refuse to Change the Passcode?
The Passcode Requirement prompt mainly displays a timeframe to change the passcode of your device. If you tap on "Later" and refuse to change the passcode of your device, the prompt will reappear after some time with the changed time. Regardless, if the user does not change the passcode after the time elapses, the pop-up will reappear after some time.
The time can range between hours, days, or weeks. However, no such thing happens to the device if the user never refuses to change the passcode.
Part 2: 4 Common Solutions To Fix iPhone Passcode Requirement Issue
We will now direct our discussion to fix the Passcode Requirement issue on your device. There are multiple remedies existing for this problem, which need to be reviewed in detail. Since many reasons can direct to a single problem, the solutions to fix this problem are diverse.
1. Change Your Passcode as Required
You can initially try changing your passcode to your requirement to resolve the problem. The pop-up that appears on the iPhone can be easily fixed by following the steps guided below:
Step 1: As the pop-up appears on your iPhone, tap on the “Continue” button to proceed to the next pop-up.
Step 2: Here, you must add your current passcode before changing it to a new one. On adding the passcode, tap on "Continue" and proceed to enter a new passcode. As you enter the passcode and hit the "Continue" button, the passcode is changed.

2. Clear Safari History
As discussed above, accumulating caches and cookies can lead to such problems. If you wish to avoid the passcode requirement pop-up on your iPhone, you can perform these simple steps to discover a solution:
Step 1: Open the “Settings” of your iPhone and proceed to the “Safari” settings in the list of options.

Step 2: Clearing the website data on your Safari can easily resolve the problem. When you find yourselves on the next screen, continue to scroll down and find the “Clear History and Website Data” option.

Step 3: As a prompt appears on your iPhone's screen, tap "Clear History and Data" to conclude the process.

3. Remove the Configuration Profiles
As stated above, multiple configuration profiles can lead to particular passcode policy issues. To avoid creating problems on your iPhone, you can consider removing the configuration profiles. To do that, follow the step-by-step guideline featured below:
Step 1: Launch the “Settings” of your iPhone and continue in the “General” settings.

Step 2: As you find yourselves on the next screen, scroll down to discover the "VPN & Device Management" option. Since this contains the configuration profiles, select the profile you wish to delete.

Step 3: Continue to locate the "Remove Profile" option and enter your passcode if prompted. On adding the passcode, tap "Remove" and restart your device after removing the profile.

4. Delete Exchange Email Account
While you can remove the configuration profiles on your iPhone, deleting the Exchange email accounts can also provide the same results. To avoid the iPhone passcode requirement pop-up, follow the steps described below to find a proper remedy to this problem:
Step 1: As you lead into the “Settings” of your iPhone, continue to locate the “Mail” option in the list.

Step 2: Look for the "Accounts" option on the next screen to open the list of accounts activated on your iPhone. Under the "Accounts" section, find the Microsoft Exchange account that has been added.

Step 3: As directed to the next screen, tap on the "Delete Account" option and confirm across the prompt.

Part 3: Fix Passcode Requirement Issue Caused by MDM With a Powerful Tool
You have gone through comprehensive methods to avoid the passcode requirement issue on your iPhone. As mentioned above, this problem can also be caused by the activated MDM system on your device. If this is the case, you will have to remove it with the help of a powerful tool. Removing the lock can become hefty when you are not connected to the business that initialized the MDM system.
Dr.Fone – Screen Unlock (iOS) comes as the perfect resolution to this problem. The platform provides a proper fix to the passcode requirement issue on iPhone and operates under the simplest of procedures. With the option of removing multiple screen locks on iPhone, Dr.Fone – Screen Unlock (iOS) stands as the best remedy to this problem.
Features of Dr.Fone – Screen Unlock (iOS)
There are multiple features that make Dr.Fone a great option to work with. To know more about the tool, look into the details described below:
- It can unlock all kinds of locks from your iPhone, including Face ID, Touch ID, and Apple ID.
- The platform supports the latest iOS versions and devices.
- The process of removing the screen lock is exceptionally simple, making it usable for all kinds of users.
Steps to Remove MDM lock on your iPhone with Dr.Fone – Screen Unlock (iOS)
If you seek to remove the MDM lock on your iPhone, follow the steps as described below:
Step 1: Launch Dr.Fone and Access Screen Unlock
Start by downloading and installing the Dr.Fone toolbox on your computer. Proceed to select "Screen Unlock" from the options and continue to connect your iOS device.

Step 2: Select Remove MDM
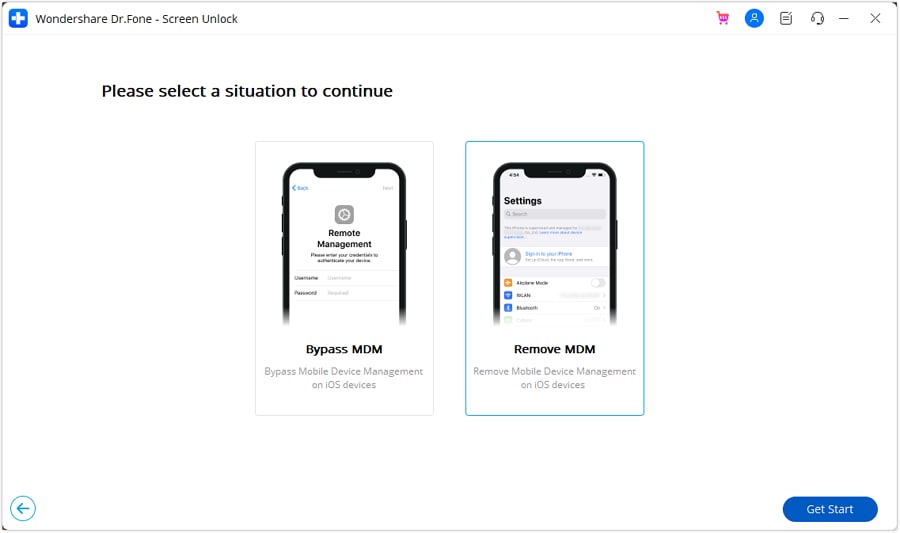
Continue to select "Unlock MDM iPhone" to proceed into the MDM removal settings. As you find yourselves in the next window, select "Remove MDM."

Step 3: Start the Process of Removing the MDM Lock
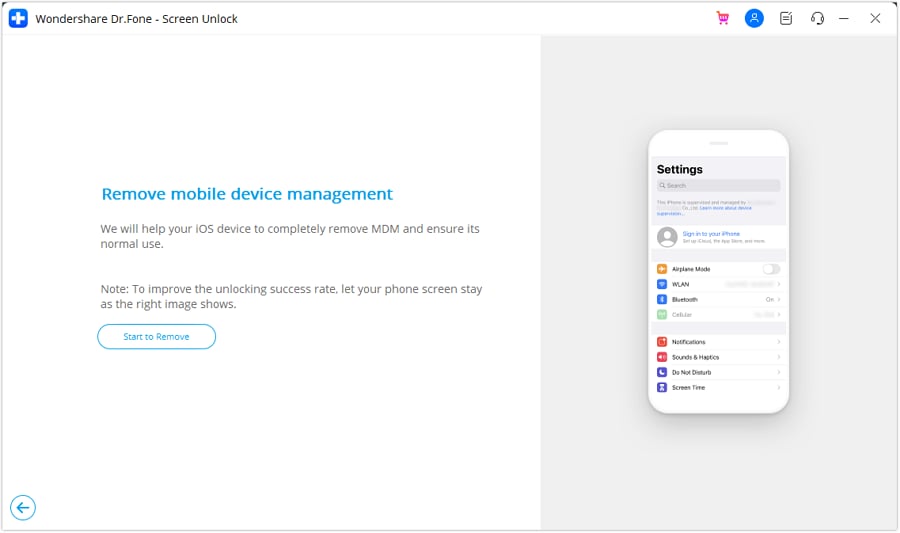
Click the "Start to remove" option on the next screen to initiate the process. You will be asked to wait until the verification process is completed, after which the process will start to execute.

Step 4: Disable Find My iPhone and Execute Successfully
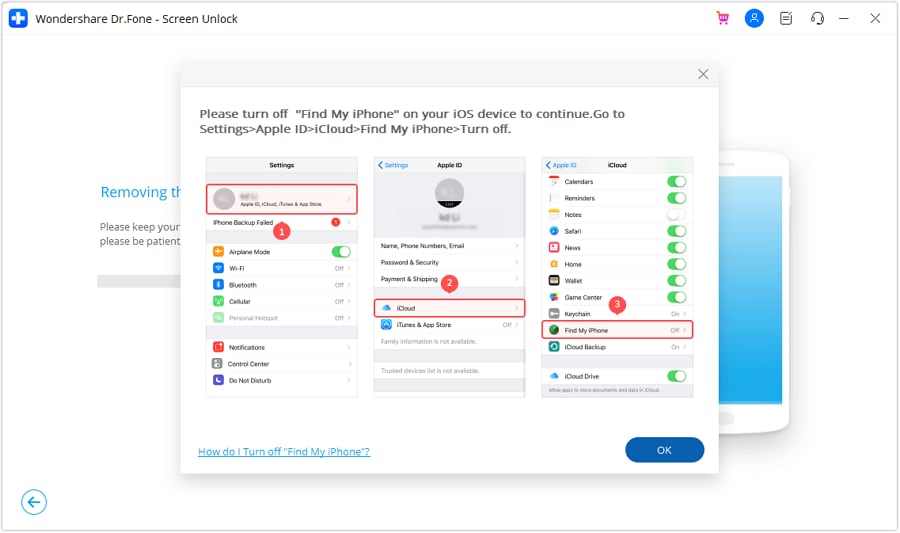
The platform will prompt you to disable the Find My iPhone service, which can be followed according to the on-screen instructions. Once done, the MDM lock will be removed from the iPhone successfully.

Conclusion
This article has featured a comprehensive discussion on how to resolve the iPhone passcode requirement pop-up. With all the reasons explaining the problem, you have gone through the solutions to this pop-up. It will surely help you resolve all the existing concerns within your device. However, for the best results in removing the MDM lock, Dr.Fone – Screen Unlock (iOS) comes with an excellent resolution.
Dr.Fone Basic:
Better Control for Your Phone
Manage, transfer, back up, restore, and mirror your device
iPhone Recovery
- Deleted Data Recover
- 1. Recover HEIC Photos on iPhone
- 2. Recover Deleted Calendar Event
- 3. Retrieve iPhone Deleted Reminders
- 4. Retrieve iPhone Deleted Voicemail
- 5. Recover iPhone Deleted Photos
- 6. Recover iPhone Deleted Note
- 7. Recover Call History from iPhone
- 8. Recover iPhone Deleted Contacts
- 9. Recover iPhone Voice Memos
- 10. Recover Deleted iOS Files
- iPhone Passwords Recover
- 1. Retrieve iPhone Email Password
- 2. See iPhone Saved Password
- 3. Access iPhone Password
- 4. Get iPhone Password Back
- 5. iPhone Passcode Requriement Pops
- 6. Find iPhone Wi-Fi Password
- iPhone WhatsApp Recover
- 1. Recover WhatsApp Messages Apps
- 2. Recover Deleted WhatsApp Messages
- 3. Recover WhatsApp Messages Online
- 4. Retrieve Deleted WhatsApp
- Recover from Stolen iPhone
- Recover from Broken iPhone
- 1. Recover Data from Broken iPhone
- 2. Fix iPhone Fell in Water
- 3. Water Damaged iPhone Data Recovery
- 4. Recover Data from Dead iPhone
- 5. Recover Photos From Broken iPhone
- iPhone Recovery Tips
- 1. GT Recovery Undelete Restore
- 2. Recover Data from Memory Card
- 3. Recover iPhone Lost Data
- 4. SD Card Recovery for Mac
- 5. Clear Safari History
- 6. Recover from iPhone in DFU Mode
- 7. iTunes Data Recovery
- 8. Recover iPhone Data Without iTunes
- iPhone Recovery Tools
- ● Manage/transfer/recover data
- ● Unlock screen/activate/FRP lock
- ● Fix most iOS and Android issues
- Recover Now Recover Now Recover Now


James Davis
staff Editor