How to Use Do Not Disturb Mode on iPhone: A Comprehensive Guide

Jul 12, 2024 • Filed to: Latest News & Tactics • Proven solutions
Do Not Disturb iPhone settings are essential features of the iPhone and can be a lifesaver in many situations.
We all know how annoying it can be when your phone is constantly buzzing and distracting you from important tasks. The Do Not Disturb feature lets you quickly silence your phone and keep it from distracting you.
This blog post will provide a comprehensive guide on using the Do Not Disturb feature on your iPhone.
So keep reading to learn more!
Part 1: What is Do Not Disturb on iPhone?
Do not disturb (DND) mode is a feature that allows users to disable all incoming notifications on their devices. so, they can focus on work or other activities without interruption.
DND mode was initially created to allow people with busy schedules the peace of mind to stay productive without being disturbed. Today, many people use DND mode to avoid unwanted phone calls and other notifications from friends and family.
Why iPhone has Do Not Disturb Mode?
Do Not Disturb mode provides a way to reduce distractions by silencing notifications when they are unwanted. It can be found in a notification or shortcuts panel, and most devices also support scheduling, which turns the mode on or off at certain times, like when you're asleep.
However, the actual events that would generate a notification still occur and can be seen in a notifications panel or the app containing the notification. For example, if you get a text while Do Not Disturb is on, it will still be visible when you open the messaging app.
Do Not Disturb features allow users to block incoming calls, texts, and notifications so they can focus without interruption. Users can typically customize their Do Not Disturb settings to block all calls or only specific contacts or groups. Some operating systems also allow users to set schedules or locations in which the Do Not Disturb feature is activated.
Part 2: How to Turn On/Off Do Not Disturb on iPhone?
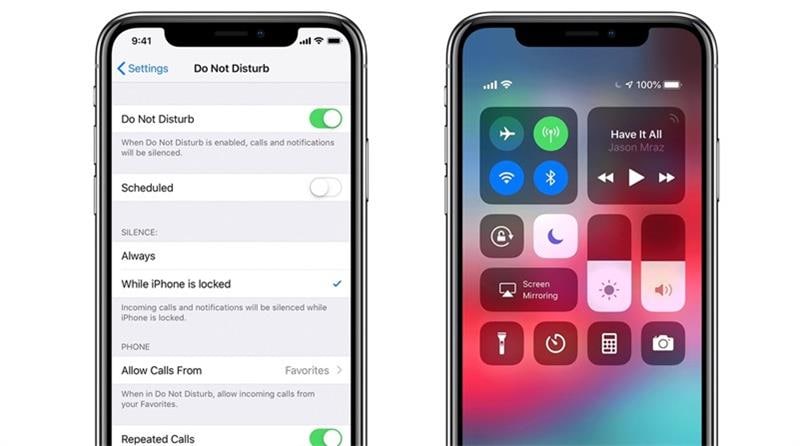
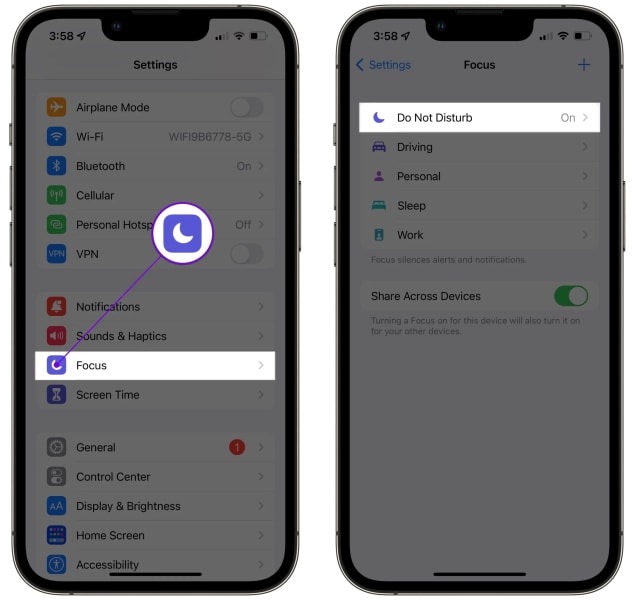
To turn on Do Not Disturb on your iPhone, go to Settings > Do Not Disturb. From there, you can manually turn on Do Not Disturb or set a schedule for when it turns on and off. To turn off do not disturb iPhone:
For iOS 15 and Later
- Tap Settings > Do Not Disturb.
- Toggle the switch at the top of the screen to the On position.
- Choose a schedule to set when Do Not Disturb turns on and off.
For iOS 14.8 and Earlier
- Tap Settings > Do Not Disturb.
- Toggle the switch at the top of the screen to the On position.
- Choose between Always, Scheduled, or From Now On to set when Do Not Disturb turns on and off. That's how to turn off do not disturb on iPhone.
Part 3: How to Allow Someone to Bypass Do Not Disturb on iPhone?
Allow your contacts to bypass Do Not Disturb on iPhone
- Open the Settings app on your iPhone.
- Tap "Do Not Disturb."
- Tap "Allow Calls From."
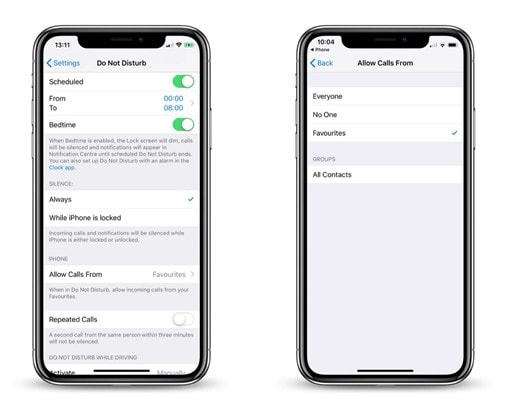
- Tap "All Contacts" to allow all of your contacts to bypass Do Not Disturb.
- Tap "Favorites" to allow only your favourite contacts to bypass Do Not Disturb.
- Tap "Groups" to allow a specific group of contacts to bypass Do Not Disturb.
- Tap "Repeated Calls" to allow calls from the same number to ring through if they are placed within three minutes of each other.
- Tap "Scheduled" if you want to allow calls to bypass Do Not Disturb during a specific time frame.
- Tap "Silence" to turn on Do Not Disturb mode.
- Tap the toggle next to "Allow Calls From" to turn it off if you want to allow all calls to bypass Do Not Disturb.
Receive Messages When Do Not Disturb Enabled
When Do Not Disturb is enabled, incoming messages are silenced and in a queue until the Do Not Disturb mode is over. Any messages sent while Do Not Disturb are enabled will not be visible or audible on your device until you disable Do Not Disturb.
You can also customize your Do Not Disturb settings to allow specific contacts or messages to bypass Do Not Disturb and alert you immediately, regardless of your Do Not Disturb status.
You can also automatically set Do Not Disturb to turn on and off at certain times. This can be helpful if you want to ensure you are not disturbed during certain hours, such as work or sleeping.

Part 4: What to Do If My iPhone is Stuck on Do Not Disturb Mode?
Dr.Fone-System Repair
Wondershare Dr.Fone-System Repair is an iOS recovery and repair system that helps users fix their iPhone and iPad systems efficiently. It offers a comprehensive range of features, including setting common iOS issues such as the notorious "iPhone is stuck on Do Not Disturb mode" issue. It can help users get out of the endless loop of the Do Not Disturb mode and bring their iOS devices back to life.
This powerful tool lets users quickly fix the iPhone stuck in Do Not Disturb mode. It can help users update their iOS to the latest version. It can also repair the operating system, delete corrupted files and restore the device to its original state. Moreover, it can help users reset their device to factory settings without losing any data.
Dr.Fone-System Repair is an efficient and reliable tool for users facing the issue of their iPhone being stuck in Do Not Disturb mode. It can help users quickly troubleshoot their device and restore it to its normal functioning.
Steps of Usage:
Step 1: Begin by launching Dr.Fone on your computer. Once it is open, select the "System Repair" option on the homepage.

Step 2: On the next page, specify the type of smartphone you are repairing by selecting "iOS" for iPhones.
Step 3: You will be brought to another page where you must select the "iOS Repair" option to repair any system issues on the iPhone.
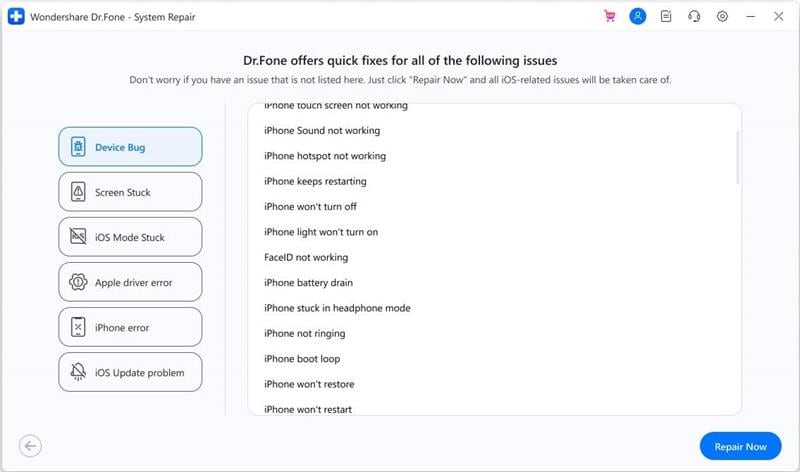
Step 4: Check the list provided for the specific problem your device is experiencing. If it is listed, click on "Repair Now" to proceed. If your device's issue is not listed, you can still click "Repair Now" and move forward.
Step 5: A new window will appear with two options: Standard Repair and Advanced Repair. Choose "Standard Repair" to fix the issue while keeping your data secure. While Advanced Repair can fix more problems, it will erase your device data.

Step 6: You must put your iOS device into Recovery Mode. Connect it to the computer via USB and enter the lock screen password. Tap on the "Trust" option when it appears. Once you have done this, click on "Enter Recovery Mode." If your device is unresponsive or behaving abnormally, select "Guide to Recovery Mode" instead.

Step 7: Follow the on-screen instructions for your specific model to put your device into Recovery Mode.
Step 8: Once the device is in Recovery Mode, the platform will automatically detect it.
Step 9: The following window will display a list of available iOS firmware for installation on the device. Choose one and click "Download" to start the process.

Step 10: The iOS firmware will begin downloading, and the progress will be shown on a progress bar.
Step 11: Once the firmware is downloaded, it will be verified before installation to prevent any issues.
Step 12: After verification, click the "Repair Now" button to start the iOS system recovery process.

Step 13: The repair process will be displayed on the progress bar. When it is finished, the prompt window will show that the process is complete. Click "Done" to finish.
The Bottom Line
Do Not Disturb iPhone settings powerful features. It can help you stay focused and productive by blocking incoming calls, texts, and notifications. However, the iPhone can sometimes get stuck in Do Not Disturb mode. This issue prevents users from accessing their devices or receiving notifications.
To resolve this issue, we recommend using Wondershare Dr.Fone-System Repair. This powerful tool can help you quickly get out of the Do Not Disturb loop and restore your device to its normal functioning.


iPhone Tips
- iPhone News
- iPhone Activate
- iPhone Data Manage
- 1. Export Notes from iPhone to PC/Mac
- 2. iPhone Notes Duplicate
- 3. Print WhatsApp Messages on iPhone
- iPhone Diagnostics
- 1. Check iPhone Wi-Fi Speed
- 2. Check and Monitor iPhone Temprature
- 3. Put iPhone in Diagnostic Mode
- 4. Test iPhone Screens
- iPhone How-tos
- 1. Force Quit Frozen Apps
- 2. Find Own Phone Number
- 3. Find Blocked Numbers on iPhone
- 4. iPhone Internet Explorer Alternatives
- 5. Sync Thunderbird with iPhone
- 6. Things Can Do with iPhone on Plane
- 7. Tips for Using VLC for iPhone
- 8. iPhone Explorer for Mac and Windows
- 9. Use iPhone as Security Camera
- iPhone Location Tips
- 1. Change iPhone GPS Location
- 2. Hide iPhone/Android Location
- 3. PokeGo++ iPhone
- 4. Change Home Address on iPhone
- 5. See Someone's Location on iPhone
- 6. PGSharp for iPhone
- 7. Change App Store Country
- iPhone Track
- 1. Track iPhone by Phone Number
- 2. Track iPhone without App
- 3. Turn Off Tracking on iPhone
- 4. Spy on iPhone without Jailbreak
- iPhone Tricks
- 1. Unlink iPhones
- 2. Mirror iPhone/iPad to Windows PC
- 3. Turn On iPhone Without Home Button
- 4. Charge iPhone Without Charger
- 5. Free Unlimited Data on Verizon iPhone
- 6. Use iPhone with Broken Home Button
- 7. Use iPhone without Touch Screen
- 8. Remote Control iPhone from PC
- 9. iPhone Stuck on Apple Logo
- 10. DFU Tools for iPhone
- 11. iPhone/iTunes Error 4013
- 12. iPhone Front Camera Not Working
- 13. Download Songs on iPhone/iPod
- 14. Unlock iPhone without Passcode
- 15. Reset iPhone Without Apple ID
- 16. Transfer Photo from Android to iOS
- Find My iPhone Tips
James Davis
staff Editor
Generally rated4.5(105participated)