Dr.Fone - Screen Unlock (iOS)
Reset iPhone without Apple ID
- Simple, click-through, process.
- Remove screen passcodes, Face id, Touch id, Apple ID and Bypass iCloud Activation Locks
- No tech knowledge required, everybody can handle it.
- Supports the latest iOS version fully!

How To Unlink Apple ID From iPhone/Apple Watch

Jul 12, 2024 • Filed to: Remove Screen Lock • Proven solutions
Apple devices are now an essential part of our daily lives. They provide access to a variety of services and apps. But there may come a time when you need to unlink your Apple ID from your device. It could be because you're giving away or selling your device or facing device limits or download issues.
Either way, understanding how to do it is essential for maintaining control over one's digital footprint. This article will walk you through the step-by-step process of how to unlink Apple ID from iPhone devices and Apple Watch. We'll provide clear and concise instructions for every scenario, whether you have your Apple ID password, have lost or forgotten it, or are dealing with a lost device.
Part 1: How To Unlink Apple ID From Connected Devices With Password
Keeping track of where your Apple ID is being used is essential for maintaining control over your digital identity. Fortunately, using your iPhone or Mac, you can easily identify all the devices currently linked to your Apple ID. It is helpful for those who have shared their Apple ID with others or suspect unauthorized access.
Removing a device from your Apple ID with two-factor authentication activated will turn off verification code delivery on that device. Also, the device will no longer be able to access iCloud content, such as your photos, contacts, and calendar.
How To Unlink Apple ID From iPhone?
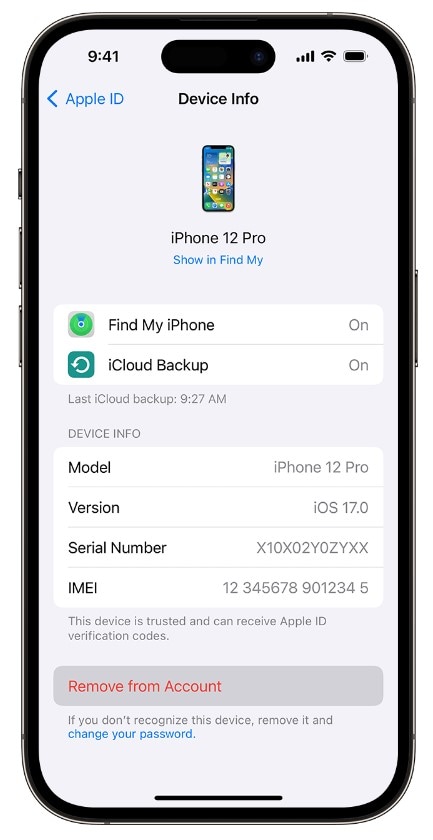
Before you unlink an iPhone from Apple ID, it's also essential to identify all the devices currently signed in with your account. This crucial step ensures you don't inadvertently lock yourself out of your Apple ID on other devices.
- Tap Sign Out, then enter your Apple ID password. Next, tap Sign Out Tap Delete Apple IDfrom iPhone to verify that you want to remove your Apple ID from the iPhone you are currently using.
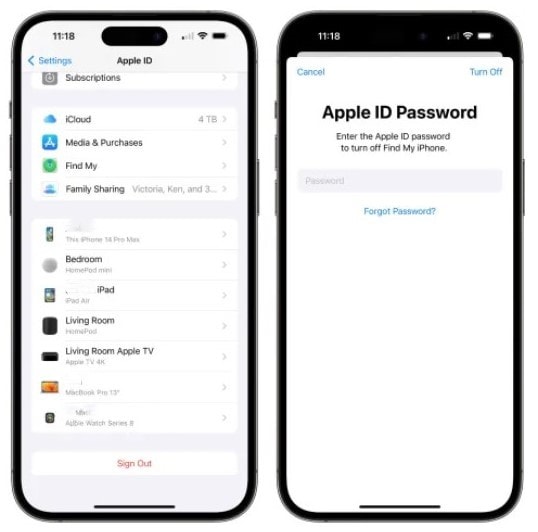
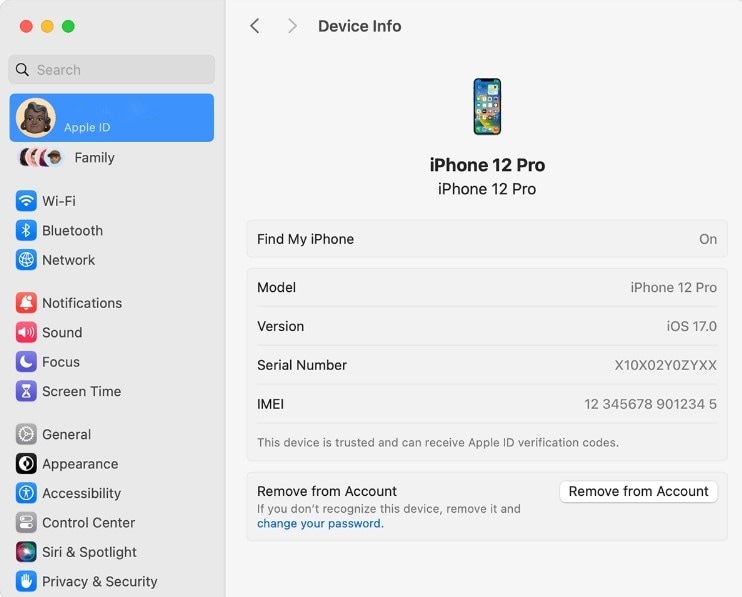
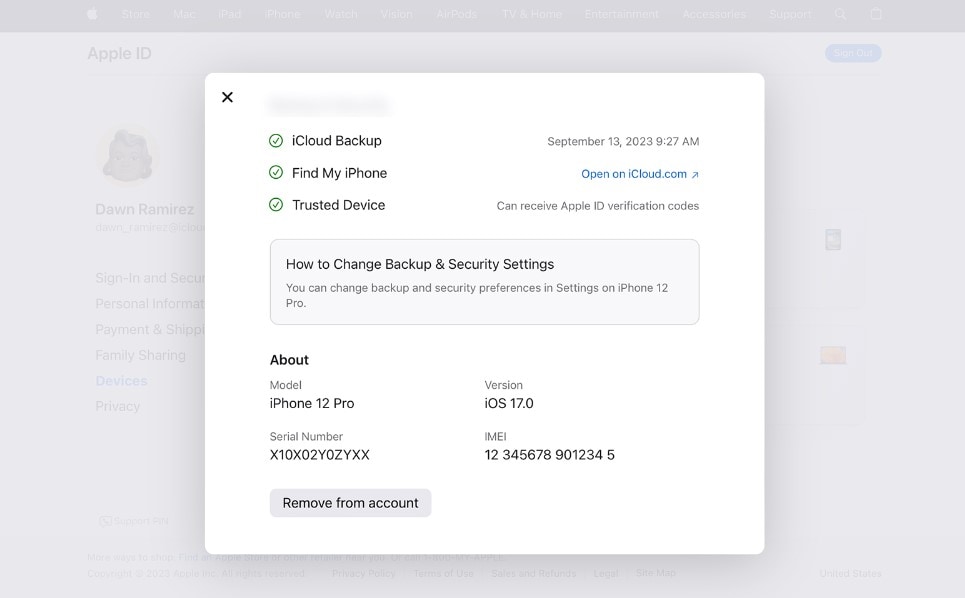
- Tap on any device name to see its details. If it is the one you trust, you can use it to receive Apple ID verification codes. Then, tap Remove from Account.
How To Unlink Apple ID Settings From Mac?
Follow these steps below to use your macOS to remove the connected devices from your Apple ID.
- Click Sign Outto remove your Apple ID on the desktop you are currently using.
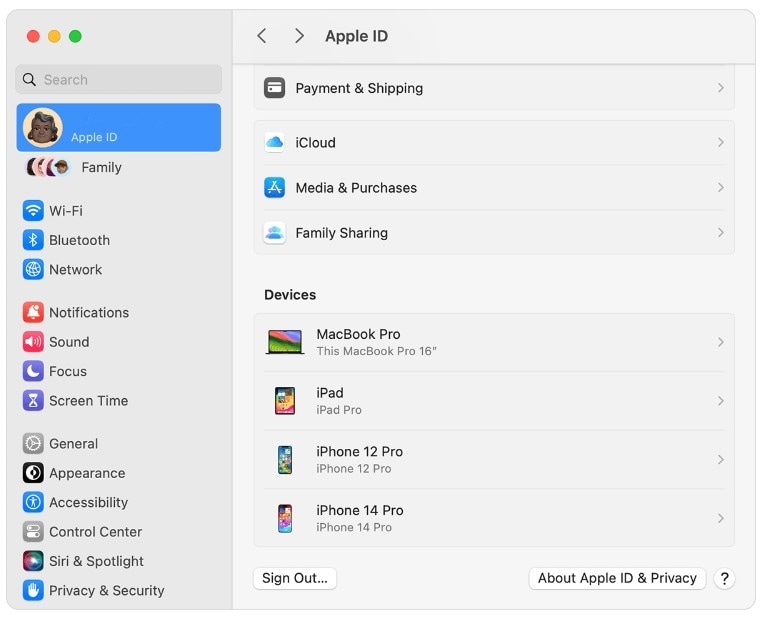
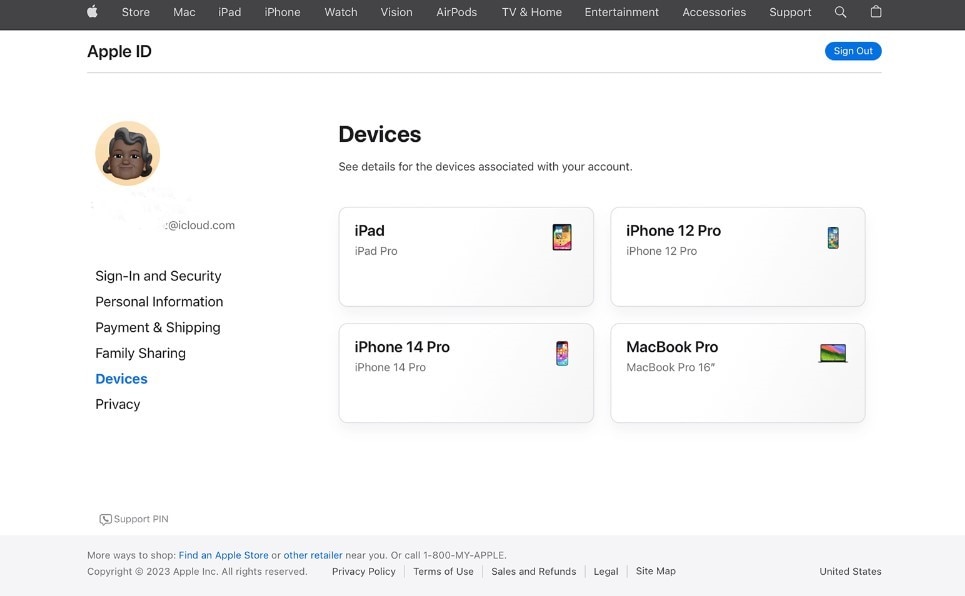
- From the Devicessection, click the connected device you want to unlink. Click Remove from Account.
Part 2: How To Unlink Apple ID From iOS Devices Without a Password?
In the previous section, we've explored the standard method to remove an Apple ID from an iPhone, which requires the Apple ID password. However, what if you've forgotten your iPhone's passcode or don't have the Apple ID password? In such situations, Wondershare Dr.Fone - Screen Unlock can help you unpair your Apple ID on iOS devices without hassle. Even without an Apple ID password, Dr.Fone can help you:
- Bypass the Activation Lock
- Unpair Apple ID and erase the iPhone's content, even if the Find My feature is enabled
- Remove the iOS lock screen
The tool guides you through the process, ensuring a seamless experience with a user-friendly interface and intuitive design. Let's delve into the step-by-step guide to discover how to unlink Apple ID from iPhone devices using Dr. Fone's - Screen Unlock tool.


Part 3: How To Unlink iPhone From Apple ID if the Device Was Lost?
You already know the methods to unlink iPhone from Apple ID, both with and without a password, assuming the device is accessible. However, what if your iPhone or Apple Watch is lost, stolen, or you already gave away? Fortunately, there's still a way to unpair your Apple ID from your iOS device.
Unlink iPhone From Apple ID Remotely
Follow these steps and explore how to unlink Apple ID from iPhone and other iOS devices online:
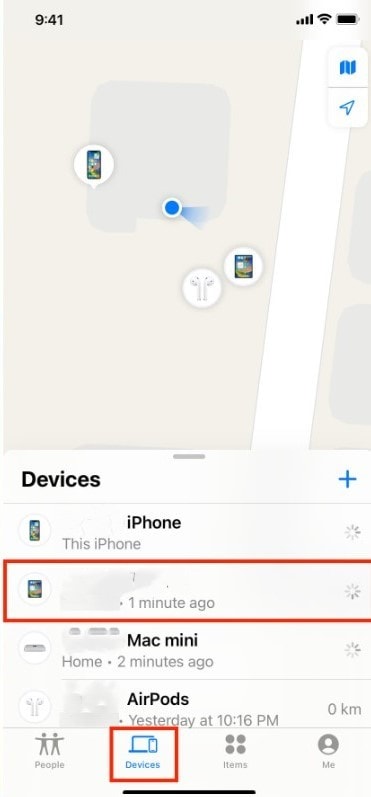
Unlink iPhone From Apple ID Using the Find My App
Here is how to unpair your Apple ID on a device you sold or gave away via the Find My app.

Note:
Indicate if the device was stolen.
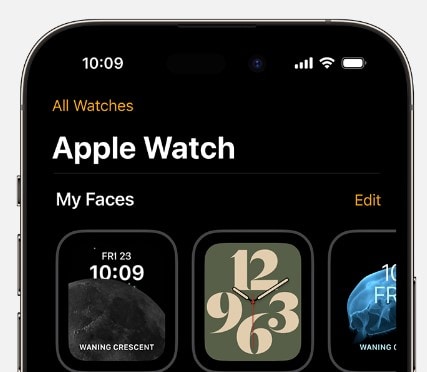
Bonus Part: How To Unlink Apple Watch From Apple ID?
There are several reasons to unpair an Apple Watch from an Apple ID. Perhaps you're selling or giving away your Apple Watch or trading it in for a new one. Or maybe you only want to remove your Apple Watch from your Apple ID altogether.
No matter what your reason, removing an Apple Watch from an Apple ID is a simple process. Here, we'll walk you through the steps to restore your Apple Watch to its factory settings.
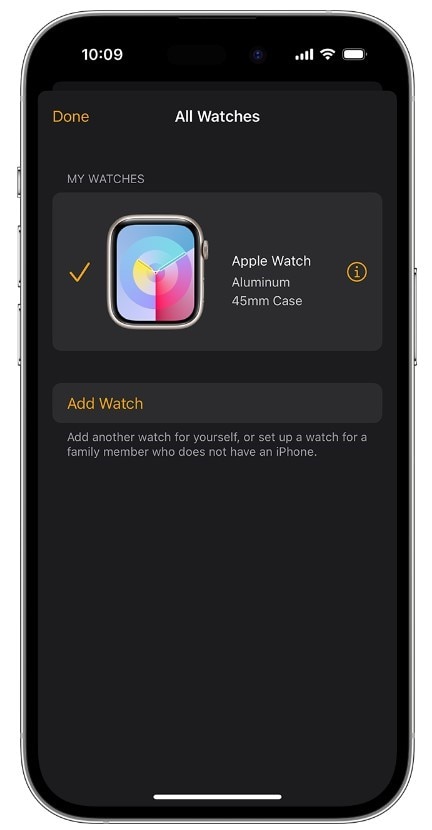
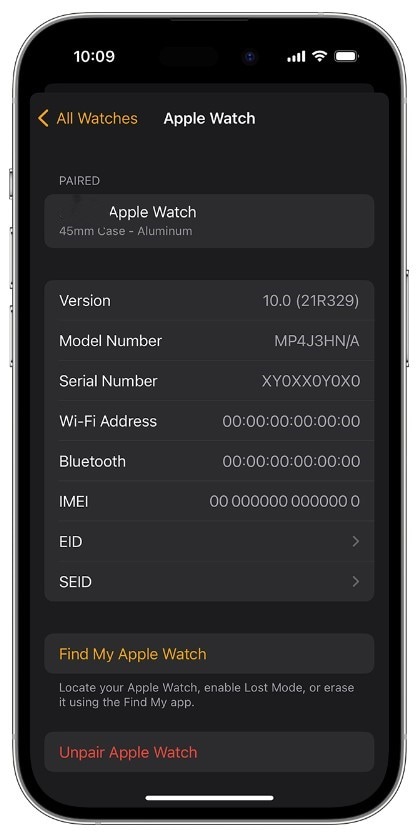
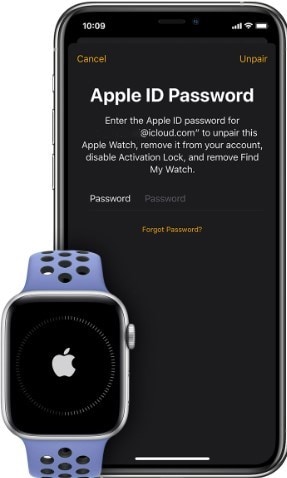
How To Unlink Apple Watch From Apple ID if You Have Your iPhone?
Follow the unpairing process on the paired iPhone to remove the Activation Lock and erase your Apple Watch's content and settings.
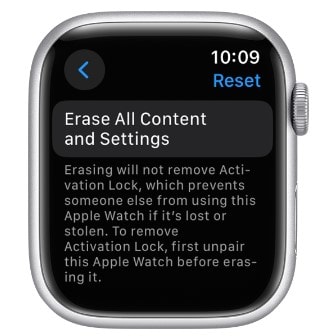
How To Unlink Apple Watch From Apple ID Without Your iPhone?
You can erase your Apple Watch without the paired iPhone, but the Activation Lock will still be active. But, if you give away your Apple Watch without turning off the Activation Lock, the person you give it to cannot use it. They'll have to enter your Apple ID and password to turn off the Activation Lock and use it with a new iPhone.
Conclusion
There are several ways to unlink your Apple ID from your iPhone or iPad. The best way to do it depends on your situation and available iOS device. Whichever your reason is, understanding how to unlink Apple ID from iPhone and other iOS devices is crucial.
If you unfortunately encounter any challenges during the process, you can seek assistance from Apple Support. Consider using Dr.Fone for a quick and easy solution, which can unlink your iPhone from your Apple ID within minutes, even without an Apple ID password.


iPhone Tips
- iPhone News
- iPhone Activate
- iPhone Data Manage
- 1. Export Notes from iPhone to PC/Mac
- 2. iPhone Notes Duplicate
- 3. Print WhatsApp Messages on iPhone
- iPhone Diagnostics
- 1. Check iPhone Wi-Fi Speed
- 2. Check and Monitor iPhone Temprature
- 3. Put iPhone in Diagnostic Mode
- 4. Test iPhone Screens
- iPhone How-tos
- 1. Force Quit Frozen Apps
- 2. Find Own Phone Number
- 3. Find Blocked Numbers on iPhone
- 4. iPhone Internet Explorer Alternatives
- 5. Sync Thunderbird with iPhone
- 6. Things Can Do with iPhone on Plane
- 7. Tips for Using VLC for iPhone
- 8. iPhone Explorer for Mac and Windows
- 9. Use iPhone as Security Camera
- iPhone Location Tips
- 1. Change iPhone GPS Location
- 2. Hide iPhone/Android Location
- 3. PokeGo++ iPhone
- 4. Change Home Address on iPhone
- 5. See Someone's Location on iPhone
- 6. PGSharp for iPhone
- 7. Change App Store Country
- iPhone Track
- 1. Track iPhone by Phone Number
- 2. Track iPhone without App
- 3. Turn Off Tracking on iPhone
- 4. Spy on iPhone without Jailbreak
- iPhone Tricks
- 1. Unlink iPhones
- 2. Mirror iPhone/iPad to Windows PC
- 3. Turn On iPhone Without Home Button
- 4. Charge iPhone Without Charger
- 5. Free Unlimited Data on Verizon iPhone
- 6. Use iPhone with Broken Home Button
- 7. Use iPhone without Touch Screen
- 8. Remote Control iPhone from PC
- 9. iPhone Stuck on Apple Logo
- 10. DFU Tools for iPhone
- 11. iPhone/iTunes Error 4013
- 12. iPhone Front Camera Not Working
- 13. Download Songs on iPhone/iPod
- 14. Unlock iPhone without Passcode
- 15. Reset iPhone Without Apple ID
- 16. Transfer Photo from Android to iOS
- Find My iPhone Tips
James Davis
staff Editor