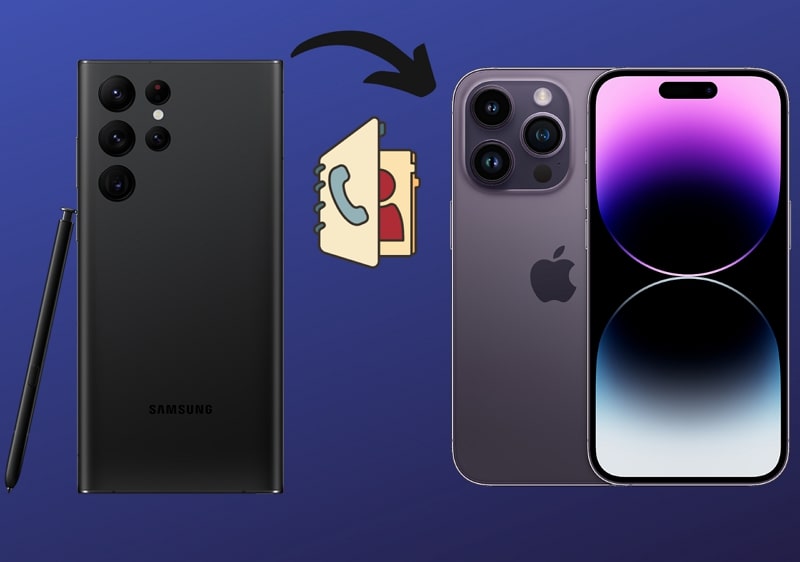
How to Transfer Contacts from Android to iPhone [6 Easy Ways in 2026]

Jun 11, 2026 • Filed to: Data Transfer Solutions • Proven solutions
 TL;DR:
Transferring contacts from Android to iPhone is most efficiently handled by Wondershare Dr.Fone for cross-platform migration between devices running up to Android 16 and iOS 26, though native methods provide alternatives based on your current setup phase.
● The official Move to iOS app facilitates direct data migration, but its usage is strictly limited to the initial setup of an iPhone or immediately following a factory reset.
● For iPhones that are already configured, syncing via a connected Google Account or emailing a generated VCF file to the iOS device bypasses the need for third-party software or device resets.
● Physical SIM card transfers remain a viable offline option for specific Android models like Samsung, but this method will not work if your contacts are exclusively managed through the Google Contacts app.
Ask AI for a summary
 ChatGPT
 Perplexity
 Gemini
 Claude
 Grok
Grok
Switching from Android to iPhone is an exciting upgrade, but moving your data can be challenging for some users. Fortunately, there are reliable ways to transfer contacts from Android to iPhone using built-in tools and cloud services. These methods make it simple to keep your important connections intact when moving to your new iPhone.
This guide covers six practical methods on how to transfer contacts from Android to iPhone without losing important information. Each step provides a clear process to complete the transfer efficiently and keep your contacts safely moved to your new device.
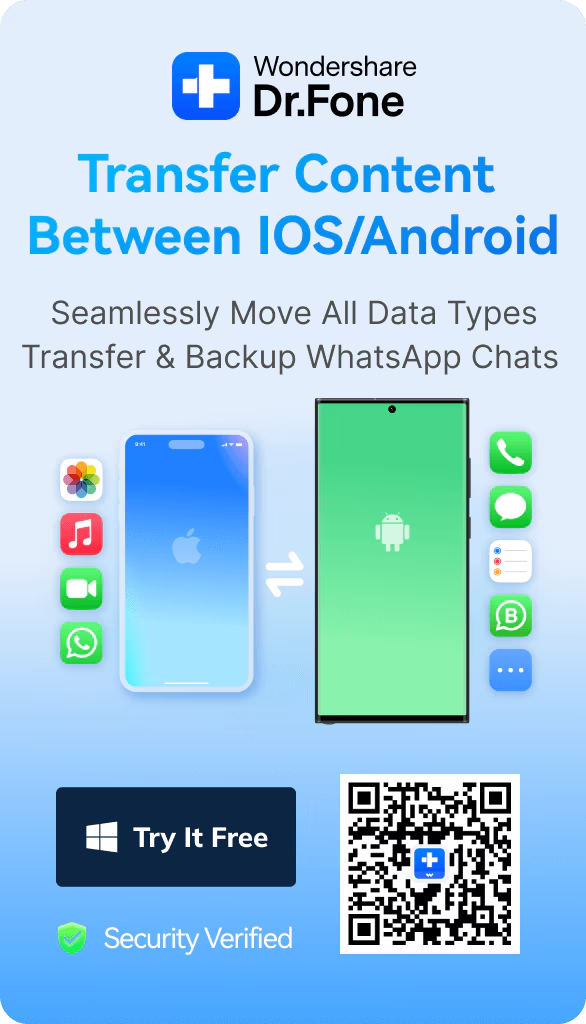
Way 1: Wondershare Dr.Fone
Wondershare Dr.Fone is an efficient tool that makes it easy to transfer contacts from Android to iPhone. Its phone transfer feature allows you to move contacts and other data between Android and iOS devices within minutes. With a clear and simple interface, Dr.Fone ensures a quick and accurate data transfer process.
Dr.Fone - Phone Transfer
Transfer Photo from Android to iPhone in 1 Click Directly!
- Cross-platform data shift between any device of your choice from Android and iPhone.
- Support massive data, including images, videos, music, messages, contacts, apps, and more.
- Works perfectly with almost mobile phones and tablets, such as iPhones, iPad, Samsung, Huawei, etc.
- Fully work with mobile system iOS 26 and Android 16 and the latest computer system versions.
- 100% safe and risk-free, backup & restore data as the original.


Steps To Transfer Contacts From Android to iPhone via Wondershare Dr.Fone
Follow these simplified steps for how to transfer contacts from Android to iPhone using Wondershare Dr.Fone:
- Step 1: Choose Phone Transfer After Launching Dr.Fone
On your computer, download and install the latest version of Wondershare Dr.Fone. Then open it once it is installed and click "Toolbox" from the left sidebar. Proceed to the primary interface and select the option labeled “Phone Transfer.” Then, connect both your Android and iPhone devices to the computer.

- Step 2: Connect Devices and Complete Contacts Transfer
Once devices are detected by Wondershare Dr.Fone, ensure that they are correctly assigned. The Android device will be at the "Source" location. In the same way, assign the "Destination" position to the iPhone. Choose the “Contacts” category among the data options and click “Start Transfer.” Allow the process a few moments to complete.

Dr.Fone Unlock Online - Free IMEI Check
iPhone 17 Is Here. Is Your Old Phone Ready to Sell?
Quickly check your iPhone or Android device status for free: Verify Blacklist, iCloud, Carrier Lock, and Warranty Status in Seconds. Ad-free, and globally.
Way 2: Utilize Move to iOS App
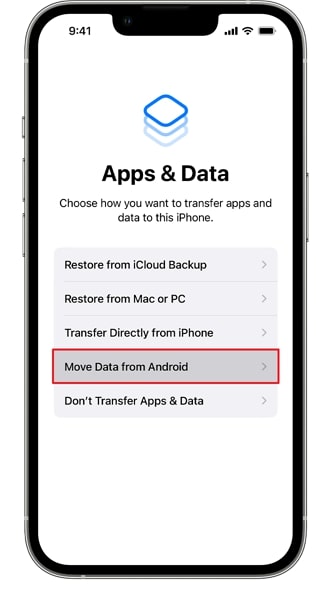
The Move to iOS app is a dedicated solution provided by Apple. It is specifically designed to help the migration of data, including contacts, from an Android device to an iPhone. This official app aims to simplify the transition process. Nevertheless, its utilization is limited to setting up an iPhone for the initial time or following a factory reset. Here is how to transfer contacts from Android to iPhone using Move to iOS app:
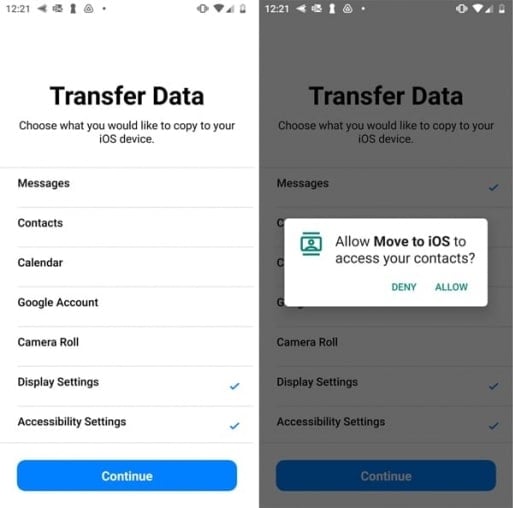
- Step 1. Download and set up the Move to iOS application on your Android device. Then, start setting up your iPhone until you reach the "Apps & Data" screen. Here, choose "Move Data from Android" and go on to open the Move to iOS app on the Android device.
- Step 2. Proceed by tapping “Continue” on both your devices and consenting to the terms and conditions. Follow it by tapping “Next” and insert the code from the iPhone to the Move to iOS app to establish a connection. From the available data transfer options, ensure to choose "Contacts." Now, follow the on-screen prompts to complete the transfer process.
Way 3: Sync Contacts to Google Account
Syncing contacts through a Google account is a practical way to transfer contacts from Android to iPhone. It works for both new and existing iPhones, especially if your contacts are already saved in your Google account. Follow these steps to sync your contacts with Google and access them later on your iPhone.
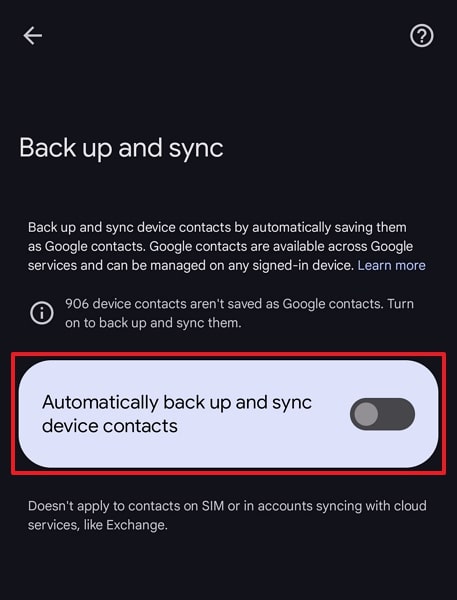
- Step 1. Access the Google Contacts app on your Android device and tap on the “Profile” icon at the top right corner. Following this, access the "Contacts Settings" option followed by "Google Contacts sync settings."

- Step 2. Next, you need to select "Also sync device contacts." On the following screen, ensure "Automatically back up & sync device contacts" is toggled on. Now, move to your iPhone and access the Settings app.
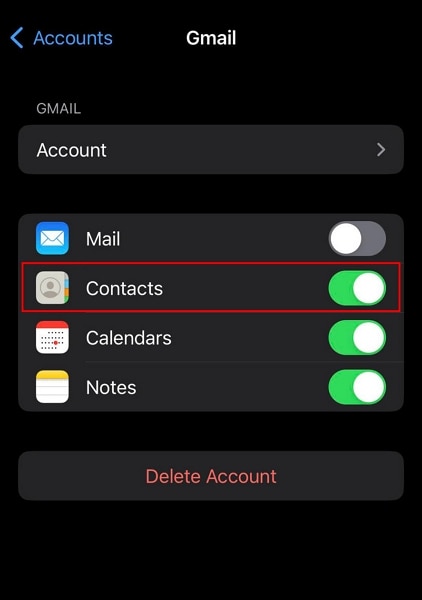
- Step 3. Go to the “Settings” app and locate the “Contacts” settings. Proceed by scrolling to locate “Accounts” and then tap on it. Afterwards, choose “Add Account” and sign in with your Google Account. Once logged in, make sure to enable the “Contacts” option.
Way 4: Using the SIM Card
Using a SIM card is a straightforward method to transfer contacts from Android to iPhone, though it requires physically switching SIM cards between devices. This option may not work if your contacts are managed through the Google Contacts app. However, some Android models, such as Samsung, still support it. Follow these steps to move your contacts from Android to iPhone using a SIM card.
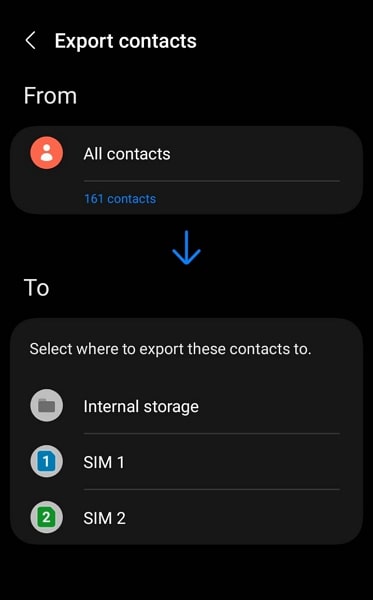
- Step 1. Open the Samsung Contacts app on your Android and tap the “Three Lines” icon to select "Manage Contacts." Here, tap "Export Contacts," choose the "SIM Card" as the export location, and select "All" contacts to be exported.
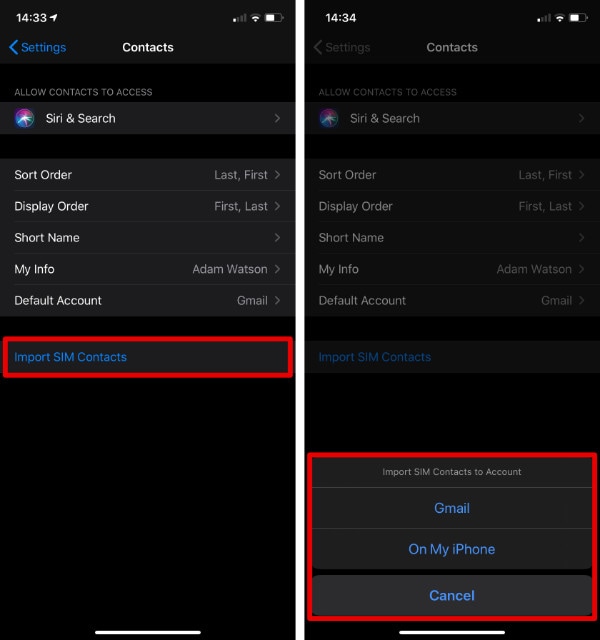
- Step 2. After it is done, insert the SIM card into the iPhone and open Settings. Move to "Contacts" and press "Import SIM Contacts" on the next screen to complete the process of moving contacts from a SIM card on an iPhone or email.
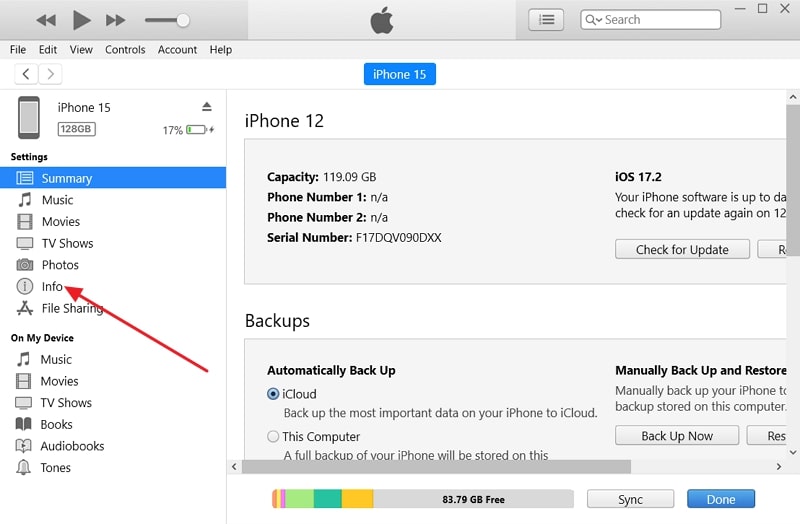
Way 5: Sync Using iTunes/Finder
Syncing through iTunes or Finder is another practical way to transfer contacts from Android to iPhone. This approach works by syncing Google contacts from your account to your iPhone, allowing you to keep all your contacts in one place. Follow these steps to move your contacts from Android to iPhone using iTunes or Finder.
- Step 1. Make sure your Android device has its contacts synced with a Google account. Next, download and install the most recent version of iTunes on your computer. Link your iPhone to your computer using a USB cable and launch iTunes. Once your iPhone icon appears in iTunes, click on it and navigate to the "Info" tab in the left sidebar.
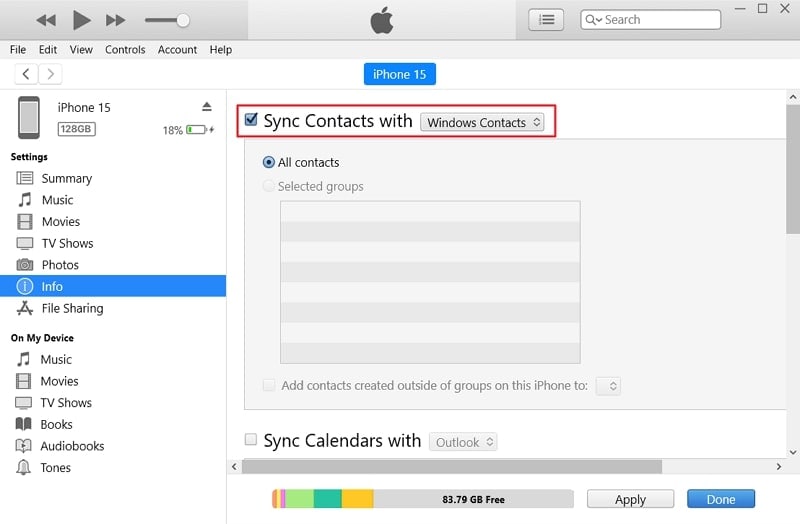
- Step 2. Ensure the box beside "Sync Contacts with" is checked, then pick "Google Contacts" from the drop-down menu. Log in to your Google account and designate the contacts for synchronization. Tap "Apply" in the bottom right to initiate syncing your iPhone with your Google contacts.
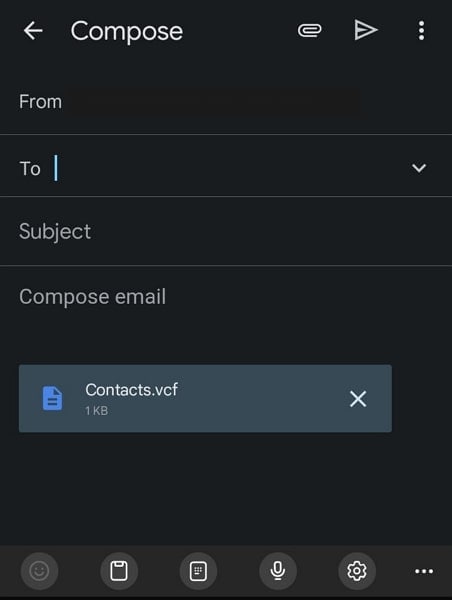
Way 6: Import the VCF File
Importing a VCF file is a direct and practical way to transfer contacts from Android to iPhone without using extra software. This method keeps all contact details intact and ensures a reliable transition. Follow these steps to import your VCF file and complete the contact transfer to your iPhone.
- Step 1. Access the Contacts app on your Android device and hold on to a contact to select. Among the options displayed, opt for "Select All" and proceed by tapping the "Share" option. Now, you need to select a way to share these contacts. Here, we are choosing Gmail as it is the simplest, but you can select any feasible method.
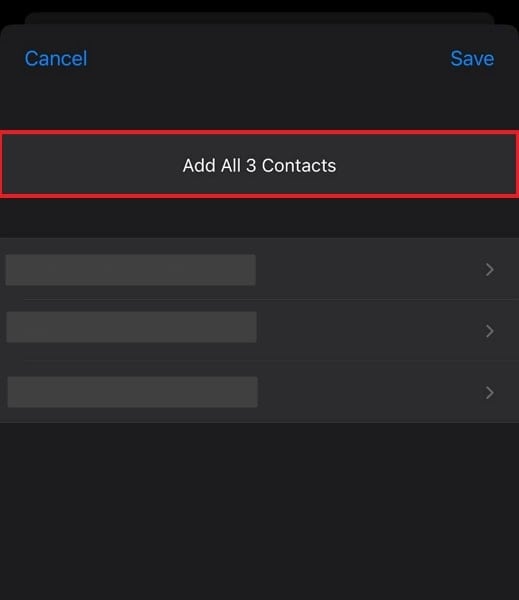
- Step 2. Now move to your iPhone and open the mail with Contacts from the Android device. Press the attached file, choose "Share," select the "Contacts" app and tap "Add All Contacts."
Author Recommendation: The Best Method To Transfer Contacts From Android to iPhone
When considering the most efficient and reliable method to transfer contacts from Android to iPhone, our recommendation leans toward using Wondershare Dr.Fone. Among various available methods, Wondershare Dr.Fone offers a comprehensive, user-friendly experience.
It simplifies the transfer process with its intuitive interface and dependable performance. Here's why we recommend Wondershare Dr.Fone for transferring contacts:
- Ease of Use: Wondershare Dr.Fone's straightforward interface makes it accessible to users with varying levels of technical expertise. The step-by-step guidance ensures a hassle-free transfer process.
- Comprehensive Transfer Options: Beyond contacts, Wondershare Dr.Fone enables the transfer of various data types. This caters to broader migration needs, including photos, messages, music, videos, etc.
- Reliability and Security: With a solid reputation in data management software, Wondershare Dr.Fone ensures the security and integrity of your data. It prioritizes privacy and reliability during the transfer process.
- Cross-Platform Compatibility: Fone supports transfers between different operating systems. That makes it an ideal choice when migrating from Android to iOS devices like iPhones.
- Efficiency and Speed: The software streamlines the transfer process to an excellent measure. It saves valuable time by swiftly migrating contacts and other data without data loss or errors.
Conclusion
In conclusion, transitioning from an Android device to an iPhone doesn't have to be a daunting task. It is especially not the case when it comes to how to transfer contacts from Android to iPhone. Throughout this guide, we've explored various effective methods. Each one offered its unique approach to simplify the transfer process.
You can choose from several ways on how to transfer contacts from Android to iPhone, such as using Dr.Fone - Phone Transfer, the Move to iOS app, Google account sync, a SIM card, iTunes/Finder, or a VCF file. The best method depends on your preferences, but Wondershare Dr.Fone stands out for its reliability, flexibility, and user-friendly design.


iPhone Contacts
- Back up iPhone Contacts
- Manage iPhone Contacts
- 1. Export Contacts from iPhone
- 2. Manage iPhone Contacts
- 3. Find and Merge Contacts on iPhone
- 4. Share Contacts on iPhone
- 5. Get iPhone Contacts from iTunes
- 6. Export iPhone Contacts to CSV
- 7. How to Export iPhone Contacts to a VCF|vCards
- 8. Delete Contacts from iPhone
- 9. Full Guide on Managing iPhone Contacts
- 10. Print Contacts from iPhone
- 11. View iPhone Contacts on Computer
- 12. Edit/Delete/Merge Contact on PC
- Recover iPhone Contacts
- 1. Recover Deleted Contacts on iPhone
- 2. Recover iPhone Deleted Text Message
- 3. Recover iPhone Deleted iMessages
- 4. Recover iPhone Deleted Photos
- 5. Recover Permanently Deleted Data
- 6. FonePaw VS Dr.Fone
- 7. See Blocked Messages on iPhone
- 8. Recover Data from Dead iPhone
- 10. Recover iPhone Deleted Text Message
- 11. Recover Contacts Without Backup
- Transfer Contacts from iPhone
- 1. Sync iPhone Contacts to Outlook
- 2. Transfer Contact without iCloud
- 3. Transfer from iPhone to iPhone
- 4. Transfer Contact With/Without iTunes
- 5. Transfer Contact from iPhone to Android
- 6. Sync Contacts from iPhone to iPad
- 7. Export from iPhone to Excel
- 8. Transfer Contact from iPhone to PC
- 9. Copy Contacts from iPhone to SIM
- Transfer Contacts to iPhone
- 1. Android to iPhone Transfer Apps
- 2. Transfer from Android to iPhone
- 3. Transfer from Android to iPhone XS
- 4. Transfer from Huawei to iPhone
- 5. Transfer from Sony Xperia to iPhone
- 6. Transfer from Samsung to iPhone
- 7. Import Contact from Excel to iPhone
- 8. Import Contact from Gmail to iPhone
- 9. Import Contacts to iPhone
- 10. Sync Outlook Contacts to iPhone
- 11. Transfer Contact from PC to iPhone
- iPhone Contacts TiPs
- ● Manage/transfer/recover data
- ● Unlock screen/activate/FRP lock
- ● Fix most iOS and Android issues
- Free Download Free Download Free Download

Alice MJ
staff Editor