How to Manage iPhone Contacts in Easy Ways
Oct 24, 2025 • Filed to: Device Data Management • Proven solutions
Dr.Fone Basic:
Better Control for Your Phone
Manage, transfer, back up, restore, and mirror your device
No matter how far the technology may go or advance, the basic and main purpose of iPhone or for that matter any smartphone will be communication. The Contacts app on iPhone is a warehouse of contact information like phone numbers, email ID, address and other details. Thus to have quick access to this large amount of data, managing it is very important. The longer the list of contacts is, the more you need for iPhone contact management.
When you manage contacts on iPhone, you can add, delete, edit, transfer and perform other functions with your contact list. So now when you know the importance of contact management and looking for options on how to manage contacts on iPhone, read below to get the best solutions.
Part 1. Manage iPhone Contacts Intelligently with Dr.Fone - Phone Manager
When it comes to iPhone manager, the software that completely steals the show is Dr.Fone - Phone Manager. This professional and versatile program allows managing content on your iPhone without any need for iTunes. Using Dr.Fone - Phone Manager, you can manage iPhone contacts by importing, exporting, deleting duplicates, and editing contacts. The software also allows transferring iPhone contacts to other iOS devices and PC. Dr.Fone - Phone Manager allows to manage iPhone contacts on PC with just a few steps.
Note: The software only allows managing the local contacts on iPhone and not the contacts which are present on iCloud or other accounts.

Dr.Fone - Phone Manager (iOS)
One-Stop Tool to Manage iPhone Contacts with Ease
- Transfer, manage, export/import your music, photos, videos, contacts, SMS, Apps etc.
- Backup your music, photos, videos, contacts, SMS, Apps etc. to computer and restore them easily.
- Transfer music, photos, videos, contacts, messages, etc from one smartphone to another.
- Transfer media files between iOS devices and iTunes.
- Fully compatible with iOS 7, iOS 8, iOS 9, iOS 10, iOS 11 and iPod.
Steps for iPhone contact management functions using Dr.Fone - Phone Manager
First of all, you need to download, install and launch Dr.Fone software on your PC and then using a USB cable, connect your iPhone to your PC.
1. Deleting local contacts selectively on iPhone:
Step 1: Select contacts on your iPhone.
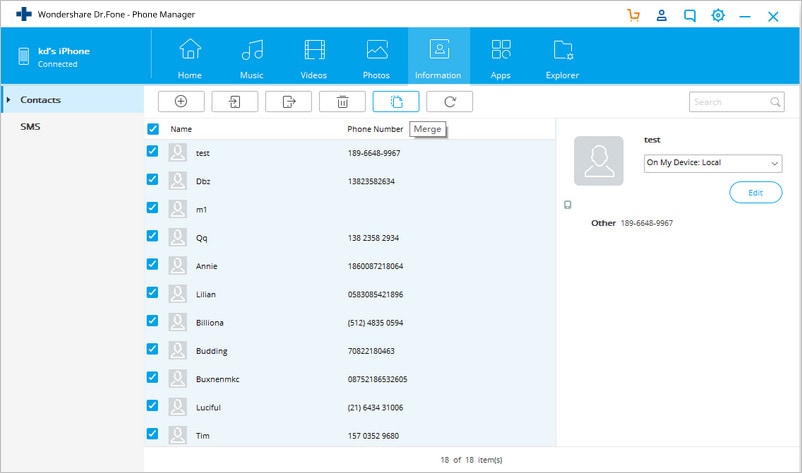
On the main software interface, click “Information” tab. On the left panel, click Contacts. The list of local contacts will be shown on the right panel. Select the ones that you want to delete.

Step 2: Delete selected contacts.
Once the desired contacts are selected, click the Trash icon. A pop-up confirmation window will open. Click “Delete” to confirm the process.
2. Editing the current contact information:
On the main interface, click “Information”. From the list of contacts, select the one that you wish to edit. On the right panel, click “Edit” option and a new interface will open. Revise the contact information from this new window. There is also an option to Add Field. Once done, click “Save” to update edited information.

Alternatively, there is another way to edit the contact information. For this, you need to select the desired contact, right click and select “Edit Contact” option. The interface for editing contacts will appear.
3. Adding contacts on iPhone directly:
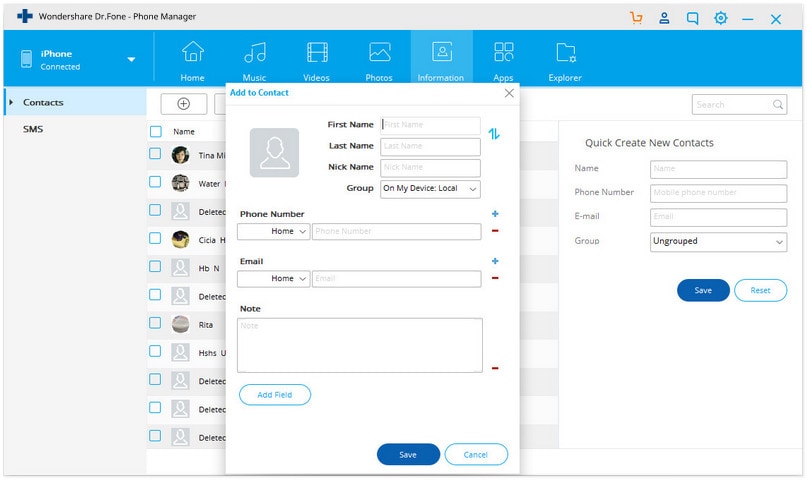
Click Information tab from the main software interface. Click the Plus Sign and a new interface to add contacts will appear. Enter the information of the new contacts with regards to name, phone number, email id and other fields. To add more information click “Add Field”. Once done, click “Save” to complete the process.

Alternatively, there is another method to add contacts by selecting “Quick Create New Contacts” options on the right side panel. Enter the desired details and click Save.
4. Finding and removing duplicate contacts on iPhone:
Step 1: Merge duplicate contacts on iPhone.
Click Information tab on the main interface. The list of local contacts on iPhone will appear on the right side.

Step 2: Select contacts to merge.
Now you can select the to-be-merged contacts and click the Merge icon in the upper area.

Step 3: Select match type.
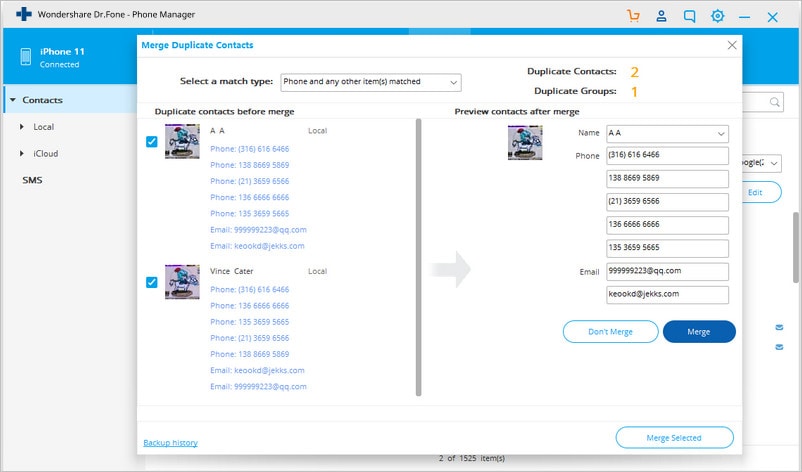
A new window will open to show the list of duplicate contacts which are exactly matched. You can even select another match type as per your requirements.
Step 4: Merge the duplicate contacts.
Next you can decide upon the items which you need to merge or not. You can also uncheck a single item that you do not wish to merge. For an entire group of duplicate contacts, you can select from options of “Merge” or “Don’t Merge”.
Finally click “Merge Selected” to confirm the process. A confirmation pop-up window will appear where you need to select “Yes”. There is also an option to backup contacts before merging.
5. Group management for contacts:
When there are a large number of contacts on your iPhone, dividing them into groups is a good option. This software has a feature which allows you to transfer contacts from one group to another or remove contacts from a particular group.
Select contact – transfer or delete from a group
Click Information tab from the main interface. From the list of contacts, select the desired one and right click on it. To transfer it to another group – Add to Group > New group name (from drop down list). In order to remove from a particular group select Ungrouped.
6. Transfer contacts between iPhone and other phone directly, between PC and iPhone.
Dr.Fone - Phone Manager allows transferring contacts from iPhone to other iOS and Android devices. The contacts can also be transferred between PC and iPhone in vCard and CSV file format.
Step 1: Connect multiple devices.
Connect iPhone and other iOS or Android device to which you wish to transfer the contacts.
Step 2: Select contacts and transfer.
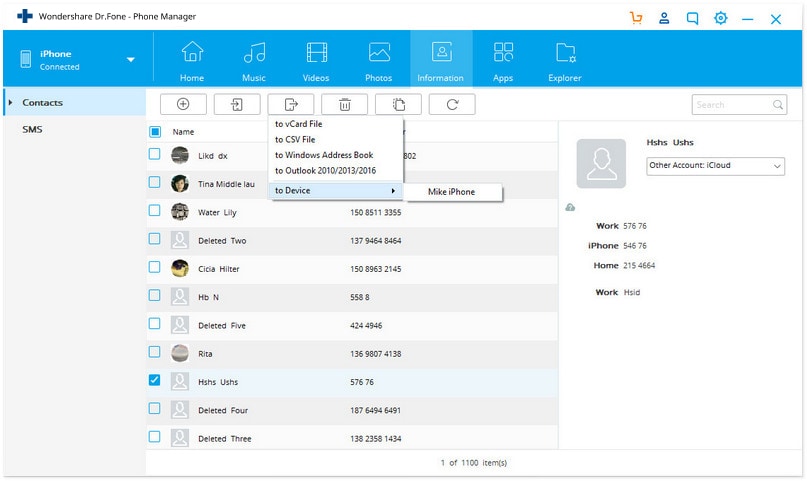
On the main interface, click Information tab and enter Contacts by default. The list of contacts on your iPhone will appear. Select the ones that you wish to transfer and click Export > to Device > select from connected device.

Alternatively, you can also right click the contacts, then click Export > to Device > Device from available list to which you want to transfer the contact.
In conclusion, with the above steps, you can easily manage iPhone contacts.
Part 2. Manage iPhone Contacts Manually
Another way to manage contacts on your iPhone is by doing it manually on your device. With this method, you can usually manage contact one by one, it will take more time to handle it with great patience, but the pro is free. The steps for performing various iPhone contact management functions are listed below.
1. Deleting local contacts on iPhone:
Step 1: Open the desired contact.
Open Contacts App on your iPhone. From the list of given contacts, click the one that you want to delete. Search bar can also be used to find the desired contact. Click Edit on the top right corner to enter Edit mode.

Step 2: Delete contact.
Scroll down the page and click “Delete Contact”. A conformation pop-up will appear, select “Delete Contact” to complete the process. With this way, you can only delete contact one by one.

2. Editing the current contact information:
Step 1: Open contact.
Open Contacts app and select the desired contact. Click "Edit" on the top-right corner to enter Edit mode.
Step 2: Edit Information.
Enter the new or edited information with respect to different fields. Click “add field” to add new fields if needed. Click “Done” to save the edited information.

3. Adding contacts on iPhone directly:
Open Contacts app and add contact.
Open Contacts App on your iPhone. On the top-right corner, click “+” sign. Enter the details of the new contacts and click Done. The contact will be successfully created.

4. Find and remove duplicate contacts on iPhone:
In order to remove duplicate contacts manually on iPhone, you need to search for the contacts that appear more than once, and then delete them manually.

5. Group management for contacts:
Manually contact groups can be created, deleted or contacts can be transferred from one group to another through iCloud.
On your browser, open the iCloud website and enter your Apple ID and password. On the iCloud interface, click Contacts.

5.1 Create new group:
On the bottom left side, click “+” icon and select “New Group” from the drop down list and name the group as per requirement. Once the group is created, you can add contacts to them by simply dragging and dropping from the main/other contact list.

5.2 Moving contacts between groups:
On the left panel, the list of created groups will appear. Select Group 1 from where you want to transfer contact and then drag and drop the desired contact to another group.

5.3 Deleting Group:
Select the desired group, click “Settings” icon at the bottom left corner, and from the drop down menu, select “Delete”. A confirmation pop-up window will appear from where click “Delete” to confirm the process.

6. Backup iPhone contacts with iCloud or iTunes:
You can back up the contacts on your iPhone through iCloud or iTunes program. With iTunes, the entire phone backup is taken including the contact list which can be restored when needed. When using iCloud system, the backup is taken on cloud storage and not on hard drive of the PC.
Steps to backup iPhone using iTunes:
Step 1: Launch iTunes and connect iPhone using a USB cable.
Step 2: Click File > Devices > Back Up. The backup process will start and take several minutes to complete. Please note that if you want to sync your contacts with your iTunes next time, the original contacts on your iPhone will be erased.

Part 3. Comparison Between the Two Methods
Above listed are the complete steps and the procedure to manage iPhone contacts manually and through using the versatile Dr.Fone - Phone Manager software. Still if you are in dilemma and confused which method to employ, the below given comparison table will surely help you.
| Features/Method | Manage Contacts Using Dr.Fone - Phone Manager | Manage Contacts Manually |
|---|---|---|
| Delete Contacts in batches | Yes | No |
| Find and remove duplicate contacts automatically | Yes | No |
| Group Management of contacts | Easy to use | Medium difficulty |
| Transfer contacts between iPhone and other device directly | Yes | No |
| Backup iPhone contacts |
|
|
|
Merge contacts from local phone, iCloud and other accounts |
Yes | No |
| Add contacts to iPhone in batch | Yes | No |
So whenever you get stuck in situation on how to manage iPhone contacts, follow the above listed methods and steps. But generally speaking, we suggest you to use Dr.Fone - Phone Manager to spare your time.
Dr.Fone Basic:
Better Control for Your Phone
Manage, transfer, back up, restore, and mirror your device
iPhone Contacts
- Back up iPhone Contacts
- Manage iPhone Contacts
- 1. Export Contacts from iPhone
- 2. Manage iPhone Contacts
- 3. Find and Merge Contacts on iPhone
- 4. Share Contacts on iPhone
- 5. Get iPhone Contacts from iTunes
- 6. Export iPhone Contacts to CSV
- 7. How to Export iPhone Contacts to a VCF|vCards
- 8. Delete Contacts from iPhone
- 9. Full Guide on Managing iPhone Contacts
- 10. Print Contacts from iPhone
- 11. View iPhone Contacts on Computer
- 12. Edit/Delete/Merge Contact on PC
- Recover iPhone Contacts
- 1. Recover Deleted Contacts on iPhone
- 2. Recover iPhone Deleted Text Message
- 3. Recover iPhone Deleted iMessages
- 4. Recover iPhone Deleted Photos
- 5. Recover Permanently Deleted Data
- 6. FonePaw VS Dr.Fone
- 7. See Blocked Messages on iPhone
- 8. Recover Data from Dead iPhone
- 10. Recover iPhone Deleted Text Message
- 11. Recover Contacts Without Backup
- Transfer Contacts from iPhone
- 1. Sync iPhone Contacts to Outlook
- 2. Transfer Contact without iCloud
- 3. Transfer from iPhone to iPhone
- 4. Transfer Contact With/Without iTunes
- 5. Transfer Contact from iPhone to Android
- 6. Sync Contacts from iPhone to iPad
- 7. Export from iPhone to Excel
- 8. Transfer Contact from iPhone to PC
- 9. Copy Contacts from iPhone to SIM
- Transfer Contacts to iPhone
- 1. Android to iPhone Transfer Apps
- 2. Transfer from Android to iPhone
- 3. Transfer from Android to iPhone XS
- 4. Transfer from Huawei to iPhone
- 5. Transfer from Sony Xperia to iPhone
- 6. Transfer from Samsung to iPhone
- 7. Import Contact from Excel to iPhone
- 8. Import Contact from Gmail to iPhone
- 9. Import Contacts to iPhone
- 10. Sync Outlook Contacts to iPhone
- 11. Transfer Contact from PC to iPhone
- iPhone Contacts TiPs


Selena Lee
chief Editor