How to Manage iPhone Contacts? 6 Easy Ways

Jun 30, 2026 • Filed to: Device Data Management • Proven solutions
 TL;DR:
To efficiently manage and back up iPhone contacts, utilize native tools like iCloud to sync across Apple devices, or use Wondershare Dr.Fone - Phone Manager (iOS) for bulk deduplication and computer transfers.
● iCloud requires a Wi-Fi connection to export entire contact lists as vCards via a web browser, whereas AirDrop and Email are strictly limited to transferring individual contacts one at a time.
● Wondershare Dr.Fone - Phone Manager (iOS) supports both Mac and Windows, providing a dedicated "Deduplicate" tool to automatically scan and merge duplicate entries that would otherwise require manual deletion on the iPhone.
● Direct on-device editing allows you to add or delete contacts and update fields, but third-party software is required to bypass Apple ecosystem restrictions for direct offline backups to a PC or migration between different smartphones.
Ask AI for a summary
 ChatGPT
 Perplexity
 Gemini
 Claude
 Grok
Grok
Dr.Fone Basic:
Better Control for Your Phone
Manage, transfer, back up, restore, and mirror your device
Are you tired of a messy iPhone contact list? Let's fix it together.
In this article, we'll show you six super easy ways to sort out your contacts. You can clean up your list, add new friends, move contacts to your computer, and more.
In the end, you will have all your contacts perfectly organized. Finding someone will be quick and easy. We promise to make it simple to manage iPhone contact.
You won't need to scroll forever to find a contact. With our tips, you'll get a neat list fast. Ready to tidy up your contacts? Let's make your iPhone's contact list the best and most organized it can be!
- Method 1. Deleting Contacts
- Method 2. Adding Contacts on the iPhone
- Method 3. Editing Already Existed Contact
- Method 4. Deleting the Duplicate Contacts on the iPhone
- Method 5. How To Move Contacts From iPhone To Computer
- 5.1 Export iPhone Contacts with iCloud
- 5.2 Transfer Contacts from iPhone to PC via Email
- 5.3 Export iPhone Contacts with AirDrop

- Method 6. Manage iPhone Contacts Easily with Dr.Fone
Method 1. Deleting Contacts
Managing your iPhone contacts means sometimes you need to declutter your contact list. This process involves evaluating which contacts are no longer needed and removing them from your iPhone.
Deleting contacts from the iPhone is a piece of cake. You must launch the contact app and tap on the appropriate option to remove unwanted contact.
The following steps will help you to delete unwanted iPhone Contacts.
Step 1: Launch the Phone app on your iPhone. Then, in the middle, tap on the Contacts option. It will open your contact list on your iPhone.

Step 2: Find the contact you want to remove from the list on your screen. Now tap on the contact to open it.
Step 3: Now tap on the Edit option at the top-right corner of your screen as the contact opens. This will let you edit the chosen contact.

Step 4: On the next screen, scroll down to the Delete Contact option. Tap on it to delete it from your device
That’s all! Your selected contact is now deleted from your iPhone.
Now, let's proceed to the next topic in our discussion to manage iPhone contact.
Method 2. Adding Contacts on the iPhone
Adding new people to your iPhone contacts is important. It lets you call, text, or email them easily. You put in their name, phone number, and other details like their email or address.
Keeping your contacts updated helps you stay connected with friends, family, and work contacts. It makes talking to them quick and easy.
Adding contacts on an iPhone is simple by following the below steps.
Step 1: Open the Phone application. Now, launch the contact section by tapping on Contacts.
Step 2: Click on the plus + sign at the top-right corner of your screen when you see your contact list. It will allow you to add a new contact to your iPhone.
Step 3: You can add the details of the new contact. Enter the name, phone number, email, and so on. When you finished doing this, tap in the Done option at the top-right corner. It will save the contact.

Now, your contact should be saved. It will appear in your contact list every time you open it on your iPhone.
Let’s keep the momentum going and discuss the next part.
Method 3. Editing Already Existed Contact
Editing contacts on your iPhone helps keep info up to date. People's phone numbers, emails, or jobs can change. By updating contacts, you make sure you have the right details.
This helps you communicate better. You can also add new info like birthdays or notes. This makes your contact list more useful.
Below are the steps to edit the contact information of already saved contacts.
Step 1: Open the Contacts application and choose the desired contact. On the top-right corner, click Edit to enter Edit mode.
Step 2: Enter the edited or new information. If you wanna add new fields, click "add field." Click Done to save the new or edited information.

That’s it! These steps will allow you to edit the already saved information. Now, let’s see other ways to manage iPhone contact.
Method 4. Deleting the Duplicate Contacts on the iPhone
Deleting duplicate contacts is another way of organizing contacts on iPhone. It cleans up your iPhone's contact list. When you have two or more entries for the same person, it can be confusing.
Removing these duplicates makes your list neater. It also makes finding contacts faster. With a cleaner list, you won't have to scroll through extra entries. This step is a good way to keep your contacts organized. It helps you stay on top of your communication game.
To delete the duplicate contacts, search for those saved more than once. Then, delete the extra saved contact manually.

Voila! You will be able to delete the duplicate contacts from your iPhone. Let’s look at the other methods on how to manage iPhone contacts.
Method 5. How To Move Contacts From iPhone To Computer
Do you want to copy contacts from iPhone to computer. Don't worry! It's not much tricky. Transferring data from your iPhone to a computer helps keep your information safe. You can transfer things like contacts, photos, and files.
This is good for making backups or clearing space on your phone. It also lets you see your data on a bigger screen. Having your data in more than one place means you won't lose it if something goes wrong with your phone.
We have enlisted some methods below to transfer contacts from iPhone to PC. Have a look at them.
5.1 Export iPhone Contacts with iCloud
iCloud syncs data like Contacts and Calendars across all your Apple devices. It's good for people who want the same data on their iMacs, MacBooks, iPhones, iPads, and iPods.
But, if you prefer more control over your data, another way might be better. To sync contacts from your iPhone using iCloud, you need Wi-Fi.
The following steps will help you to move iPhone contacts with iCloud.
Step 1: On your iPhone, go to Settings, then Your Name, and finally to iCloud. Ensure to toggle on Contacts.

Step 2: Open your internet browser on your computer. Then, use your Apple ID to log in to iCloud Contacts.
Step 3: Now, click the (...) menu icon and select “Select All Contacts.”
Step 4: In the top-right corner of the iPhone screen, tap the share icon. Finally, tap "Export vCard" to save to save contacts from iPhone to Computer.

That's all on how to move contacts from iPhone to computer.
Now, let's move to another way of transferring contacts from iPhone to PC.
5.2 Transfer Contacts from iPhone to PC via Email
This method works well for sending a few contacts but only for a few at a time. You can send contacts from your iPhone by email.
This lets you quickly share a contact's info with someone or send it to yourself. Then, you can get the contact on your computer. Next, let’s discuss how to export contacts from iPhone to laptop via Email.
Follow the below steps to share contacts via Email.
Step 1: Open the Contacts application on your iPhone. Next, click on the contact you wish to send.
Step 2: Scroll down and click Share Contact.

Step 3: Choose Mail, then compose your email and send it!
Your contact will be shared as an attachment with the mail in vCard format. Now, let’s move to another potential method of transferring contacts from iphone to computer.
5.3 Export iPhone Contacts with AirDrop
Airdrop lets you quickly send files from your iPhone to your Mac. Both devices need to be on the same Wi-Fi. Just pick a file and use Airdrop to share it.
But, if you have many contacts to send, think about another way. Airdrop only sends one file at a time. Sending your whole contact list this way can take a long time.
The following steps will help you in transferring contacts from iPhone to PC using AirDrop.
Step 1. Turn on AirDrop on your iPhone
Open the Control Center on your iPhone. Access more options by tapping and holding the wireless control-Click the AirDrop icon and choose “Everyone.”

Step 2. Turn on AirDrop on your Mac
Launch Finder on Your Mac and Tap Go, then choose Airdrop and tap on the “Allow me to be discovered by:” Image name. Ensure that your iPhone can discover you. Choose either Contact Only or Everyone.

Step 3. Next, open the Contacts application on your iPhone.
Step 4. Choose a contact you want to transfer, then click “Share Contact.”
Step 5. Tap Airdrop, then tap on your Mac as it is detected.

Step 6. A notification will appear on your Mac. Click to accept the contact file on your Mac.
That’s all about this method. If you are still wondering about how do I transfer contacts from iPhone to laptop, let’s share an easy way!
Method 6. Manage iPhone Contacts Easily with Dr.Fone
Are you asking yourself how you can effortlessly manage your iPhone contacts? The simple answer is using Wondersahre Dr.Fone. It simplifies the organization, editing, and transferring of contacts between iPhones and other devices.
It allows users to merge duplicate contacts easily, keeping their address book organized. The software provides options for backing up contacts to a computer, ensuring data is securely preserved. Additionally, it supports restoring contacts to the iPhone, aiding in quick data recovery.
Dr.Fone - Phone Manager (iOS)
Manage and Export Your iPhone Contacts
- Transfer, manage, export/import your music, photos, videos, contacts, SMS, Apps, etc.
- Back up your music, photos, videos, contacts, SMS, Apps, etc., to the computer and restore them easily.
- Transfer music, photos, videos, contacts, messages, etc., from one smartphone to another.
- Transfer media files between iOS devices and iTunes.
- Fully compatible with the newest iOS system.


Dr. Fone's user-friendly interface makes it accessible to users with any level of technical skill. Thus offering a hassle-free solution for you to manage iPhone contacts . This tool is especially beneficial for those looking to maintain a clean and updated contact list on their iPhones. Below are the steps to manage iPhone contacts using Dr.Fone.
Firstly, download and install Dr.Fone on your PC. Then, follow the below steps to manage iPhone contact using Dr.Fone.
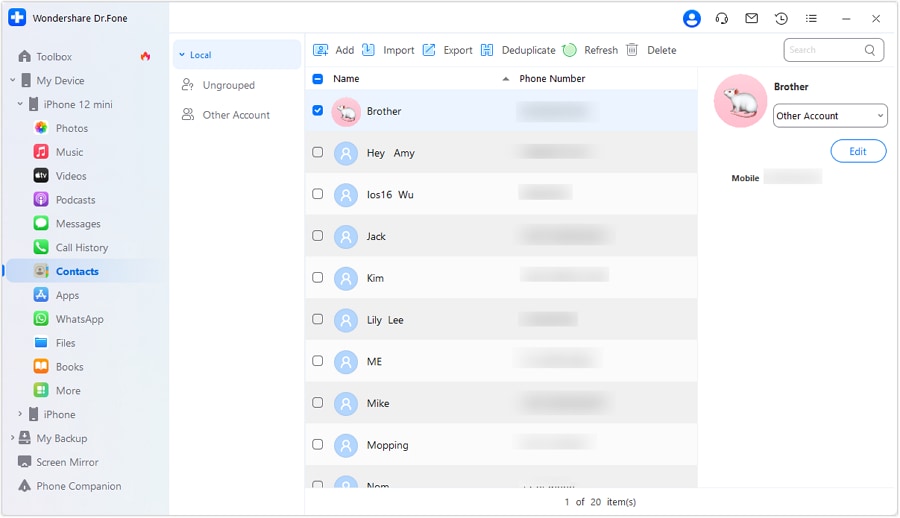
Step 1. Open Contacts on Dr.Fone
Open Contacts on Dr.Fone from the panel available on the left.
Step 2. Merge Duplicate Contacts
To combine duplicate contacts, click the Deduplicate button at the top. When the platform finds duplicates, you'll see a progress bar appear.

Step 3. Choose Contacts and Merge Accordingly
In the next window, you'll see all the duplicate contacts. Choose how to find matches with the "Select a match type" option. Decide to "Merge" or "Don't Merge" for each contact. To combine all duplicates at once, click the "Merge Contacts" button to finish.

That’s all about using Dr.Fone to manage iPhone Contact! The tool is for both Mac and Windows users. So it is an ideal choice for everyone.
Let’s conclude our topic!
Wrapping Up!
To sum up, managing iPhone contacts is easy in these six ways. You can delete, add, merge, or move contacts to your computer. Wondershare Dr.Fone is an efficient tool for this. It helps you keep your contact list clear and current. So it is easy to manage iPhone contacts. You can quickly find and talk to your friends and family. This keeps your phone's contacts sorted and ready to use.
Also, keeping your contacts updated makes calling or messaging quick and hassle-free. You can ensure, with just a few clicks, that you're always in touch with the people who matter most. This way, your phone becomes a bridge, not a barrier, to communication. So, take a little time to manage your iPhone contacts. It's worth it for its ease and connectivity to your daily life!
Dr.Fone Basic:
Better Control for Your Phone
Manage, transfer, back up, restore, and mirror your device


iPhone Contacts
- Back up iPhone Contacts
- Manage iPhone Contacts
- 1. Export Contacts from iPhone
- 2. Manage iPhone Contacts
- 3. Find and Merge Contacts on iPhone
- 4. Share Contacts on iPhone
- 5. Get iPhone Contacts from iTunes
- 6. Export iPhone Contacts to CSV
- 7. How to Export iPhone Contacts to a VCF|vCards
- 8. Delete Contacts from iPhone
- 9. Full Guide on Managing iPhone Contacts
- 10. Print Contacts from iPhone
- 11. View iPhone Contacts on Computer
- 12. Edit/Delete/Merge Contact on PC
- Recover iPhone Contacts
- 1. Recover Deleted Contacts on iPhone
- 2. Recover iPhone Deleted Text Message
- 3. Recover iPhone Deleted iMessages
- 4. Recover iPhone Deleted Photos
- 5. Recover Permanently Deleted Data
- 6. FonePaw VS Dr.Fone
- 7. See Blocked Messages on iPhone
- 8. Recover Data from Dead iPhone
- 10. Recover iPhone Deleted Text Message
- 11. Recover Contacts Without Backup
- Transfer Contacts from iPhone
- 1. Sync iPhone Contacts to Outlook
- 2. Transfer Contact without iCloud
- 3. Transfer from iPhone to iPhone
- 4. Transfer Contact With/Without iTunes
- 5. Transfer Contact from iPhone to Android
- 6. Sync Contacts from iPhone to iPad
- 7. Export from iPhone to Excel
- 8. Transfer Contact from iPhone to PC
- 9. Copy Contacts from iPhone to SIM
- Transfer Contacts to iPhone
- 1. Android to iPhone Transfer Apps
- 2. Transfer from Android to iPhone
- 3. Transfer from Android to iPhone XS
- 4. Transfer from Huawei to iPhone
- 5. Transfer from Sony Xperia to iPhone
- 6. Transfer from Samsung to iPhone
- 7. Import Contact from Excel to iPhone
- 8. Import Contact from Gmail to iPhone
- 9. Import Contacts to iPhone
- 10. Sync Outlook Contacts to iPhone
- 11. Transfer Contact from PC to iPhone
- iPhone Contacts TiPs
- ● Manage/transfer/recover data
- ● Unlock screen/activate/FRP lock
- ● Fix most iOS and Android issues
- Free Download Free Download Free Download


James Davis
staff Editor