Effortlessly manage data through preview, delete, export, etc.

 100% Security Verified | No Subscription Required | No Malware

 :
: 
 ChatGPT
 Perplexity
 Gemini
 Claude
 Grok
Grok

Can I directly save all photos from iMessage on my iPhone to my computer?
Common User Inquiry
This is a question which comes up quite often across forums and support channels. If just a few people write to us asking how they can save all photos from iMessage, we know that means many more, possibly thousands, have the exact same question about how to efficiently extract media files, get contact details, and secure other pictures from iMessage without dealing with convoluted syncing errors.
A typical scenario looks like this: I want to directly save photos in the iMessage on my iPhone to a computer. I know that I can save photos to my iPhone and then transfer all the photos to the computer. It's a little annoying, because I have lots of photos in the iMessage. How can I directly save all photos in my iPhone iMessage to the computer?
In order to save all photos from iMessage easily and bypass the repetitive manual work, we can utilize comprehensive iOS management tools. Specifically, you can use Dr.Fone - Backup & Restore (iOS) to securely backup and export all the photos from iMessage directly in just one click. Actually, Dr.Fone is not limited to media; it can also allow us to backup iPhone contacts, save imessage conversion, SMS records, essential notes, specialized files created by third-party apps, high-definition videos, your call history, music tracks, and much more to your computer's local drive.
One of the biggest advantages is that you can directly read the exported files right from your computer's storage. This intuitive accessibility is something which you cannot do with iTunes or Finder backups. Standard backups encrypt and hide these items, meaning you cannot easily find and identify all those files which hide deeply within the unreadable backup databases.
In this article
Part 1. Using Dr.Fone to Get Your Pictures and More
To successfully save picture from iMessages to computer environments natively (specifically Windows PC), using professional software removes the friction of manual sorting. If you are operating a Mac, the application process is extremely similar and you will be able to follow this exact same method without any compatibility issues.
 Effortlessly manage data through preview, delete, export, etc.
- Transfer all data between devices.
- Robust backup solutions for reliable data protection.
- Mirror screens to PC for meetings, teaching, and control.

By leveraging dedicated mobile solution toolkits, extracting media no longer requires hours of scrolling through chat histories. Follow the detailed steps below to perform the extraction flawlessly in 2026.
-
Step 1 Run the program and connect your iPhone
First, download and run the Dr.Fone program on your computer. Choose the 'Backup & Restore' module from Dr.Fone's main interface. Connect your iPhone to your computer via a lightning or USB-C cable, and it should be recognized automatically by the software.

-
Step 2 Scan your iPhone for pictures from iMessage
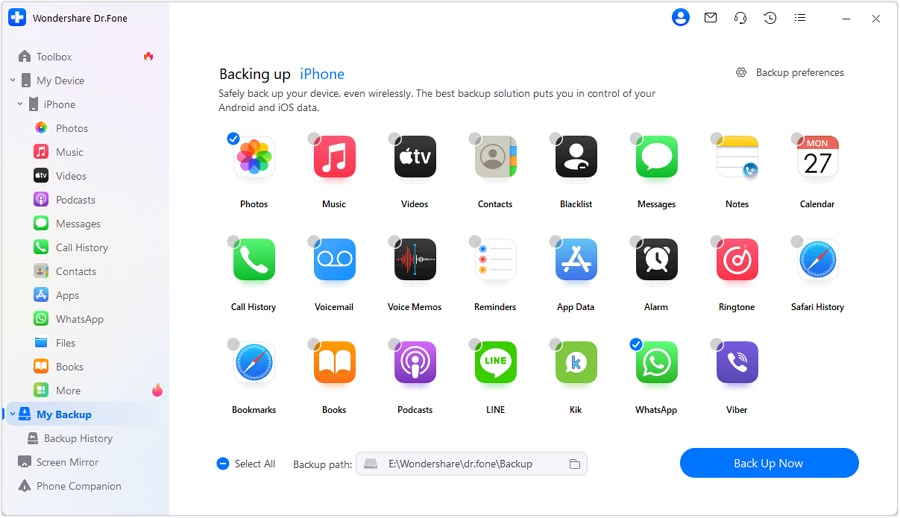
Once the software successfully recognizes your connected iPhone, you will see a detailed selection screen. To exclusively save pictures from iMessage, you can directly choose 'Messages & Attachments' under the file types menu, and then click on the 'Backup' button at the bottom right corner.
-
Step 3 Backup iPhone iMessage & Attachments
After you carefully select the specific backup file types you need, click on Backup to initiate the thorough backup process. The tool will begin safely reading the database of your device.

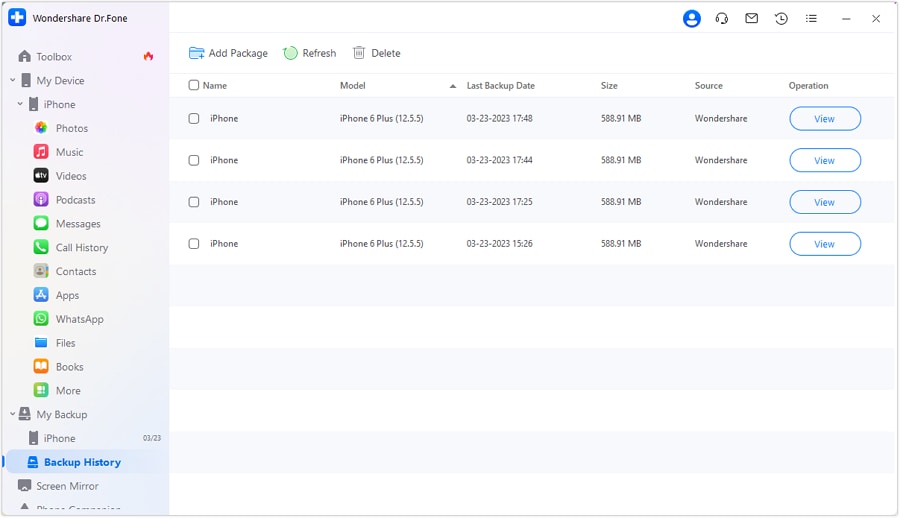
Once the backup completes, click the 'View Backup History' link on the success screen. You can then select the most recent backup file you just created and click View to access its raw contents.
-
Step 4 Preview and save photos from iMessage to computer
To finally find and export photos from iMessage, you can click on 'Message Attachments' in the left sidebar, where you can locate all attachments gathered from SMS/MMS (text/media messages) and Apple's iMessage. Moreover, you can choose 'Messages' to preview the whole text conversations and media contents in context. Then simply put a check mark next to the specific image files which you want to recover and click the 'Export to PC' button to save them all on your computer with a single click. Note that you can actually preview the found image data in full resolution during the initial scan.

If you prefer visual instructions, check out the detailed walkthrough below explaining the process clearly.
We are here to help, so let us give you a really simple and easy tool download link right here to get started instantly.




Part 2. Drag and Drop Your Photos (Mac Method)
If you prefer not to use third-party tools and happen to operate exclusively within the Apple ecosystem, this native method works flawlessly for a Mac PC running modern macOS versions.
-
Step 1 Connect your device
Attach your phone securely to your computer with an official Apple USB cable. There is no need for iTunes or Finder sync to run in the background, so if it starts to run automatically, make sure to close it down immediately to avoid conflicts.
-
Step 2 Launch the macOS Messages App
You now need to open the Messages App natively in macOS and navigate to the specific text message thread that contains the picture attachment you want to move to your computer's local drive.
-
Step 3 Prepare a target folder
Next open a new Finder window. Now navigate to a dedicated folder where you want to keep the iMessage photos which are currently stored on your iPhone. Create a new folder in a convenient place like your Desktop or Documents if you need to stay organized.
-
Step 4 Drag the photos
With the 2 windows, the Messages App and the Finder window, positioned side by side and open, simply drag and drop the media messages from the former directly to the latter. There you go! What could be easier?
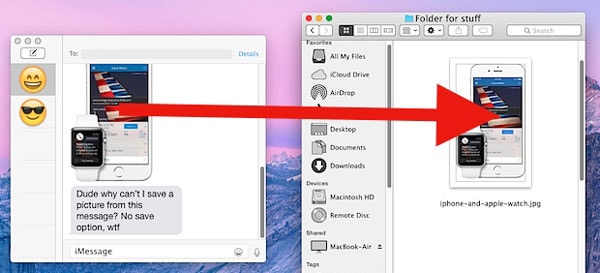
Unfortunately, there does not seem to be an equivalent, very easy native drag-and-drop way on a Windows PC right now, but we are always looking for innovative ways to save photos from iMessage. We are, after all, here to help. Windows users can, of course, rely on Dr.Fone - Basic with all its added benefits, streamlined previews, and unmatched speed.
Conclusion
Extracting precious memories scattered across multiple message threads shouldn't be a frustrating chore. Whether you rely on intuitive drag-and-drop mechanics exclusively available on Mac computers, or use a universally robust desktop solution like Dr.Fone for comprehensive data management on Windows and macOS, preserving your attachments is fully manageable. Choosing the right tool guarantees you safely back up images without degrading their quality or facing data overwrites.
More articles you may like:
FAQ
-
1. Can I save all iMessage photos at once without third-party software?
On macOS, you can drag and drop multiple photos from the Messages app into a local folder, but you still have to manually scroll through conversations. Without third-party software on Windows, saving them in bulk directly from the phone isn't natively supported unless you download them to the Photos app first and sync via iCloud or a USB connection. -
2. Does saving iMessage photos to a computer reduce their original quality?
No, extracting images through backup extraction software or by dragging and dropping them natively on macOS will preserve the original resolution and metadata. The only time quality drops is if you take screenshots or if the sender originally compressed the image before sending. -
3. Why can't I see my iMessage photos on my Windows PC automatically?
Windows PCs do not have a native Apple Messages application. Therefore, you cannot sync or view iMessage threads natively via Bluetooth or USB like you can on a Mac. You must extract the database using iOS backup tools to view the attachments locally. -
4. Are deleted iMessage photos still saved in an iTunes backup?
If you made a local iTunes or Finder backup before the photos were deleted from your iPhone, the images are still stored securely within that specific backup file. You can use extraction software to scan that historical backup and retrieve the deleted attachments.
 Add Wondershare Dr.Fone as a preferred source on Google