
Never Reset your iPhone Before Reading the Ultimate Checklist

Jun 11, 2026 • Filed to: Mobile Tips & Tactics • Proven solutions
 TL;DR:
Always begin troubleshooting iPhone glitches with a Soft Reset for minor lags, escalate to a Hard Reset for frozen screens, and only perform a Factory Reset or utilize Dr.Fone - System Repair (iOS) to resolve stubborn firmware issues.
● Soft Resets resolve minor app or network glitches by restarting the device, whereas Hard Resets force a reboot specifically for unresponsive devices stuck on a black, white, or Apple logo screen without deleting personal data.
● Factory Resetting hides the data indexes so files can still be recovered unless overwritten, requiring a preliminary backup via iCloud, iTunes, or Dr.Fone - Phone Backup; executing this without a passcode requires synced iTunes, Find My, Recovery Mode, or Dr.Fone - Screen Unlock.
● If standard resets fail, Dr.Fone - System Repair (iOS) reinstalls the device firmware, offering a Standard Repair mode to retain existing files, alongside Advanced and Anti-Recovery modes that permanently delete data to clear severe system errors.
Ask AI for a summary
 ChatGPT
 Perplexity
 Gemini
 Claude
 Grok
Grok
Dr.Fone Basic:
Better Control for Your Phone
Manage, transfer, back up, restore, and mirror your device
Have you just bought your new iPhone 14? Although millions love this epitome of perfection, the device still comes up with different problems. These problems can be as fundamental as software glitches or device malfunctions. Since you aim to resolve these problems, you would seek to reboot your iPhone.
There are different levels to try out while rebooting or restarting your iPhone. This article is about discussing these problems and figuring out the different classes you can try, depending on the nature of your device's problem. Then, with a detailed overview of the process, the article features a checklist that you have to ensure to avoid any mishap across your iOS device.
Part 1: iPhone Hard Reset vs. iPhone Soft Reset vs. iPhone Factory Reset
There are three recognized levels of resetting your iPhone. With different operability and results, these reset techniques have a dedicated representation that makes them essential according to the level of problems your device is in. This part will provide a comparative analysis of the different reset options that you have across your iPhone:
| Soft Reset | Hard Reset | Factory Reset | |
| Another Name | Reboot or Restart iPhone | Force Restart iPhone | Remove Data and Reset All Settings |
| Definition | This is referred to as turning off the iPhone and restarting it. | Performing a particular reset procedure if the iPhone gets unresponsive or extremely glitchy | Removing everything across the iOS device, i.e., from its data to its settings. |
| When to Use It | ·Not receiving messages and calls on the device. ·The device is lagging and not functioning correctly. ·There is some glitch across an application you are using. ·Audio and network-related issues are evident. ·Minor issues involving the software of your iPhone |
·When seeking to fix corrupted software. ·While trying to remove the viruses. ·Removing all unwanted settings across the device. ·Unresponsive device or iPhone stuck at Apple logo. ·iPhone with the white or black screen issues. |
·If the soft and hard reset fails to amend the issues, you must factory reset it. ·When you are about to sell out your device. ·Reverting the iPhone to its original and default settings. |
| How to Use It | Use the Power and Volume buttons (according to model) and turn off iPhone with a slider. Then, simply restart it with the help of the buttons. | Tap the Volume buttons respectively and hold the Power button of your iPhone (according to your model) until the Apple logo appears on the screen. | Access your device's Settings and find the "Transfer and Reset iPhone" option across "General" settings. Then, follow the on-screen instructions to factory reset your iPhone to different extents. |
| What Happens When Used | The iPhone launches again and operates perfectly. | The device starts operating properly on restarting. | All the data and settings of the device are removed, making it start as a completely new device. |
iPhone devices follow a rigorous chronological order of resetting and resolving all prevalent errors. While you understand how to reset your iPhone, there is a sequential procedure you can look out for. Initially, try the soft reset on an iPhone, where you just have to restart your device. This can be used when your device lags or glitches across some specific function. Although the device is operational, you can seek to reboot your iPhone to resolve any slight glitches across the software or applications in use.
Following this, if your iPhone is stuck and unresponsive, you should go for force restarting your device. Also referred to as hard reset, this procedure guides you to resolve iPhone errors causing it to stop its operation. You might be stuck in the Apple logo or would have a black or white screen across the device, for which you have to force restart the iPhone. Practicing it would resolve conditions that are complex and more stubborn.
If the hard reset fails and your device still malfunctions, you can then look forth to factory reset your device. This is the penultimate condition that you can think of, where the issue in the device is embedded in such a nature that it does not get removed quickly. The only way to process it is to delete everything from the iPhone. Thus, you can go to factory reset your iPhone and reset it all.
Part 2: How to Soft Reset an iPhone
As discussed, soft resetting your iPhone is the first step to resolving the problems across it. When talking about soft reset an iPhone, there is a slight difference that needs to be realized for the different models of iPhone. This part is based on providing you with a guide showing how to reboot your iPhone in the simplest ways. At times, the most straightforward methods give out the best results. So, let's find out how you are going to soft reset your iPhone:
For iPhone with Home Button
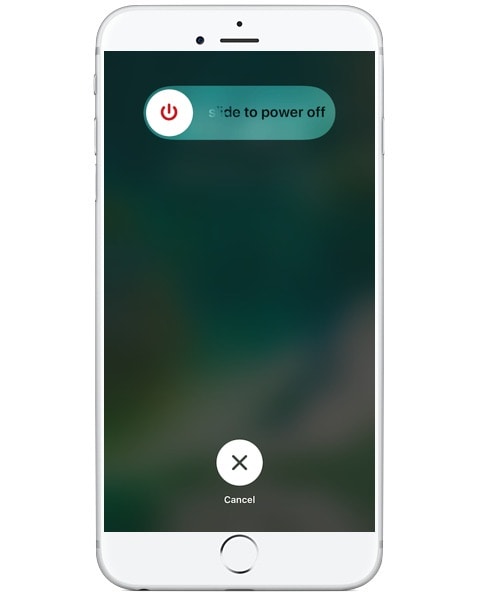
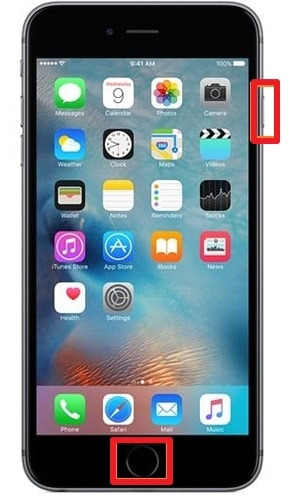
Step 1: If you own an iPhone 8 or any earlier model, you must hold the "Power" button.
Step 2: As you hold the button, a slider will appear on the screen to help you shut down the iPhone. Use the "Power" button on your button to restart the iPhone after a few seconds.
For iPhone without Home Button
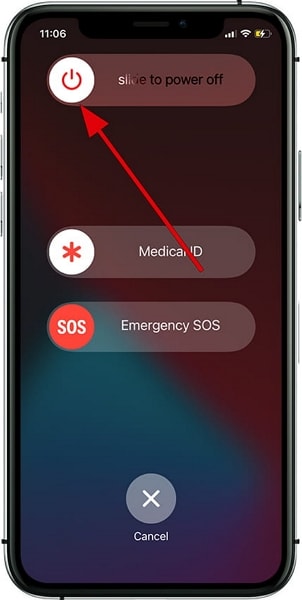
Step 1: If you have an iPhone X or a later model, you must press and hold the "Volume Up" and "Power" buttons simultaneously.
Step 2: A screen displaying the slider will emerge on the screen that will help you turn off the device. Hold the "Power" button after a few seconds to restart your iPhone.
Part 3: How to Hard Reset an iPhone
If the soft reset fails or does not respond appropriately, you must look for the next level. The next level holds the method to force restart the iPhone, also referred to as a hard reset. This will help you get your iPhone out of conditions where it is completely stuck. This process does not erase any data across your device but goes towards a stricter and more detailed check of your iOS device. If your iPhone's screen is frozen, try the following steps to hard reset it and make it functional again:
For iPhone 8 or Later Devices
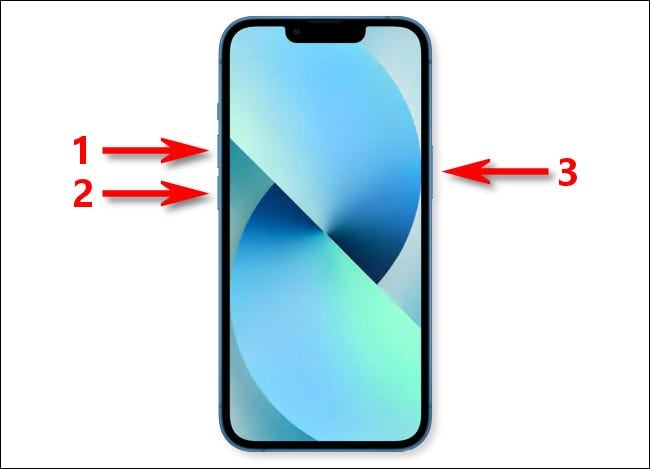
Step 1: Press and release the "Volume Up" button on your iPhone. Following this, do the same with the "Volume Down" button.
Step 2: Next, press and hold the "Power" on the side of your iPhone until the Apple logo appears on the screen.
For iPhone 7 or 7 Plus
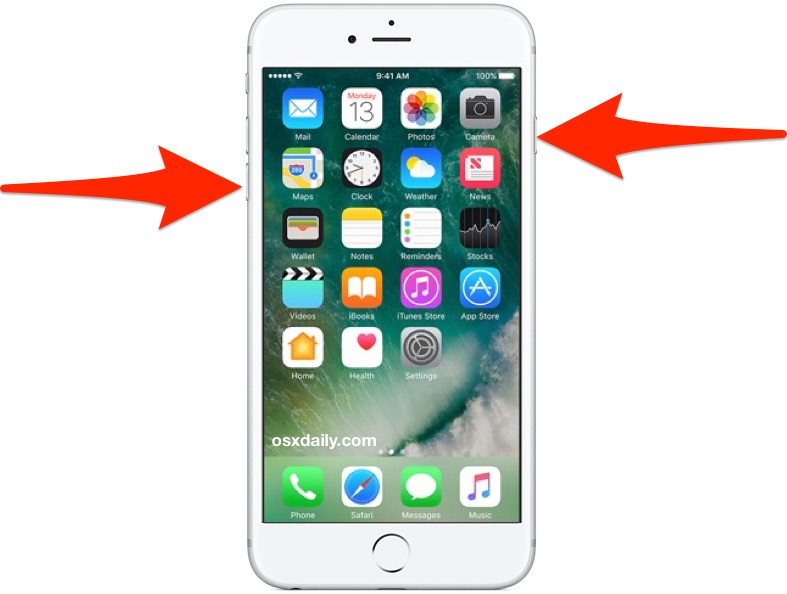
Step 1: If you hold an iPhone 7 or 7 Plus, you need to press and hold the "Volume Down" and "Power" buttons.
Step 2: Keep the iPhone buttons pressed until the Apple logo appears on the screen. This will force the restart of your iPhones successfully.
For iPhone 6 or Earlier Models
Step 1: To force restart an iPhone 6 or earlier model, press and hold the "Power" button on the side and your device's "Home" button.
Step 2: Leave the buttons when the Apple logo appears on the screen, which marks the device being force restarted.
Part 4: How to Factory Reset an iPhone
Soft and hard resetting is one effective way to resolve problems across your iPhone. If the iPhone still keeps up with its problems, the only perfect way to eliminate all concerns is by factory resetting your iPhone. This part will provide a detailed guide on factory resetting the iPhone under different conditions. Before we get straight to the steps, it is essential to be aware of the checklist that needs to be ensured before factory resetting the iOS device.
Preparations For Factory Resetting the iPhone
While you go to factory reset your iPhone without a passcode, there are a few things that you have to ensure. As this process will remove all data from your iPhone, you have to keep a tab on the data and create some kind of backup that can be restored after resetting the device.
You can come across different forms of backup, which varies between iCloud backup and iTunes backup. While there are a few generic forms of backups that you can create, another evident tool named Dr.Fone - Phone Backup provides exclusive services for backing up essential data. The table below shows you a comparison of these backup techniques and helps you in figuring out the differences and characteristics that every method holds against each other:
| iCloud Backup | iTunes Backup | Dr.Fone - Phone Backup | |
| What is the mode of backup? | Requires internet to set up a backup | Requires the device and a USB cable to process | Requires the device to backup and lightning cable or Wi-Fi for connection |
| Can you select data for backup? | Features different options that allow you to devise a customized backup. | Does not offer selective backup options. | It gives a detailed set of options to decide from while backing up data. |
| When and how can you restore backed-up data? | It helps you restore the data when setting up the iPhone. | Restores while setting up the iPhone or after setting it up for some time. | It can be used to restore data across the iPhone at any time. |
| How much data can be backed up? | Provides 5GB free cloud storage, which can rise to 2TB through subscription plans. | Depends on the storage space of the computer in use. | Depends on the storage space of the computer in use. |
| Is the data encrypted during backup? | Encrypts the data whenever it is backed up. | It provides the option of encrypting data when backing up. | It does not encrypt the data that is backed up across the device. |
| How is it processed? | The option of setting up iCloud backup is set across the "Settings" of the iPhone. Specify the type of data that is to be backed up. | Connect your iPhone to the computer and open iTunes to access the option of "Backup." | Connect the iPhone and access the tool to select the specific data type you wish to back up through the device. |
Way 1: How to Factory Reset iPhone with Password
The first technique to have your iPhone reset is the generic and official approach of factory resetting iOS devices. Before any iPhone is put into factory reset, the user must back up their data using appropriate techniques and sign out of Apple ID that is logged into the device. When performing such a permanent act, you should also disable iCloud and Find My services across your iPhone. Once it is ensured, the process to factory reset the iPhone with a password is quite simple and effective:
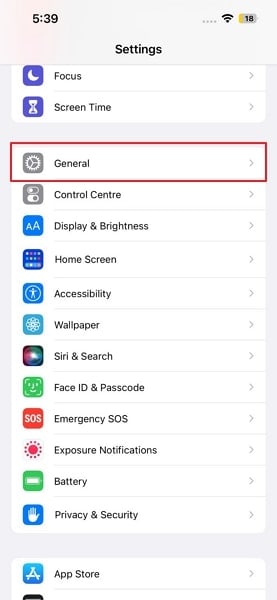
Step 1: Start by accessing the "Settings" of your iPhone. Lead into the "General" settings from the list of options.
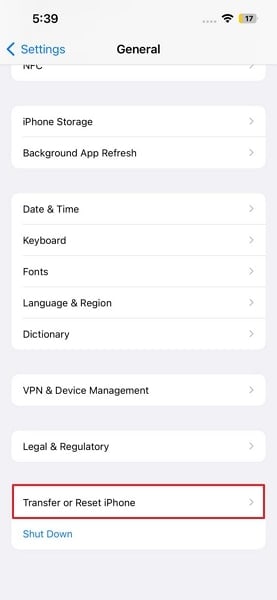
Step 2: As you are redirected to the next screen, click on the "Transfer or Reset iPhone" option to navigate toward the factory reset option.
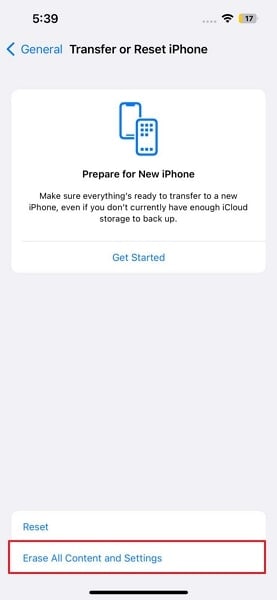
Step 3: Following this, tap on the "Erase All Content and Settings" option on the next screen. Follow the on-screen instructions to factory your iPhone successfully.
Way 2: How to Factory Reset an iPhone without Password
What if you cannot remember the password to your iPhone? When it comes to factory resetting iPhones without a passcode, multiple ways can be employed. While every other method has its approach, the result is the same in all cases. In this section, we shall see how an iPhone can reset without a password. Practicing these processes leads to complete data loss; hence, always keep backups.
Method 1: Dr.Fone - Screen Unlock (iOS)
The first technique you can employ to factory reset the iPhone without a passcode is a tool for unlocking the screen. Once you unlock the screen, you can utilize the generic method of factory resetting your iPhone. To unlock the screen successfully, you can consider using Dr.Fone - Screen Unlock (iOS) as the appropriate solution. While it covers major screen unlock scenarios, it efficiently executes the task in seconds. To understand the process of using Dr.Fone - Screen Unlock (iOS), look into the steps provided below:
Dr.Fone - Screen Unlock
Reset iPhone passcode within 10 min
- The factory reset an iPhone without knowing the passcode.
- Easy-to-follow instructions are provided during the unlock operations.
- The best alternative to iTunes is to remove the iPhone lock screen.
- Support all models of iPhone, iPad, and iPod touch!


Step 1: Start Dr.Fone and Select Screen Unlock
Download and install Wondershare Dr.Fone on your computer and proceed to launch it. Select "Screen Unlock" from the available options on the home screen.

Step 2: Connect the Device and Proceed to Unlock the Screen
Select the Unlock iOS Screen option to initiate the unlocking process. Ensure your device has sufficient battery and then put it into Recovery Mode following the on-screen instructions.

Step 3: Download and Install iOS Firmware
Once in Recovery Mode, the platform will automatically detect your device model. Amend if necessary, select your System Version, and proceed to download the iOS firmware. After successful download and verification, click Unlock Now to begin the unlocking process.

Step 4: Complete the Unlocking Process
Enter the required confirmation code when prompted, and wait as the platform unlocks your device. Once completed successfully, click Done . If the device remains locked, select Try Again to restart the process.

Method 2: Find My iPhone
Find My is another effective technique for accessing your iPhone and performing a factory reset. If the device has an activated Apple ID across it, the phone would be connected to the Find My service. Although it provides the real-time location of the iPhone, it can also be used to reset and erase the iPhone without a password. To perform this, you need to proceed with the following steps:
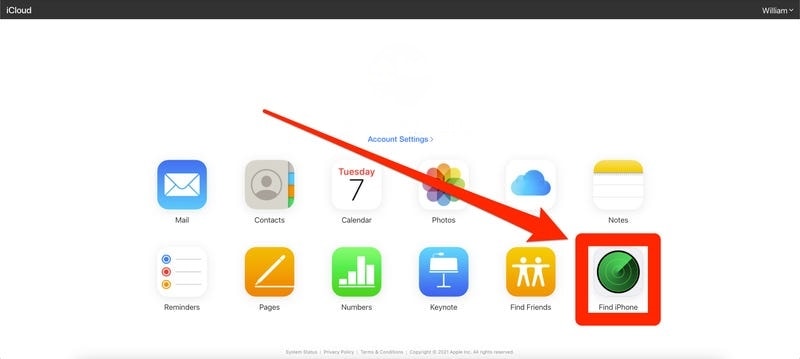
Step 1: Open the official website of iCloud and log in with your Apple ID credentials. As you redirect into the website's main menu, click on "Find iPhone" to proceed with the service.
Step 2: The next screen will display the map and all the devices connected to the Apple ID. Select "All Devices" from the top and select the iPhone that needs reset.
Step 3: A pop-up appears with a list of different performing options. Click on "Erase iPhone" and confirm the action to reset the iPhone within an instant.

Method 3: iTunes
You can also try iTunes to reset your iPhone to factory settings. The only requirement to execute this method is to be connected and synchronized with iTunes. The process is simple and adequate, which can be understood with the steps featured next:
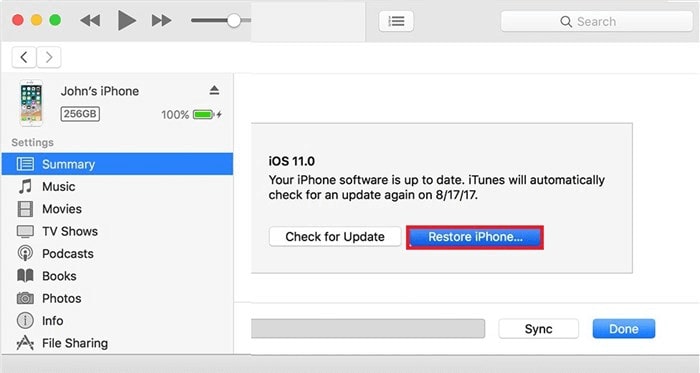
Step 1: You must plug in your iPhone with a lightning cable and launch iTunes on your computer. Proceed into the "Summary" section across the left panel after clicking on the "iPhone" icon.

Step 2: As a new menu opens up on your screen, click "Restore iPhone" and confirm the process for restoring the device.
Step 3: The process will take a while and reset with the data contained in the recent backup. Any change in the device after that backup will be lost.
Method 4: Recovery Mode
Recovery Mode is another impressive direction to resolve the problem of iPhones that cannot be covered with a soft and hard reset. If you want to factory reset your iPhone without a passcode, you can use Recovery Mode to execute the process without putting up a lot of effort. As the process completes itself, you must direct your device in the right direction. For that, it is advised that you should follow the steps as defined below:
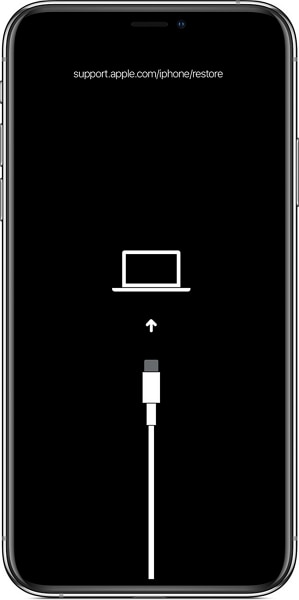
Step 1: Start your computer and make sure iTunes is installed across it. If you use a Mac, you can cover this method with Finder. Make sure that the iPhone is not plugged into the device. As you turn off your iPhone according to your own model, proceed to put your iPhone into Recovery Mode.
Step 2: Before putting the device in Recovery Mode, you must plug it into the computer. The steps of putting the iPhone are similar to performing a force restart. As you hold the "Power" button to execute the process, you must wait until the Recovery Mode screen does not appear across it.
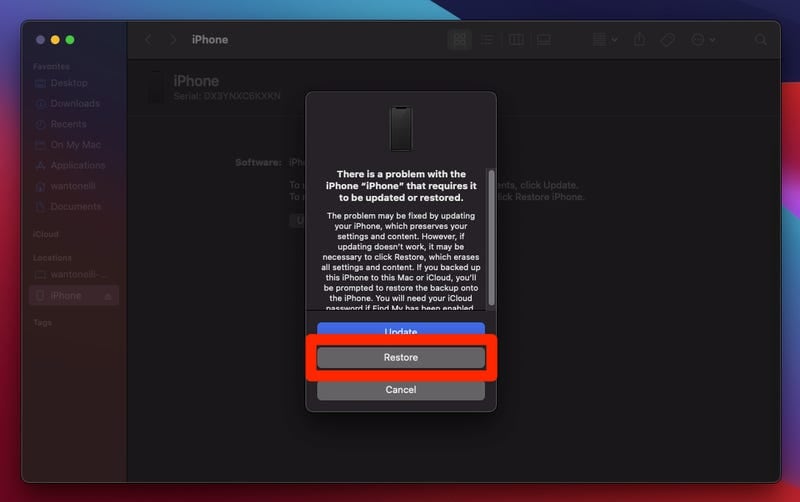
Step 3: Locate the iPhone across Finder or iTunes as per the device you use to reset it. A set of options will appear on your screen where you have to select "Restore" to start the process of factory resetting your iPhone without a passcode.
What Happens When You Factory Reset your Phone?
Every major setting across it gets formatted as the device is reset to its factory settings. The data across the device is not erased basically, but the indexes to these files are hidden. While the original files are ready to be overwritten, they can always be recovered if the phone is not used after being factory reset. The need for a good tool is essential to erase all kinds of data from your phone. Wondershare Dr.Fone - Data Eraser features an excellent tool for this purpose.
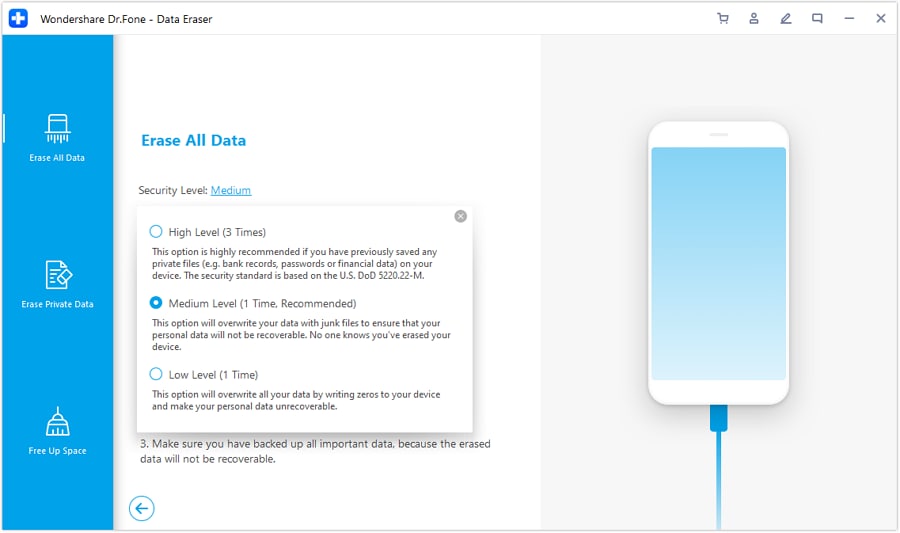
While it is a perfect tool for erasing all kinds of data across an iPhone, it does not keep up the indexes of the original files across the device. This helps you ensure that all your data is protected and cannot be recovered. This is what makes this tool an excellent option for ensuring the security and privacy of your data.
Part 5: How to Fix iPhone Not Working Even After Reset?
The three methods provided are pretty detailed and definite in helping your fix the issues with your iPhone. If the issue persists across your iPhone, the problem lies across the firmware or software that is running across your device. Rather than putting your device through factory settings or restarting it frequently, you may have to change the software settings. For that, the method that would be used would be more definite and deep than what you have been going through in this article.
We believe that using Dr.Fone - System Repair (iOS) is the right step that one can take in such a situation. Reinstalling the firmware across your iPhone might remove all prevailing software concerns and make your device new. While you try to sell out your iPhone to another user, using this technique resets your iPhone deeply and troubleshoots some errors that might not be resolved with simple factory resets.
Restarting an iPhone does not solve many errors compared to this system-repairing tool. In such situations, Dr.Fone - System Repair (iOS) gives you the perfect environment for repairing your iPhone. This part will provide insight into why this tool is a great option to fix an iPhone that does not work even after the reset.
All-in-One iOS Repair Tool
Dr.Fone - System Repair (iOS) has been built to fix major system issues across any iOS device. While it provides 150+ repairing options across the iPhone, which includes the White Apple logo, boot loop issue, iPhone Black Screen issue, Error 1110, and touch screen issues; Dr.Fone - System Repair (iOS) ensures that the user does not have to go through a heap of methods to come across the same result.
While the tool automates most of the process, Dr.Fone - System Repair (iOS) provides a platform allowing users to resolve all major and minor problems with the device. This tool features one of the best interfaces for repairing the iPhone's system errors. There are multiple repair modes and other scenario-based solutions provided across this tool. This is what makes it a special tool for resetting iPhone devices.
Three Prominent Repair Modes
Dr. Fone offers three prominent repairing modes - System Repair (iOS). The following direction provides you with a table with a clear distinction between all repair modes:
| Standard Repair Mode | Advanced Repair Mode | Anti-Recovery Repair Mode | |
| How is data managed across the mode? | Does not deletes the data after the process. | Deletes the data from the device after completion of the process. | Removes the data deeply from the device and makes it completely new. |
| What is the time for processing? | Quick method, takes less time to execute. | It takes considerable time to complete the process. | Takes a lot of time as the process is quite deep and detailed. |
How to Fix Your iPhone to Normal?
We shall now see how you can fix your iPhone to its normal state with the help of Dr.Fone - System Repair (iOS). We shall be trying out the Standard Repair for the complete execution of the process:
Step 1: Access System Repair
Download and install the latest version of Dr.Fone's iOS toolkit on your computer. Once it is launched, lead into the "System Repair" tab from the homepage.
Step 2: Proceed to Repair the iOS
Select "iOS" on the next screen to specify the nature of the device in use. Following this, select "iOS Repair" from the list of options available on the next screen.

Step 3: Initiate the Device Repair Process
Put your iOS device in Recovery Mode. The platform will detect and download the necessary iOS firmware. Click Repair Now to start installation. Once done, select Done.

iPhone Repair Services
Considering the problem still holds shape and cannot be resolved, there is nothing else that you can personally try. This time, you will have to go to the Apple Store to get the device to perfection.
Conclusion
This article has featured some unique approaches to restart your iPhone and resolve the problems that exist across it. While the methods led to complex results, you can consider fixing the problems by force restarting iPhone or factory resetting the iPhone without a passcode. With tools like Dr.Fone - Screen Unlock and System Repair at hand, you won't have difficulty resolving all relevant problems. Keep proper backups of your iOS data and secure everything to perfection.
Dr.Fone Basic:
Better Control for Your Phone
Manage, transfer, back up, restore, and mirror your device


iPhone Reset
- iPhone Recovery Mode
- 1. Exit iPhone Recovery Mode Loop
- 2. iPhone in Recovery Mode
- 3. iPhone Recovery Mode
- 5. Get Data from iPhone in Recover Mode
- 6. Put iPhone in Recovery Mode
- 7. Recuva Data Recovery Review
- 8. DFU Mode vs Recovery Mode
- iPhone DFU Mode
- 1. Put iPhone in DFU Mode
- 2. Enter and Exit DFU Mode
- 3. Get Data from iPhone in DFU Mode
- 4. Tools for iPhone to Enter DFU mode
- 5. Enter/Exit DFU Mode on iPhone X
- 6. Enter/Exit DFU Mode on iPhone SE
- 7. DFU Mode Works on iPhones
- 8. Enter DFU Mode on iPod Touch
- iPhone Factory Reset
- 1. Factory Reset iPhone
- 2. Factory Reset iPhone without iTunes
- 3. Reset iPhone without Passcode
- 4. Reset iPhone Without Apple ID
- iPhone Hard Reset
- 1. Hard Reset VS Soft Reset iPhone
- 2. Hard Reset Without Computer
- 3. Force Restart iPhone
- 4. Restart or Force Restart iPhone
- 5. Hard/Soft/Factory Reset iPhone 8
- iPhone Reset Tips
- 1. Soft Reset iPhone
- 2. Restart or Reboot iPhone
- 3. iPhone Reset All Settings
- 4. Reset iPhone Battery
- 5. Reset iPhone without Apple ID
- 6. Reset Jaibroken iPhone
- 7. Reset Network Settings On iPhone
- 8. Reset Restriction Passcode iPhone
- 9. Restart iPhone Without Power Button
- 10. Turn Off iPhone Without Home Button
- 9. Turn off iPhone without Screen
- 10. Reset Disabled iPhone
- ● Manage/transfer/recover data
- ● Unlock screen/activate/FRP lock
- ● Fix most iOS and Android issues
- Free Download Free Download Free Download


James Davis
staff Editor