How To Turn Off iPhone Without Using the Screen?
Aug 27, 2025 • Filed to: Mobile Tips & Tactics • Proven solutions
It's no secret that things are most likely to get scary when an iPhone's screen stops working. Of course, the first step would be to turn off the device and visit the repair center to get the unresponsive screen fixed. But, if you've been using your iPhone for a while, you may already know that it's not possible to power off the device without using the screen. Even though there's a power button on every iPhone, you won't be able to turn it off unless you swipe the Power slider on your screen. So, what would be your next step to shut down the device?
Fortunately, there are several other solutions to power off an iPhone without using the screen. This article will explain how to turn off the iPhone without touching the screen before you leave it at the repair center. So, without any further ado, let's dive in.
Part 1: How To Turn Off iPhone Without Screen?
Now, when it comes to turning off an iPhone without the screen, you can follow different solutions that are stacked on the Internet. But, in our experience, we found out that the majority of these solutions are nothing but hokum. They either don't work at all or may require the use of the screen at least once. So, after executing rigorous research, we've evaluated the only working solution on how to turn off iPhone without the screen. You can follow these steps and your device will automatically shut down, even if you don't touch the screen at all.
- Step 1. Start by simultaneously pressing the Sleep/Wake and the Home buttons together.
- Step 2. Wait for a few seconds and release these buttons once you see the Apple logo flashing on your screen. Make sure to release the buttons otherwise, your device will initiate the resetting process.
That's it; your iPhone would now have turned off, and you'll be able to leave it at the repair center easily.
Part 2: How to Recover Data When iPhone is Broken?
Now, while the screen becomes unresponsive and your iPhone crashes unexpectedly, you may also end up losing unsaved data during the process. We have two different solutions that'll help you get back the lost files and prevent any data loss if this happens. We'll look at both situations, i.e., when you have a dedicated iCloud/iTunes backup and when there's no backup at all.
Method 1. Use iTunes to Recover Data From an iPhone
Now, you have backed up your iPhone's data using iTunes, you won't have to look around to retrieve the lost files. Simply connect the iPhone to a laptop, and you'll be able to get back everything without any hassle. Let's quickly walk you through the step-by-step process to recover data from an iPhone using the iTunes backup.
- Step 1. If you haven't done it already, install the iTunes application on your system and connect your device to the computer to get started.
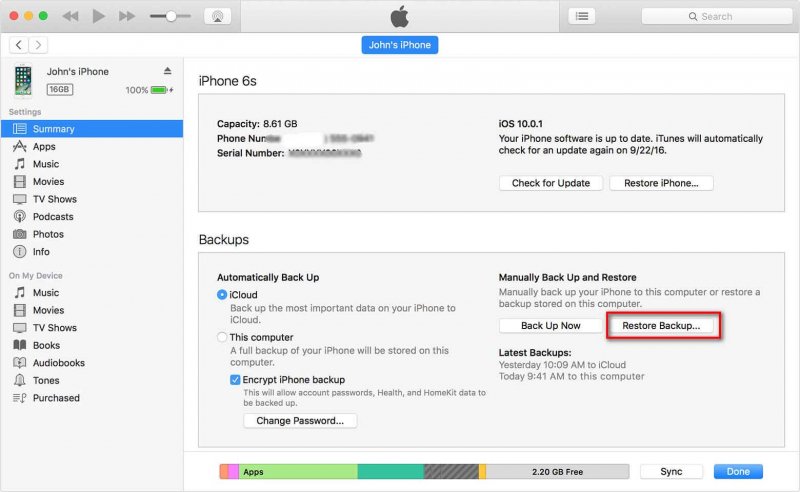
- Step 2. Once the device gets recognized, you'll be able to see its icon on the left menu bar. Here, click the “Summary” tab to proceed further.
- Step 3. Now, click the “Restore Backup” button under the “Backups” tab and let iTunes automatically restore data from the backup file.

Once the process completes, you'll get back all the lost files on your device.
Method 2. Restore iCloud Backup to your iPhone
The next official method is to restore your iCloud backup data to your iPhone. Yes, this may sound absurd now, but it is worth giving a try. There are several reasons that your iPhone screen went unresponsive, it can be due to a software glitch or a hardware malfunction. Therefore, in order to make this method feasible, first you must have data backed up on your iCloud account or else you can directly skip to the next method. Second, you need to first factory reset your iPhone using iTunes and then while setting it up again, you'll have the option to restore an iCloud backup to your device. Let's understand how to get it done.
- Step 1. Connect your iPhone with your PC and launch iTunes.
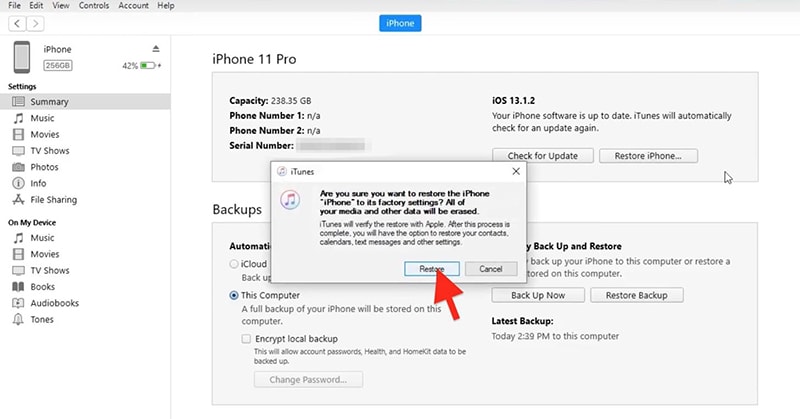
- Step 2. Next, select the Device icon on the left and then get into “Summary” section, followed by tapping the “Restore iPhone” button. Confirm your actions and your device will be restored to the factory state.

Now, your iPhone will simultaneously be updated to the latest iOS version as well. Therefore, if your screen went unresponsive due to some software glitches, it will get fixed, and you can then proceed to restore the iCloud backup.
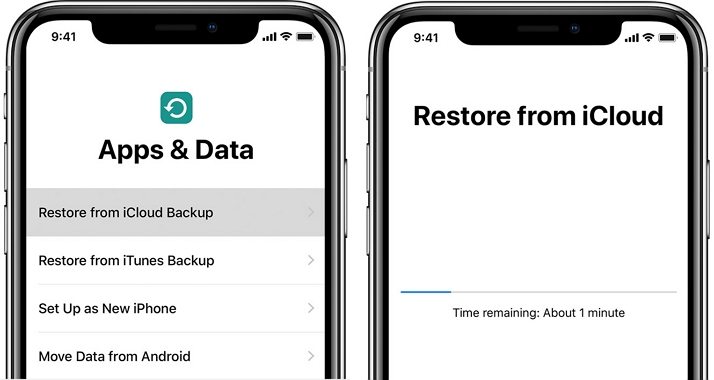
- Step 3. From the “hello” screen, you need to set up your device like you usually do. Just make sure to opt for the “Restore from iCloud Backup” option on the Apps and Data screen.

- Step 4. Lastly, sign in the same Apple ID previously configured with your device and then select the iCloud backup you wish to restore.
Wait for the process to complete. And you're done. Upon completion of the restore, all your data will be back on your iPhone.
Method 3. Use Dr.Fone - Data Recovery Solution
But what if that's not the case, your screen didn't become responsive even after this, and you were not able to complete the iCloud restore due to a hardware malfunctioning screen or a broken screen! Also, if you don't have a dedicated iCloud or iTunes backup, you'll have to look for other solutions to retrieve the lost files. Worry not. One such method uses a data recovery solution such as Dr.Fone - Data Recovery. It's an exclusive data recovery tool for iOS that has the highest recovery rates.
With Dr.Fone Data Recovery solution, you can recover data with or without a backup file. The tool supports both iPhone and iCloud data recoveries, which means you'll be able to get back all your lost files without any hassle.

Dr.Fone - Data Recovery (iOS)
Best alternative to Recuva to recover from any iOS devices
- Designed with the technology of recovering files from iTunes, iCloud, or phone directly.
- Capable of recovering data in serious scenarios like device damage, system crash, or accidental deletion of files.
- Fully supports all the popular forms of iOS devices such as iPhone 15/14/13/12/11, iPad Air 2, iPod, iPad, etc.
- Provision of exporting the files recovered from Dr.Fone - Data Recovery (iOS) to your computer easily.
- Users can speedily recover selective data types without having to load the entire chunk of data altogether.
Why Dr.Fone - Data Recovery is a Better Suitable Option Than iTunes or iCloud in Terms of Data Recovery?
As compared to using iTunes or iCloud backup, choosing a reliable data recovery tool is way more beneficial. Here we have put together a few comparison points that explain why Dr.Fone - Data Recovery (iOS) is an ideal solution for recovering lost files when you can't turn off iPhone without the screen.
- Success Rate
Dr.Fone - Data Recovery has a higher success rate as compared to using the iTunes or iCloud backup. Since the tool fetches the files from the local storage, it doesn't need an iCloud or iTunes backup to get the job done. As a result, you can expect a 100% success rate with Dr.Fone.
- Supports Multiple File Formats
Another reason why Dr.Fone Data Recovery is a better solution to retrieve lost files is the multiple file format support. Be it pictures, videos, documents, or messages or others, you'll be able to recover everything using this tool.
- Recover Files to Computer
Finally, Dr.Fone - Data Recovery also allows users to retrieve files directly to the computer. Since your iPhone's screen is already broken, there is no point in restoring the data on the device itself.
This way, you'll have the liberty to access all these files while your iPhone's screen is getting repaired at the service center. For detailed instructions, please refer to the step-by-step guide at https://drfone.wondershare.com/guide/ios-data-recovery.html.
Conclusion
Even though you can use the two solutions mentioned above to recover data from an iPhone whose screen is not working, it's always a good strategy to have a backup file to make the process more convenient. Simply connect the iPhone to a computer and use iTunes to restore all your files. If you regularly back up your files, you won't have to look for additional solutions to recover the deleted files.
Tips: Wondershare Dr.Fone is a tool that helps you keep your important data safe. It can back up all the important information on your iPhone/iPad/iPod, like photos, music, videos, contacts, and more and is compatible with iOS 9.0 or later. The backup process is easy and only takes a few clicks. You can also restore your backup to any device you want, and choose which data you want to restore. This is a great way to make sure you never lose your important information!
iPhone Reset
- iPhone Recovery Mode
- 1. Exit iPhone Recovery Mode Loop
- 2. iPhone in Recovery Mode
- 3. iPhone Recovery Mode
- 5. Get Data from iPhone in Recover Mode
- 6. Put iPhone in Recovery Mode
- 7. Recuva Data Recovery Review
- 8. DFU Mode vs Recovery Mode
- iPhone DFU Mode
- 1. Put iPhone in DFU Mode
- 2. Enter and Exit DFU Mode
- 3. Get Data from iPhone in DFU Mode
- 4. Tools for iPhone to Enter DFU mode
- 5. Enter/Exit DFU Mode on iPhone X
- 6. Enter/Exit DFU Mode on iPhone SE
- 7. DFU Mode Works on iPhones
- 8. Enter DFU Mode on iPod Touch
- iPhone Factory Reset
- 1. Factory Reset iPhone
- 2. Factory Reset iPhone without iTunes
- 3. Reset iPhone without Passcode
- 4. Reset iPhone Without Apple ID
- iPhone Hard Reset
- 1. Hard Reset VS Soft Reset iPhone
- 2. Hard Reset Without Computer
- 3. Force Restart iPhone
- 4. Restart or Force Restart iPhone
- 5. Hard/Soft/Factory Reset iPhone 8
- iPhone Reset Tips
- 1. Soft Reset iPhone
- 2. Restart or Reboot iPhone
- 3. iPhone Reset All Settings
- 4. Reset iPhone Battery
- 5. Reset iPhone without Apple ID
- 6. Reset Jaibroken iPhone
- 7. Reset Network Settings On iPhone
- 8. Reset Restriction Passcode iPhone
- 9. Restart iPhone Without Power Button
- 10. Turn Off iPhone Without Home Button
- 9. Turn off iPhone without Screen
- 10. Reset Disabled iPhone


Selena Lee
chief Editor