
iPhone DFU Mode Vs Recovery Mode Explained For iPhone Users
Dec 16, 2025 • Filed to: Phone Repair Solutions • Proven solutions
When your iPhone runs into issues, understanding the difference between DFU mode vs recovery mode can be a game-changer for effective troubleshooting. Both modes serve unique purposes, from restoring your device to fixing critical software problems.
This article will compare and contrast iPhone DFU mode vs recovery mode, explaining the differences between the two and providing examples of when to utilize either.
This article will outline all the necessary instructions and advice as to whether your device has stuck, or you want to perform advanced repairs. By the end, you will be familiar with all these modes and be able to fix most iOS issues quickly with ease.

Part 1. Knowing the Difference Between Recovery and DFU Mode
1-1. What is iPhone Recovery Mode?
Recovery mode is integrated, enabling your iPhone to connect to iTunes or the new Finder, facilitating the restoration of the device to factory settings or the update of the existing system. This mode engages iBoot, the iOS Bootloader, to validate all the versions of installed iOS. Upon entering the mode, a screen will appear inquiring about the method to connect to a computer.

1-2. When Should You Use Recovery Mode?
In the following circumstances, you ought to think about utilizing Recovery Mode:
- For several minutes, your iPhone is sluggish and stuck on the Apple logo without displaying a progress bar.
- The device fails to be recognized by iTunes, or iTunes indicates that the phone is in Recovery Mode.
- A screen that says "Connect to iTunes" appears on your iPhone.
Additionally, Recovery Mode may be required in less common cases, such as:
- Because you can't remember your passcode, you'll have to factory reset your iPhone. This will completely reset the device, erasing all data and setting it up like new.
- You lack the passcode necessary to disable USB Restricted Mode.
- A previous jailbreak is preventing an update or upgrade from being installed.
- You want to remove traces of a jailbreak and restore the operating system to a clean state.

1-3. What is iPhone DFU Mode?
When your iPhone is in DFU mode, you can use Finder or iTunes without having to launch the operating system or iBoot. This enables you to downgrade the iOS version or run custom firmware, among other minor firmware modifications. It requires very accurate timing and button sequences to enter the DFU mode. In this mode, the screen will stay blank.

1-4. When to Use DFU Mode?
Device Firmware Update (DFU) Mode is necessary in several situations:
- Repairing a corrupted bootloader: DFU Mode enables you to reinstall software on a Mac or Windows computer if the bootloader on your iPhone is damaged.
- Firmware updates and downgrades: Use DFU Mode to upgrade from a beta iOS version or revert to a previous one.
- Jailbreaking or undoing a jailbreak: DFU Mode is often used to jailbreak your iPhone or remove the jailbreak, especially when the process requires tethering.

1-5. Key Differences Between DFU and Recovery Modes
The primary difference between DFU mode and Recovery mode lies in their interaction with the device's bootloader:
- Recovery Mode: Utilizes iBoot to ensure that only signed firmware versions are installed, preventing downgrades to older iOS versions.
- DFU Mode: Bypasses iBoot, allowing for more flexibility, such as downgrading firmware or installing custom firmware.
Due to its capabilities, DFU mode is often used for more complex troubleshooting, while Recovery mode is suitable for standard restores and updates.
Part 2. How to Enter/Exit iPhone DFU Mode
2-1. Entering DFU Mode
The method for entering or exiting DFU Mode varies depending on the iPhone model.
For iPhone 6 and Earlier:
- Using a USB cord, connect the iPhone to a computer running iTunes, then start iTunes.
- Turn off the device, and hold both the Home and Lock buttons together for 5 seconds.
- Hold down the Home button while releasing the Lock button until iTunes recognizes a phone that is in recovery. One significant distinction between DFU and Recovery Mode on the iPhone is that the screen will remain dark.

For iPhone 7 and 7 Plus:
- Use a USB cord to connect the iPhone to your PC, then launch iTunes.
- At the same moment, press and hold the Side and Volume Down buttons.
- Holding down the Volume Down button, release the Side button.
- iTunes will notify you of a device in recovery mode, but your screen should remain black, showcasing another distinction in Recovery Mode vs DFU.

For iPhone 8 and Later:
- Start by connecting the iPhone to a computer using a USB cable and opening iTunes.
- The Volume Up and Volume Down buttons should be pressed and released quickly.
- Hold the Side button until the screen goes dark, then press both the Volume Down and Side buttons together.
- Let go of the Side button after five seconds, but keep holding down the Volume Down button for ten more.
- iTunes will detect a device in recovery mode while the iPhone’s screen remains black, highlighting the subtle variations in iPhone Recovery Mode vs DFU Mode.

2-2. Exiting DFU Mode
The steps to exit DFU Mode also differ by device, underscoring how DFU vs Recovery Mode iPhone processes are tailored to specific models.
- iPhone 8 or later: Press and quickly release the Volume Up button; press and quickly release the Volume Down button; press and hold the Side button until your device restarts.
- On iPhone 7 and 7 Plus: hold down both the Side and Volume Down buttons until your phone restarts.
- iPhone 6 and older: Press and hold both the Home and Lock buttons at once until the device restarts.
Part 3: How to Enter/Exit iPhone Recovery Mode
3-1. Manually Enter Recovery Mode
Follow these steps to manually access Recovery Mode on your iPhone.
For iPhone 6 and Earlier:
- Launch the app after you've connected your iPhone to a computer running iTunes.
- Simultaneously press the Home and Lock buttons on the top or side of the phone.
- Even when the Apple logo shows, continue to hold down both buttons. Only when Recovery Mode appears on the screen may you release them.
- You’ll see the Update and Restore options in iTunes.

For iPhone 7 and 7 Plus:
- Connect your iPhone to a PC, then open iTunes.
- Both the Volume Down button and the Side button should be pressed and held simultaneously.
- Keep pressing after the Apple logo appears, and release only when Recovery Mode is displayed on the phone screen.
- iTunes will then prompt you with Update and Restore options.

For iPhone 8 and Later:
- Launch iTunes once you've connected your iPhone to a computer.
- The Volume Up button should be pressed and released quickly.
- Do the same with the Volume Down button.
- Even when the Apple logo shows, keep pressing and holding the Side button.
- Press and hold the Side button until the Recovery Mode screen appears.
- iTunes will offer the choice to Update or Restore the device.

3-2. Exit iPhone Recovery Mode
When your iPhone restarts after a successful restore, it will automatically exit Recovery Mode. If no restore is needed, you can still exit Recovery Mode manually. This is helpful when comparing DFU vs Recovery Mode iPhone for troubleshooting.
- If you're using an iPhone 8 or later, push and release the volume up button quickly, followed by the volume down button. Once you see the Apple logo, release your grip on the side button.
- When the Apple logo appears on an iPhone 7 or 7 Plus, press and hold the Side button in addition to the Volume Down button. Release both buttons at the same time.
- For iPhones 6 and older, simultaneously press and hold the Home and Power buttons. When you see the Apple logo, let go of it.
Part 4: Resolve iPhone Stuck in Recovery or DFU Mode
Whether it's a software or hardware problem, your iPhone can become trapped in Recovery Mode or DFU Mode. Dr.Fone - System Repair (iOS) provides a trustworthy answer to this problem. This expert-level program is compatible with both iOS and iPadOS and can fix more than 150 different problems with your system.
Use Dr.Fone - System Repair (iOS) to get out of Recovery Mode without paying a dime if your iPhone gets trapped there. If you'd rather not take the chance of losing data while fixing the issue, you can use the regular repair mode. Fixing system issues on your iOS device is a breeze with this tool—all it takes is a few minutes and no technical knowledge.
With these essential capabilities and more, Dr.Fone - System Repair (iOS) is a versatile solution for controlling device difficulties. It also offers alternatives to upgrade or downgrade your iOS system software.

Dr.Fone - System Repair (iOS)
Resolve iPhone Stuck in Recovery or DFU Mode.
- Only fix your iOS to normal, no data loss at all.
- Fix various iOS system issues stuck in recovery mode, white Apple logo, black screen, looping on start, etc.
- Upgrade and Downgrade iOS without iTunes at all.
- Work for all iPhone/iPad/iPod Touch, running on all iOS versions
Steps To Exit Recovery Mode
Step 1: Download and Install Dr.Fone
For PCs and Macs, get Dr.Fone - System Repair (iOS). Launch the program and go to the main menu. From there, choose System Repair.

Step 2: Connect Your Device
Use a USB cable to link your iOS device—iPhone or iPad—that has entered recovery mode to a computer. To exit recovery mode, go to the menu and pick iPhone, then Toolbox Repair.
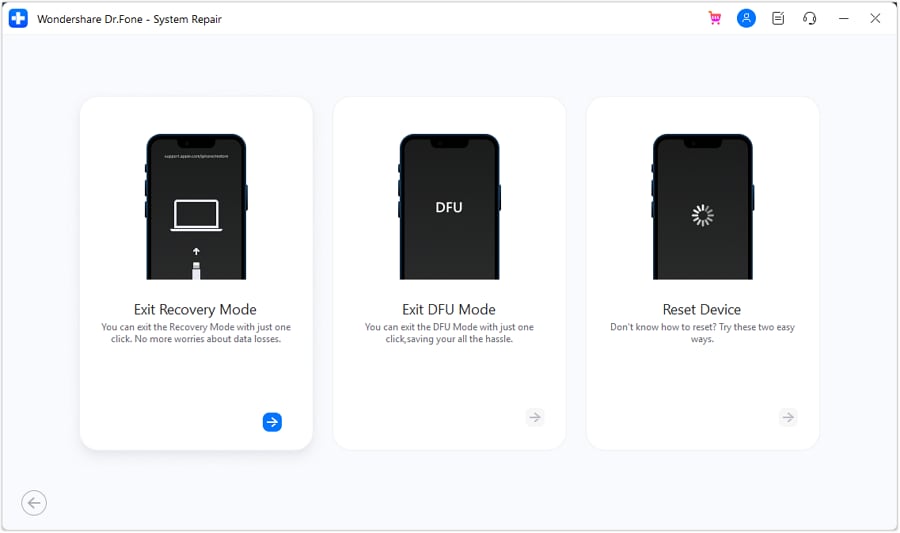
Step 3: Exit Recovery Mode
A window will appear showing what your device looks like when stuck in recovery mode. Click on the Exit Recovery Mode button to proceed.
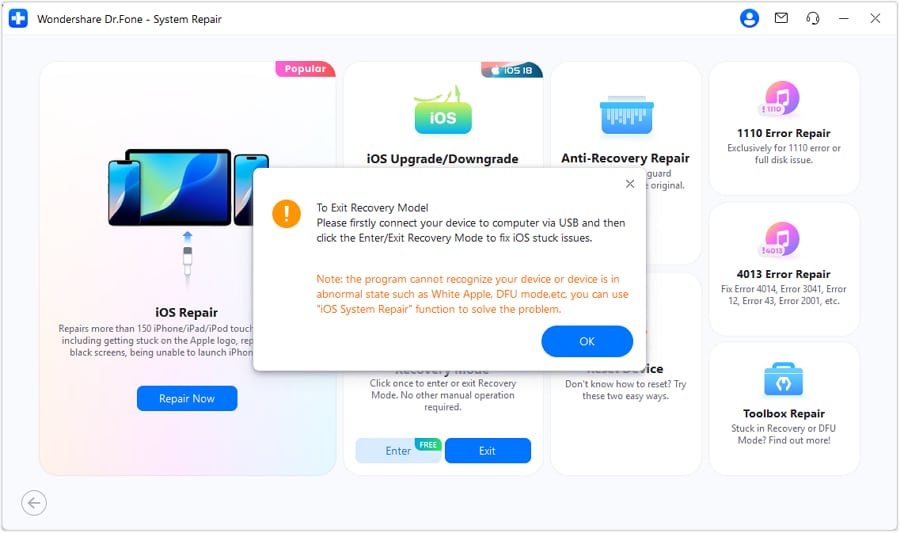
Step 4: Confirm Success
Following a brief procedure, the notification "Exited Recovery Mode successfully" will be shown on your screen. Take your iPhone away from the computer and use it normally.
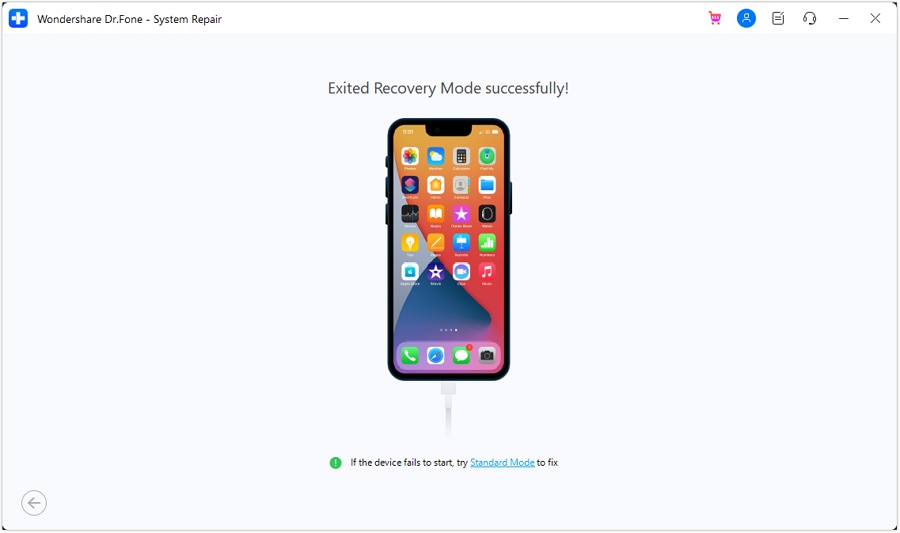
Without losing any data, you may fix any smartphone following these methods. This includes iPhone 7 and all the way up to iOS 18. This solution works even in challenging scenarios like water damage or failed updates.
Steps To Exit DFU Mode (Free Service)
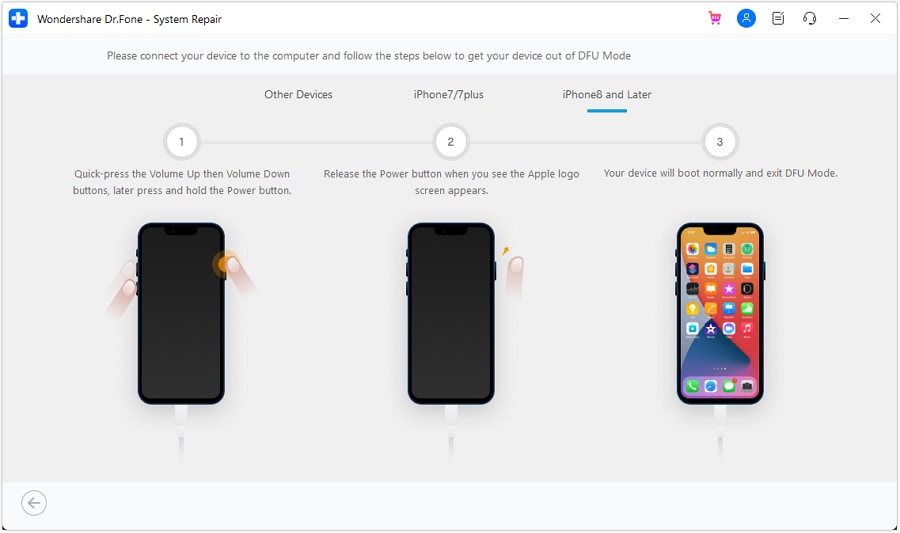
A special function in Dr.Fone-System Repair (iOS) makes it easy for users to get out of DFU mode. Use these straightforward steps if your iOS device has accidentally become locked in DFU mode:
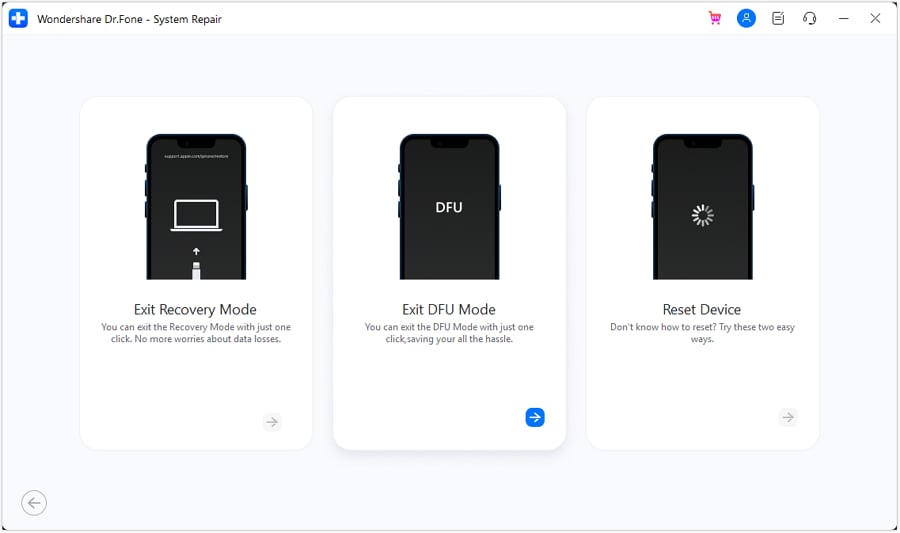
Step1: Select the Exit DFU Mode Option
Access the Toolbox Repair feature within Dr.Fone - System Repair (iOS). On the next screen, choose the "Exit DFU Mode" option to proceed.
Step 2: Follow the On-Screen Instructions
To escape DFU mode, follow the on-screen instructions. Make sure you follow the instructions to precisely after selecting your iPhone model from the drop-down menu.
Conclusion:
Understanding the difference between DFU Mode and Recovery Mode is important in troubleshooting iPhones. Both modes serve different purposes: Recovery Mode is meant to handle most of the common issues, such as updating and resetting, while DFU Mode provides more advanced solutions like firmware downgrading or repairing serious software problems. Knowing when to use it can save time and prevent loss of data.
To facilitate efficient repairs and enhance user experience, tools such as Dr.Fone - System Repair (iOS) prove to be extremely beneficial. Whether addressing problems associated with iPhone DFU Mode in contrast to Recovery Mode or managing intricate malfunctions, this tool streamlines the procedure. Due to its adaptability, it represents a dependable choice for iOS troubleshooting and system administration.
4,624,541 people have downloaded it
iPhone Reset
- iPhone Recovery Mode
- 1. Exit iPhone Recovery Mode Loop
- 2. iPhone in Recovery Mode
- 3. iPhone Recovery Mode
- 5. Get Data from iPhone in Recover Mode
- 6. Put iPhone in Recovery Mode
- 7. Recuva Data Recovery Review
- 8. DFU Mode vs Recovery Mode
- iPhone DFU Mode
- 1. Put iPhone in DFU Mode
- 2. Enter and Exit DFU Mode
- 3. Get Data from iPhone in DFU Mode
- 4. Tools for iPhone to Enter DFU mode
- 5. Enter/Exit DFU Mode on iPhone X
- 6. Enter/Exit DFU Mode on iPhone SE
- 7. DFU Mode Works on iPhones
- 8. Enter DFU Mode on iPod Touch
- iPhone Factory Reset
- 1. Factory Reset iPhone
- 2. Factory Reset iPhone without iTunes
- 3. Reset iPhone without Passcode
- 4. Reset iPhone Without Apple ID
- iPhone Hard Reset
- 1. Hard Reset VS Soft Reset iPhone
- 2. Hard Reset Without Computer
- 3. Force Restart iPhone
- 4. Restart or Force Restart iPhone
- 5. Hard/Soft/Factory Reset iPhone 8
- iPhone Reset Tips
- 1. Soft Reset iPhone
- 2. Restart or Reboot iPhone
- 3. iPhone Reset All Settings
- 4. Reset iPhone Battery
- 5. Reset iPhone without Apple ID
- 6. Reset Jaibroken iPhone
- 7. Reset Network Settings On iPhone
- 8. Reset Restriction Passcode iPhone
- 9. Restart iPhone Without Power Button
- 10. Turn Off iPhone Without Home Button
- 9. Turn off iPhone without Screen
- 10. Reset Disabled iPhone


Daisy Raines
staff Editor
Generally rated4.5(105participated)