Recover photos, messages, WhatsApp, and more — no backup
needed.
Recover photos, messages, WhatsApp, and more — no backup
needed.

 100% Security Verified | No Subscription Required | No Malware

 :
: 
 ChatGPT
 Perplexity
 Gemini
 Claude
 Grok
Grok
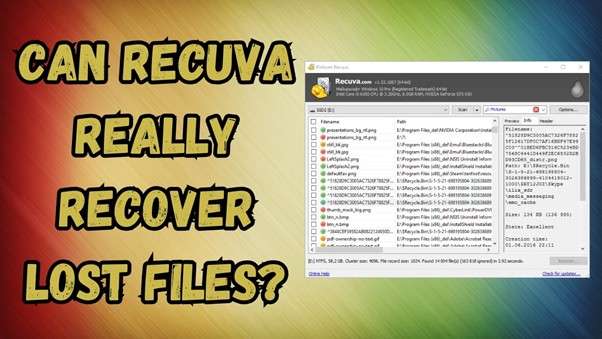
Losing crucial files can trigger immense panic, especially when a reliable backup system is not in place. For many years, Recuva has remained a highly recommended utility that claims to salvage deleted files from local hard drives, USB flash drives, and external memory cards. The tool guarantees an effortless extraction process, whether your data was accidentally erased, lost due to a sudden system crash, or wiped during a quick format.
But does this veteran software still hold up to modern standards in 2026? In this comprehensive review, we put the software to the test to evaluate its real-world recovery performance. We will dive deep into its core features, analyze its pros and cons, and help you determine whether the Recuva download is genuinely worth your time and potential investment.
In this article
Part 1. Recuva Review: A Complete Analysis of Its Features & Performance
When selecting a dependable file retrieval mechanism, closely examining its technical parameters and scanning consistency is paramount. Over the years, this application has established a widespread reputation, but users must evaluate its modern-day viability. By thoroughly analyzing its functionality, you can decide whether initiating a Recuva software download aligns with your specific retrieval requirements.
1-1. A Brief Overview of Recuva Data Recovery
Initially developed by Piriform, this application is a staple for individuals needing to rescue vanished files from diverse local storage setups. It relies on a simplistic, intuitive framework that ensures even individuals with limited technical proficiency can navigate the restoration process effortlessly. Recuva data recovery is optimized to trace back deleted documents, high-resolution photographs, video clips, and emails, proving beneficial against accidental deletion and minor directory corruption.
The program is fundamentally divided into two tiers. A generous free version provides baseline extraction capabilities, which is typically sufficient for minor accidents. Alternatively, purchasing the Professional edition unlocks an extended suite of features, including virtual hard drive scanning and prioritized developer assistance, granting advanced users a wider safety net.
1-2. 6 Essential Features of Recuva Software for PC
This desktop utility houses an array of practical functions bundled within an incredibly lightweight installation package. It rarely overburdens system resources, making it ideal for older workstations. Here are six standout attributes of the Recuva software for PC:
- Comprehensive File Recovery: The engine is engineered to identify and restore a wide spectrum of extensions, including Microsoft Office documents, multimedia formats, and compressed archives stored on traditional HDDs or SD cards.
- Deep Scan Algorithm: For sectors where standard scanning fails to detect any remnants, the integrated Deep Scan meticulously analyzes the drive byte-by-byte to reconstruct fragmented files.
- Secure Overwrite Protocol: Ironically, alongside retrieval, the software offers a military-grade deletion module. This function deliberately overwrites sectors, guaranteeing that highly sensitive files remain unrecoverable by anyone.
- Portability Option: A distinct portable build allows users to execute the program directly from a USB stick, bypassing the installation sequence that might overwrite the very files they are trying to save.
- Virtual Drive Integration: Exclusive to the paid tier, the application can mount and scan virtual hard drives (VHD), an essential trait for IT professionals running virtualized Windows environments.
- Priority Technical Support: Subscribers of the Pro edition receive rapid-response troubleshooting from the development team, minimizing critical downtime during data emergencies.
1-3. Benefits and Drawbacks of Using Recuva Recovery Software
Every digital utility presents a unique set of trade-offs. While the application is celebrated for its straightforward, no-nonsense interface, successful extraction is heavily dependent on the physical state of the storage media. Assessing the strengths and weaknesses of this tool is essential before initiating any intensive scan.
- Offers an exceptionally capable free version with unlimited data volume restoration.
- The user interface is minimalist, utilizing a step-by-step wizard to guide beginners seamlessly.
- Standard scanning is lightning-fast, drastically cutting down on waiting periods.
- Includes a built-in file shredder to permanently destroy confidential documents.
- The installation footprint is minimal, ensuring it operates smoothly on outdated hardware.
- Struggles significantly with severely corrupted sectors or drives that have been heavily overwritten.
- Strictly limited to Windows platforms; no compatibility with macOS or Linux operating systems.
- Lacks modern advanced features like RAID array reconstruction or specialized database repair.
- Users of the free version do not receive any official customer support or automatic patches.
1-4. What Are the Differences Between Recuva and Recuva Pro
Determining whether the cost-free iteration is adequate or if a premium upgrade is warranted depends entirely on your specific disaster scenario. To assist you in making an informed decision, we have mapped out the primary disparities between the standard version and the Professional counterpart.
| Feature Set | Recuva Free | Recuva Professional |
|---|---|---|
| Standard File Retrieval | ||
| Deep Scan Algorithms | ||
| Secure File Overwrite | ||
| Virtual Hard Drive (VHD) Mount Support | ||
| Automated Background Updates | ||
| Premium Customer Assistance | ||
| Estimated Price Tag | Free Forever | $24.95 |
Part 2. How To Use Recuva Data Recovery Software on Your Windows PC
One of the primary reasons behind the widespread popularity of this tool is its highly approachable interface. The built-in wizard takes the guesswork out of the restoration process, making it simple to fetch lost items. After completing the Recuva download and finishing the installation on your Windows desktop, adhere to the sequence below to reclaim your missing data:
Step 1 Initiate the Wizard and Select File Types
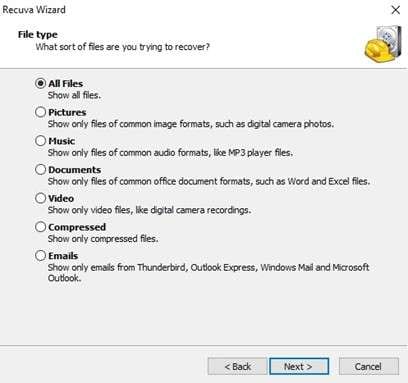
Launch the application from your desktop. Immediately, you will be greeted by the welcoming wizard. Click "Next" to bypass the intro screen. You will then be prompted to specify the exact category of the files you are hunting for, such as Pictures, Music, Documents, or Video. If you are uncertain, simply select "All Files" to broaden the search scope, and then press "Next."
Step 2 Pinpoint the Original Storage Location
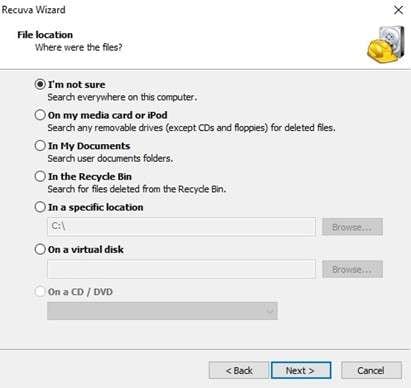
The program will ask where the missing items were last stored. You can navigate directly to a specific folder, select an external USB drive, or check the Recycle Bin. If the exact location escapes your memory, choose the "I'm not sure" option. This commands the software to inspect the entirety of your connected computer drives.
Step 3 Activate Scanning Algorithms
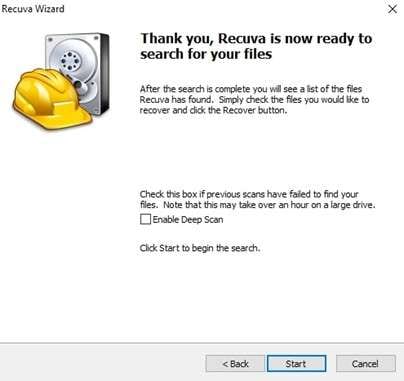
Before kicking off the process, you have the option to enable "Deep Scan." This is highly recommended if a standard quick scan previously failed to yield results, though it will significantly increase the scanning time. Click "Start" to authorize the software to begin probing your drive's sectors.
Step 4 Review and Export the Rescued Data
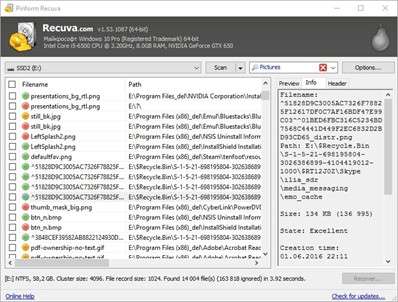
Once the analysis concludes, a structured list of detected files will populate the screen, alongside color-coded indicators representing their structural integrity (Green means excellent, Red means unrecoverable). Check the boxes next to the viable files you wish to rescue. Finally, click the "Recover" button and designate a safe output directory, crucially, ensure this destination is on a completely different drive to prevent localized overwriting.
Part 3. The Best Alternative to Recuva To Recover Data From iPhone [All Models]
While the aforementioned software holds its ground as a sturdy PC utility, a massive limitation is its complete incompatibility with smartphones. Mobile users desperate to rescue missing media or messages from an Apple device require a sophisticated, dedicated platform. For such precise operations, Dr.Fone – Data Recovery (iOS) emerges as a premier alternative, expertly addressing the gaps left by traditional desktop tools.
Engineered to communicate seamlessly with Apple's architecture, this robust toolkit tackles scenarios involving accidental deletion, water damage, or iOS firmware crashes. It effortlessly retrieves high-value information, including WhatsApp chat histories, iMessage logs, contacts, and camera roll photos. The interface is meticulously crafted so that even individuals unfamiliar with data extraction can salvage their digital assets.
Moreover, Dr.Fone avoids the "one-size-fits-all" approach by offering three distinct scanning modalities: directly reading the device's internal memory, extracting specific fragments from iTunes backups, or seamlessly downloading encrypted packets from iCloud. Follow these detailed steps to utilize this versatile tool for immediate content retrieval:
Step 1 Launch the Module and Form a Secure Connection
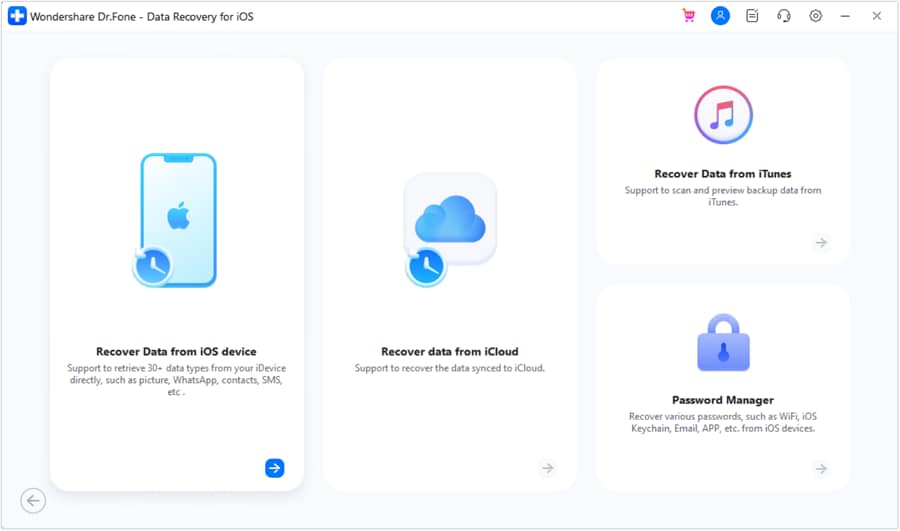
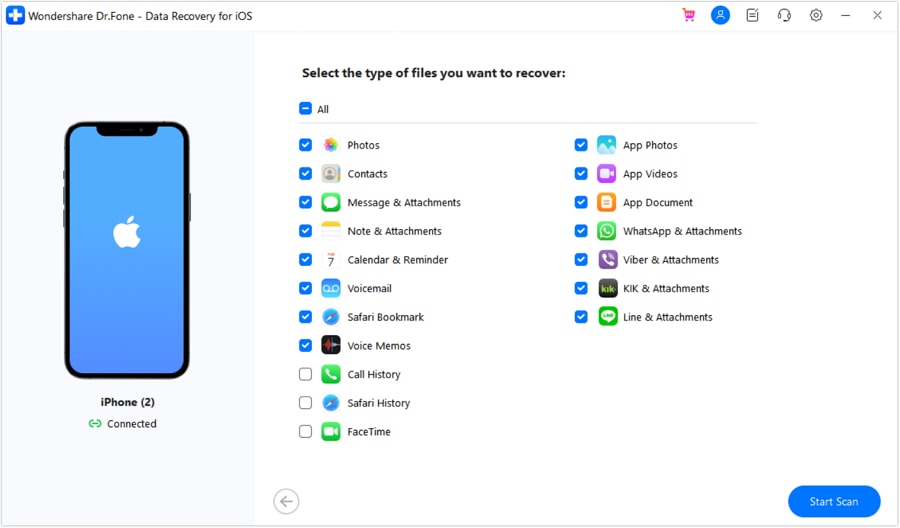
Begin by launching the main interface of Dr.Fone on your computer. Establish a firm physical connection between your iPhone and the PC utilizing an MFi-certified Lightning or USB-C cable. Navigate to the central "Toolbox" tab and click on "Data Recovery." From the prompt, confirm your ecosystem by selecting "iOS," and proceed to click on "Recover Data from iOS Device." You will then be prompted to select the precise data categories you wish the engine to hunt for.
Step 2 Initiate the Deep Device Scan
With your desired parameters established, hit the "Start Scan" trigger. The engine will methodically scrutinize the iOS file system to locate lingering bits of deleted data. Once the procedure wraps up, a neatly organized array of found files will be displayed. Take advantage of the real-time "Preview" function to verify the quality and relevance of the items before committing to the extraction phase.
Step 3 Finalize the Extraction Protocol
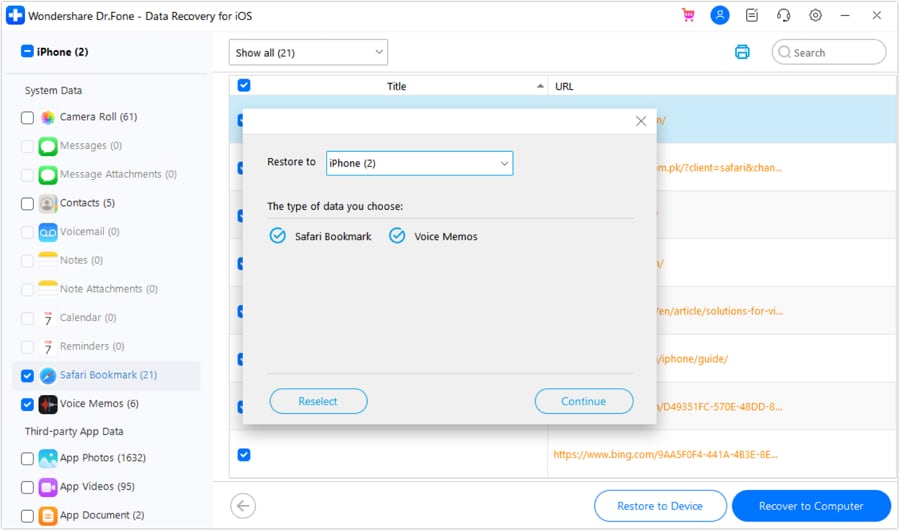
Upon reviewing the files, decide the best storage route. If you wish to seamlessly inject the data back into your smartphone environment, select "Restore to Device" (ensure the Find My feature is temporarily disabled to bypass security blocks). Alternatively, if preserving the data locally on your PC is the goal, click "Recover to Computer," select a secure directory path, and finalize the export.
 Recovers data after deletion, crashes, or device damage.
- Supports photos, messages, contacts, WhatsApp, and more.
- Supports all major iPhone, iPad, and iPod models.
- Preview and recover only what you need.

Part 4. Discover the Most Powerful Data Recovery App To Restore Data on Android
As clarified earlier, a native Recuva Android application simply does not exist for mobile ecosystems. Relying on PC software to scan a modern Android phone often results in frustrating compatibility roadblocks. Therefore, adopting an application explicitly built for the Android OS is paramount. Dr.Fone App for Android serves as a formidable, highly accessible solution for directly restoring erased assets directly from a wide array of mobile handsets.
This dynamic application is heavily equipped to resurrect fragmented data, encompassing high-definition multimedia, crucial PDF documents, and sentimental audio recordings. Whether the erasure occurred due to a chaotic firmware update, an accidental tap, or a rogue application crash, this platform scales effortlessly to meet the challenge. Its extensive compatibility library spans over 6,000 distinct Android iterations, guaranteeing that both vintage devices and modern flagships are thoroughly supported.
Beyond merely acting as a retrieval utility, the Dr.Fone App incorporates advanced sector-level scanning to elevate the statistical probability of a successful rescue. Users can intuitively filter and preview recovered fragments within a sleek gallery interface before committing to a final save location. Dive into the systematic instructions below to effectively operate this Android-specific lifesaver:
Step 1 Install the Mobile Client and Navigate the Menu
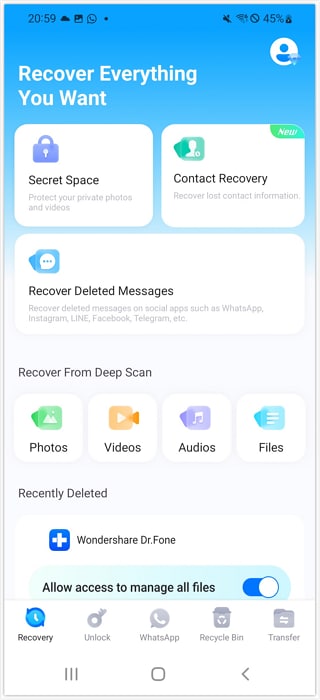
Initiate your rescue mission by securely downloading the Dr.Fone App directly from the Google Play Store. Launch the application from your home screen. On the main dashboard, look toward the bottom navigation bar and tap on the "Recovery" sector. Within this menu, select the specific data classifications listed under the "Recovery from Deep Scan" header that match your missing files.
Step 2 Grant Access Permissions and Execute the Scan
For the application to effectively probe your device's internal NAND memory, you must authorize specific system permissions when prompted. Once granted, the app will instantly launch a rigorous deep scan. As the scan reaches 100%, carefully browse through the categorized tabs (such as Photos, Audio, or Files) to visually locate and confirm your lost items.
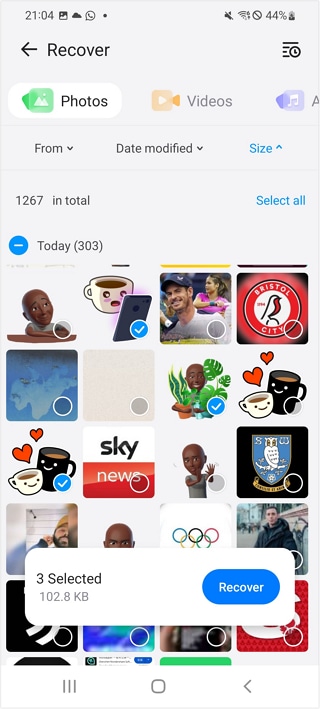
Step 3 Isolate and Secure Your Restored Files
Carefully tick the checkboxes associated with the exact pieces of data you wish to reclaim. Tap the bold "Recover" button to trigger the export sequence. The interface will then present a "Save To" overlay, allowing you to designate a secure localized folder on your phone. You can conveniently review these saved assets at any point by accessing the built-in "Recovery History" log.
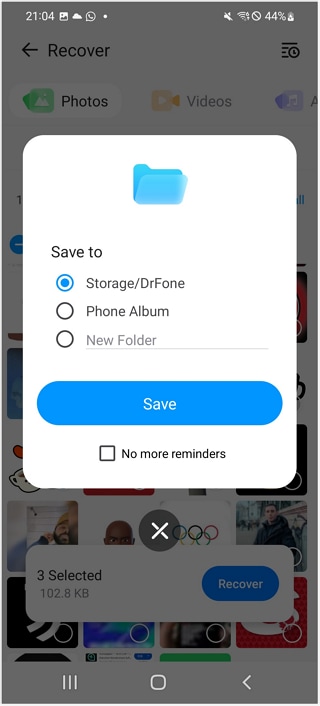
- Scan Android phones and tablets directly.
- Preview and recover only what you want.
- Supports WhatsApp, photos, videos, contacts, and more.
- Works with 6000+ Android devices.
Conclusion
To conclude, realizing that vital documents or irreplaceable memories have vanished can be a deeply stressful ordeal. However, utilizing purpose-built extraction software acts as a dependable failsafe against digital disasters. The classic PC program, Recuva, proves itself to be a competent, cost-effective avenue for standard Windows storage restoration. Yet, its inherent lack of cross-platform mobility leaves mobile users stranded.
If you find yourself needing to recover complex datasets from a smartphone in 2026, transitioning to a specialized mobile toolkit is strictly necessary. Apple users should lean toward the highly optimized Dr.Fone – Data Recovery (iOS) to dissect iTunes/iCloud backups and device memory. Conversely, the Dr.Fone App - Data Recovery (Android) stands as an unrivaled asset for the Android ecosystem, boasting sweeping compatibility and robust retrieval success rates to ensure your critical files are never permanently lost.




FAQ
1. Can you use Recuva on an iPhone to restore data?
Unfortunately, no. The software was strictly engineered to interact with Windows-based file systems like NTFS and FAT32. It fundamentally cannot mount or decode iOS architecture. Apple users searching for a mobile equivalent should deploy a dedicated iOS solution, such as Dr.Fone, to reliably retrieve media from internal storage or encrypted iCloud backups.2. Is there an official Recuva app available for Android mobile phones?
There is no official application titled "Recuva Android" listed on the Google Play Store or endorsed by Piriform. While you can physically remove a microSD card from an Android device, connect it to a Windows PC via a card reader, and scan it with the desktop tool, you cannot scan the phone's internal memory directly.3. Does this recovery utility function on Apple Mac devices?
No, the software operates exclusively within the Windows ecosystem and lacks any executable build for macOS or Linux. Individuals utilizing a MacBook or iMac must seek alternative, Mac-compatible data restoration software tailored to handle APFS or Mac OS Extended formats efficiently.4. Is it safe to install the software on the same drive where data was lost?
It is highly dangerous to install any recovery software, including this one, onto the exact partition from which you are attempting to salvage data. Doing so runs a massive risk of permanently overwriting the deleted files. Always install the software on a secondary drive or utilize the portable version on a USB thumb drive.
 Add Wondershare Dr.Fone as a preferred source on Google