How to Enter and Exit DFU Mode of iOS Device

Jun 30, 2026 • Filed to: Phone Repair Solutions • Proven solutions
 TL;DR:
Putting an iPhone into DFU mode requires an updated iTunes or Finder connection and specific hardware button sequences to resolve deep system errors, but it inherently causes complete data loss by returning iOS to factory settings.
● You must connect the device using a genuine USB cable to iTunes for Windows and older macOS versions, or use Finder if running macOS Catalina and later.
● Entry and exit combinations vary strictly by model: iPhone 6s and earlier use Power and Home buttons, iPhone 7 and 7 Plus rely on Power and Volume Down, while iPhone 8, X, and later require sequential presses of Volume Up, Volume Down, and the Side button.
● Third-party tools like Dr.Fone - System Repair can bypass standard DFU data loss using the "Standard Repair" function, but selecting its "Advanced Repair" option will still completely wipe the device data.
Ask AI for a summary
 ChatGPT
 Perplexity
 Gemini
 Claude
 Grok
Grok
DFU (Device Firmware Update) is an advanced state of recovery that people often put their iPhones into for a variety of reasons:
- You can put the iPhone in DFU mode if your device is stuck while updating.
- You can put iPhone in DFU mode if internal data is corrupted and the device is malfunctioning in a way that normal Recovery Mode isn't helping.
- You can put iPhone in DFU mode to jailbreak it.
- You can put iPhone in DFU mode to downgrade the iOS to a previous version.
However, as you'll find out DFU mode iPhone often leads to data loss as it returns your iOS to factory settings. Because of this people are often apprehensive about trying it out. If you don't want to lose your data, another alternative to putting your iPhone in DFU mode is to use a software called Dr.Fone - System Repair, but more on that later.
Read on to learn how to put iPhone in DFU mode.
- Part 1: What you need to do before putting iPhone into DFU mode
- Part 2: How to put iPhone in DFU mode
- Part 3: How to exit iPhone DFU mode
- Part 4: Alternative to put iPhone in DFU mode (No Data Loss)
- Tips: How to selectively restore iPhone after exiting DFU mode
Part 1: What you need to do before putting iPhone into DFU mode
Before putting your iPhone into DFU mode, it's essential to ensure you have everything in place for a successful attempt. Here's what you need to do before you put iPhone into DFU mode:
- Check Compatibility: Make sure you have an iPhone that supports DFU mode. Typically, this mode is available on all iPhone models, but the button combinations may vary slightly between different generations.
- Install iTunes or Finder: Depending on your computer's operating system, ensure you have the necessary software installed. For Windows and older macOS versions, you'll need iTunes. For macOS Catalina and later, you'll use Finder to manage your iPhone.
- Update Software: Ensure your computer's iTunes or Finder is up to date. Having the latest software version helps in ensuring compatibility and a smoother connection with your iPhone.
- Prepare a Genuine USB Cable: Use an official and genuine USB cable to connect your iPhone to your computer. The third-party cables might lead to connectivity issues during the DFU process.
Part 2: How to put iPhone in DFU mode
You can simply put iPhone in DFU mode using iTunes or Finder. This is recommended because iTunes/Finder also allows you to create a backup of your iPhone. It is recommended to back up your iPhone because putting iPhone in DFU mode may lead to data loss, as I already mentioned earlier.
Enter DFU mode on iPhone 6s and earlier:
- Run iTunes or Finder.
- Connect iPhone to a computer using a cable.
- Press the Power and Home buttons simultaneously for 10 seconds.
- Release the Power button, but continue pressing the Home button. Do this for another 10 seconds.
- You'll receive a pop-up message from iTunes or Finder, and you can let go of them.

Enter DFU mode on iPhone 7 and iPhone 7 Plus:
- Connect your iPhone to your computer.
- Press and hold the Volume Down button and the Power button at the same time.
- Release the Power button while continuing to hold the Volume Down button after about 8 seconds.
- If the screen remains black or you see a pop-up message on iTunes or Finder, your iPhone is in DFU mode.

Enter DFU mode on iPhone 8, 8 Plus, X, and later:
- Connect your iPhone to your computer.
- Quickly press and release the Volume Up button. Do the same operation for the Volume Down button.
- Press and hold the Side button until the iPhone screen goes black.
- Continue holding the Side button and simultaneously holding the Volume Down button.
- Release the Side button while continuing to hold the Volume Down button after about 5 seconds.
- If your iPhone screen shows black, it should be in DFU mode.

It's really that simple to put your iPhone in DFU mode!
Alternatively, you can also use a DFU tool to put your iPhone in DFU mode.
Part 3: How to exit iPhone DFU mode
Sometimes it might so happen that your iPhone might get stuck in DFU mode. This means that the DFU mode couldn't restore your iPhone as you'd hoped and now you have to exit your iPhone from DFU mode.
Exit DFU Mode on iPhone 6s and earlier:
To exit DFU mode on iPhone 6s and earlier models, press and hold both the Power button and the Home button until you see the Apple logo on the screen. Once the logo appears, release the buttons. Your iPhone will restart automatically and exit DFU mode.

Exit DFU Mode on iPhone 7 and iPhone 7 Plus:
Exiting DFU mode on iPhone 7 and 7 Plus involves pressing and holding the Power button and the Volume Down button simultaneously until the Apple logo appears on the screen. Once you see the logo, release the buttons. Now, your iPhone should restart and exit DFU mode.

Exit DFU Mode on iPhone 8, 8 Plus, X, and later:
To exit DFU mode on iPhone 8, 8 Plus, X, and later models, quickly press and release the Volume Up button, followed by the Volume Down button. Then, press and hold the Side button until you see the Apple logo on the screen. Once the logo shows, release the Side button. Your iPhone should restart and exit DFU mode successfully.

If you'd like a sure-shot and easy means of exiting iPhone from DFU mode, or of simply fixing your iPhone without DFU mode, and without data loss, then you can read on for the alternative.
Part 4: Alternative to exit iPhone in DFU mode (No Data Loss)
You can use the software Dr.Fone - System Repair (iOS) to either exit DFU mode or to fix all the system errors of your iPhone without having to put iPhone in DFU mode, to begin with. It can also fix your iPhone stuck in DFU mode. When you fix your phone to normal with Advanced Repair on Dr.Fone, the data will be lost. In addition to that, Dr.Fone offers a far more convenient, less time-consuming, and reliable solution.
Dr.Fone - System Repair
Restore iPhone and repair iPhone to normal with ease!
- Simple, safe, and reliable!
- Fix various iOS system issues like recovery mode, white Apple logo, black screen, looping on start, etc.
- Works for all models of iPhone, iPad, and iPod touch.
- Works for all iOS devices. Compatible with the latest iOS version.

- Fully compatible with Windows and Mac.


How to fix system errors without DFU mode using Dr.Fone:
- Launch Dr.Fone. Select "System Repair" > "iPhone" > "iOS Repair".

- You can select "Standard Repair" or "Advanced Repair" to continue.

- Connect your iOS device to a computer and Dr.Fone will automatically detect your iOS device and the latest firmware. You can click on 'Download' now.

- After the download is complete, click on "Repair Now" and it will automatically start repairing your system of any and all errors.

A video guide to fix iPhone system errors without DFU mode:
Join millions of users who have recognized Dr.Fone as the best tool.
Following this, your iOS device will be completely fixed on all aspects without any data loss!
Tips: How to selectively restore iPhone after exiting DFU mode
After exiting DFU mode, you can restore iPhone from iTunes backup, or you can restore iPhone from iCloud backup. However, doing so would mean that you will be restoring your entire iPhone exactly as it had been. But if you would like a fresh start instead, and if you would like to import only the most vital data, then you can use an iTunes backup extractor, and our personal recommendation would be Dr.Fone - Data Recovery.
Dr.Fone - Data Recovery is a really flexible tool with which you can access and view all your iTunes and iCloud backup on your computer. After viewing them, you can select the data that you want to preserve and save it to your computer or iPhone, and get rid of all the junk.
Dr.Fone - Data Recovery (iOS)
Selectively Restore iTunes or iCloud Backup Data!
- Provide three ways to recover iPhone data.
- Scan iOS devices to recover photos, videos, contacts, messages, notes, etc.
- Extract and preview all content in iCloud/iTunes backup files.
- Selectively restore what you want from iCloud/iTunes backup to your device or computer.
- Supports the newest iPhone and the latest iOS version fully!
- Fully compatible with Windows and Mac.
How to selectively restore iPhone backup using Dr.Fone:
Step 1. Select Data Recovery Type.
After you launch the tool, data recovery, you have to select the recovery type. Depending on whether you want to recover data from iTunes or iCloud, you can select either "Recover Data from iTunes" or "Recover Data from iCloud".

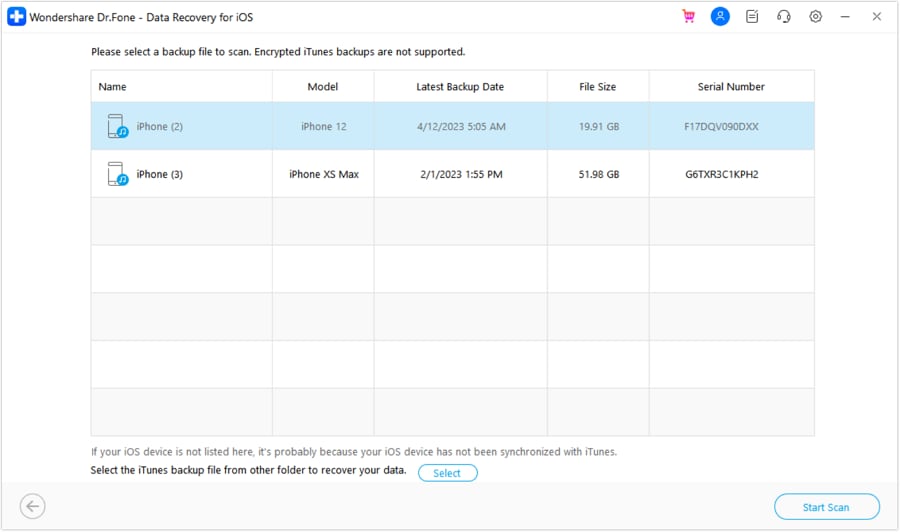
Step 2. Choose the backup file.
You'll find a list of all the different backup files available. Select the one from which you want to recover data. Once you've selected it, click on "Start Scan".
Step 3. Selectively restore iPhone backup.
Now you can browse through your gallery, select the ones you want to save, and then click on "Recover to Computer" or "Restore to Device".
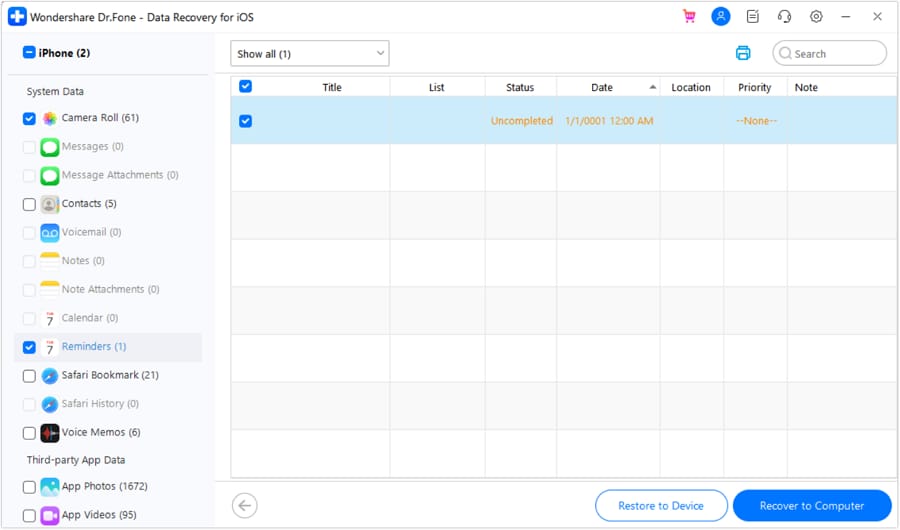
This method will help you restore only the iPhone data that you really want and not all the junk that comes with it.
So now you know how to fix an iPhone by putting the iPhone in DFU mode, you also know how to exit DFU mode if your phone gets stuck. However, as already mentioned this method causes data loss, so our recommendation is for you to use the alternative method of Dr.Fone in order to fix all system errors without any data loss!


iPhone Reset
- iPhone Recovery Mode
- 1. Exit iPhone Recovery Mode Loop
- 2. iPhone in Recovery Mode
- 3. iPhone Recovery Mode
- 5. Get Data from iPhone in Recover Mode
- 6. Put iPhone in Recovery Mode
- 7. Recuva Data Recovery Review
- 8. DFU Mode vs Recovery Mode
- iPhone DFU Mode
- 1. Put iPhone in DFU Mode
- 2. Enter and Exit DFU Mode
- 3. Get Data from iPhone in DFU Mode
- 4. Tools for iPhone to Enter DFU mode
- 5. Enter/Exit DFU Mode on iPhone X
- 6. Enter/Exit DFU Mode on iPhone SE
- 7. DFU Mode Works on iPhones
- 8. Enter DFU Mode on iPod Touch
- iPhone Factory Reset
- 1. Factory Reset iPhone
- 2. Factory Reset iPhone without iTunes
- 3. Reset iPhone without Passcode
- 4. Reset iPhone Without Apple ID
- iPhone Hard Reset
- 1. Hard Reset VS Soft Reset iPhone
- 2. Hard Reset Without Computer
- 3. Force Restart iPhone
- 4. Restart or Force Restart iPhone
- 5. Hard/Soft/Factory Reset iPhone 8
- iPhone Reset Tips
- 1. Soft Reset iPhone
- 2. Restart or Reboot iPhone
- 3. iPhone Reset All Settings
- 4. Reset iPhone Battery
- 5. Reset iPhone without Apple ID
- 6. Reset Jaibroken iPhone
- 7. Reset Network Settings On iPhone
- 8. Reset Restriction Passcode iPhone
- 9. Restart iPhone Without Power Button
- 10. Turn Off iPhone Without Home Button
- 9. Turn off iPhone without Screen
- 10. Reset Disabled iPhone
- ● Manage/transfer/recover data
- ● Unlock screen/activate/FRP lock
- ● Fix most iOS and Android issues
- Free Download Free Download Free Download


Alice MJ
staff Editor
Generally rated4.5(105participated)