
How to Exit iPhone Recovery Mode: A Step-by-Step Guide
Dec 16, 2025 • Filed to: Phone Repair Solutions • Proven solutions
Is your iOS device stuck in recovery mode? Are you trying your hard to get out of it? If yes, then you have come to the right place!
Many iPhone users face this issue. It can happen any time, whether your phone update failed or while troubleshooting. But the good news is, several ways can help you come out of it. You just need a little patience and the right approach.
In this guide, we will take you through a step-by-step guide to fix it and make your device work normally. There is no need for technical skills or complicated tools.
Let's get started!
Part 1. What is iPhone Recovery Mode?
iPhone recovery mode is a built-in feature in iOS devices. This feature is integrated to fix smartphone software-related issues. Using this feature, you can easily connect your iPhone to a PC for troubleshooting.

When your iPhone enters recovery mode, it turns off the usual operating system and shows a screen with a cable and computer icon. This means your iPhone is ready to connect to iTunes or Finder on your desktop.
Recovery Mode is helpful but not something you’ll use every day. It’s mainly for fixing serious issues. However, getting stuck in Recovery Mode can be frustrating, especially if you didn’t mean to activate it.
Part 2. How to Enter iPhone Recovery Mode?
Before we explore how to get iPhone out of recovery mode, let's understand how the iPhone enters it. Sometimes, it might enter recovery mode automatically, especially when there is any glitch or software issue. Other times, you might need to put it in Recovery Mode yourself to troubleshoot a problem.
Here’s how you can manually enter recovery mode if needed:
Step 1: Connect your iPhone to your desktop using a USB cable. Make sure that your Windows/Mac has the latest version of iTunes. Then, open iTunes/Finder on your computer/Mac.
Step 2: Next, force restart your iPhone by following the steps below:
For iPhone 8 or later (including iPhone SE 2nd generation):
- Press and release the Volume Up button.
- Press and release the Volume Down button.
- Keep pressing the Side button until the "Connect to iTunes" screen appears.

For iPhone 7, iPhone 7 Plus, and iPod touch (7th generation):
- Press the Top (or Side) button and the Volume Down button together.
- Keep pressing until the "Connect to iTunes" screen appears.

For iPhone 6s or earlier and iPod touch (6th generation or earlier):
- Press both the Home button and the Top (or Side) button at the same time.
- Keep pressing until the "Connect to iTunes" screen appears.

Step 3: Now, select your device in iTunes. You will see a pop-up in iTunes saying your iPhone is in Recovery Mode.
Now that we have learned about putting an iPhone in recovery mode, let’s learn how to get out of it if you are already stuck in there.
Part 3. How to Get iPhone Out of Recovery Mode Using Dr.Fone
Dr.Fone - System Repair (iOS) is one of the reliable and effective solutions to get iPhone out of recovery mode. With its "System Repair" feature, you can easily fix your stuck iPhone with just a few clicks. No need to go through daunting steps. It offers two types of repair modes: "Standard Repair" and "Advanced Repair." You can use one according to your. need
Unlike other methods that might involve data loss, Dr.Fone fixes this issue without any data loss. Not only recovery mode, you can fix up to 150+ system issues. Plus, it works on iPhone/iPad/iPhone touch, running on all iOS versions.
The best part? Dr.Fone is user-friendly, which means anybody can access it. No need to have any tech skills or knowledge.

Dr.Fone - System Repair (iOS)
Get iPhone Out of Recovery Mode Without data loss.
- Only fix your iOS to normal, no data loss at all.
- Fix various iOS system issues stuck in recovery mode, white Apple logo, black screen, looping on start, etc.
- Upgrade and Downgrade iOS without iTunes at all.
- Work for all iPhone/iPad/iPod Touch, running on all iOS versions
Download and install Dr.Fone on your PC/laptop and follow the below instructions to get your iPhone out of recovery mode using Dr.Fone:
Step 1: After installing Dr.Fone on your desktop, launch it. Go to the "Toolbox" and select "System Repair" from the list.

Step 2: Now, connect your iOS device to your PC/laptop via a USB cable. A new window will appear. Select "iPhone" from the options and proceed.

Step 3: After selecting your device type, you will prompted to the next window. Select ""iOS Repair"" from the options for exiting recovery mode.

Step 4: Next, verify if your iPhone is showing the cable icon. If yes, then Dr.Fone will show the below interface. Select " "Exit Recovery Mode" " from the options and proceed.
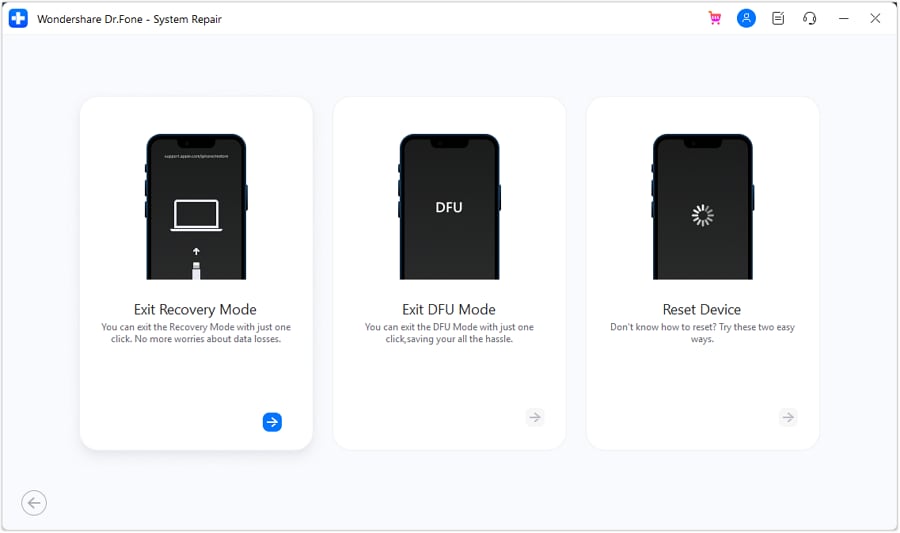
Step 5: In the next window, click ""Exit Recovery Mode"" on the right bottom of the window. The next window will show the completion of the process, and your iPhone will start.
However, if the iPhone fails to restart, click the " "Standard Mode"" option to fix the problematic device.
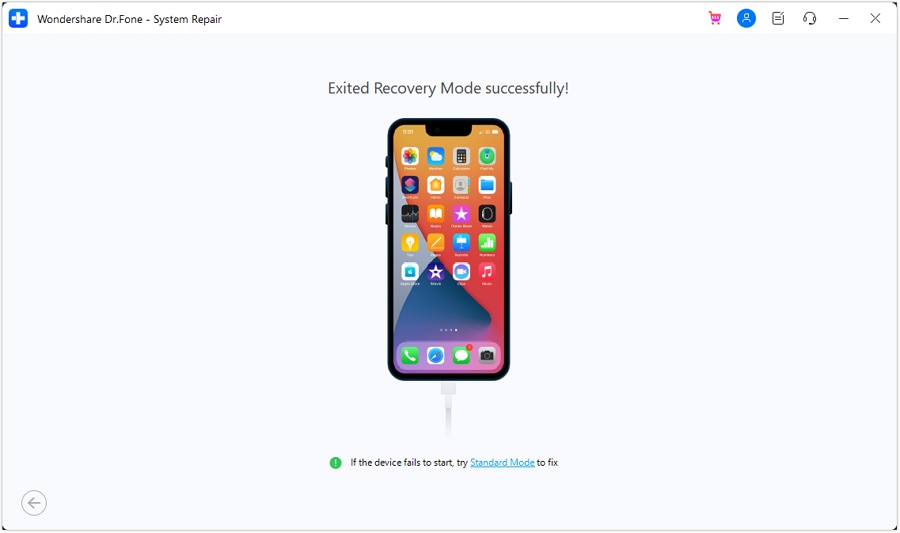
This is the easy and simple solution to get iPhone out of restore mode. However, there is also a manual way to do so. Let’s explore it together!
4,624,541 people have downloaded it
Part 4. How to Restore iPhone With iTunes in Recovery Mode
If your iPhone is stuck in recovery mode, you can use iTunes to fix it. iTunes will reinstall the software and fix all the glitches and bugs. However, there is one issue: it will delete all the data from your device. So, you can consider it as your last resort. While it erases all your data, it is a reliable way to bring your device back to normal.
Here is how you can restore your iPhone with iTunes in recovery mode:
Step 1: Connect your iPhone to your computer/laptop via a USB cable. Then open "Finder" or "iTunes", depending on your computer.
Step 2: Your iPhone must be in recovery mode already. If it’s not, put it in recovery mode (See step 2 in part 2).
Step 3: Once your iPhone is in recovery mode, iTunes or Finder will detect your iPhone and give you two options; "Update" or "Restore".

Step 4: Select ""Restore."" This will erase your iPhone and reinstall the latest version of iOS.
Step 5: Wait until the process is finished. Your iPhone will restart once the restore is complete. You can set it up again.
This solution is reliable, but you will lose all your data while using it. In case, you have performed it and lost your data or are planning to perform it, don’t worry!
Dr.Fone is here to rescue you. This tool offers an amazing feature that helps retrieve data from an iPhone, even if it's in recovery mode. Let’s see how!
Part 5. How to Retrieve Data from an iPhone in Recovery Mode?
Dr.Fone also allows you to retrieve data from your iPhone that is stuck in recovery mode. Dr.Fone - Data Recovery (iOS) helps you extract essential data, including messages, contacts, photos, and apps. This ensures that you retain your valuable data during the recovery process.
This targeted approach minimizes data loss and provides a user-friendly experience. This makes Dr.Fone an ideal choice for data retrieval from iPhones in Recovery Mode.
Here is how you can restore iPhone in recovery mode:
Step 1: Launch Dr.Fone on your desktop. Go to the "Toolbox" and select "Data Recovery" from the options. Then, on the next window, select "iOS" from the options and proceed.

Step 2: Next, select "Recover Data from an iOS device"from the options. Then, connect your iPhone to PC/laptop via a USB cable. Dr.Fone will automatically detect the device.
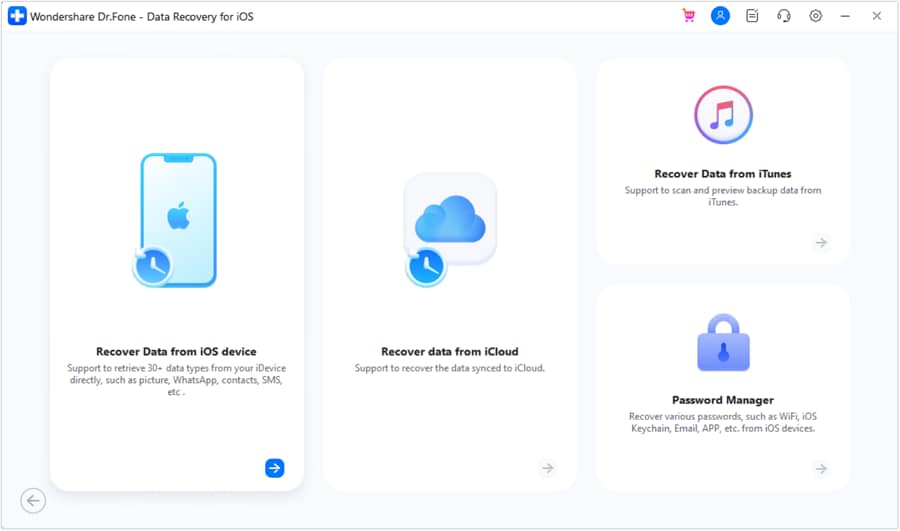
Step 3: Use a USB/power cable to connect your iPhone to your desktop and let Dr.Fone automatically detect your device. Once your iPhone is detected, you will see a screen with all the file types. Select what you want to recover and click "Start Scan."
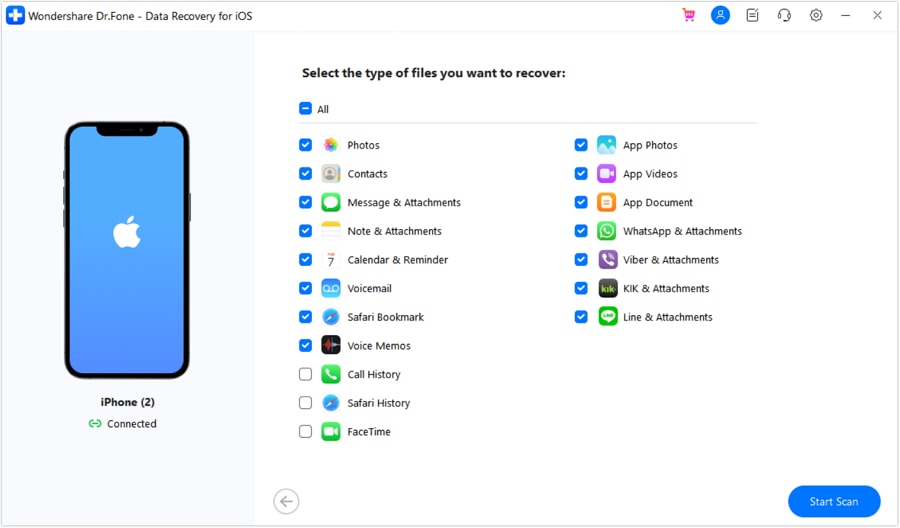
Step 4: When Dr.Fone starts scanning the data, you can preview the data that is being recovered from your iOS device. Let the scanning process complete.
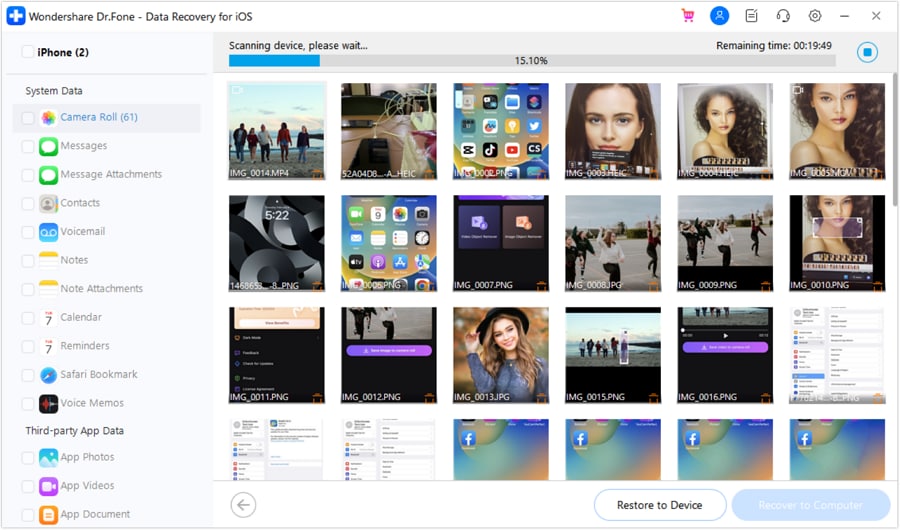
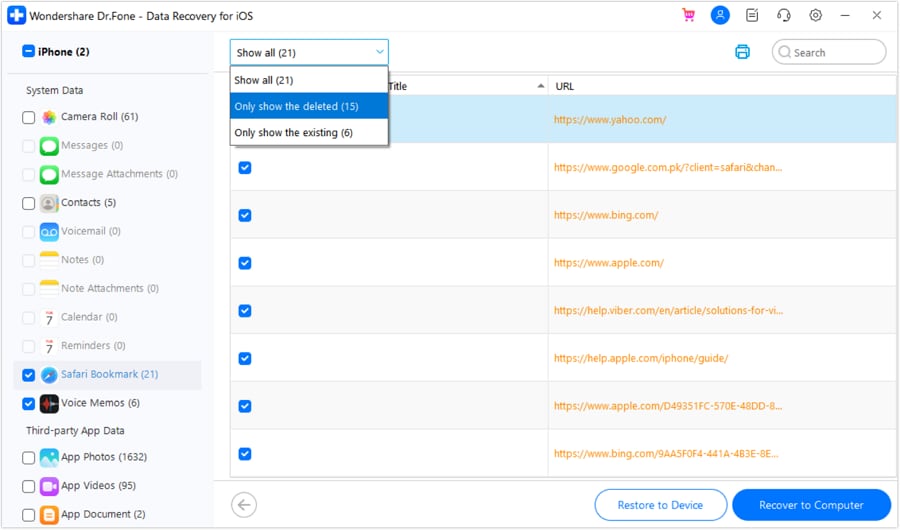
Step 5: Once the scanning is completed, you can filter out and select the data you want to retrieve. You can click the tab at the top and either view all the data, the deleted data, or the existing data. Once selected, click the "Restore to Computer" button.
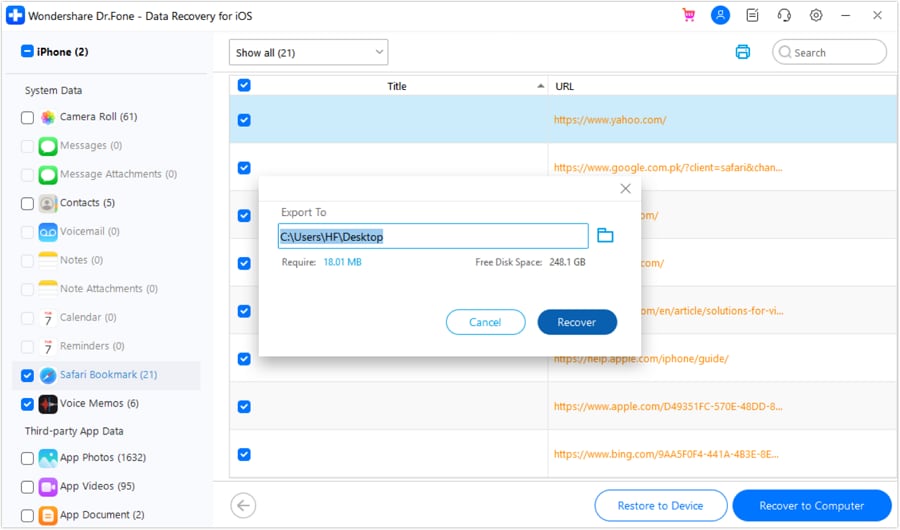
Step 6: You will see a prompt appear. Select the location in your computer where you want to restore the data and click the "Recover"button.
That’s all! This is how you can retrieve your data from an iPhone using Dr.Fone. Isn't it a reliable tool for your iOS-related needs?
Conclusion
Wrapping it up! You see, how easy it is to get iPhone out of recovery mode. We have explored two options; one is a manual way, and the other is an automatic and easy way to get the job done.
So, if you want to make your iPhone work normally again without any hassle, use Dr.Fone - System Repair (iOS). The good thing about this tool is its simplicity and effectiveness. Also, it is compatible with both Windows and Mac OS. Apart from this feature, Dr.Fone offers plenty of other features as well. It is a complete solution for your iOS device. So, download it now and give it a try!
4,624,541 people have downloaded it
FAQs
- ● Check your cable and USB port; try another if needed.
- ● Update iTunes to the latest version.
- ● Restart your iPhone and computer.
- ● Use a different computer with iTunes.
- ● Re-enter Recovery Mode and reconnect.
iPhone Reset
- iPhone Recovery Mode
- 1. Exit iPhone Recovery Mode Loop
- 2. iPhone in Recovery Mode
- 3. iPhone Recovery Mode
- 5. Get Data from iPhone in Recover Mode
- 6. Put iPhone in Recovery Mode
- 7. Recuva Data Recovery Review
- 8. DFU Mode vs Recovery Mode
- iPhone DFU Mode
- 1. Put iPhone in DFU Mode
- 2. Enter and Exit DFU Mode
- 3. Get Data from iPhone in DFU Mode
- 4. Tools for iPhone to Enter DFU mode
- 5. Enter/Exit DFU Mode on iPhone X
- 6. Enter/Exit DFU Mode on iPhone SE
- 7. DFU Mode Works on iPhones
- 8. Enter DFU Mode on iPod Touch
- iPhone Factory Reset
- 1. Factory Reset iPhone
- 2. Factory Reset iPhone without iTunes
- 3. Reset iPhone without Passcode
- 4. Reset iPhone Without Apple ID
- iPhone Hard Reset
- 1. Hard Reset VS Soft Reset iPhone
- 2. Hard Reset Without Computer
- 3. Force Restart iPhone
- 4. Restart or Force Restart iPhone
- 5. Hard/Soft/Factory Reset iPhone 8
- iPhone Reset Tips
- 1. Soft Reset iPhone
- 2. Restart or Reboot iPhone
- 3. iPhone Reset All Settings
- 4. Reset iPhone Battery
- 5. Reset iPhone without Apple ID
- 6. Reset Jaibroken iPhone
- 7. Reset Network Settings On iPhone
- 8. Reset Restriction Passcode iPhone
- 9. Restart iPhone Without Power Button
- 10. Turn Off iPhone Without Home Button
- 9. Turn off iPhone without Screen
- 10. Reset Disabled iPhone


Alice MJ
staff Editor
Generally rated4.5(105participated)