100% Security Verified | No Subscription Required | No Malware

 :
: 
 ChatGPT
 Perplexity
 Gemini
 Claude
 Grok
Grok
If you have recently purchased a new Apple device or are managing multiple gadgets simultaneously, you are likely wondering "how to transfer files from iPad to iPhone" quickly and efficiently. Navigating the Apple ecosystem is generally straightforward, but knowing the precise steps to move your photos, videos, expansive documents, or entire folders can save you a significant amount of time and effort.
Whether you need a reliable method for transferring high-resolution media offline, or you want to establish an automatic sync via the cloud, we have compiled the ultimate guide. Below, we dive into five highly effective and proven methods to seamlessly transfer files from iPhone to iPad or the other way around. Select the approach that best fits your file sizes, network conditions, and overall workflow.
In this article
Part 1. How to Transfer Files (5 Proven Methods)
Many users constantly ask, "How do I transfer files from iPhone to iPad smoothly without technical headaches?" The reality is that the iOS ecosystem provides an array of built-in and third-party tools to facilitate effortless data sharing. You merely need to pick the solution that aligns with your available resources, such as internet speed and the volume of data being moved. Below is an in-depth breakdown of the most reliable file transfer strategies.
Which Method is Best for You? A Quick Comparison
| Method | Best For | Transfer Speed | File Size Limit | Requires Internet |
|---|---|---|---|---|
| AirDrop | Quickly sharing a few photos or videos locally | Very Fast | No official limit | No |
| iCloud Sync | Automatic, hands-off multi-device syncing | Depends on Wi-Fi connection | Limited by iCloud storage plan | Yes |
| iCloud Drive | Sharing documents natively across Apple IDs | Depends on Wi-Fi connection | Limited by iCloud storage plan | Yes |
| Google Drive | Cross-platform access and massive files | Depends on Wi-Fi connection | Limited by Google Drive plan | Yes |
| Dr.Fone | Bulk transfers, specific selections, zero data loss | Lightning Fast (Wired) | Unlimited | No (for transfer) |
1-1. Method 1: Transfer files from iPad to iPhone and vice versa via AirDrop
If you want to transfer files from iPhone to iPad locally, AirDrop is an exceptional built-in utility. Utilizing Apple's proprietary peer-to-peer Wi-Fi and Bluetooth technology, AirDrop is ideal for firing off brief videos, pictures, or PDFs swiftly without needing cellular data or a Wi-Fi router. Follow these simple steps:
-
Step 1 Prepare Network Settings
Start by confirming that both Bluetooth and Wi-Fi are fully activated on both iOS devices. Additionally, ensure that your Personal Hotspot is turned off, as this can occasionally block the AirDrop connection.
-
Step 2 Access the Control Center
On the receiving device, swipe down to open the Control Center. Press and hold the Network Settings block to reveal advanced connectivity options.

-
Step 3 Open AirDrop Menu
From the expanded connectivity menu, tap on the AirDrop icon.

-
Step 4 Set AirDrop Visibility
Select the Everyone for 10 Minutes option. This temporarily makes your device discoverable to nearby Apple hardware.
-
Step 5 Select Files on Sender Device
Switch to the sending iPhone or iPad. Navigate to the files or media you want to move. Tap the Share button (the square with an upward arrow). If it's not immediately visible, tap More to find it.
-
Step 6 Initiate the AirDrop
Tap AirDrop from the list of sharing options.

-
Step 7 Choose the Recipient
Wait for the recipient's avatar or device name to appear on the screen, then tap it.
-
Step 8 Accept the Transfer
Return to the receiving device. A prompt will appear asking for permission. Tap Accept to conclude the transfer.
1-2. Method 2: Transfer files from iPhone to iPad and vice versa by syncing iCloud files
For users deeply integrated into the Apple ecosystem, iCloud Sync serves as a continuous background solution. If you configure iCloud properly, there is barely any need to manually transfer files from iPad to iPhone. Modifications made to files on one device seamlessly appear on the other, provided they are logged into the same Apple ID.
-
Step 1 Verify Apple ID Sign-In
Check both devices to ensure they are actively signed into identical Apple ID accounts. Consistent credentials are required for syncing.
-
Step 2 Launch Settings App
Open the Settings app from your home screen.
-
Step 3 Enter Apple ID Profile
Tap on your Profile Name/Icon located at the very top of the Settings menu.
-
Step 4 Access iCloud Configuration
Select the iCloud option from the list.

-
Step 5 Enable Specific App Syncing
Scroll down to the Apps Using iCloud section. Toggle on the switches for applications containing the data you want to synchronize (e.g., Photos, Contacts, Notes). Over the next few minutes, your files will upload to the cloud and mirror across all designated iOS devices.


1-3. Method 3: Transfer files from iPad to iPhone via iCloud Drive
Similar to standard syncing, iCloud Drive acts as Apple's dedicated cloud storage locker (comparable to Dropbox or OneDrive). When you place a file into iCloud Drive, you can summon it on any authorized iOS device anywhere in the world. Here is how to transfer files from iPhone to iPad using iCloud Drive:
-
Step 1 Open iOS Settings
Navigate to the Settings app on your primary iOS device.
-
Step 2 Access Your Apple ID
Tap your Profile Name at the top of the interface.
-
Step 3 Tap on iCloud
Select iCloud to manage your cloud services.
-
Step 4 Activate iCloud Drive
Under the Apps Using iCloud segment, locate and select iCloud Drive. Ensure the toggle for Sync This iPhone/iPad is turned on.

-
Step 5 Upload Files to the Drive
Open the file you wish to share, tap the Share button, and choose the Save to Files option, specifically targeting a folder within iCloud Drive.
-
Step 6 Access Files on Receiver
Grab your secondary iOS device and launch the native Files app.
-
Step 7 Browse Storage Locations
Tap the Browse tab located at the bottom-right corner.
-
Step 8 Select iCloud Drive
Tap iCloud Drive from the available storage Locations list.

-
Step 9 Retrieve Uploaded Files
Locate your uploaded documents or media folders to view, edit, or save them locally on your new device.
1-4. Method 4: Transfer files from iPhone to iPad via Google Drive
If you prefer a third-party ecosystem or need greater base storage limits than Apple provides for free, Google Drive is a phenomenal platform. Google Drive accommodates enormous file types and can be a life-saver if you occasionally share data with Android or PC systems too. Follow this straightforward setup:
-
Step 1 Install Google Drive
Download the Google Drive application from the App Store onto both your iPad and iPhone. Log in using a shared Google account.
-
Step 2 Launch on the Sender Device
Open the Google Drive app on the device containing your original files.
-
Step 3 Create a Dedicated Folder
Tap the New (+) button, select Folder, and give it a recognizable name (e.g., 'Transfer to iPad').
-
Step 4 Prepare to Add Files
Navigate inside your new folder and press the Add (+) icon once more at the bottom right corner.

-
Step 5 Upload Your Data
Choose Upload. Pick the relevant files, photos, or documents, and wait for the upload to complete over your internet connection.

-
Step 6 Switch to Receiving Device
Open the Google Drive application on the receiving iPhone or iPad.
-
Step 7 Access and Download
Open your created folder and tap the three-dot menu next to any file to access options for downloading or saving the items directly onto your device's internal storage.
1-5. Method 5: Transfer files from iPad to iPhone using Wondershare Dr.Fone
Are you looking for the absolute most secure, fastest, and most comprehensive option to transfer files from iPad to iPhone? Look no further. Wondershare Dr.Fone is a premier desktop suite that eliminates the pain points of cloud storage limits and unstable Wi-Fi drops. Utilizing a wired connection, it safely clones data across Apple devices without sacrificing image quality or risking corruption.
No high-level technical expertise is required. You simply connect your devices to your PC or Mac and let the robust algorithms handle the migration. Here is your tutorial to utilize Wondershare Dr.Fone - Phone Transfer efficiently:
 Move data between iOS to Android and vice versa.
- Transfer contacts, SMS, photos, videos, music, and more types.
- Available with all phones with Android and iOS versions.
- Simple, click-through process.
-
Step 1 Install the Software
Download the official Wondershare Dr.Fone suite and successfully install it on your Mac or Windows desktop.
-
Step 2 Connect Your iOS Devices
Launch the application. Once the main dashboard appears, connect your iPad and iPhone to your computer using high-quality USB/Lightning cables. Follow any brief on-screen instructions to authorize the "Trust This Computer" prompt.
-
Step 3 Launch Phone Transfer Tool
From the left-hand navigation pane, select Toolbox. In the main menu interface, click on the Phone Transfer module.

-
Step 4 Assign Source and Target
Verify that your devices are correctly labeled as Source (the sending device) and Target (the receiving device). If they are flipped, simply click the prominent Flip button in the top middle of the interface.
-
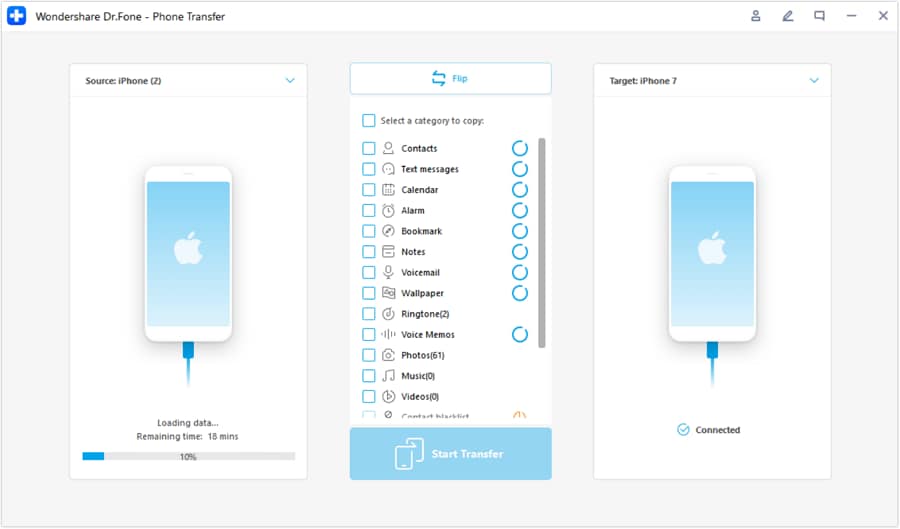
Step 5 Select File Types to Move
Review the list of data categories, such as Photos, Contacts, Calendar, and Music. Check the tickboxes for all the content you intend to migrate. When ready, hit the Start Transfer button.

-
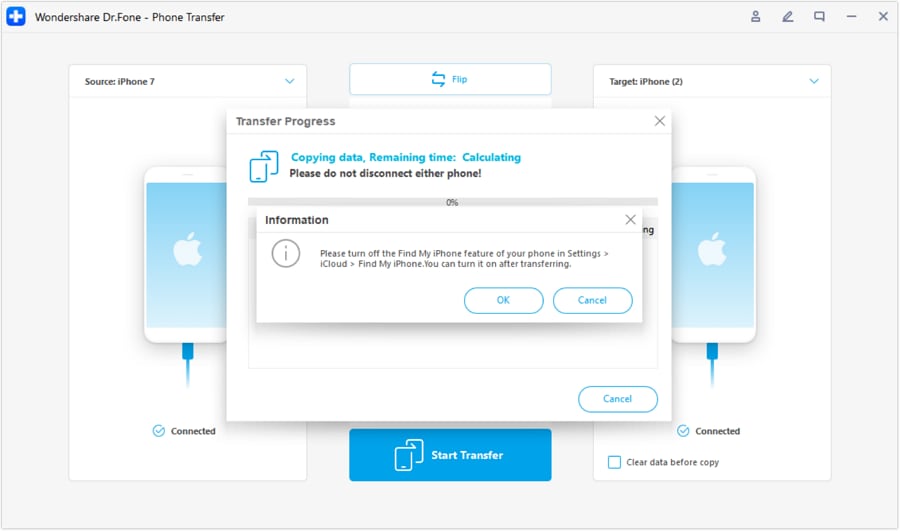
Step 6 Turn Off "Find My" (If Prompted)
If you have "Find My" actively running on your Apple devices, a prompt might pause the process. Click OK, temporarily disable the feature in your iOS Settings, and let the software resume its task automatically.
-
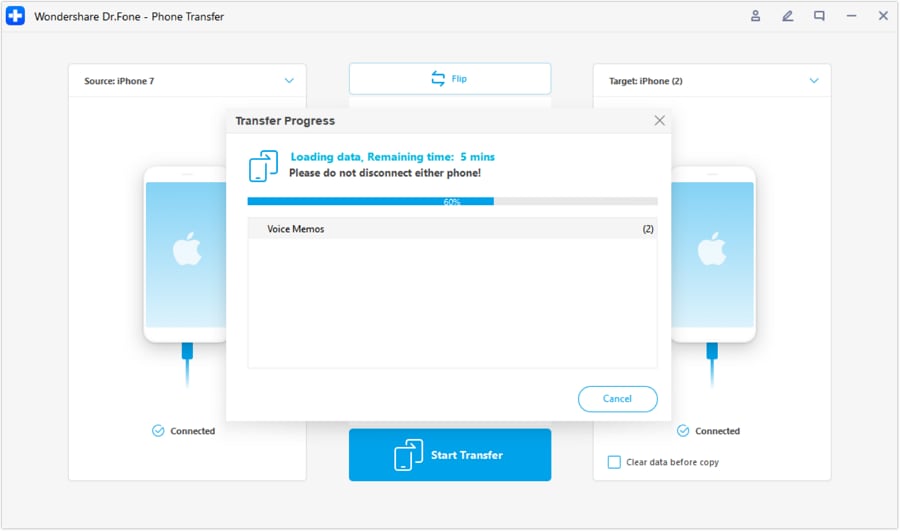
Step 7 Await Completion
Allow Wondershare Dr.Fone to conduct the data transfer at blazing speeds. Do not disconnect the cables or heavily use the mobile devices during this crucial window to avoid disruption.
-
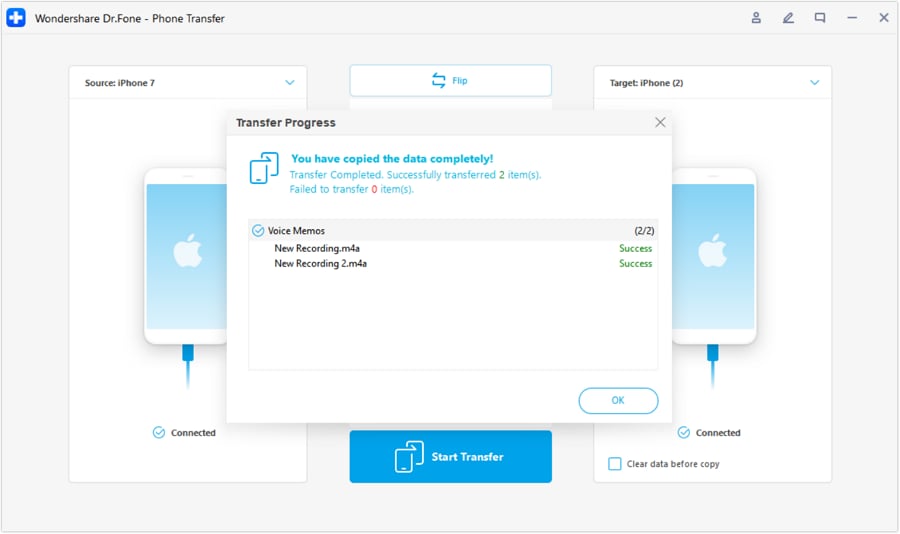
Step 8 Verify the Copied Data
Once you are greeted with a success pop-up, click OK. You can now detach your devices safely and navigate through the target iPhone or iPad to verify your newly copied files.


Part 2. Important Things to Consider Before Transferring
While discovering how to transfer files from iPhone to iPad is quite easy, treating data migration casually is not recommended. Exchanging data across platforms—even within Apple's tightly sealed ecosystem—presents minor risks. System glitches, network stutters, or simple user errors can lead to unintended consequences. Therefore, implementing proactive habits prior to hitting the "Share" button is highly advisable. Keep these essential tips in mind.
Verify Your Recipient with Absolute Certainty

Particularly when using proximity protocols like AirDrop, identifying the correct recipient can be tricky if multiple generic names (e.g., "iPhone") appear. Accidental transfers expose your personal information to strangers. Always ensure the receiving device's avatar or specific device identifier perfectly matches your intended target before tapping accept.
Proceed Cautiously with Highly Sensitive Files

Although Apple leverages advanced encryption for AirDrop and iCloud services, you should remain vigilant. If your payload includes sensitive business materials, financial records, or deeply personal media, consider using a secured, wired, offline tool instead of broadcasting over public Wi-Fi networks where vulnerabilities might exist.
Perform a Thorough Quality Check

Keep in mind that once a file transfer is actively initiated, options to retroactively cancel are usually non-existent or unreliable. Double-check your file selections to confirm you aren't omitting critical documents or accidentally sending irrelevant folders, which will clutter the recipient's storage.
Adopt the Most Relevant Tool for the Job

As illustrated throughout this guide, numerous avenues exist to move iOS data. Do not limit yourself to just one technique. If you are syncing a heavy 4K video, opting for AirDrop might prove frustratingly slow compared to a wired transfer. Evaluate file volume and adapt your approach appropriately.
Part 3. BONUS TIP: Back Up Your Files First
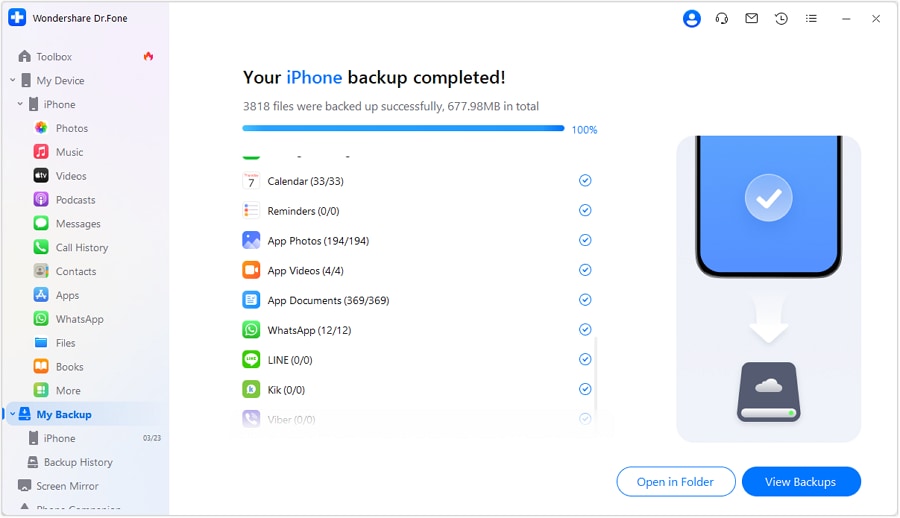
As emphasized previously, migrating massive data loads implies a minute but real risk of data corruption or device freezes. Practicing data safety means expecting the unexpected. Constructing a solid backup structure prior to attempting large transfers guarantees total peace of mind. Wondershare Dr.Fone significantly streamlines the backup procedure down to a few clicks, stripping away the complications native software often presents.
-
Step 1 Connect and Initialize
Open the Wondershare Dr.Fone software on your desktop. Connect your primary iOS device securely. Wait for the application's engine to recognize and mount your Apple product.
-
Step 2 Access the Backup Module
On the left-side navigation panel, select My Backup. In the main operations window, click on Back Up Now to initiate the indexing.

-
Step 3 Let the Software Process
Dr.Fone will rapidly encode and store your iOS data onto your computer's hard drive. Avoid interacting with the phone or cable during this state. If needed, the Cancel button can abort the action safely.

-
Step 4 Review Your Secure Backup
When the loading bar hits 100%, you can select Open in Folder or View Backups to physically inspect the encapsulated files stored safely on your PC.
It is non-negotiable to maintain redundant data when maneuvering critical files. Whether you lean on iCloud, the aging iTunes framework, or versatile third-party desktop suites, preserving a secondary copy protects against catastrophic loss. Dive deeper into these solutions through our comprehensive review of the best ways to back up your iPhone.
Conclusion
Effectively managing data is an inevitable requirement for all smartphone users. Luckily, deciphering how to transfer files from iPad to iPhone is a painless endeavor owing to Apple's cohesive ecosystem and capable third-party developers. Whether you utilize iCloud for automated consistency, AirDrop for immediate localized sharing, or Google Drive for cross-platform convenience, there is a method perfectly tailored to your scenario.
However, if you want uncompromised speed, expansive flexibility, and top-tier security without data limitations, giving Dr.Fone - Phone Transfer a try is highly recommended. It handles massive transfers instantaneously and pairs beautifully with built-in backup tools to keep your data completely protected throughout its lifecycle.
FAQ
-
1. Can I transfer files from iPad to iPhone without a computer?
Yes, absolutely. The Apple ecosystem is designed to allow wireless file management. You can employ built-in features like AirDrop, iCloud Sync, or iCloud Drive, as well as third-party cloud apps like Google Drive, to move files seamlessly without ever plugging into a PC or Mac. -
2. What is the fastest way to transfer a large video from iPad to iPhone?
For immense video files—such as long 4K recordings—utilizing a wired connection via desktop software like Dr.Fone - Phone Transfer guarantees the highest transfer speeds and zero compression. Alternatively, AirDrop functions well if the file isn't overwhelmingly huge and both devices are side-by-side. -
3. What are some important considerations before transferring files between an iPad and an iPhone?
Always double-check the recipient device's identifier to avoid sending sensitive data to strangers (especially on AirDrop). Prioritize the confidentiality of your documents, carefully confirm you have selected all intended files before initiating, and importantly, establish a secure backup to prevent data loss in the event of a system disruption. -
4. Does transferring files between iPhone and iPad consume mobile data?
It depends on the method chosen. AirDrop relies on local peer-to-peer Wi-Fi and Bluetooth, consuming zero cellular data. However, uploading or syncing files via iCloud Drive or Google Drive over a cellular connection will consume your data plan. To avoid charges, it is recommended to conduct cloud transfers strictly over standard Wi-Fi connections.
 Add Wondershare Dr.Fone as a preferred source on Google