Why Is AirDrop Not Working on Mac? Find Best Solutions!

May 22, 2026 • Filed to: Phone Repair Solutions • Proven solutions
 TL;DR:
To restore AirDrop functionality on a Mac, verify that both devices share an active Wi-Fi and Bluetooth connection, remain within a 30-foot (9-meter) proximity, and run the latest OS versions to prevent software incompatibilities.
● Change the AirDrop discovery setting in Finder to "Everyone" and disable the "Block all incoming connections" option within the macOS Network Firewall settings to ensure security software does not block the transfer.
● If the failure originates from an iPhone or iPad system glitch rather than the Mac, use the Standard Repair mode in Wondershare Dr.Fone to fix the iOS software issue without experiencing data loss.
● While AirDrop transfers maintain the original quality of standard files and media, users running iOS 17 should utilize the distinct NameDrop feature specifically for exchanging contact information by bringing their iPhones close together.
Ask AI for a summary
 ChatGPT
 Perplexity
 Gemini
 Claude
 Grok
Grok
Apple's AirDrop has emerged as a powerful and convenient tool. It is known for effortlessly sharing files, photos, and more among Apple devices. However, AirDrop is not immune to occasional errors. Numerous Mac users have encountered their fair share of challenges regarding AirDrop failures.
If you've ever wondered, 'Why is AirDrop not functioning on my Mac?' rest assured, many macOS users are facing or have faced this issue. This article will explore the typical problems that can result in AirDrop not working on Mac. We'll also offer effective solutions to help you restore its functionality.
Part 1: AirDrop in MacBook Not Working: What Are the Reasons?
Several factors can contribute to AirDrop malfunctioning. Gaining insight into these potential causes will empower you to address the issues effectively. Here are some common reasons why AirDrop is not showing up on Mac:
- Bluetooth and Wi-Fi Issues: AirDrop relies on both Bluetooth and Wi-Fi to function in a proper way. If either of these connections is disabled or experiencing issues, AirDrop may not work.
- Visibility Settings: AirDrop has visibility settings that allow you to choose who can send you files (Contacts Only or Everyone). If you have it set to "Contacts Only," ensure that the device you're trying to share with is in your Contacts.
- Firewall or Security Software: Sometimes, security software or firewall settings on your MacBook can block AirDrop. Check your firewall settings and make sure they aren't preventing AirDrop connections.
- Software Updates: Outdated macOS or iOS software can sometimes cause compatibility issues. Make sure your MacBook's OS and the software on the device you're sharing with are up to date.
- Temporary Glitch: Sometimes, technology encounters temporary glitches. Try turning off AirDrop and then turning it back on or restarting your MacBook.
Part 2: Top Solutions To Fix AirDrop Not Working on Mac
Now that we've identified the common reasons behind MacBook AirDrop not working, now is the time for solutions. Given below are the top 6 solutions to get AirDrop back in action:
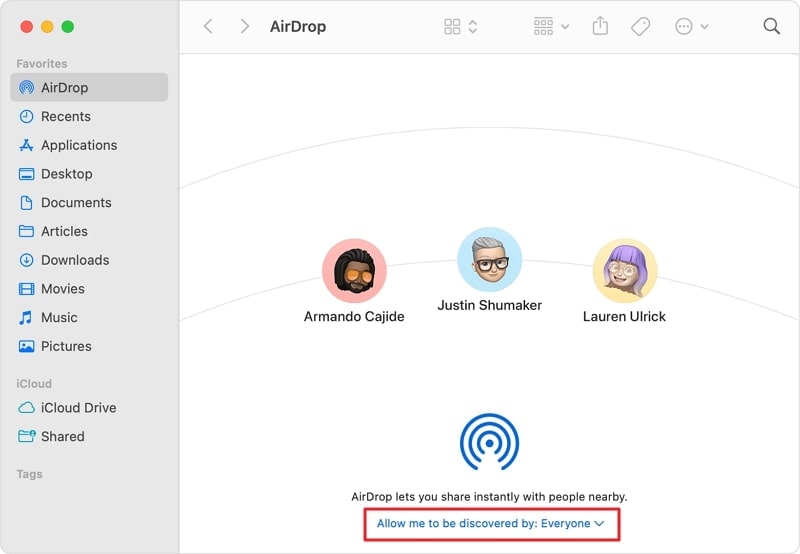
Solution 1. Check the Status of AirDrop on the Mac
Checking if AirDrop is enabled on your Mac is a crucial first step in troubleshooting AirDrop issues. You can use the following instructions to check AirDrop status on Mac:
Instructions: Click "Finder" from the Dock on your Mac home screen. Then tap "AirDrop" from the left sidebar and ensure its “Allow me to be discovered by:” setting is set to “Everyone.”
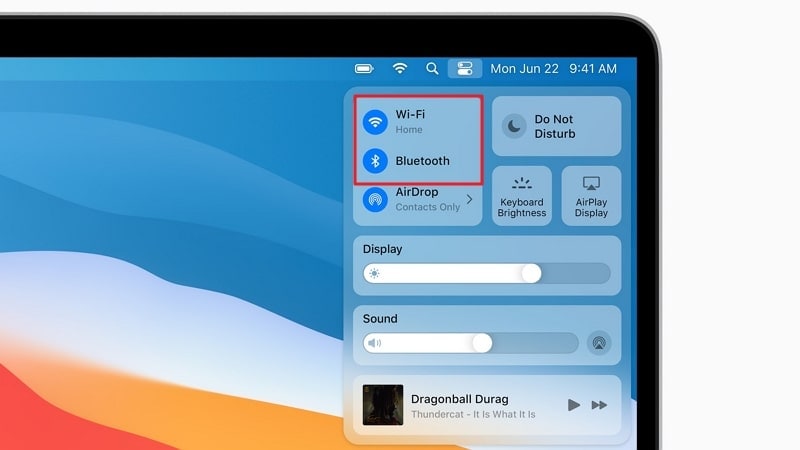
Solution 2. Verify Network Connectivity
For AirDrop to function successfully, it relies both on Wi-Fi and Bluetooth. That’s why it is essential that your Mac and the other device are connected to the same network. You can ensure that both devices have Wi-Fi enabled by accessing their Control Centers. For iOS devices, it can be accessed by swiping downward from the top right corner. The Mac's Control Center is also located at the top right corner.
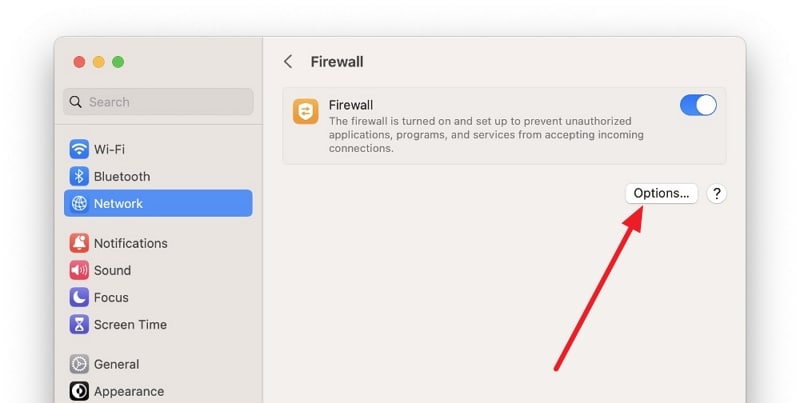
Solution 3. Keep a Look at Firewall Settings on the Mac
Monitoring and adjusting your firewall settings on your Mac is a critical step in resolving AirDrop issues. This is because firewalls can sometimes block the necessary incoming network connections of AirDrop. Here's how to check and manage firewall settings to resolve AirDrop not working on Mac:
- Step 1: Click the “Apple” logo from the top left corner to select "System Settings." Here, move to the "Network" settings and choose the “Firewall” option. Now, click the “Options” button located under “Firewall.”
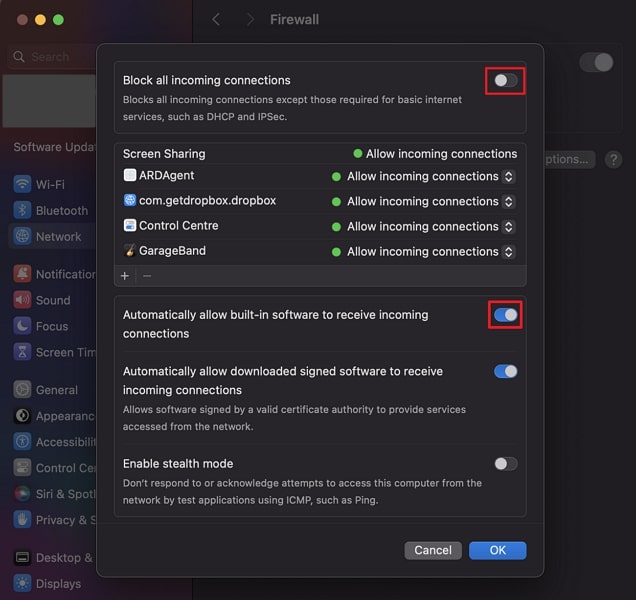
- Step 2: Here, you need to ensure that the “Block all incoming connections” option is toggled off. Following this, you will need to turn on the "Automatically allow built-in software to receive incoming connections” feature.
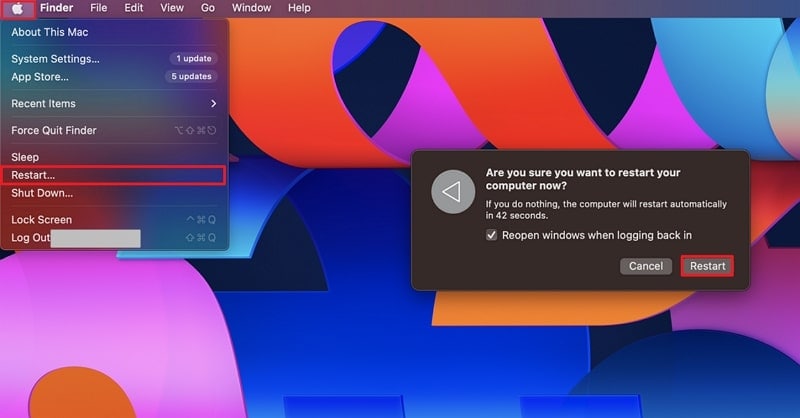
Solution 4. Restart Mac Properly
Restarting your Mac properly is a fundamental troubleshooting step. It can help resolve a variety of issues, including AirDrop not showing up on Mac. The reason is that restarting your Mac removes temporary glitches and resets all the processes. Here's how to restart your Mac correctly:
Instructions: In the top-left corner of your screen, click the “Apple” icon to open the menu. From the drop-down Apple menu, tap “Restart.” Confirm the choice that you are restarting by again clicking “Restart” in the confirmation prompt.
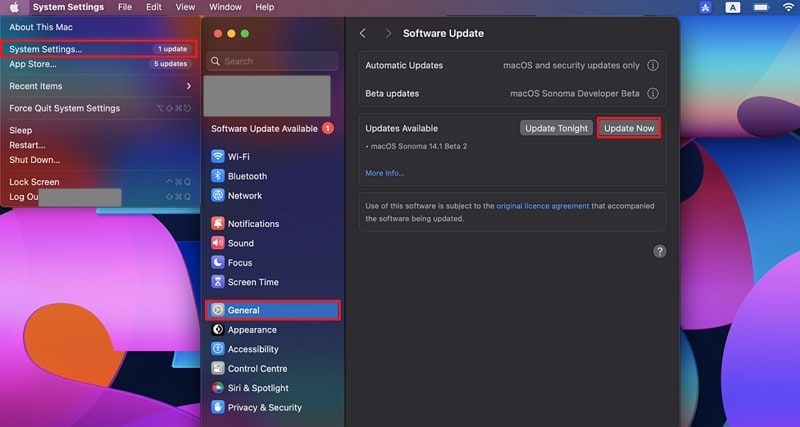
Solution 5. Make Sure the Mac is Updated To the Latest Version
Ensuring your Mac is running the latest version of its operating system is vital. It enhances the device's performance and makes the system more secure with the latest security patches. This helps resolve software bugs affecting the AirDrop functionality. Use the following guidelines to update your macOS to its latest version and fix the MacBook AirDrop not working problem:
Instructions: Access the “System Settings” on the Mac using the “Apple” menu. Here, click “General” from the left sidebar and tap “Software Update." Press "Update Now" to kickstart the updating process if an update is available.
Solution 6. Keep the Devices Closer to Each Other
Maintaining proximity between your Mac and the target device during an AirDrop transfer is essential for successful file exchange. It is recommended that the devices be positioned no more than 30 feet (9 meters) apart. This will help ensure the successful operation of AirDrop. Moreover, ensure that Wi-Fi and Bluetooth are activated on your Mac and the destination devices.
Bonus Tip: Finding the Best Solution to AirDrop Not Working on iPhone/iPad
When it comes to AirDrop from iPhone to Mac not working, it is possible that the problem is within your iOS device. It could be a software bug or glitch that is preventing AirDrop from functioning successfully. In this scenario, trying to resolve such issues manually can be a tedious and potentially pointless effort. That's why we recommend you go for a trusted iOS repair tool, Wondershare Dr.Fone .
Dr.Fone provides two powerful modes for iOS system repair: Standard Repair and Advanced Repair. Standard Repair mode can fix iOS system issues without data loss. On the other hand, Advanced Repair can fix even the most complex and stubborn software-related issues. With Wondershare Dr.Fone, you can fix iOS issues such as boot loop, app crashing, black screen, etc.
Key Features of Wondershare Dr.Fone
- Using Dr.Fone, you are able to upgrade or downgrade your iOS device to the desired iOS version.
- This software helps you upgrade your iOS device to the latest available beta versions.
- It allows you to enter and exit Recovery Mode and DFU Mode using a single click.
Steps To Repair AirDrop Not Working on iPhone/iPad via Wondershare Dr.Fone
Here is how you can fix AirDrop from iPhone to Mac not working with the help of Wondershare Dr.Fone:
- Step 1: Install Dr.Fone and Initiate System Repair
To initiate, first, you need to have the latest version of Wondershare Dr.Fone on your device. Once you open it, navigate toward the tool panel at the left and choose "Toolbox." Then, from the appeared options, select "System Repair" to begin with.

- Step 2: Connect iOS Device and Select iOS Repair
To start the AirDrop repair process, first, connect your system to your iOS device and click "iPhone" from the device options. From the following window, tap "iOS Repair" and select "Standard Repair." Now, it is time to put your device in "Recovery Mode" by following the guidelines on the screen.

- Step 3: Fix the iOS Recovery Mode Stuck Issue
While your iOS is one Recovery Mode, you'll see many iOS firmware versions. Click the "Download" option for any one of them in order to start downloading the iOS firmware. Finally, press the "Repair Now" button, and after repairing, click "Done" to end the process. This process will fix the issue of AirDrop from iPhone to Mac not working.

FAQs Instructing More About AirDrop Feature
Conclusion
In summary, Apple's AirDrop revolutionizes the ease of sharing files between Mac and iOS devices, yet it may experience occasional problems. In this article, we've explored common reasons behind AirDrop not working on Mac and top solutions to resolve these issues. From checking device compatibility to firewall settings, we've covered a range of fixes.
One solution that can be particularly helpful when facing more complex iOS system issues is Wondershare Dr.Fone. This comprehensive iOS system repair tool offers a wide array of features. It includes the ability to repair various iOS system problems.


iPhone Problems
- iPhone Hardware Problems
- iPhone Home Button Problems
- iPhone Keyboard Problems
- iPhone Headphone Problems
- iPhone Touch ID Not Working
- iPhone Overheating
- iPhone Flashlight Not Working
- iPhone Silent Switch Not Working
- iPhone Sim Not Supported
- iPhone Call Volume Low
- iPhone Software Problems
- iPhone Passcode Not Working
- Google Maps Not Working
- iPhone Screenshot Not Working
- iPhone Vibrate Not Working
- Apps Disappeared From iPhone
- iPhone Emergency Alerts Not Working
- iPhone Battery Percentage Not Showing
- iPhone App Not Updating
- Google Calendar not Syncing
- Health App Not Tracking Steps
- iPhone Auto Lock Not Working
- iPhone Screen Recorder No Sound
- Find My iPhone Not Sharing Location
- iPhone Battery Problems
- iPhone Media Problems
- iPhone Echo Problem
- iPhone Camera Black
- iPhone Won't Play Music
- iOS Video Bug
- iPhone Calling Problem
- iPhone Ringer Problem
- iPhone Camera Problem
- iPhone Front Camera Problem
- iPhone Not Ringing
- iPhone Not Sound
- iPhone Mail Problems
- Reset Voicemail Password
- iPhone Email Problems
- iPhone Email Disappeared
- iPhone Voicemail Not Working
- iPhone Can't get Mail connection
- Gmail Not Working
- Yahoo Mail Not Working
- iPhone Update Problems
- iPhone Stuck at the Apple Logo
- Software Update Failed
- iPhone Verifying Update
- Software Update Server Couldn't Be Contacted
- iOS update Problem
- iPhone Won't Update
- iPhone Connection/Network Problems


James Davis
staff Editor
Generally rated4.5(105participated)