iPhone Won't Sync with iPad or Computer/iTunes? Full Guide to Fix!

Jun 30, 2026 • Filed to: Phone Repair Solutions • Proven solutions
 TL;DR:
You can resolve an iPhone failing to sync with a computer or iPad by troubleshooting iTunes settings, performing model-specific device resets, or bypassing iTunes entirely using alternative methods like iCloud or Wondershare Dr.Fone.
● Fix common iTunes sync failures by turning off Apple Music in both iPhone and iTunes settings, reauthorizing the computer via the Stores tab, or manually updating iOS drivers through the Windows Device Manager.
● If standard restarts fail, perform a hard reset by holding Home and Power for iPhone 6s and older, Power and Volume Down for iPhone 7 and 7 Plus, or quick-pressing Volume Up then Volume Down before holding the Side button for iPhone 8 and newer.
● Alternative transfer methods require specific conditions: iCloud syncing works only when both devices share the exact same account, while using Wondershare Dr.Fone requires disabling the Find My feature on the devices before starting the transfer.
Ask AI for a summary
 ChatGPT
 Perplexity
 Gemini
 Claude
 Grok
Grok
iOS devices are believed to stand in the elite section of smartphones. Their interconnectivity is one of the most highlighted features that exists among devices. The easy connection of the devices with each other makes it efficient for the user to transmit data between devices without any difficulty. When it comes to syncing an iOS device to a different option, this article provides directions for its execution.
Along with an understanding of how to sync iOS devices to other platforms accordingly, the discussion of iPhone not syncing properly is also considered. Read the article thoroughly to know the in-depth details about the iPhone not syncing with iTunes.
Part 1: How to Sync from iPhone/iPad to Computer?
Our first mode of discussion would revolve around finding out how to sync data from iPhone or iPad to the computer. For this, you will be using iTunes or Finder for its proper execution. A comprehensive overview of syncing iOS devices to the computer has been offered.
1.1 Sync iPhone/iPad to Computer Using Finder/iTunes
The process of synchronizing the iPhone or iPad to the computer using Finder or iTunes is simple. Before you go with the steps, learn the data types that will be effectively synchronized with the computer.
- Music
- Movies
- TV Shows
- Podcasts
- Audiobooks
- Books
- Photos
- Contacts
- Calendar
Provided below are the steps that will help you understand the basis of the operation:
Step 1: Open Finder or "iTunes" on your computer. Continue to connect your iPhone or iPad using a USB cable to the computer and let it be detected.
Step 2: As it is detected, navigate to the respective iPhone from the left panel and select the “Sync” button that appears on the bottom-right side of the window. The iPhone is successfully synchronized with the computer in an instant.

1.2 Wondershare Dr.Fone: Transfer Data Between iPhone and Computer
A third-party platform can be a better solution among the two in the discussion. Wondershare Dr.Fone fills in the space with its exquisite functionality and intuitiveness. The platform provides exceptional features that make it a great data management platform. While it makes data transfer easy, you can transfer all kinds of data types between iPhone and computer with ease.
Advantages of Using Wondershare Dr.Fone
Instead of facing issues executing functions like iPhone not syncing with iTunes, you can always try going for Wondershare Dr.Fone. Learn more about its advantages of how it makes phone management easy:
- You can easily manage and transfer data from your social media accounts, such as LINE, Kik, WhatsApp, and Viber.
- Data can be dragged and dropped to the destination without any difficulty.
- There is no need to connect the iOS device to iTunes or any other associated service.
Types of Data That Can Be Transferred Using Wondershare Dr.Fone
- Photos
- Music
- Videos
- Podcasts
- Ringtones
- Books
- Messages
- Call History
- Voicemail
- Safari Data
- Calendar
- Contacts
- Notes
- Voice Memos
- App Data
Steps To Transfer Data Between iPhone and Computer Using Wondershare Dr.Fone
We will now lead into discussing the simple and effective steps to transfer data between iPhone and computer:
Step 1: Connect your iPhone and Open Wondershare Dr.Fone
Connect your iPhone to the computer using a USB cable and launch Wondershare Dr.Fone. As it opens, select the “Export all data” option in the section that is opened.

Step 2: Select Data For Export
You can select the respective file types that you want to export from the iOS device. On selecting them, click the “Export” button to continue.

Step 3: Encrypt the Backup
Define a password for the backup that is set on the computer of the data being exported. Provide a password and click “Verify” to continue.

Step 4: Successful Transfer Of Data
All the data is successfully transferred to the computer in a while. You can also click the "Open in Folder" button to view the exported data.

Part 2: How to Sync from iPhone to iPad?
If you are trying to sync your iPhone data to your iPad, there are multiple techniques to make it happen. Those who are using both devices simultaneously can find this feature to be a great option. The part recognizes two different methods that can be used to synchronize the data properly.
2.1 Sync iPhone to iPad Using iCloud
iCloud can be an excellent option for synchronizing two different iOS devices quickly. If you are looking into this option, learn more about the data types that can be synchronized from iPhone to iPad:
- App Data
- Apple Watch Backups
- Device Settings
- Home screen and app organization
- iMessage, text (SMS), and MMS
- Photos and Videos
- Purchase History
- Ringtones
- Visual Voicemail
To know how you can synchronize iPhone to iPad using iCloud, follow the steps to understand the simple process:
Step 1: Open the “Settings” on your iPhone and select the name on the top for accessing the iCloud settings.

Step 2: Select the "iCloud" option on the next screen and tap "iCloud Drive" to enable the option.

Step 3: Turn on the toggle against the "Sync this iPhone" option and synchronize your iPhone successfully.

Step 4: Lead into the iPad and navigate the same settings as on the iPhone. You will have to turn on the toggle of "Sync this iPad" to synchronize the iPad successfully. Remember that the iPad should also have the same iCloud account logged into the device.

2.2 Phone Transfer: Transfer Data from iPhone to iPad
Wondershare Dr.Fone fills in the space of transferring data easily from iPhone to iPad. The "Phone Transfer" feature offered by the third-party service makes it easy to execute the process. Its one-click functionality and extensive support make it a perfect alternative in the market. Wondershare Dr.Fone promises a high-speed transfer, making the operations quick.
Advantages of Using Phone Transfer
If you are seeking to use the services of Wondershare Dr.Fone – Phone Transfer, learn some more details involving the advantages of the service:
- The service is compatible with over 8000+ Android and iOS devices, making it a diverse option.
- The entire transfer process takes approximately 3-5 minutes.
- Provides support for more than 15 file types during the transfer.
Types of Data That Can Be Transferred Using Dr.Fone – Phone Transfer
- Photos
- Music
- Videos
- Contacts
- Blacklist
- Text Messages
- Calendar
- Reminders
- Alarm
- Bookmark
- Voicemail
- Ringtone
- Voice Memos
Steps To Transfer Data Between iPhone and iPad Using Dr.Fone – Phone Transfer
Below are the steps to transfer data between iPhone and iPad with the help of Wondershare Dr.Fone – Phone Transfer:
Step 1: Access Phone Transfer Feature
Open Wondershare Dr.Fone on your computer and lead into the "Toolbox" section on the left panel. Proceed to select the "Phone Transfer" button to initiate the process.

Step 2: Connect Devices and Define the Position
Connect your iPhone and iPad to the computer using USB cables as you lead to the next window. As they are detected, they appear on the screen. Define the "Source" and "Destination" devices and use the "Flip" button if needed.
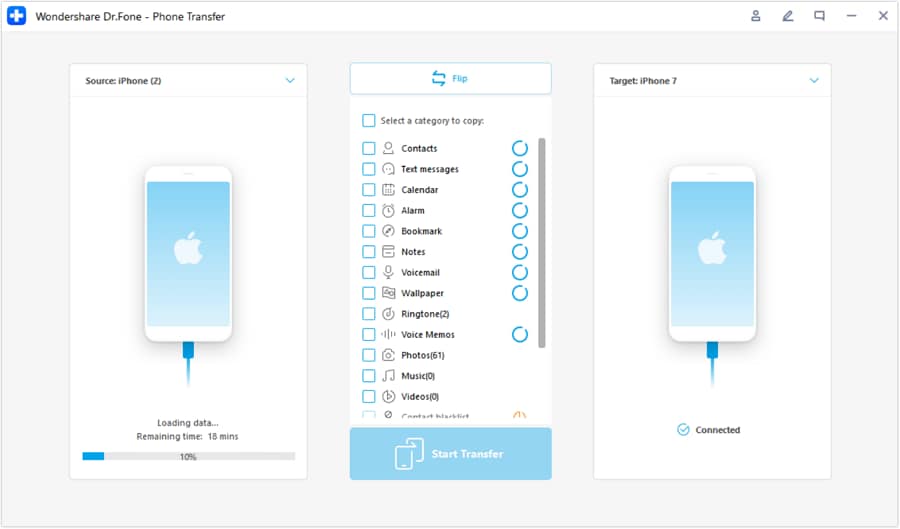
Step 3: Select Data Type and Transfer
Select the data type and click the "Start Transfer" button to initiate transferring data between iPhone and iPad. You might have to turn off the Find My feature from the devices to execute the process.

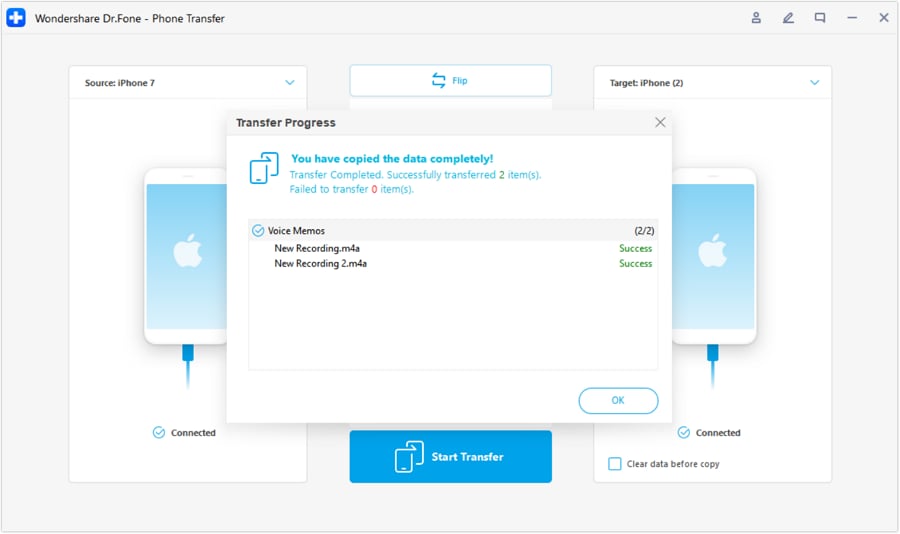
Step 4: Transfer Data Between iPhone and iPad
The data transfer process initiates and concludes in a while. Once done, a prompt appears on the screen where you have to click the "OK" button to execute the process.
Part 3: Why Won’t iPhone Sync?
What if you are facing issues with the sync session failing to start properly on your iPhone? Before you lead to figuring out a proper solution to the problem, you should understand the reasons behind the inability of the process. Look through the provided reasons to know why the iPhone sync won't:
- Outdated Software: It is possible that the iOS version installed on your device might be outdated, due to which it won't sync.
- Not Trusted the Device: If you have accidentally not trusted the computer on connection, you won’t be able to execute any data transfer between devices.
- Restrictions on iPhone: You might have imposed restrictions on the iPhone because it is not executing any data transfer process. Before making it possible, it is necessary to disable all limits.
- Bugs in Device: Due to any temporary bugs in the iOS device, it is possible that the device won’t execute any operation properly.
- Outdated iTunes: If you are trying to use iTunes for the data transfer process, but your iPhone not syncing with iTunes. It might be outdated because no data transfer is processed.
Part 4: 10 Tips to Fix iPhone Not Syncing with iTunes Issue
Whenever my iPhone will not sync, there are some expert suggestions that I implement in a stepwise manner. I have listed all of them right here.
One of the most common reasons for facing the iPhone not syncing with iTunes issue is using an older version of iTunes with your phone. If you have a new generation phone, then chances are that an older iTunes might not work with it. Most of the time, the iPhone won’t sync with iTunes and is resolved by simply updating iTunes.
To do this, go to the iTunes tab, and click on the “Check for Updates” option. It can be found under the “Help” section in Windows. It will check the latest version of iTunes available. Later, you can follow the on-screen instructions to update iTunes.

Initially, while making purchases, you must have authorized your computer to access iTunes. Chances are that there could be a security concern making the sync session failed to start. To fix this, you can reauthorize your computer with iTunes. Go to the Stores tab on iTunes and click on the “Authorize this Computer” option. Select the “Authorize” button on the pop-up message to complete the operation.

Needless to say, this is one of the easiest things to do. If your iPhone will not sync even after updating it, then simply restart your computer. It will implement the recent changes and might resolve this issue.
4. Check the USB and connection port
If either the USB port of your system or the connecting port of your phone is not working properly, then it can also lead to iPhone not syncing issue. To resolve this, check if your phone’s connection port is working properly or not. At the same time, try connecting your device to the system via another USB port.

You can sync iPhone with iTunes via a USB cable or wirelessly. If the USB method is not working, then turn on the WiFi sync option. Furthermore, repeat the same process if you think the WiFi sync option is malfunctioning. Simply go to the Options tab under “Summary” of your device and turn on/off the feature of syncing your device over Wifi.

If you are trying to sync your iOS device with iTunes on a Windows system, then you should update its drivers. Go to the Device Manager on your PC and right-click your iOS device. From here, you can choose to update its drivers. Simply search for updates online and follow the on-screen instructions to update the related drivers for your iOS device.

7. Turn off the Apple Music features
This might surprise you, but most of the time iPhone won’t sync with iTunes due to some conflict with the Apple Music application. If iTunes is not able to sync Apple music, then it might cause this problem. Therefore, you can always turn this feature off and diagnose the root cause of the issue. To start with, just go to your iPhone settings and turn off the features of Apple Music. Do the same with iTunes as well. Go to iTunes General Preferences and uncheck the option of “Show Apple Music”.

Later, you can restart iTunes and try connecting your device again to check if the sync session failed to start or not.
If there is a problem with your iOS device, then it can be fixed by simply restarting it. Just disconnect your device from your system and press its Power (sleep/wake) button to get the Power slider on your phone. Just slide it and turn off your device. Wait for a few seconds till your phone would be turned off. Afterward, restart it and try connecting it to iTunes again.

The iPhone 6s won’t sync with iTunes can sometimes not be fixed by simply restarting your phone. Therefore, you might need to take added measures to fix this. Ideally, when my iPhone will not sync, I hard reset it to fix this problem.
If you are using an iPhone 6s or older generation devices, then simply long-press the Home and Power (wake/sleep) button at the same time for at least 10 seconds. The screen will turn black and it will be restarted by displaying the Apple logo.

For iPhone 7 and 7 Plus devices, the same can be done by pressing the Power and Volume Down button at the same time. Let go of them when the Apple logo would appear on the screen.

For iPhone 8 or later devices, first, press and quickly release the Volume Up button. And then, press and quickly release the Volume Down button. You need to press and hold the Side (or Power) button until the Apple logo appears on the screen. Release the side button once the Apple logo appears.

Consider this as your last resort as this will erase your device’s data. If none of the above-mentioned suggestions would work to resolve the iPhone not syncing problem, then try to reset your device. Go to its Settings > General > Reset (or Transfer or Reset) and select the option of “Erase all Content and Settings”. Just agree to the pop-up message and factory reset your device.

After when your device would be restarted, try connecting it to iTunes again. You can also restore its backup from iTunes as well.
After following these suggestions, you would certainly be able to fix the iPhone not syncing issue. If you are still having some problems with iTunes, then simply use its alternative and have an effortless smartphone experience. It will let you save your time and effort while managing your device and your important data files without any trouble.


iPhone Issues
- iPhone Storage Full
- 1. Stuck on Apple Logo Storage Full
- 2. Erase Content Settings not Working
- 3. iPhone Lagging
- 4. iPhone Running Slow
- iPhone Update Problems
- 1. Stuck on Updating iCloud Settings
- 2. iPhone Frozen During iOS Update
- 3. iPhone Checking for Update Stuck
- 4. iPhone Cellular Update Failed
- 5. iPhone Software Update Failed
- 6. iPhone Stuck on Update Requested
- 7. iPhone Update Error 1110
- 8. iPhone Stuck On Verifying Update
- 9. iPhone Won't Update
- 10. Update Server Couldn't Be Contacted
- 8. iPhone & iPad Security Updates
- 9. Update iPhone with/without iTunes
- 10. Can't Download or Update Apps
- iPhone Media Problems
- 1. Apple Music Song Not Available
- 2. iPhone Not Ringing
- 3. iPhone Echo Problem
- 4. iPhone Ringer Problems
- 5. iPhone Plays Music by Itself
- 6. Ringer Volume Changes by Itself
- 7. Music Won't Play on iPhone
- 8. Blurry Photos & Videos on iPhone
- 9. iPhone Volume Problems
- iPhone Sound Problems
- 1. YouTube no Sound
- 2. iPhone Microphone Problem
- 3. Test iPhone Microphone
- 4. Headphones No Sound from iPhone
- 5. No Sound on iPhone Game
- 6. iPhone Sound Not Working
- 7. iPhone Screen Recording no Sound
- iPhone Calling Problems
- 1. iPhone No Sound on Calls
- 2. Screen Goes Black During Call
- 3. iPhone Recent Calls Not Showing
- 4. iPhone Dropping Calls Issue
- 5. iPhone Calling Problem
- iPhone Camera Problems
- 1. iPhone Camera Black
- 2. iPhone Camera Blurry
- 3. iPhone Camera Not Working
- 4. iPhone Front Camera Not Working
- 5. TrueDepth Camera Not Working
- 6.Out-of-Focus Photos on iPhone 15
- iPhone Network Problems
- 1. Airpods Won't Connect to iPhone
- 2. iPhone Disabled Connect to iTunes
- 3. iPhone Not Syncing Problems
- 4. iPhone Internet Not Working
- 5. iPhone Keep Disconnecting from Wifi
- 6. iPhone WIFI Not Working
- 7. PC Not Recognizing iPhone
- 8. iPhone Stuck on Connect to iTunes
- 9. iPhone Not Showing up in iTunes
- 10. iTunes Not Detecting Your iPhone
- 11. iPhone Bluetooth Disconnect
- 12.Apple CarPlay Keeps Disconnecting
- Other iPhone Problems


Alice MJ
staff Editor
Generally rated4.5(105participated)