100% Security Verified | No Subscription Required | No Malware

 :
: 
 ChatGPT
 Perplexity
 Gemini
 Claude
 Grok
Grok
iPhones and iPads are perhaps the most premium mobile devices available today, celebrated for their robust security, sleek design, and consistent software updates. However, like any sophisticated piece of technology, these Apple flagship devices can experience critical software lockouts. The most common and frustrating of these is the dreaded iPhone is disabled connect to iTunes problem.
If you are currently staring at an iPhone (from older models to the latest series) stuck on this disabled screen or trapped in recovery mode on iOS 14, 15, or beyond, do not panic. The good news is that your device is not permanently broken. Throughout this guide, we will reveal several expert methods to bypass the disabled screen. More importantly, we will show you exactly how to recover data that might be at risk when resolving an iPhone stuck in recovery mode or disabled state.
In this article
Part 1. Why Is Your iPhone Disabled or Stuck in Recovery Mode?
Before jumping into solutions to fix an older iPhone or the latest flagship model stuck in a disabled state, it is vital to understand the underlying causes. Rushing into a fix without diagnosing the root problem can sometimes make the situation worse. Generally, there are two main culprits behind an iPhone being stuck in recovery mode or displaying the disabled screen: software corruption and hardware damage.
If you recently went swimming, accidentally dropped your phone in water, or exposed it to extreme physical trauma, there is a high likelihood that a damaged internal component is triggering a hardware-based lock.
However, the vast majority of these errors stem from software issues. Common software causes include:
- Entering the wrong lock screen passcode too many consecutive times.
- An interrupted or corrupted attempt to update the device to the latest iOS software.
- A botched attempt to jailbreak the iOS ecosystem.
- Situations where you deliberately activated recovery mode to troubleshoot another bug but the device failed to exit properly.
Part 2. Why Does the iPhone Disabled Error Persist After a Fix?
There are numerous strategies to address an iPhone stuck in recovery mode or displaying the disabled screen. Many users immediately try a standard iTunes restore or browse for troubleshooting tips in the Apple Support Community.
While these basic methods can be helpful, they often fail to permanently resolve deeper system conflicts. If basic troubleshooting falls short, what is the next step? The answer is DFU mode.

Activating DFU (Device Firmware Update) mode is widely considered the most definitive way to rescue an iPhone that is stubbornly stuck. Unlike standard recovery, DFU mode interfaces with iTunes without loading the device's operating system or bootloader. This makes it incredibly powerful for bypassing deep-rooted software locks.
However, the major pitfall of utilizing DFU mode to fix an iPhone disabled connect to iTunes issue is the severe consequence of data loss. Flashing the firmware via DFU mode will wipe the device completely, a reality that most iPhone users understandably want to avoid.
Part 3. 5 Solutions to Fix a Disabled iPhone & Bypass the iTunes Error
If you are frustrated by an iPhone disabled connect to iTunes message or trapped in recovery mode, there is no need to panic. The tech community has developed several reliable methods to get your iOS device fully functional again.
Keep in mind that while some of these methods might wipe your phone, you are safe if you have previously backed up your iPhone / iPad. Let us dive into the top 5 practical fixes.
3-1. Fix "iPhone Disabled" Without Data Loss
Most official solutions for a disabled iPhone—especially those relying solely on Apple's native tools—will reset the device to factory settings, permanently erasing all unsaved data. If you wish to bypass the disabled screen and exit recovery mode without losing a single file, professional software is your best bet.
 Fix iOS issues, no data loss.
- One-click repair for all iOS problems.
- Solve recovery mode, Apple logo, black screen, etc.
- Upgrade or downgrade iOS without iTunes

Using a tool like Dr.Fone - System Repair (iOS) provides a highly secure and intuitive way to fix a multitude of iOS disasters without compromising your personal files. It seamlessly resolves devices stuck in recovery mode, stuck on a white Apple logo, or displaying a black screen. It also elegantly bypasses annoying iTunes errors like iTunes error 4013, error 14, iTunes error 27, and iTunes error 9. Here is how to use it:
-
Step 1 Launch the iOS System Repair Tool
Download and install the repair software on your Windows or Mac computer. Launch the application and select "System Repair" from the main interface.

-
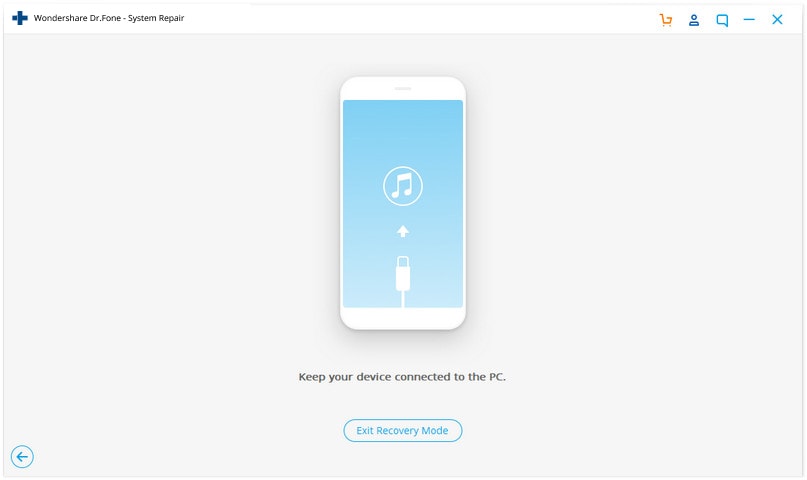
Step 2 Connect Your Disabled iPhone
Connect your malfunctioning iOS device to the computer using a certified lightning cable. Look for the "Exit Recovery Mode" option in the lower right part of the screen.

-
Step 3 Execute the Repair Process
A new window will pop up confirming the device's state. Simply click the "Exit Recovery Mode" button to initiate the software's automated repair sequence.
-
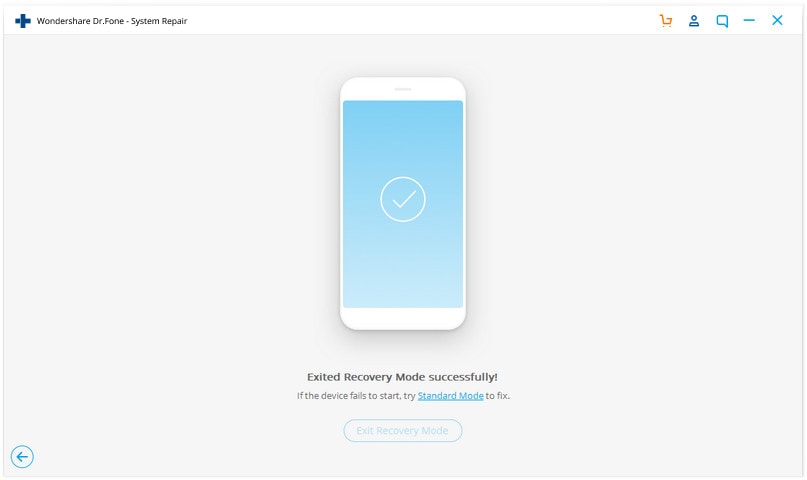
Step 4 Successfully Reboot the Device
In a short while, your iPhone will be brought out of the recovery mode loop, and the software will display an "Exited Recovery Mode successfully" message.


Further Reading:
3-2. Get Out of a Disabled Screen Without a Computer
If you don't have access to a PC, a forced restart is a powerful hardware-level maneuver that can occasionally snap a device out of a falsely triggered disabled state.
-
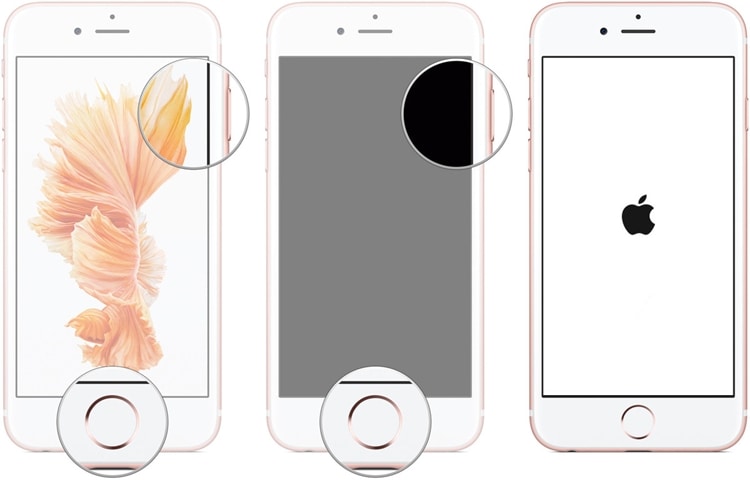
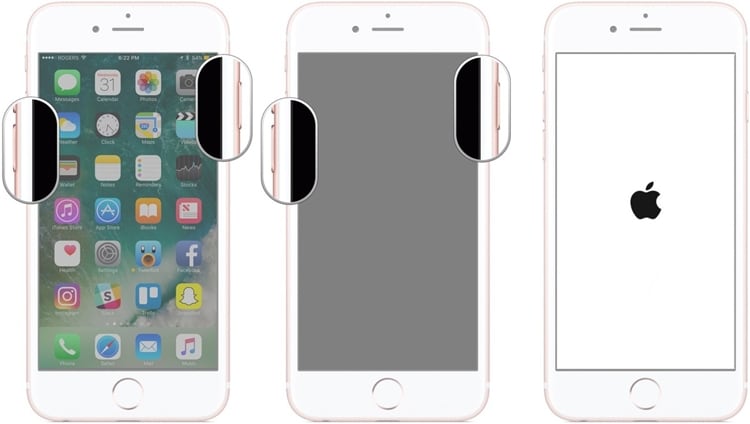
Step 1 For iPhone 6s and Older
Press the Power (wake/sleep) button and the Home button simultaneously. Keep holding them for 10-15 seconds until the Apple logo appears.
-
Step 2 For iPhone 7 and 7 Plus
Press and hold the Volume Down button alongside the Power (wake/sleep) button for roughly 10 seconds until the Apple logo interrupts the black screen.
-
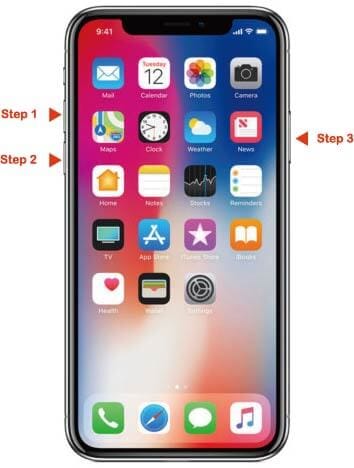
Step 3 For iPhone 8, X, and Newer Models
Quickly press and release the Volume Up key, then the Volume Down key. Finally, press and firmly hold the side Power key until the Apple logo boots up.
Further Reading:
- Top 6 Ways Fix iPhone Frozen in 10 Seconds
- Tips & Tricks to Resurrect Your Dead iPhone
- iPhone Keeps Freezing? Here Is The Quick Fix!
3-3. Fix iOS iPhone Stuck in Recovery Mode with TinyUmbrella
TinyUmbrella is a well-known hybrid tool heavily utilized by older generations of iOS users to bypass restrictive recovery loops. While its updates are less frequent for the most modern iOS versions, it remains a solid basic utility for legacy devices.
-
Step 1 Install TinyUmbrella
Download TinyUmbrella from its official site onto your Mac or Windows system and launch the application.
-
Step 2 Connect the Disabled Device
Connect your disabled iOS device via USB. Wait as the tool automatically detects the device's stuck state.
-
Step 3 Trigger the Exit Sequence
Once populated in the interface, click on the "Exit Recovery" button on the top right.
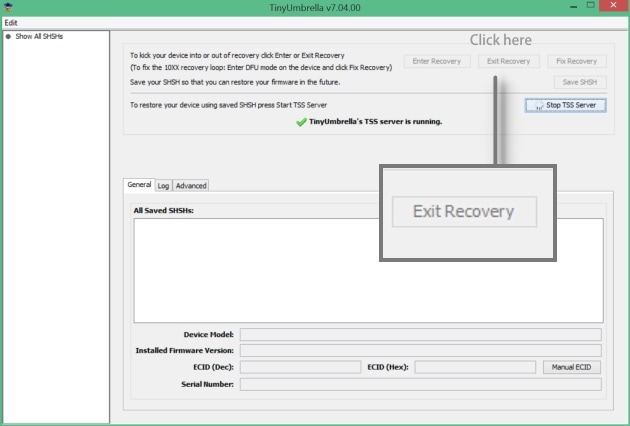
Note: This tool is not entirely foolproof, and it can occasionally cause data to be wiped if the firmware loop is too severe.
3-4. Fix iPhone Disabled with iTunes Restore
If third-party solutions do not align with your preferences, Apple's native ecosystem offers a path out. Using the "Restore to factory settings" procedure in iTunes will completely format the device, resetting it to the state it was in when shipped from the factory.
-
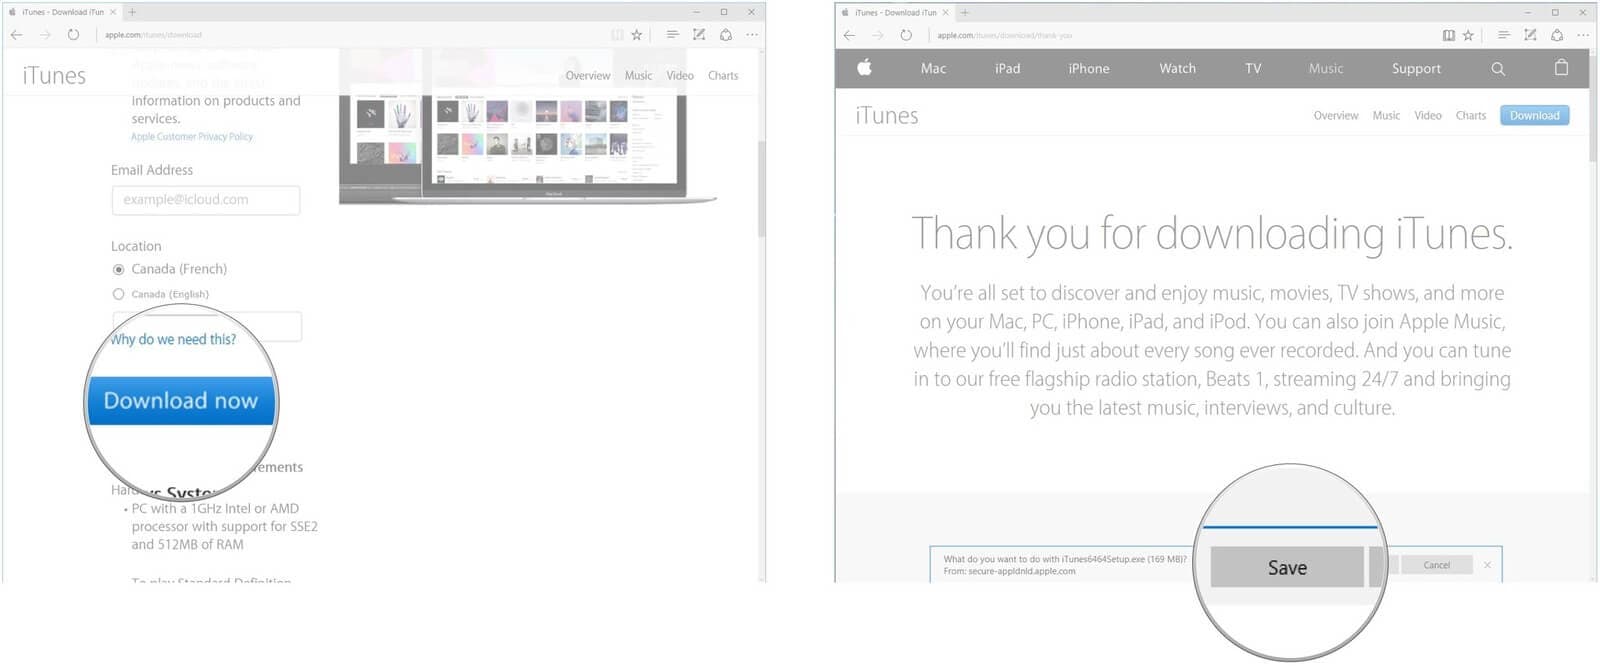
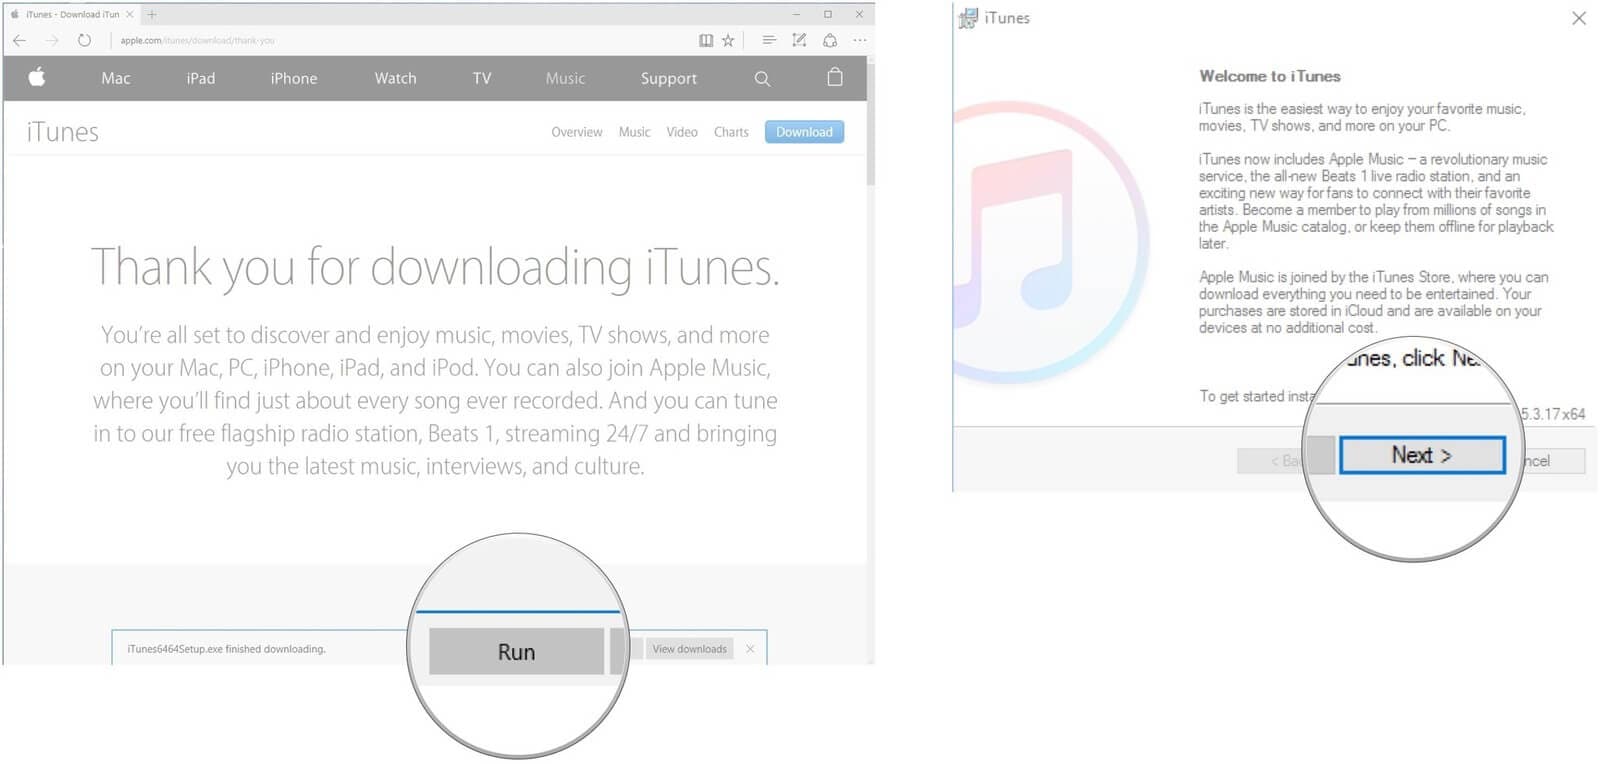
Step 1 Update Your Software
Head to the Apple website to ensure you have the latest version of iTunes installed.

-
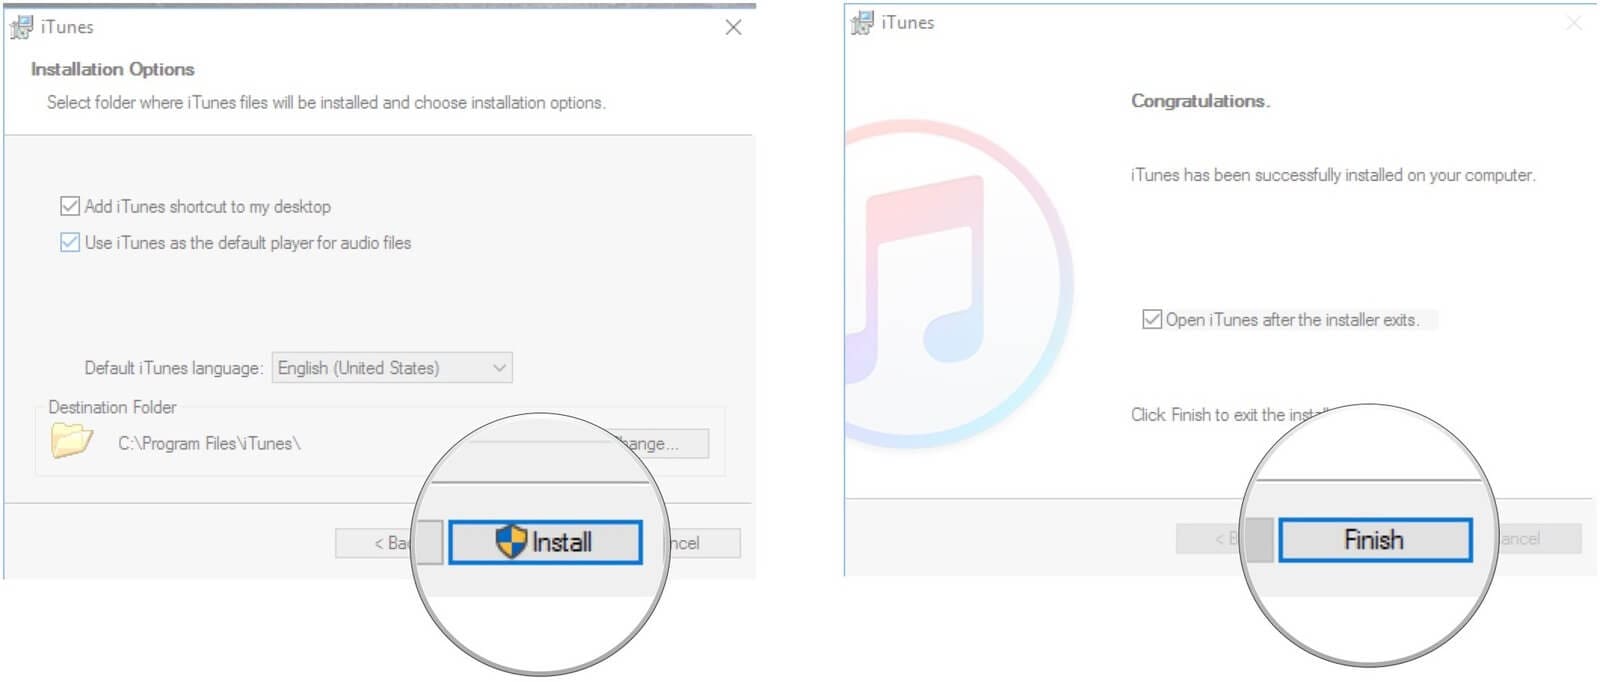
Step 2 Download and Run the Installer
Select the version explicitly compatible with your PC's operating system.
-
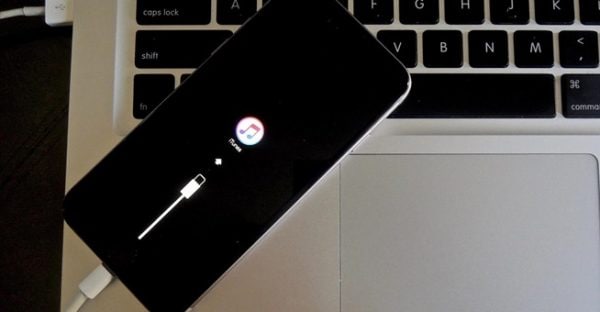
Step 3 Connect the iPhone to the Computer
Plug in the iPhone that is trapped on the disabled screen.
-
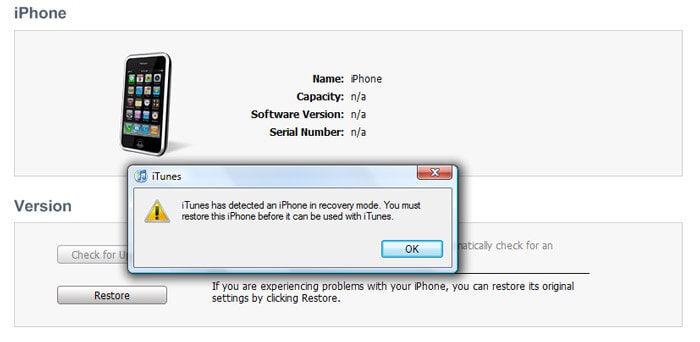
Step 4 Allow iTunes to Detect the Error
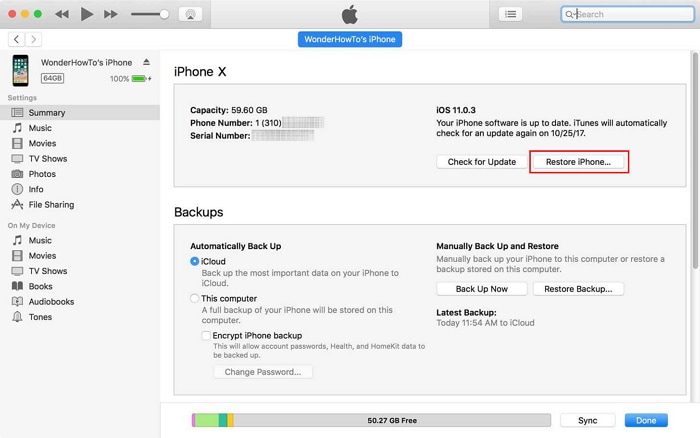
Launch iTunes. The platform is designed to instantly detect devices stuck in recovery mode and will display a corresponding popup.
-
Step 5 Trigger the Factory Restore
Click "Restore" to authorize iTunes to download fresh firmware and format the device. Upon completion, you will have a factory-fresh iPhone.
Further Reading:
- Proven Solutions to Fix "iPhone is Disabled Connect to iTunes"
- 4 Ways to Fix iTunes Error 9006
- How to Download Music on iPhone without iTunes
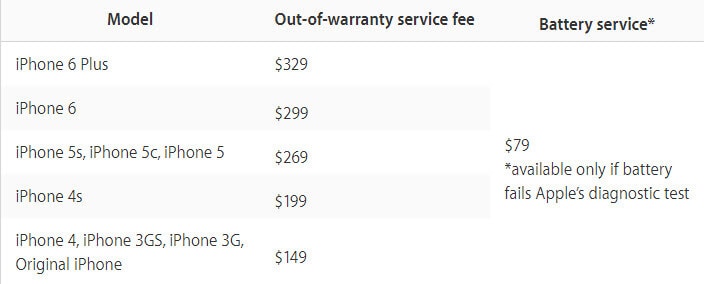
3-5. Go to an Apple Store for Hardware Issues
If software-based interventions fail to resolve the iPhone stuck in recovery mode or the stubborn disabled prompt, the device might be suffering from a hardware failure. Scheduling an appointment at an Authorized Apple Service Provider or a dedicated Apple Store ensures professionals can run advanced diagnostics.
Part 4. How to Recover Lost Data After Fixing a Disabled iPhone
You never know the true value of your data until it is gone. If you relied on an iTunes factory reset or DFU mode, the unfortunate aftermath is an entirely wiped device. This highlights why regular data protection using backup software is so critical. Fortunately, if you have legacy iCloud or iTunes backups, Dr.Fone - Data Recovery (iOS) acts as a powerful bridge to securely extract your files without overwriting new configurations.
- Recovers data after deletion, crashes, or device damage.
- Supports photos, messages, contacts, WhatsApp, and more.
- Supports all major iPhone, iPad, and iPod models.
- Preview and recover only what you need.

This iPhone data recovery suite operates well beyond just fixing "iPhone disabled" scenarios. It is robust enough to salvage files after lost data after a factory reset, a device locked error, a forgotten password, or even errors generated by an unstable iOS update. Whether your device is bricked or simply stuck and not responding, the software can scan the device, allow you to selectively extract your iTunes backup, or cleanly pull data down to extract your iCloud backup.
Conclusion
Experiencing an iPhone disabled connect to iTunes error can be incredibly stressful, but it is rarely a permanent death sentence for your device. While basic approaches like force restarts can fix minor glitches, deeper system locks will require iTunes factory restores or specialized iOS repair software. Choosing a solution that safeguards your data should always be the priority, allowing you to regain control over your Apple ecosystem without sacrificing precious memories.
FAQ
-
1. Will fixing my disabled iPhone erase all my data?
The outcome depends entirely on the method you choose. If you restore the iPhone using iTunes or put it into DFU mode, all data on the device will be completely erased. However, if you use a dedicated iOS system repair tool, you can often bypass the error and exit recovery mode without losing any existing files.• iTunes Restore: Wipes all data securely.• System Repair Software: Safe, preserves files natively. -
2. Why does the "iPhone is disabled" error even happen?
This error is a built-in security measure triggered by Apple's iOS ecosystem. It most commonly occurs when an incorrect lock screen passcode is entered too many times consecutively, forcing the device into a lockdown state to protect against unauthorized access. -
3. How long does the "iPhone disabled" lockout last?
Initially, the device may lock you out for 1 minute, which escalates to 5, 15, and 60 minutes with further incorrect attempts. If you fail the passcode entry 10 times, the device will permanently display the "connect to iTunes" message, requiring external intervention. -
4. Can I bypass the disabled screen without iTunes?
Yes, you are not strictly limited to iTunes. You can utilize third-party system repair software, execute a forced hardware restart (if it is a minor software glitch), or use iCloud's "Find My" feature to remotely erase and unlock the device if it is connected to the internet.
 Add Wondershare Dr.Fone as a preferred source on Google