Resolve common problems and system crashes on both iPhone and Android devices.

 100% Security Verified | No Subscription Required | No Malware

 :
: 
 ChatGPT
 Perplexity
 Gemini
 Claude
 Grok
Grok
It's incredibly frustrating when your iPhone's Wi-Fi suddenly stops working. In today's connected world, a stable internet connection is essential for everything from work emails and video calls to streaming media and staying in touch with loved ones. Many users report experiencing various iPhone Wi-Fi problems, such as being connected but having no internet access, the Wi-Fi toggle being greyed out, or the connection constantly dropping.
These issues can appear without warning, leaving you disconnected and searching for answers. This guide addresses the most common reasons why Wi-Fi is not working on your iPhone and provides clear, actionable solutions to get you back online quickly. We'll walk you through everything from basic troubleshooting to more advanced fixes.
In this article
- Part 1: Fix: iPhone Connects to Wi-Fi But No Internet
- Part 2: Fix: iPhone Wi-Fi Option is Greyed Out
- Part 3: Fix: iPhone Wi-Fi Keeps Disconnecting
- Part 4: Fix: iPhone Cannot Find Wi-Fi Networks
- Part 5: Fix: iPhone Fails to Connect to a Wi-Fi Network
- Part 6: The Ultimate Fix for All iPhone Wi-Fi Problems
Part 1: Fix: iPhone Connects to Wi-Fi But No Internet
One of the most confusing iPhone Wi-Fi problems is when your device appears to be connected successfully—the Wi-Fi icon is visible in the status bar—but you can't load any websites or use online apps. This indicates a communication breakdown between your iPhone and the internet, even though the local network connection is active. Here’s how to resolve this issue.
-
Step 1 Power Cycle Your Router
The simplest solution is often the most effective. Turn off your Wi-Fi router, unplug it from the power source, and wait for about 30 seconds before plugging it back in and turning it on. This clears its temporary memory and can resolve underlying glitches.
-
Step 2 Forget and Rejoin the Network
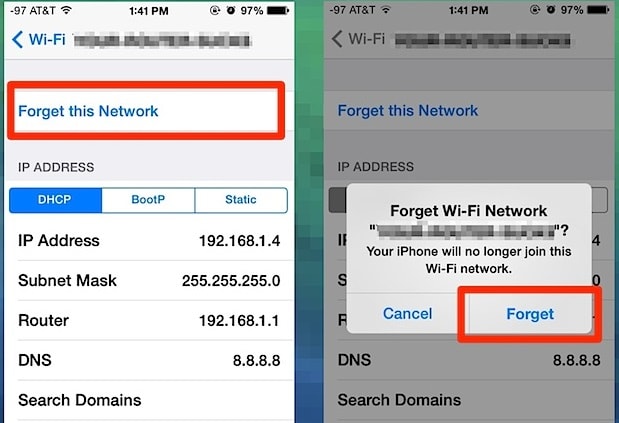
Your iPhone may have stored incorrect settings for the network. Go to Settings > Wi-Fi. Tap the information icon (the blue 'i') next to your network's name and then select Forget This Network. Confirm the action when prompted.
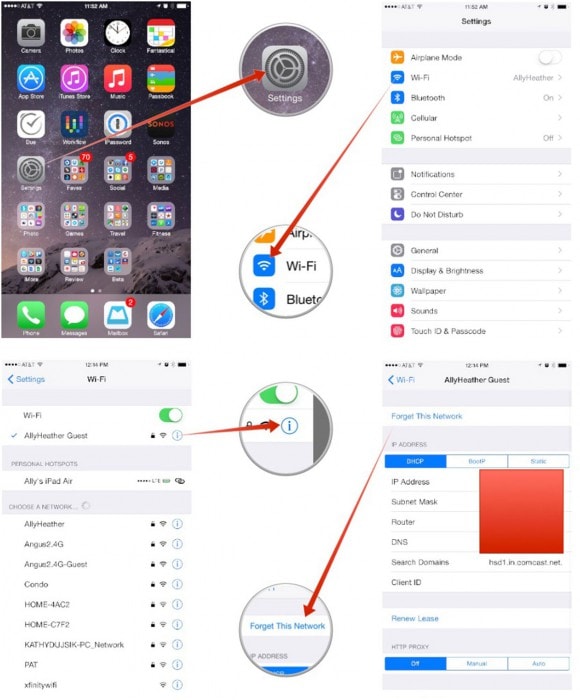
Once the network is forgotten, find it in the list of available networks, tap on it, and enter the password again to rejoin.

-
Step 3 Reset Network Settings
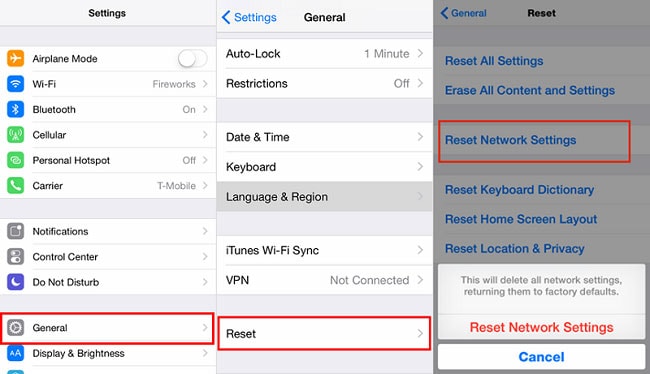
If the issue persists, resetting your iPhone's network settings can clear out any corrupt configurations. Navigate to Settings > General > Transfer or Reset iPhone > Reset. From there, tap on Reset Network Settings. This will erase all Wi-Fi networks, passwords, cellular settings, and VPN configurations. You will need to reconnect to your Wi-Fi network afterward.
Part 2: Fix: iPhone Wi-Fi Option is Greyed Out
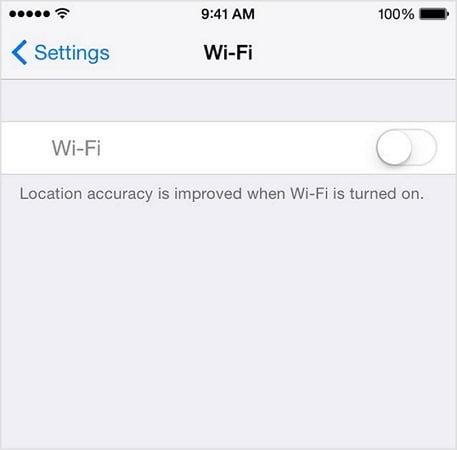
The "Wi-Fi greyed out" issue is a serious problem where the Wi-Fi toggle in your Settings or Control Center is inactive and cannot be turned on. This often points to a deeper software glitch or, in some cases, a hardware malfunction. Before assuming the worst, try these software-based solutions.
1. Update Your iOS Version
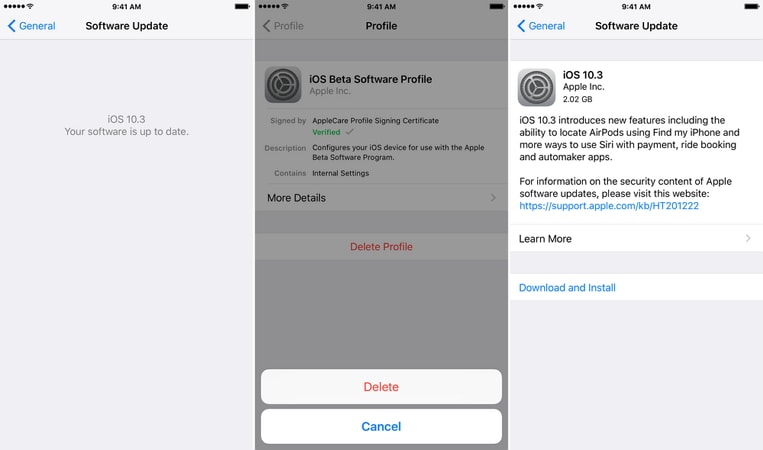
An outdated iOS can cause compatibility issues and bugs. Ensure your iPhone is running the latest software version. Go to Settings > General > Software Update. If an update is available, download and install it immediately. This often includes patches for known connectivity problems.
2. Reset Network Settings
As mentioned in the previous section, resetting network settings is a powerful troubleshooting step. This process can resolve deep-seated software conflicts that may be causing the Wi-Fi function to be disabled. Follow the steps outlined in Part 1 to perform this reset.
3. Restart Your iPhone
A simple restart can often resolve temporary software glitches. Press and hold the appropriate buttons for your iPhone model to bring up the power-off slider, then turn it back on after a minute.
Part 3: Fix: iPhone Wi-Fi Keeps Disconnecting
Is your iPhone constantly dropping its Wi-Fi connection? This is a highly disruptive issue that interrupts downloads, streams, and calls. If your iPhone keeps disconnecting from Wi-Fi, it could be due to network instability, settings conflicts, or weak signal strength. Here are some effective fixes.
- Check Your Proximity to the Router: Wi-Fi signals have a limited range. If you are far from the router, the signal may be too weak to maintain a stable connection. Move closer to your router to see if the connection stabilizes.
- Test Other Devices: Determine if the problem is with your iPhone or the network itself. Connect another device, like a laptop or tablet, to the same Wi-Fi network. If it also experiences disconnects, the issue is likely with your router or internet service provider.
- Forget the Network: As a common troubleshooting step, forgetting and rejoining the network can help. Go to Settings > Wi-Fi, tap the 'i' next to the network, and select Forget This Network.
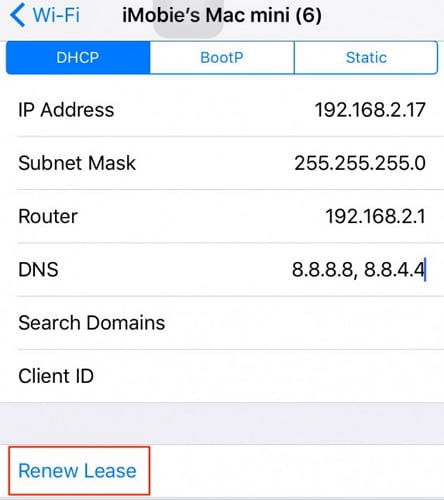
- Renew DHCP Lease: This forces your iPhone to request a new IP address from the router, which can resolve connection conflicts. In your Wi-Fi settings, tap on your network, scroll down, and tap Renew Lease.
- Disable Wi-Fi Assist: Wi-Fi Assist automatically switches to cellular data when the Wi-Fi connection is poor. Sometimes, this can cause the connection to drop prematurely. Go to Settings > Cellular and scroll to the bottom to turn off Wi-Fi Assist.
Part 4: Fix: iPhone Cannot Find Wi-Fi Networks
When you open the Wi-Fi menu and your home or office network doesn't appear in the list, it can feel like a dead end. This iPhone Wi-Fi problem can happen if the network is hidden, the router is malfunctioning, or your iPhone's wireless hardware isn't detecting signals correctly. Try these solutions to locate and connect to your network.
-
Step 1 Ensure the Router is Broadcasting
First, verify that your Wi-Fi router is turned on and that its indicator lights show it's broadcasting a signal. If other devices can see the network, the router is working correctly.
-
Step 2 Move Closer to the Router
If you're too far away, your iPhone may not be able to detect the network's signal. Reduce the distance between your iPhone and the router to see if the network name appears.
-
Step 3 Connect to a Hidden Network Manually
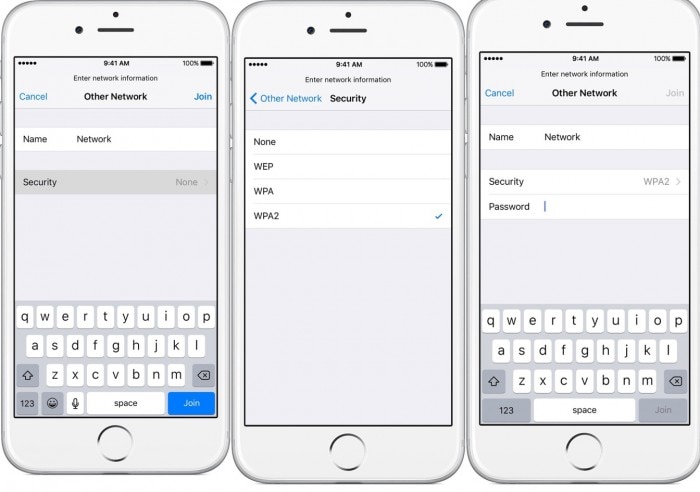
Some networks are configured to be "hidden," meaning they don't broadcast their name (SSID). You can connect to these manually. Go to Settings > Wi-Fi and select Other... under the list of networks.
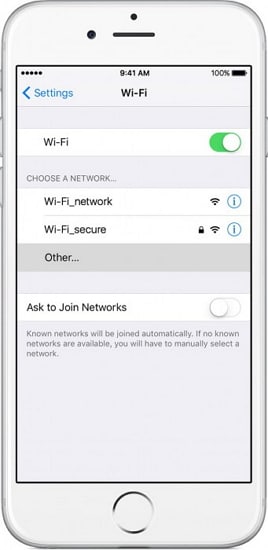
You will need to enter the exact network name, select the correct security type (e.g., WPA2, WPA3), and type the password. After entering all details, tap Join.
-
Step 4 Check for Hardware Issues
If none of the above solutions work and your iPhone cannot detect any Wi-Fi networks at all (while other devices can), there might be an issue with your iPhone's Wi-Fi antenna. This could require professional repair.
Part 5: Fix: iPhone Fails to Connect to a Wi-Fi Network
Another common iPhone Wi-Fi problem occurs when you can see your network, but every attempt to connect fails. You might see an "Unable to join the network" error or the connection process might time out. This usually points to an authentication issue or a settings conflict.
- Double-Check the Password: The most frequent cause of this error is a mistyped password. Wi-Fi passwords are case-sensitive, so enter it carefully. Tap the eye icon in the password field to view the characters as you type.
- Restart Your iPhone and Router: A full restart of both your iPhone and your Wi-Fi router can clear temporary glitches that prevent a successful connection.
- Check for Router Restrictions: Some Wi-Fi networks have security settings like MAC address filtering that may be blocking your iPhone. Log in to your router's admin panel and ensure there are no restrictions preventing new devices from joining.
- Disable VPN: If you have a VPN app installed, it might be interfering with the connection process. Open your VPN app and disable it, or go to Settings > General > VPN & Device Management and turn off the VPN status.
Part 6: The Ultimate Fix for All iPhone Wi-Fi Problems
If you've exhausted all the standard troubleshooting steps and the Wi-Fi on your iPhone is still not working, the problem may lie within the iOS system itself. Firmware corruption or deep-seated software bugs can cause persistent connectivity issues that basic resets can't fix. In this scenario, a professional system repair tool like Dr.Fone - System Repair (iOS) is your most reliable solution.
Dr.Fone - System Repair is a user-friendly application designed to resolve over 150 types of iOS system issues without causing any data loss. It can fix problems like a greyed-out Wi-Fi, connection failures, and other glitches by reinstalling a fresh version of iOS on your device safely. It's a secure and effective way to restore your iPhone's functionality when nothing else works.
 Fix iOS issues, no data loss.
- One-click repair for all iOS problems.
- Solve recovery mode, Apple logo, black screen, etc.
- Upgrade or downgrade iOS without iTunes
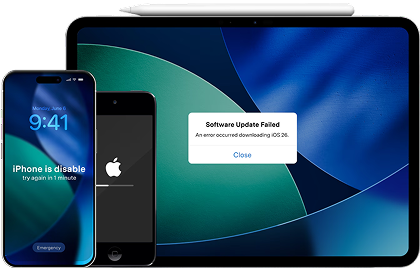
Here’s how to use Dr.Fone - System Repair to fix your iPhone Wi-Fi problem:
-
Step 1 Launch the Tool and Connect Your iPhone
Download and install Dr.Fone on your computer. Launch the application and select the System Repair module from the main interface. Connect your iPhone to the computer using a USB cable.

-
Step 2 Select the Repair Mode
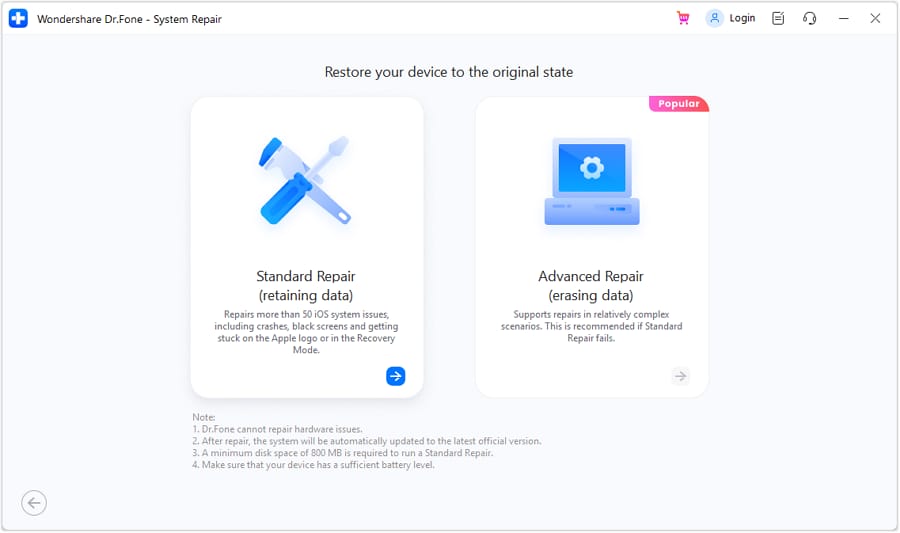
Choose iOS Repair and then select Standard Repair. This mode is designed to fix most common iOS issues without erasing your personal data. The Advanced Mode should only be used for more severe problems as it will erase all data.
-
Step 3 Download the Correct Firmware
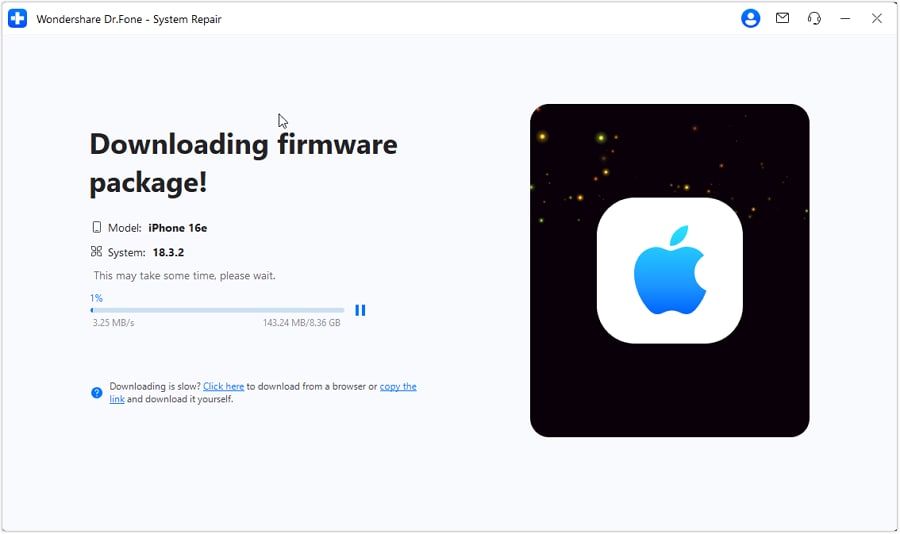
The software will automatically detect your iPhone model and display the latest compatible iOS firmware. Verify the details are correct and click Start to begin the download.
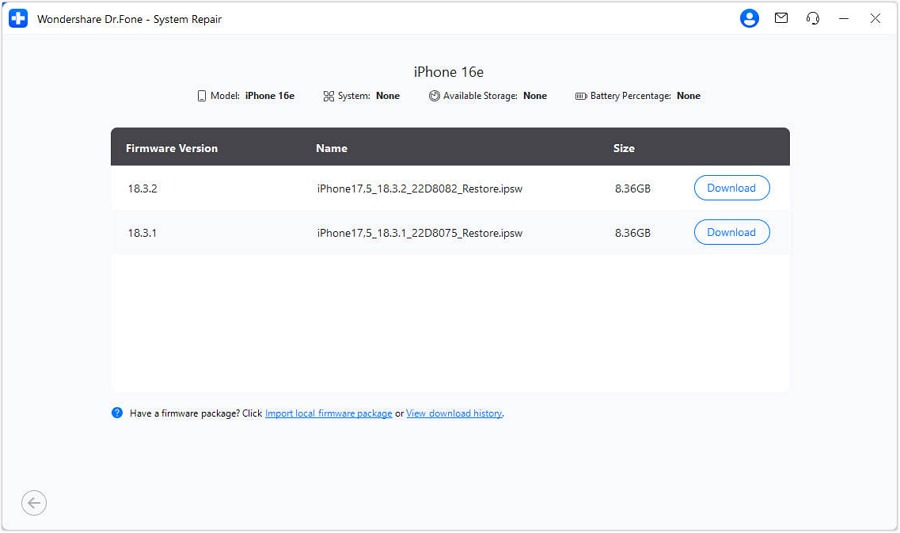
Wait for the firmware to be downloaded and verified by the application. This ensures a safe and compatible installation.
-
Step 4 Initiate the System Repair
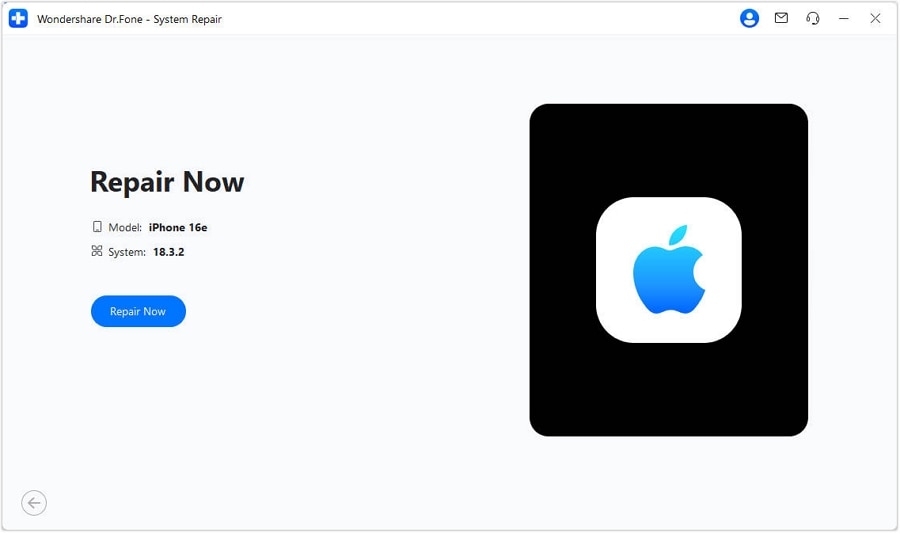
Once the firmware is verified, click the Fix Now button to start the repair process. Dr.Fone will begin fixing the iOS system files that are causing the Wi-Fi problem.
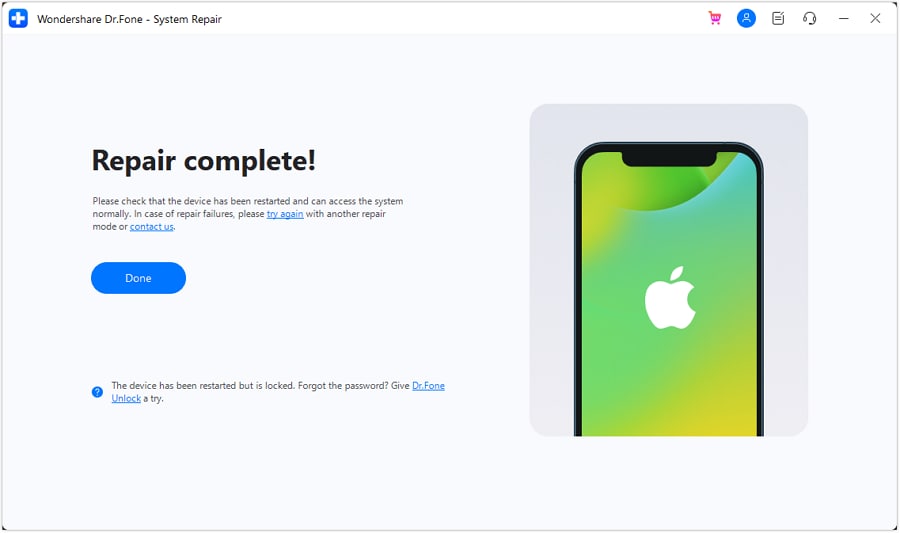
Keep your iPhone connected throughout the process. When the repair is complete, you will see a confirmation screen. Your iPhone will restart automatically, and the Wi-Fi functionality should be restored.
Conclusion
Experiencing Wi-Fi problems on your iPhone can certainly be disruptive, but most issues are fixable. By systematically working through the solutions provided in this guide—from simple restarts and network resets to using a powerful tool like Dr.Fone - System Repair—you can effectively troubleshoot and resolve the root cause of the problem. Start with the basic steps first, and if your iPhone Wi-Fi is still not working, a dedicated system repair is a safe and reliable final option to get you back online without losing your data.
FAQ
-
1. Why is the Wi-Fi option on my iPhone greyed out?
This usually indicates a software glitch or, less commonly, a hardware failure of the Wi-Fi antenna. Start by updating your iOS to the latest version and resetting network settings. If the problem persists, it may require a system repair or professional hardware service. -
2. Will resetting network settings on my iPhone delete my personal data?
No, resetting network settings will not delete any of your personal data like photos, contacts, apps, or messages. It will only erase saved Wi-Fi networks and their passwords, cellular settings, and any configured VPN settings. You will need to re-enter your Wi-Fi passwords afterward. -
3. What should I do if my iPhone connects to Wi-Fi but has no internet?
This is a common issue. First, restart your Wi-Fi router and your iPhone. If that doesn't work, try using the "Forget This Network" option and then reconnecting. The final step for this issue is typically to reset your network settings, which often resolves the problem. -
4. Why does my iPhone keep disconnecting from Wi-Fi?
Frequent disconnections can be caused by being too far from the router, network interference, or a software issue. Try moving closer to the router, renewing the DHCP lease in your Wi-Fi settings, or disabling Wi-Fi Assist. If the problem affects other devices, the issue is likely with your router or internet service.
 Add Wondershare Dr.Fone as a preferred source on Google