iPhone Lagging? 11 Fixes to Make It Smooth Again! [Video Guide included]

Jun 25, 2026 • Filed to: Data Wipe Solutions • Proven solutions
 TL;DR:
To resolve iPhone lagging or freezing issues caused by heavy resource usage or recent iOS updates, you must free up storage space and reduce CPU strain through manual setting adjustments or system cleaning tools.
● Limit background processing and visual drain by disabling Background App Refresh and auto-updates, while enabling Reduce Motion and Reduce Transparency in the iOS Accessibility settings.
● Use Dr.Fone - Data Eraser to efficiently scan and bulk-delete hidden system junk, large video files, Safari cache, and useless applications instead of manually removing them one by one.
● Perform a full factory reset for severe unresponsiveness, provided you back up your device first since this action permanently deletes all personal files, media, and installed apps.
Ask AI for a summary
 ChatGPT
 Perplexity
 Gemini
 Claude
 Grok
Grok
The iPhone is indeed a robust device compared to the average smartphone in the market. It is designed to last, and that is why iPhones tend to have a high resale value. However, it is not devoid of issues like iPhone 14 lagging or iPhone 7 lagging.
Well, iPhone lagging is undoubtedly annoying. It forces you to wait to execute certain tasks, a wait that wasn’t there before. In some cases, it takes too long to start up, and the screen even freezes during startup, which can be worrying.
Usually, lagging is a result of how we use our iPhones and what we use them for. For instance, the installation of too many applications can clog your memory and overpower your CPU speed. As a result, your iPhone 14 pro starts lagging and freezing altogether.
Also, back in the year 2017-2018, iPhone users began complaining about their phones suddenly behaving sluggishly after the iOS update. Apple came out explaining that an update they released slowed down the iPhones. Therefore, the sluggishness of your iPhone doesn’t leave you entirely to blame.
Such updates are for newer devices with faster CPUs, better memory (RAM), and fresh batteries.
So, this article is going to shade more light on why is my iPhone lagging or its apps, e.g., Snapchat lagging, and the possible solutions;
- Part 1: When the iPhone becomes lagging
- Part 2: 11 solutions to fix the iPhone lagging
- 2.1 Clear system junk data in your iPhone

- 2.2 Delete useless large files
- 2.3 Quit all running apps
- 2.4 Restart your iPhone
- 2.5 Clear Safari junk data
- 2.6 Delete useless apps
- 2.7 Enable the optimized battery charging mode
- 2.8 Turn off the auto-update feature
- 2.9 Disable Background app refresh
- 2.10 Reduce Transparency and Motion
- 2.11 Restore factory settings
Part 1: When the iPhone becomes lagging
Some of the situations when your iPhone is lagging include moments when typing. It is a common problem with iPhone 14 users where it might not only be unresponsive but also predictions stop showing or get hidden.
It is consistent with the iPhone lagging after iOS 16 update. Updates always carry either new features or bug fixes. Either way, an update always brings in new software components. These can be having bugs/errors that can, as a result, cause your iPhone to malfunction in various ways.
Such malfunctions are usually also noticeable with third-party applications like WhatsApp and Snapchat. As they operate on your iPhone’s OS, an update can cause them to crash. At this point, the iPhone or iPad lags when starting the app, and in some cases, the app randomly closes.
Furthermore, a low battery charge can also cause your iPhone to lag. It happens because there is not enough power to support its operations.
However, there are solutions you can implement on your iPhone to stop the lag. Below are some of those solutions.
Part 2: 11 solutions to fix the iPhone lagging
Solutions to iPhone lagging include;
2.1 Clear system junk data in your iPhone
Daily system operations lead to the creation of junk files. These include code used to facilitate updates or in the installation of an app, image thumbnails for images that have already been deleted, amongst other content. As a result, the accumulation of junk files ultimately causes your iPhone to lag since there is no ‘breathing space’ for your iOS.
Therefore, you’ll have to wipe out these junk files, and one efficient way to do so is by using the Dr.Fone - Data Eraser tool. Why is it termed as efficient?
Dr.Fone - Data Eraser
An effective tool to clear system junk data in your iPhone
- Makes use of a military-grade algorithm to wipe off your data permanently.
- It can access private data that is both there and that which was deleted, then wipe it off completely.
- It allows you to select what files to erase.
- You can use it with any iOS versions.
- The interface is straightforward to understand.

So, how can you wipe off junk files with Dr.Fone?
Note: But take care. If you'd like to remove the Apple account after you forgot the Apple ID password, it's recommended to use Dr.Fone - Screen Unlock (iOS). It will erase the iCloud account from your iOS devices.
Step 1: To start the process, make sure you have Dr.Fone - Data Eraser installed and launched on your computer.
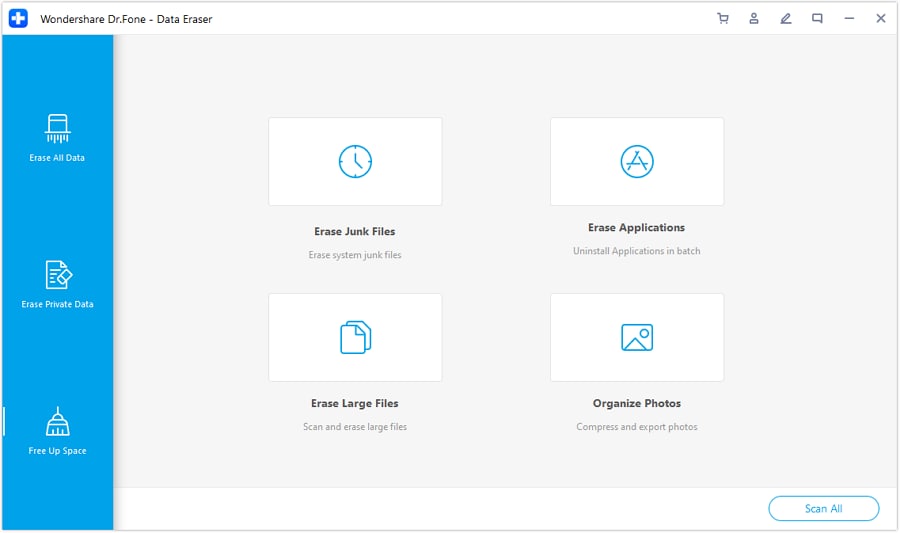
Step 2: Click on the Data Eraser feature. Connect your phone then select the free-up space at the bottom. On the left pane is the first option, Erase junk files. Click on it.
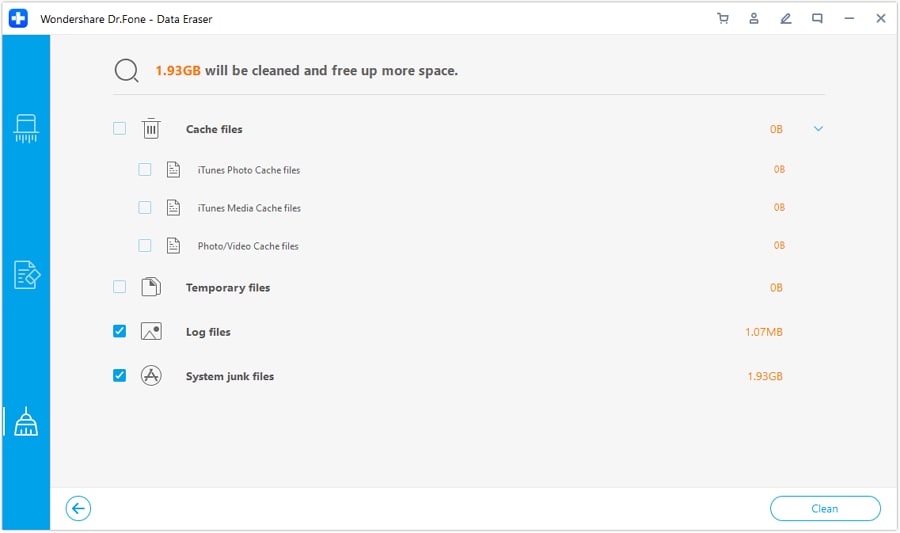
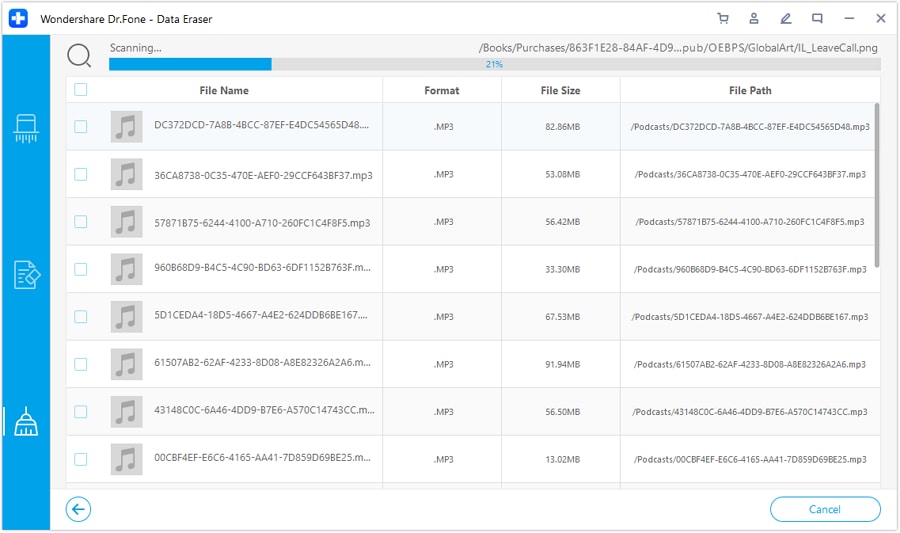
Step 3: The software then scans and displays all found junk files. On the left are checkboxes for you to mark, and on the right are their sizes. Select all the data you don’t need and click on clean.
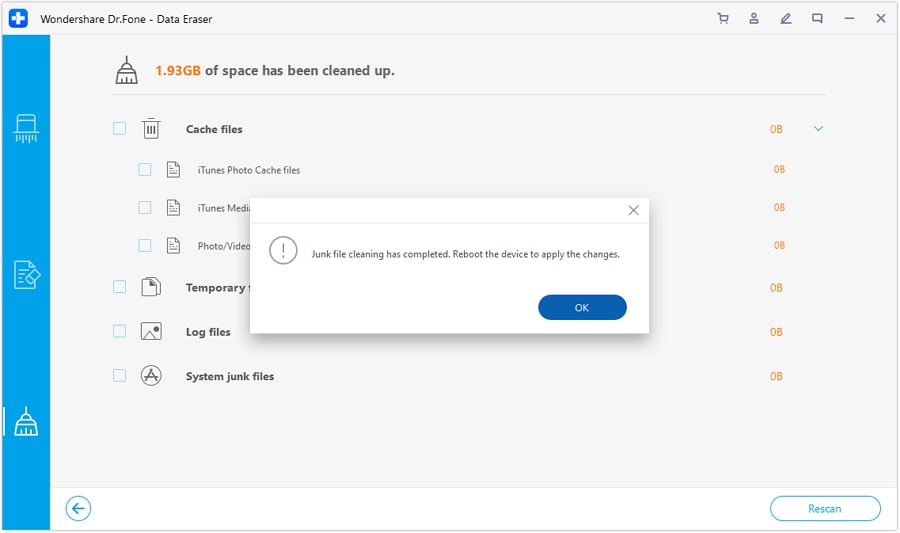
Step 4: When cleaning is complete, the next window opens up to show the amount of space freed. At this point, you can also do a rescan.
2.2 Delete useless large files
Most large files on your iPhone include videos and movies. Additional data can be the movies you have already watched or the videos you no longer need. To remove such with Dr.Fone;

Step 1: Back at the free-up space tab is the option to erase large files. Click on it.
Step 2: The program starts searching for these files.
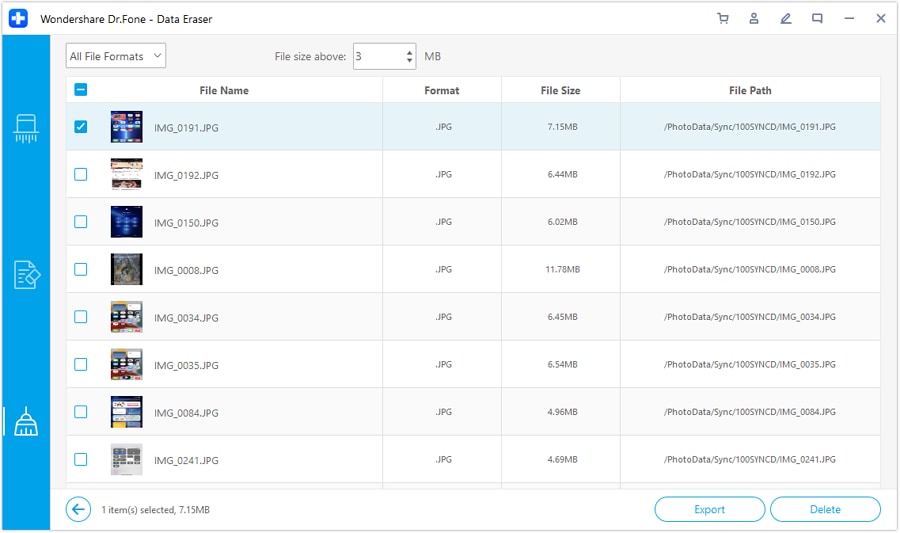
Step 3: Files detected will be shown in a list. The window has drop-down menus at the top for applying filters in file formats and sizes. After filtering, you can mark the files to wipe out and click either Delete or Export. Both get rid of data on your computer.
2.3 Quit all running apps
You will find it easier to access an app right from the app switcher as opposed to clicking on the app icon itself. The app switcher lets you quickly pick up from where you left. But what if these apps become overwhelming? Well, at this point you’ll have to close some of them.
To do so on your iPhone 6 or 7;
Step 1: First, press the Home button twice to access your app switcher.
Step 2: Swipe to and from the sides to go through various apps. Swipe up to get rid of the running process.
You can also get rid of multiple apps by swiping up with three fingers.
iPhone 8 to newer iPhone users have no Home button. Therefore, you’ll have to;
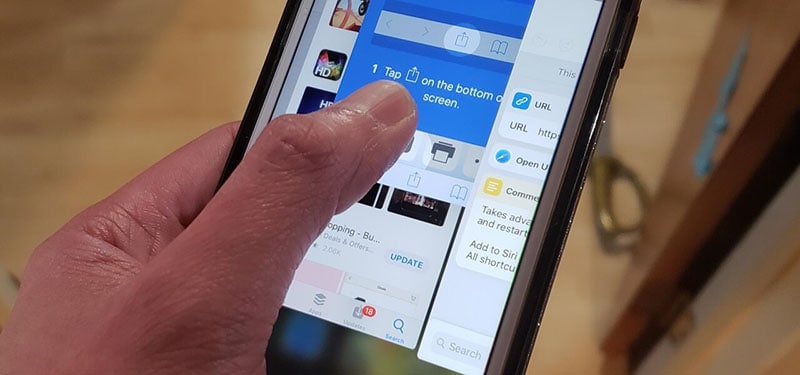
Step 1: To start, from the bottom of the screen, swipe up. This will bring up the app switcher.
Step 2: Now, long press on the app until the red circle appears for you to delete.
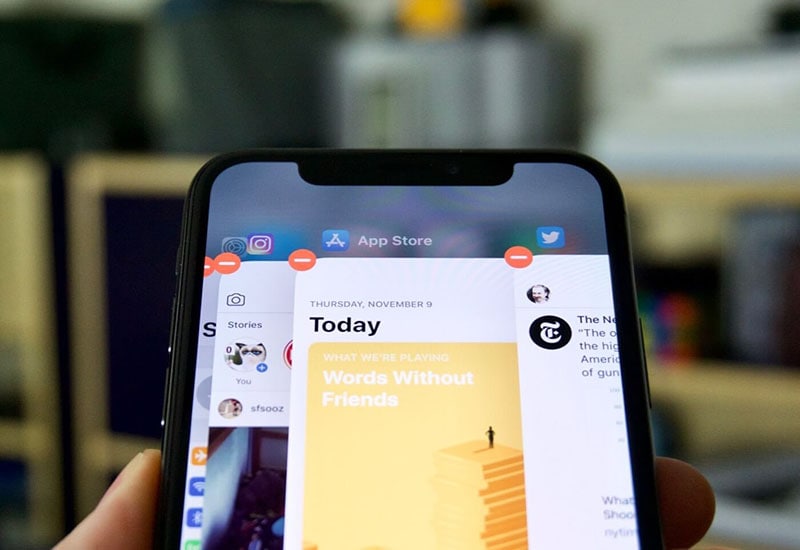
If you don't see the red circle in the app switcher, you can swipe the app up and off the top of the screen. This action will remove the app from the list of running apps and close it. Repeat the swipe-up gesture for each app you want to quit until all the running apps have been closed.
2.4 Restart your iPhone
Restarting iPhone is an easy operation but is a helpful way to fix various issues such as app crashes, slow performance, and other software-related problems.
1. To restart iPhone X, iPhone 11, iPhone 12, iPhone 13, and newer models:
Press and hold the side button and either volume button, then slide to power off. To turn it back on, press and hold the side button.
2. To restart iPhone 6, iPhone 7, iPhone 8, or iPhone SE (2/3):
Press and hold the side button, then slide to power off. To turn it back on, press and hold the side button.
3. To restart iPhone SE (1), iPhone 5, and earlier models:
Press and hold the top button, then slide to power off. To turn it back on, press and hold the top button.

2.5 Clear Safari junk data
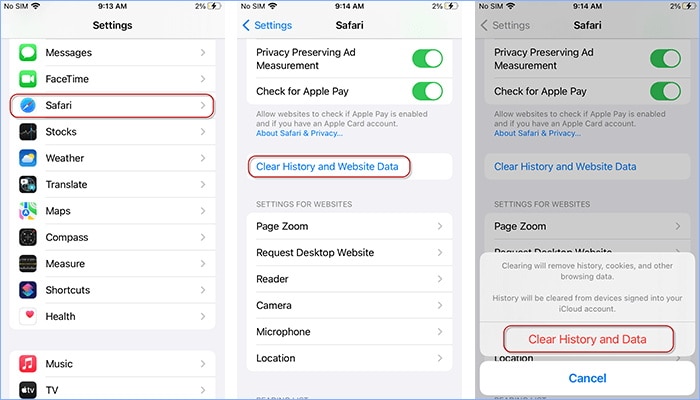
Some of the junk files including history, cache, cookies, and even bookmarks may be causing your iPhone to lag. Clearing Safari junk data can help free up storage space and can also improve the overall performance of the Safari browser. To do so from your iPhone;
Step 1: Go to the Settings menu and tap on Safari.
Step 2: Then, select Clear History and Website data.
Step 3: Lastly, tap on the Clear History and Data tab.
Use Dr.Fone - Data Eraser to clear Safari junk data.
Step 1: First of all, to use Dr.Fone - Data Eraser, ensure your iPhone is connected. Select the erase private data tab on the left column.
Step 2: On the right panel, select the type of data to scan and click on the option Start.
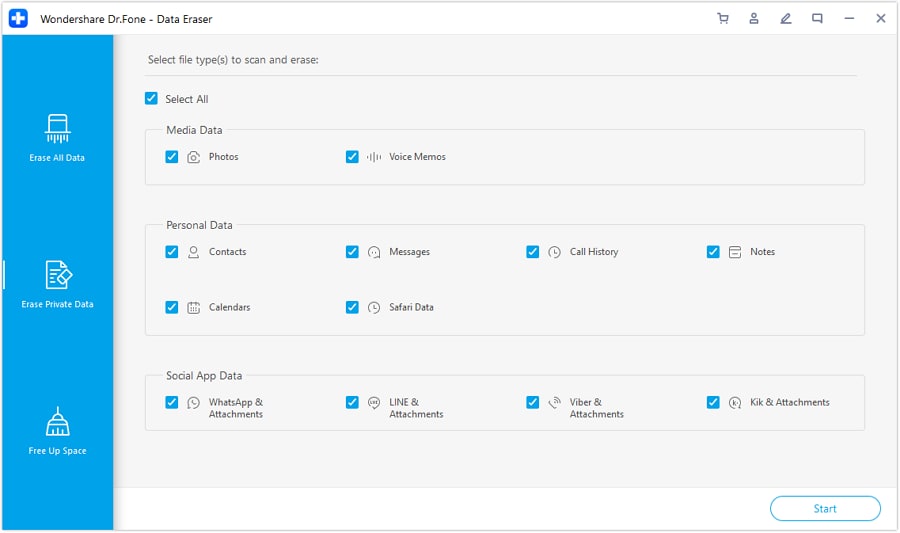
Step 3: When scanning is complete, details are shown. You can now erase the data.

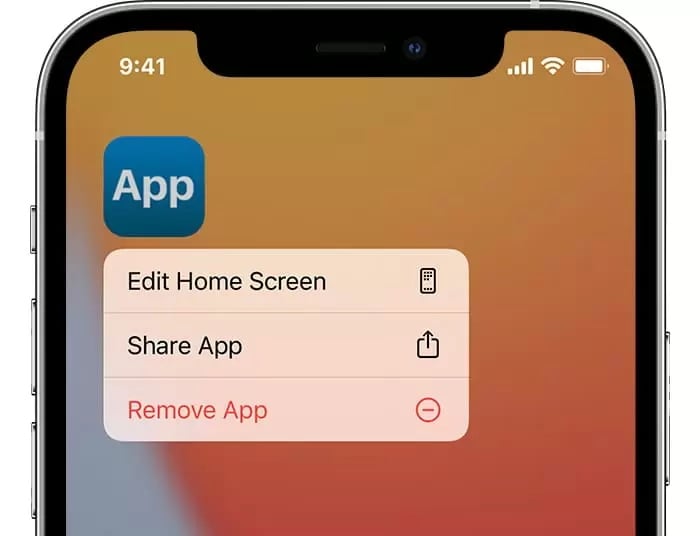
2.6 Delete useless apps
On the home page, press and hold the app icon until "Remove App" appears. Tap the "Remove App" to delete the app you want.
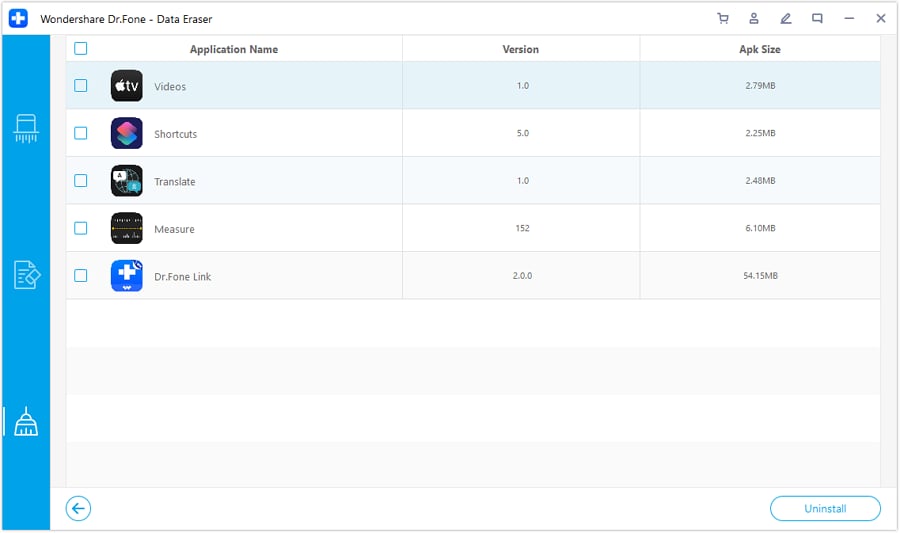
Although you can manually tap and delete unwanted apps one by one, using Dr.Fone - Data Eraser allows you to easily remove all useless apps with just one click;
Step 1: On the Free Up Space window, tap Erase Applications and then select the apps by marking them on the checkbox.
Step 2: Click on Start to launch the scanning process.
Step 3: On the last window, click on Uninstall to wipe out apps and their data.
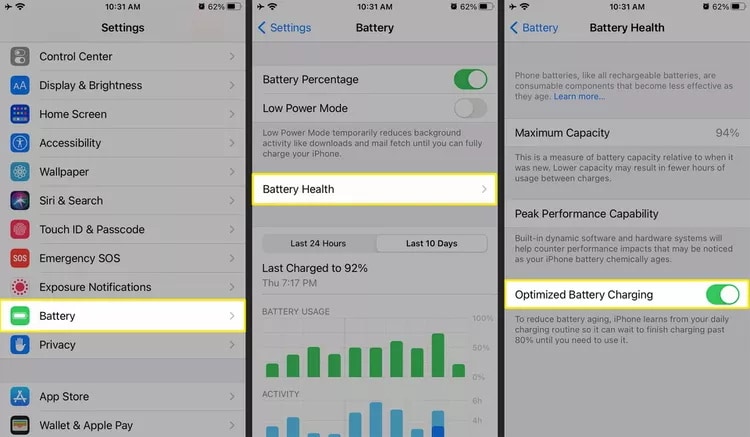
2.7 Enable the optimized battery charging mode
Many people complain about the slow battery charging issues in iOS 16, where it takes an extended time to fully charge their device. Optimized Battery Charging on iPhone is to improve battery health and prolong its lifespan. By learning your charging patterns, it adjusts the charging rate intelligently to avoid overcharging and reduce battery aging.
Step 1: Go to Settings > Battery.
Step 2: Click the Battery Health menu to turn on Optimized Battery Charging.
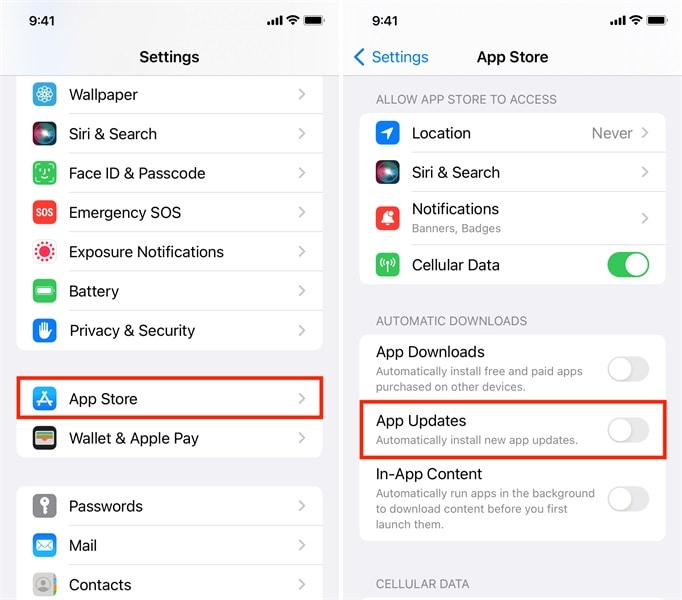
2.8 Turn off the auto-update feature
Apps often come with updates that include new features or improvements. These updates can take up additional storage space on your device. Auto-updates apps on your iPhone with low storage can sometimes contribute to performance issues and lag. If you experience lagging after app updates, you can follow these steps to disable auto updates:
Step 1: Go to the Settings menu.
Step 2: Scroll down to find App Store.
Step 3: Turn the toggle off from Green to Grey on the ‘App Updates’ tab.
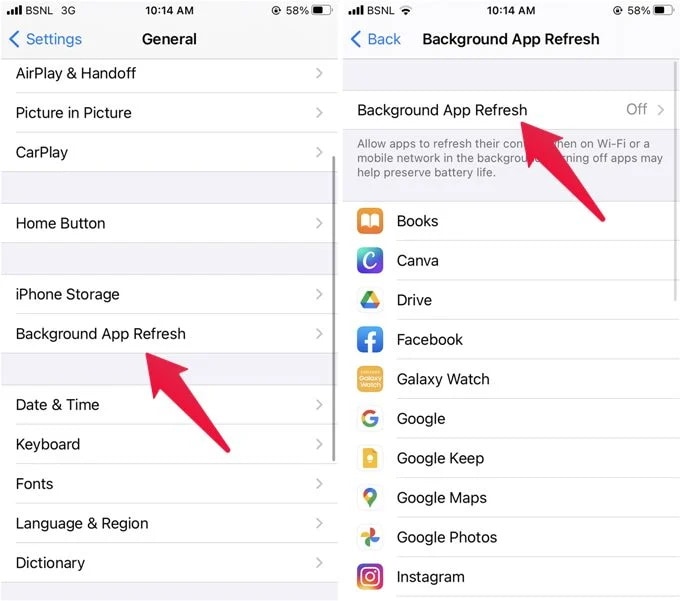
2.9 Disable Background app refresh
When Background App Refresh is enabled, apps continue to refresh their content in the background, even when you're not actively using them. This constant refreshing consumes processing power and data, which can slow down your device and drain its battery faster.
Step 1: Using the Settings app, go to your iPhone’s General tab.
Step 2: Select ‘Background App Refresh.’
Step 3: On the next window, tap 'Background App Refresh' to turn it off.
2.10 Reduce Transparency and Motion
Reduce Transparency and Motion on your device can improve the overall performance and your experience by reducing the visual effects and animations. This can help to minimize the strain on system resources, resulting in smoother navigation, faster app launches, and reduced battery consumption.
Step 1: Open the Settings app.
Step 2: Scroll down to select accessibility.
Step 3: Tap the Motion tab to turn on the ‘Reduce Motion’ feature.

Step 4: Under the Display & Text Size feature, turn on ‘Reduce Transparency’.
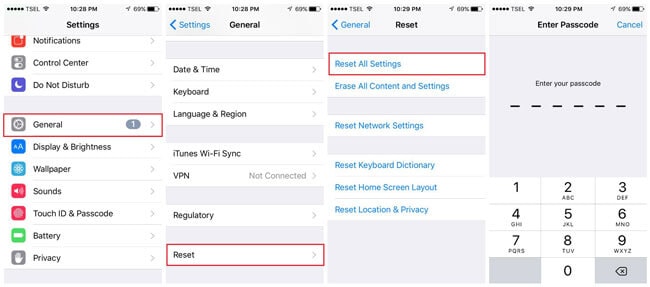
2.11 Restore factory settings
When you reset your iPhone to factory settings, it removes all installed apps, media, contacts, and other personal data. It can be useful for iPhone lagging. It's important to note that resetting to factory settings permanently deletes all data on the device, so it's crucial to back up any important information before proceeding.
Step 1: Go to Settings and then General.
Step 2: Here, scroll down to find the ‘Reset’ option (or 'Transfer or Reset iPhone' > 'Reset').
Step 3: Select ‘Reset All Settings,’ enter your passcode and confirm.
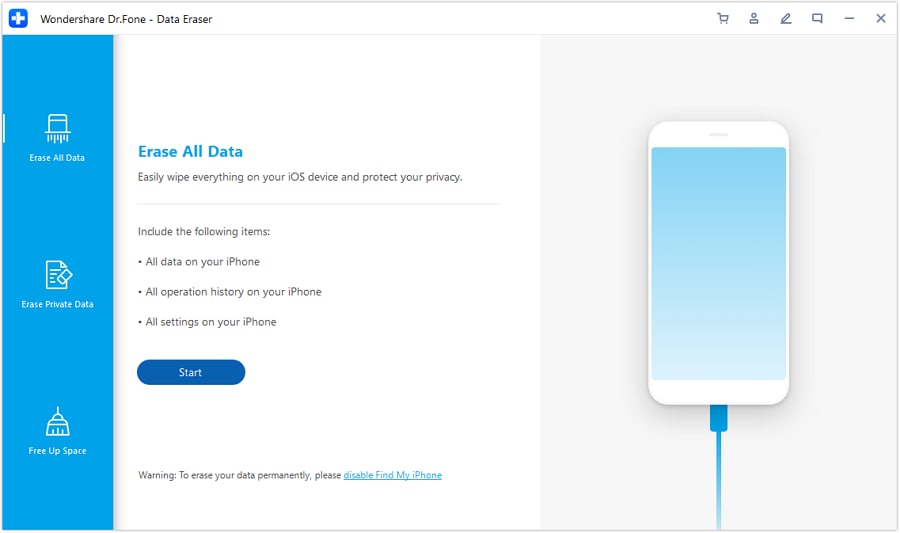
To use Dr.Fone - Data Eraser to reset factory settings.
Step 1: Connect your phone to the computer, and on the Erase all data window, click on Start.
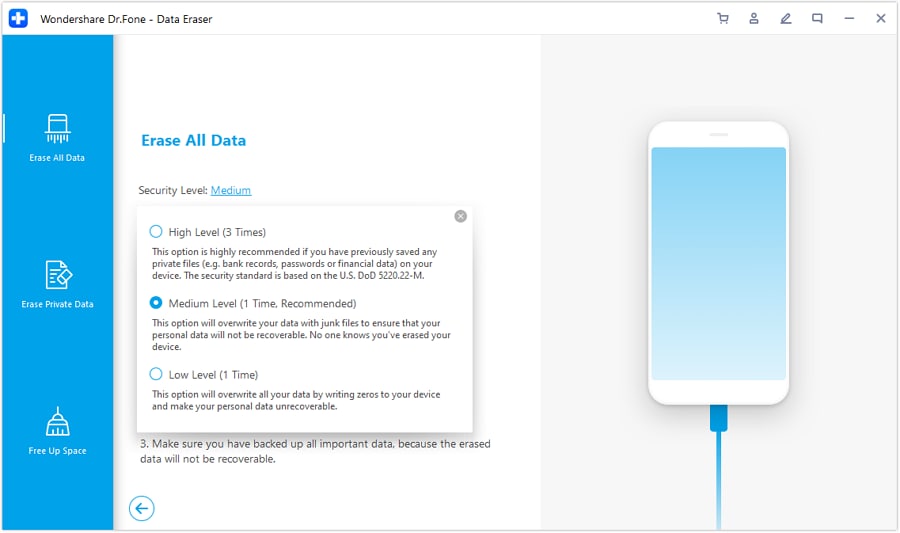
Step 2: The next window requires you to select the level of security. Select the highest or medium.
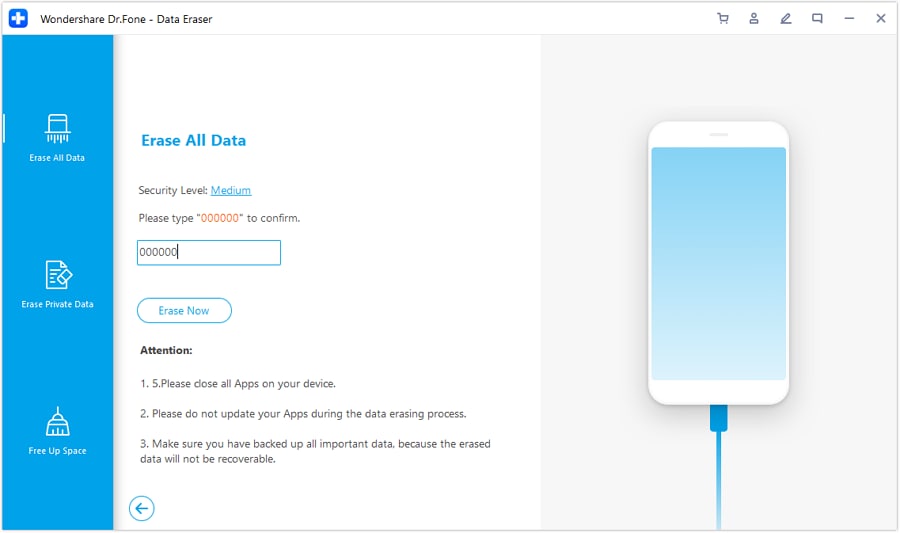
Step 3: Enter the confirmation code ‘000000’ and click ‘Erase now.’
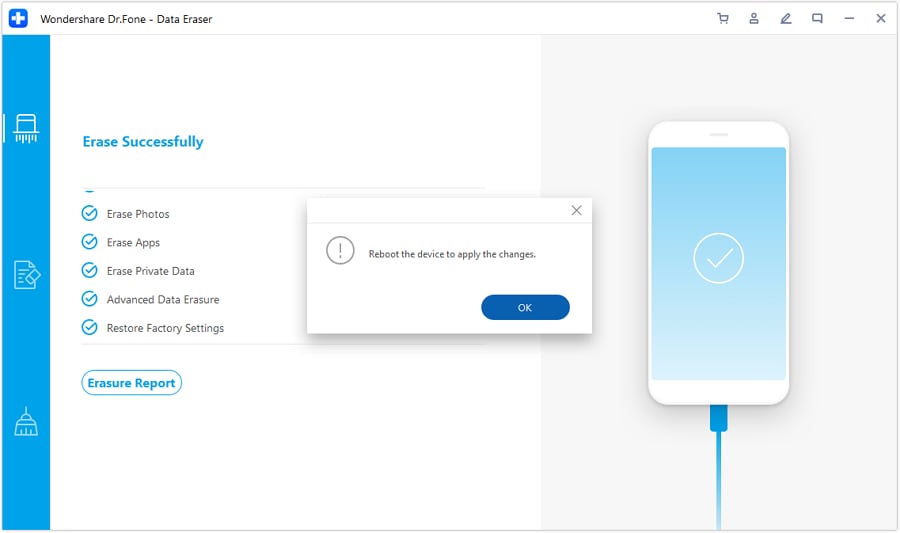
Step 4: Now, confirm ‘Ok’ to reboot your iPhone.
Conclusion:
While there are ways to boost your iPhone’s functionality, it is still essential to make sure that it doesn't get weighed down. Hence, when it comes to performing updates, you can try deferring them until you find a fix for whatever underlying issue.
Therefore, monitoring the number of apps we use at any given time goes a long way in keeping your iPhone snappy and efficient. Frequent closing of apps keeps your iPhone from lagging.
However, in extreme cases where your iPhone becomes unresponsive and shuts down from time to time, use the Dr.Fone - Data Eraser toolkit for a factory reset.
Lastly, we would urge you to share this article on phone lagging issues with your friends and loved ones.


iPhone Issues
- iPhone Storage Full
- 1. Stuck on Apple Logo Storage Full
- 2. Erase Content Settings not Working
- 3. iPhone Lagging
- 4. iPhone Running Slow
- iPhone Update Problems
- 1. Stuck on Updating iCloud Settings
- 2. iPhone Frozen During iOS Update
- 3. iPhone Checking for Update Stuck
- 4. iPhone Cellular Update Failed
- 5. iPhone Software Update Failed
- 6. iPhone Stuck on Update Requested
- 7. iPhone Update Error 1110
- 8. iPhone Stuck On Verifying Update
- 9. iPhone Won't Update
- 10. Update Server Couldn't Be Contacted
- 8. iPhone & iPad Security Updates
- 9. Update iPhone with/without iTunes
- 10. Can't Download or Update Apps
- iPhone Media Problems
- 1. Apple Music Song Not Available
- 2. iPhone Not Ringing
- 3. iPhone Echo Problem
- 4. iPhone Ringer Problems
- 5. iPhone Plays Music by Itself
- 6. Ringer Volume Changes by Itself
- 7. Music Won't Play on iPhone
- 8. Blurry Photos & Videos on iPhone
- 9. iPhone Volume Problems
- iPhone Sound Problems
- 1. YouTube no Sound
- 2. iPhone Microphone Problem
- 3. Test iPhone Microphone
- 4. Headphones No Sound from iPhone
- 5. No Sound on iPhone Game
- 6. iPhone Sound Not Working
- 7. iPhone Screen Recording no Sound
- iPhone Calling Problems
- 1. iPhone No Sound on Calls
- 2. Screen Goes Black During Call
- 3. iPhone Recent Calls Not Showing
- 4. iPhone Dropping Calls Issue
- 5. iPhone Calling Problem
- iPhone Camera Problems
- 1. iPhone Camera Black
- 2. iPhone Camera Blurry
- 3. iPhone Camera Not Working
- 4. iPhone Front Camera Not Working
- 5. TrueDepth Camera Not Working
- 6.Out-of-Focus Photos on iPhone 15
- iPhone Network Problems
- 1. Airpods Won't Connect to iPhone
- 2. iPhone Disabled Connect to iTunes
- 3. iPhone Not Syncing Problems
- 4. iPhone Internet Not Working
- 5. iPhone Keep Disconnecting from Wifi
- 6. iPhone WIFI Not Working
- 7. PC Not Recognizing iPhone
- 8. iPhone Stuck on Connect to iTunes
- 9. iPhone Not Showing up in iTunes
- 10. iTunes Not Detecting Your iPhone
- 11. iPhone Bluetooth Disconnect
- 12.Apple CarPlay Keeps Disconnecting
- Other iPhone Problems


James Davis
staff Editor