Recover photos, messages, WhatsApp, and more — no backup
needed.
Recover photos, messages, WhatsApp, and more — no backup
needed.

 100% Security Verified | No Subscription Required | No Malware

 :
: 
 ChatGPT
 Perplexity
 Gemini
 Claude
 Grok
Grok
Over the years, Facebook Messenger has solidified its place as a central hub for staying connected with friends, family, and colleagues, preserving thousands of cherished memories and critical conversations. Accidentally losing these meaningful chats due to an errant swipe or device malfunction can be highly distressing. However, there is no need to panic. If you are wondering how to recover deleted Messenger messages on iPhone, you have come to the right place.
This comprehensive guide explores the most effective techniques to retrieve your communications. Even if your messages are not permanently erased, sifting through a massive cluster of chats can be a frustrating struggle. We will also reveal efficient tricks to locate old messages in a fraction of the time. Let’s dive directly into these proven strategies!





In this article
Part 1. How to Recover Deleted Facebook Messages
If you have accidentally cleared out important Facebook conversations, you still have several robust recovery avenues available. Below, we outline actionable methods that can successfully recover deleted Messenger messages on iPhone, ensuring your personal and professional communications remain accessible.
For data loss involving other social apps, explore Dr.Fone social media recovery options before choosing the most relevant recovery path.
Method 1: Check Archived Conversations
Before assuming a conversation is gone forever, you should verify that it hasn't simply been archived. The Facebook Messenger app features a hidden “Archived Message” folder designed to declutter your primary inbox without permanently destroying data. Because swiping a chat can easily trigger the archive command rather than the delete function, checking this repository is often the quickest path to recovering your messages.
-
Step 1 Access the Messenger Menu
Launch the Facebook Messenger application on your iPhone. Locate and tap on the “three-bar” menu icon situated in the top-left corner of the main interface.

-
Step 2 Navigate to Archives
From the slide-out menu that appears, select the “Archive” option to open your hidden folder.

-
Step 3 Unarchive the Desired Chats
The new window will display a complete list of all conversations you previously archived. Scroll through to locate the lost chat. Press and hold the conversation for a few seconds, then choose “Unarchive” from the pop-up context menu. The messages will instantly reappear on your primary chat screen.

Method 2: Download Your Facebook Information
Because Facebook continuously saves your account activities to its robust servers, you hold the right to request a formal copy of your data history at any given time. This feature is a powerful workaround to recover deleted messages in Messenger iphone users frequently rely on. Follow these detailed steps to submit a data download request via the app:
-
Step 1 Open Messenger Settings
Open the Messenger app on your iOS device and tap the three-line icon located at the top-left corner.
-
Step 2 Access the Accounts Center
Tap on the Gear (Settings) icon. Scroll down to the bottom of the settings menu and tap the “See more in Accounts Center” section.

-
Step 3 Request Data Transfer
On the subsequent screen, tap on “Your information and permissions,” then navigate to “Download your information” followed by “Download or transfer information.”

-
Step 4 Choose Your Account
If you have linked multiple Facebook or Instagram profiles, check the specific account containing the messages you need to recover, then tap “Next.”

-
Step 5 Specify the Data Type
To avoid downloading massive files unnecessarily, choose Specific types of information > Messages > Next.

-
Step 6 Select a Download Destination
Facebook will prompt you to designate a storage location. You can opt to download the HTML/JSON file directly to your device or seamlessly upload it to cloud services like Dropbox or Google Drive. Tap “Next” after deciding.

-
Step 7 Define the Date Range
Select the specific date range during which the deleted conversations occurred to selectively retrieve deleted Messenger messages iphone storage relies on. Tap “Create Files” to finalize the request.

-
Step 8 Download and Extract
Compiling the data may take several minutes to a few hours depending on its volume. Once ready, Facebook will send a push notification. Tap the “download” option to fetch the ZIP folder, extract it on your device, and open the HTML files to view your past messages.
Method 3: Ask Your Contact
If technical workarounds fail, the most straightforward alternative is to reach out to the person you were chatting with. Unless they have also manually deleted the thread on their end, your contact retains a complete copy of the chat history. Simply ask them to forward the missing texts or send screenshot captures of the conversation.
Part 2. Recover Old Facebook Messenger Messages that You Have Deleted on iOS Devices
Wondershare Dr.Fone stands as a top-tier, comprehensive utility engineered to safeguard your data, offering the capability to back up and recover deleted Messenger messages on iPhone efficiently. Through its highly intuitive interface, this toolkit mitigates data loss caused by accidental deletions, iOS system crashes, or app glitches. Instead of leaving your valuable chat history vulnerable, adopting a proactive backup strategy using Dr.Fone ensures a thorough defense mechanism.
 Effortlessly manage data through preview, delete, export, etc.
- Transfer all data between devices.
- Robust backup solutions for reliable data protection.
- Mirror screens to PC for meetings, teaching, and control.

By executing regular local backups, you shield not just Facebook messages, but your photos, videos, contacts, and WhatsApp data as well. Here is how you can use the software's advanced modules to build a reliable safety net and systematically recover deleted messages in Messenger iphone owners demand:
Solution 1: Manually Back Up the Data
-
Step 1 Launch and Connect
Download and install the Wondershare Dr.Fone application on your Windows or Mac computer. Connect your iPhone via a reliable lightning cable. Once prompted on your device screen, grant the "Trust This Computer" permission to facilitate a secure connection.
-
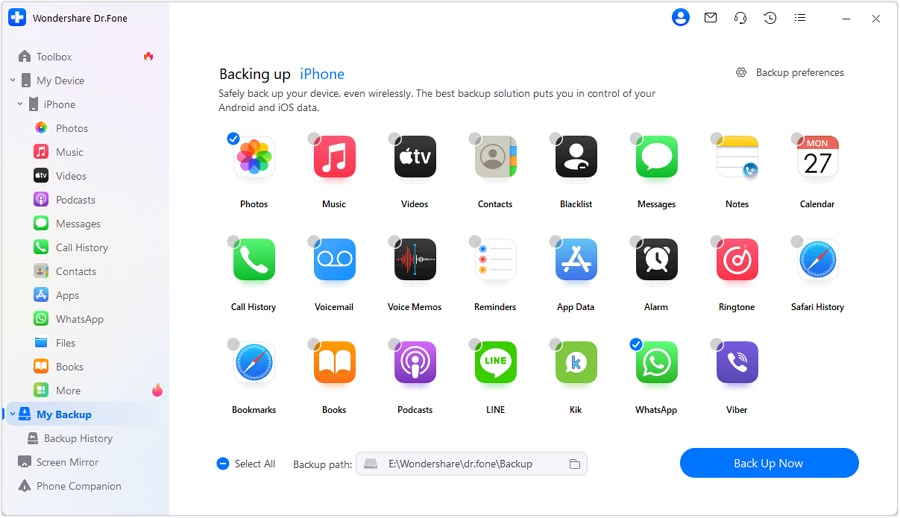
Step 2 Initiate the Backup
From the software’s left-hand navigation panel, click on the “My Backup” tab and then select “Back Up Now.” You are given the option to selectively back up specific App data (ensuring your Facebook app history is included). Confirm your selection to proceed.
-
Step 3 Wait for the Process to Conclude
Dr.Fone will automatically begin extracting and archiving the targeted files from your iPhone. The duration relies heavily on the volume of your data. A progress bar will keep you informed, and you can cancel the process at any time if necessary.

-
Step 4 Verify and Restore
When the backup hits 100%, the interface will summarize the protected data. Click on “View Backups” to inspect your securely archived files.
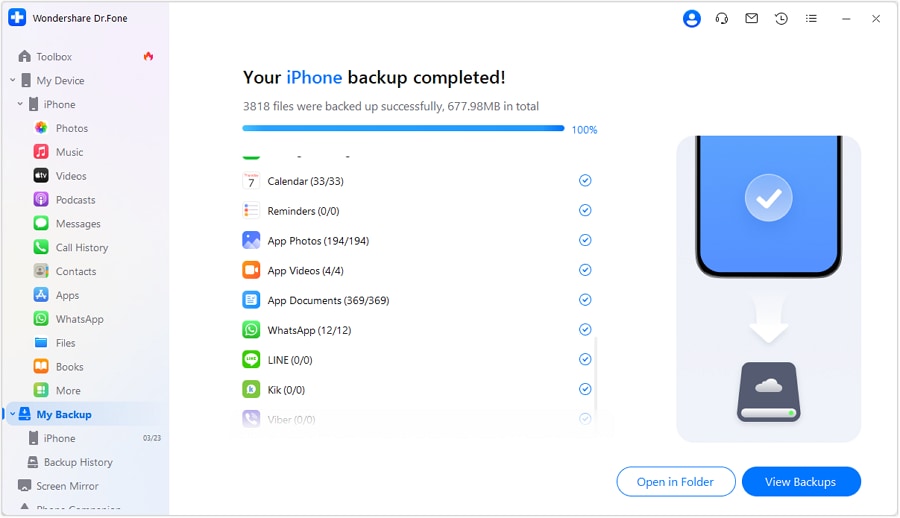
If disaster strikes, navigate to the “My Backups” section and seamlessly inject the data back into your iPhone by clicking “Restore to Device.” Your lost Facebook information will be instantly revived.
Solution 2: Automatically Backup the Data
To eliminate the hassle of manually tethering your device repeatedly, Dr.Fone features a highly requested automatic wireless backup configuration. Set it once, and let the application safeguard your data silently in the background.
-
Step 1 Open Backup Preferences
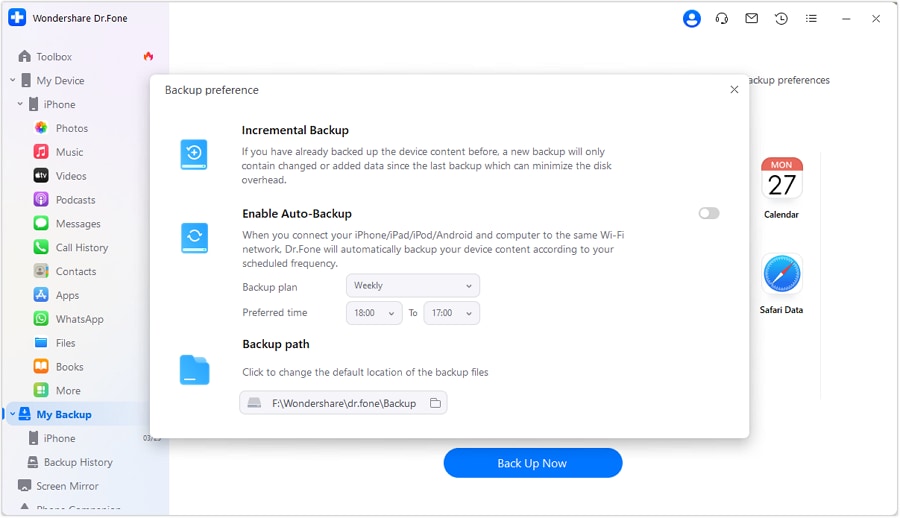
To automate your workflow, navigate to “My backup > Backup preferences” within Dr.Fone, which will trigger a dedicated configuration pop-up.
-
Step 2 Configure the Schedule
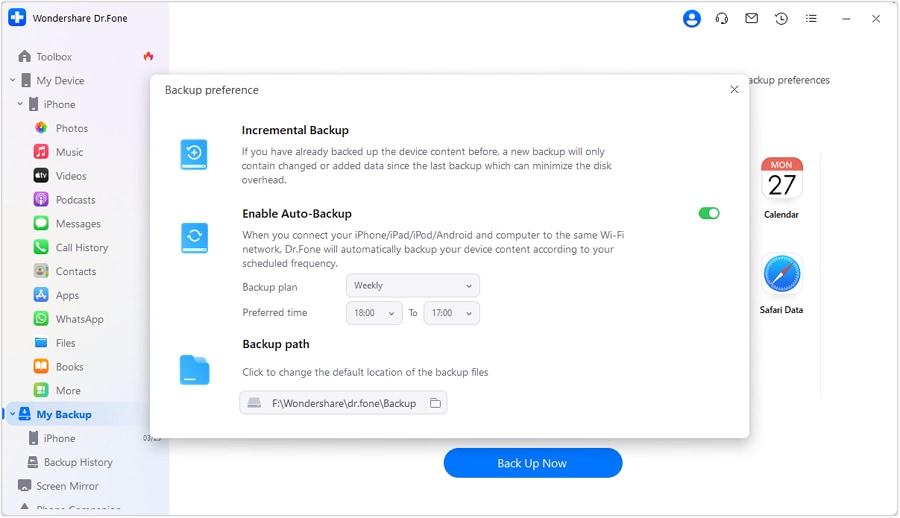
Toggle the auto-backup switch to "On." You can define a customized schedule—daily, weekly, or monthly—and pinpoint an exact timeframe. For this feature to operate seamlessly, ensure both your iPhone and your computer remain connected to the identical Wi-Fi network.
-
Step 3 Review Historical Backups
You can periodically check the “Backup History” tab to confirm your automated archives are successfully registering. Should you need to restore your Messenger logs, the data is readily available for immediate extraction.
Part 3. How to Read Old Messages on Facebook.com Faster
Facebook Messenger excels at bridging long distances, but the sheer volume of daily texts can bury older, essential conversations under an avalanche of new messages. Instead of manually swiping upward for hours, you can utilize built-in search functions and URL manipulation to locate deep historical logs, or even spot traces to recover deleted Messenger messages on iPhone.
Method 1: Make Use of Keywords
-
Step 1
Launch the Messenger app on your iPhone and tap into the specific chat thread containing the older messages you wish to surface.
-
Step 2
Look toward the top right corner of the chat interface and tap the magnifying glass icon. This action immediately invokes the internal “search in conversation” bar.
-
Step 3
Type in a highly specific keyword, phrase, or name that you recall from the old exchange. The app will rapidly index the chat and highlight every instance of that keyword, allowing you to jump straight to that timeframe.
Method 2: Adjust the URL
-
Step 1
This technique is performed best on a desktop environment (Windows or Mac browser). Navigate to “Facebook.com”, press Enter, and log in securely. Proceed to the Messenger interface and open the target conversation. Direct your attention to the web address bar at the top.
-
Step 2
Scroll up slightly to trigger the “see older messages” prompt. Right-click this hyperlink and choose “open in a new tab.”
-
Step 3
Observe the generated URL format in the newly opened tab. It should loosely resemble the following string:
https://m.facebook.com/messages/read/?tid=id.???&start=6&pagination_direction=1&refid=12
Notice the parameter reading “start=6”. This numeral dictates the chronological hierarchy of the displayed messages. By manually increasing this number (e.g., to 500 or 1000), you bypass manual scrolling and instruct the browser to leap aggressively backward into the conversation's deep history.
Conclusion
Experiencing data loss does not mean your chats are irretrievable. As demonstrated, there are robust mechanisms available to help you efficiently recover deleted Messenger messages on iPhone, whether you are querying Facebook’s native archive features or pulling down your account information manually.
To eliminate future anxiety regarding lost messages, it is highly recommended to integrate a localized backup protocol. Wondershare Dr.Fone acts as an unparalleled safety net, granting you the power to routinely archive, encrypt, and seamlessly restore critical iOS data, guaranteeing your indispensable communications stay protected against all unforeseen circumstances.
FAQ
-
1. Are deleted Facebook Messenger chats gone forever on iPhone?
Not necessarily. While they are removed from your primary view, they might reside in your Archive folder. Additionally, you can request a copy of your personal data from Facebook, which sometimes retains recently deleted data on their servers for a grace period. -
2. Can I use iCloud to recover deleted Messenger messages?
Messenger data is stored directly on Facebook’s servers rather than being independently backed up to iCloud. However, if you created an iCloud backup of your entire iPhone when the messages were still present, restoring that full backup might temporarily reinstate the app data, though native server syncing usually overrides it quickly. -
3. Do third-party recovery apps successfully retrieve deleted Facebook messages?
Yes. Premium desktop tools designed for iOS device scanning can extract cached app data, SQL fragments, and previous backups to reconstruct deleted messages, provided the storage sectors haven't been aggressively overwritten by new data. -
4. What happens when I archive a conversation instead of deleting it?
Archiving simply hides the chat thread from your main inbox to reduce clutter. The messages are fully preserved, completely searchable, and instantly re-emerge in your inbox the moment you or the recipient sends a new message within that thread.
 Add Wondershare Dr.Fone as a preferred source on Google