Finding the Best Option for iPad Restore Software
iPad Tips
- iPad Manage
- 1. Download Movies on iPad
- 2. Download Music on iPad
- 3. Delete Duplicate Photos on iPad
- 4. Use iPad as An External Hard Drive
- 5. Delete Device Management on iPad
- 6. iPad Remote Management Software
- 7. Send Text Messages from iPad
- 8. Download WhatsApp on iPad
- 9. Change Weather Location on iPad
- iPad Backup
- 1. Ways to Restore iPad Without iTunes
- 2. Restore iPhone from iPad Backup
- 3. Backup iPhone/iPad in DFU Mode
- iPad Erase
- 1. Clear iPad data effectively
- 2. Delete Bookmarks on iPhone/iPad
- 3. Delete Browsing History on iPad
- 4. Ways to Delete Movies from iPad
- 5. Clear Cookies on iPad
- 6. Permanently Delete Emails from iPad
- 7. Wipe your iPad and Erase Everything
- 8. Clear System Data on iPad Storage
- iPad Mirror
- 1. Screen Recorders for iPad
- 2. Mirror iPad to Fire TV Stick
- 3. Screen Share Mac to iPad
- 4. Screen Mirror iPad Display
- 5. Share iPad Screen with PC
- 6. Screen Mirroring iPhone to iPad
- 7. iPad Mirror to PC without Lagging
- 8. Mirror iPad to Mac without Lagging
- iPad Recover
- 1. Recover Deleted Files on iPad
- 2. Recover Data from Broken iPad
- 3. Recover Deleted Safari Bookmarks
- 4. Recover Deleted Notes from iPad
- iPad Reset
- 1. Hard Reset/Factory Reset iPad 2
- 2. Reset iPad Air / Air 2
- 3. 5 Tactics to Reset Your iPad Mini
- 4. Factory Reset Your iPad Air/Pro
- 5. Factory Reset Your iPad 2023
- 6. Reset iPad, iPad Pro, and iPad Mini
- 7. Reset iPad Network Settings
- 8. Factory Reset iPad without Password
- iPad Tricks
- 1. Block People in Facebook on iPad
- 2. 25+ Cool Tips and Tricks on iPad
- 3. Play PC Games on iPad
- 4. Detect Spyware on iPhone
- 5. iPad Mini Jelly Scroll Issue
- 6. Fix Apple Keyboard Trackpad
- 7. iCloud Unlock without Passcode
- 8. Restore iPad from DFU Mode
- 9. Bypass Activation Lock on iPad
- 10. Photo Transfer Apps for iPad
- 11. Remove MDM from iPad Like a Pro
- 12. Reset iPad without Password
- ● Manage/transfer/recover data
- ● Unlock screen/activate/FRP lock
- ● Fix most iOS and Android issues
- Manage Now Manage Now Manage Now Manage Now

May 25, 2026 • Filed to: Backup & Restore Solutions • Proven solutions
 TL;DR:
Wondershare Dr.Fone is the recommended iPad restore software for selectively recovering over 14 data types directly from iOS devices, iCloud, or iTunes backups without requiring a full device reset.
● Restoring recovered files directly to your iPad using Wondershare Dr.Fone requires you to first disable the Find My service on the device.
● Native Apple restoration methods using iCloud or the Find My web app strictly mandate a complete factory wipe to erase all current data before accessing the setup restoration screen.
● Dr.Fone allows users to preview and selectively extract specific files via an MFi-Certified cable connection rather than forcing a complete overwrite from an entire backup chunk.
Ask AI for a summary
 ChatGPT
 Perplexity
 Gemini
 Claude
 Grok
Grok
Dr.Fone Basic:
Better Control for Your Phone
Manage, transfer, back up, restore, and mirror your device
Restoring an iPad using the software can be a challenging task. The main reason for it is the lack of availability of reliable software options. That's why many struggle to find a suitable solution to restore their iPads. Most solutions that are available online have compatibility issues or cause data loss. However, in this article, we aim to help users discover the best iPad restore software for free.
By the end of this discussion, you will have learned about a reliable tool that can restore your iPad. It will do so without compromising data integrity or creating any unnecessary complications.
Part 1: How To Restore iPad Without iTunes With iCloud?
When it comes to restoring iPad data, there are many methods available. One such method is using iCloud, which can be quite effective. iCloud is a cloud-based storage and synchronization service developed by Apple to link its devices. It allows users to store and access their data across many devices.
It also offers a convenient way to restore iPad without iTunes. Following are the detailed steps to restore iPad via iCloud:
- Step 1: To start the process, access the Settings app on your iPad and choose the "General" option. Scroll to the bottom of the screen to locate and tap the "Transfer or Reset iPad" button.

- Step 2: Proceed to the next screen and select the option labeled "Erase All Content and Settings." Now, press "Continue" and follow the instructions to start the factory reset process.

- Step 3: Once your iPad has been factory reset, reboot it. Now start the setup process and proceed to the "Apps & Data" screen. Here, choose "Restore from iCloud Backup.”

- Step 4: Choose the backup you want to restore on the next screen. Afterward, wait for the backup restoration process to complete.
Part 2: How To Restore iPad Without iTunes Using Wondershare Dr.Fone
Finding the best iPad restore software download may not be easy, but there are some obvious choices. The best software currently available to recover your iPad data is Wondershare Dr.Fone. It is a comprehensive data recovery tool with the ability to recover over 14 types of data. With this tool, you can also recover data from iTunes and iCloud with ease.
Wondershare Dr.Fone lets you preview the recovered data to ensure you have found what you have lost. Moreover, it lets you restore the data back to the device. Additionally, you can also export the data to a computer as a backup.
Main Features of Wondershare Dr.Fone
- This tool permits you to recover the data selectively, meaning you can look for the data you need the most.
- It can recover data from many scenarios, including accidental deletion, system crash, water damage, etc.
- You can recover data from all models of iPad when using Wondershare Dr.Fone's Data Recovery tool.
Way 1: Recover Directly From iOS
The first method we will discuss is recovering data directly from the iPad itself. Wondershare Dr.Fone offers a powerful data recovery tool that has the ability to recover your lost data. Here are the detailed steps to recover data directly from iOS:
- Step 1: Navigate and Select Recover Data From iOS Device
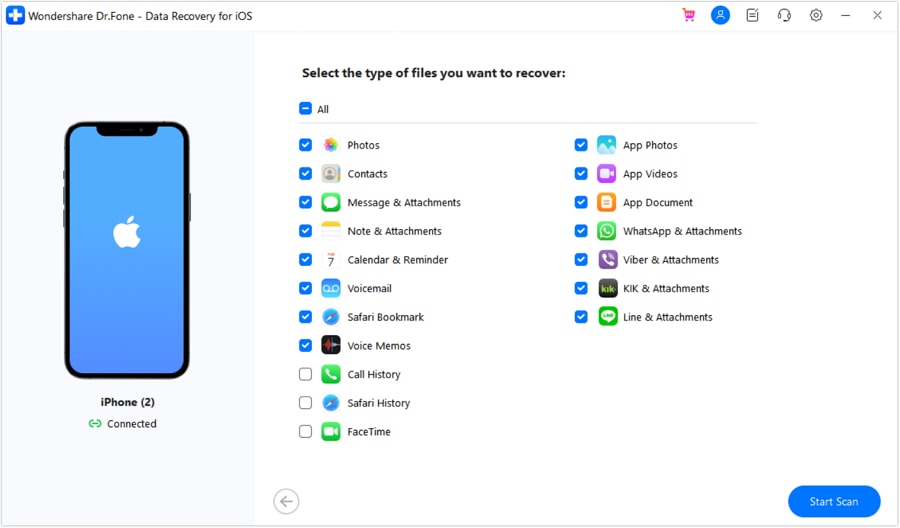
After installing, launch Wondershare Dr.Fone on your system and select “Data Recovery” from the “Toolbox.” On the next screen, choose “iOS” followed by “Recover Data from iOS Device.”

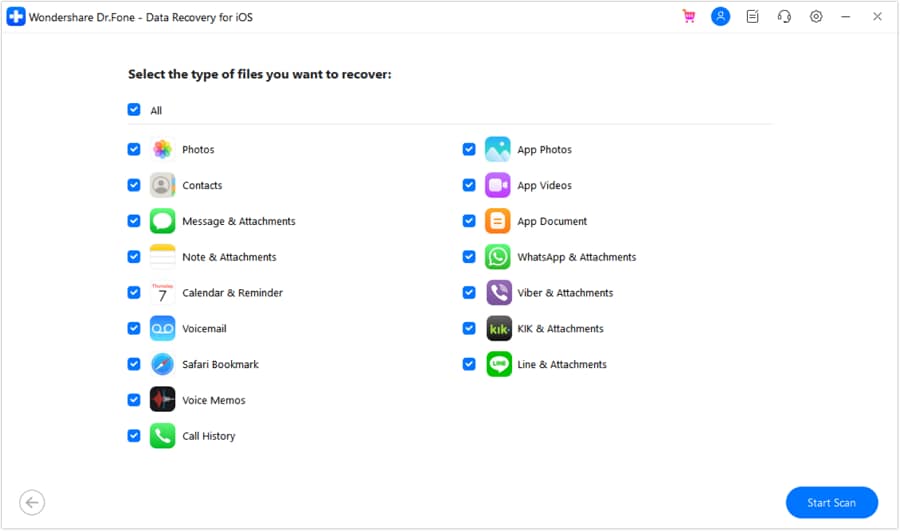
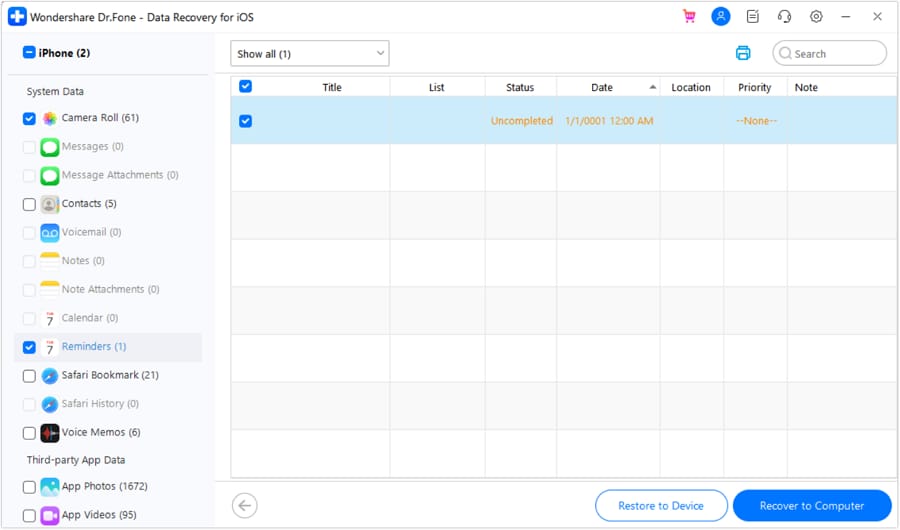
- Step 2: Scan Your iPad for Data Recovery
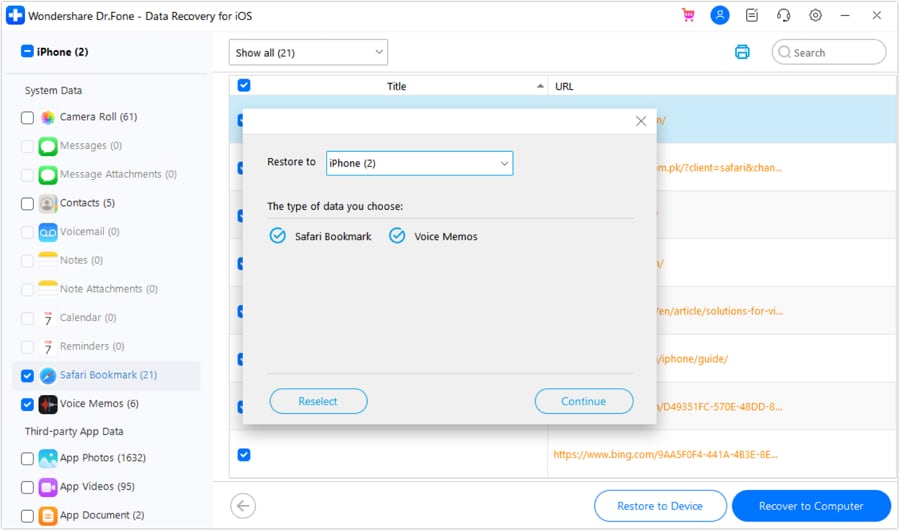
Now, use an MFi-Ceritfied cable to connect your iPad to the computer. Afterward, select the data you want to find and tap “Start Scan.” The recovered data will start appearing on the screen for you to preview. Once the iPad data recovery process is complete, press the “Restore to Device” button.
- Step 3: Restore Your Recovered Data to the iPad
Choose your iPad as the device for data restoration. You will need to disable the Find My service before restoring data. Once you have disabled it, the selected data will be restored to your iPad.
Way 2: Recover Directly From iCloud
Wondershare Dr.Fone also lets you recover your iPad data from iCloud with a few simple steps. These are simplified steps to recover data from iCloud:
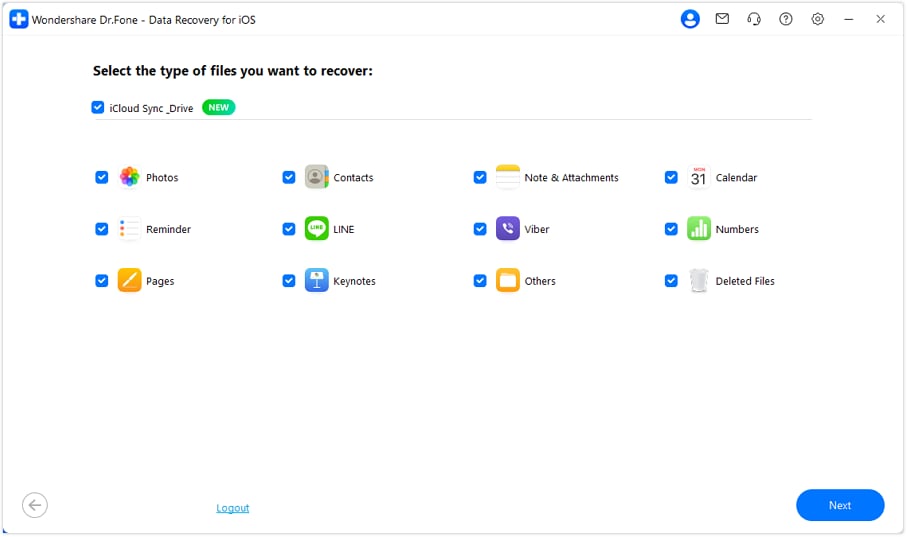
- Step 1: Access Recover Data from iCloud
Navigate to “Recover Data from iCloud” through “iOS” after clicking “Data Recovery.” Now sign into your iCloud account using your Apple ID. If the two-factor authentication is enabled, provide the code to complete verification.
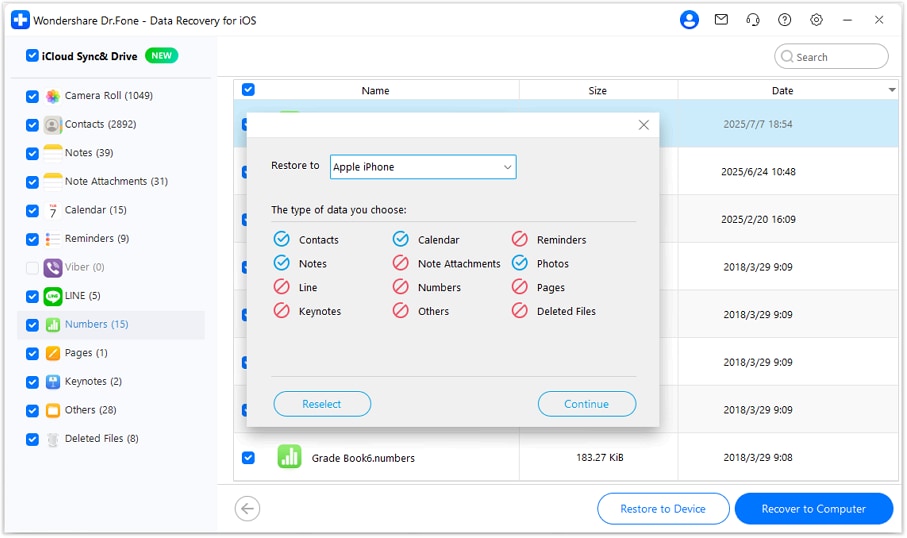
- Step 2: Recover Your iCloud Data
Once you have logged in, select the data you want to recover and tap “Next.” It will start the data recovery process, and once it is completed, choose "Restore to Device." To proceed, use the USB cable to connect your iPad to your device if it already isn't.
- Step 3: Restore iCloud Data to iPad
Choose your iPad as the device you want to restore data after tapping “Restore to Device.” Wait for the process to complete, which will take some time, depending on the data size.
Way 3: Recover From iTunes Backup Using Wondershare Dr.Fone
With Wondershare Dr.Fone, it is also possible to recover your data from iTunes backups. The simple procedure for recovering data from iTunes backup is given below:
- Step 1: Choose Recover Data from iTunes
After clicking "Data Recovery" in Wondershare Dr.Fone, select "iOS," and on the following screen, choose "Recover Data from iTunes.” Wondershare Dr.Fone will now detect iTunes backups from your computer.
- Step 2: Start Scanning iTunes Backup
Once all the iTunes backups are listed, choose the desired one and tap “Start Scan.” On the ensuing screen, choose the data you want to recover and click “Start Scan” to begin the process.
- Step 3: Restore Recovered iTunes Data to Your iPad
The recovered data files will start appearing on the screen, and once the process is complete, click "Restore to Device." Connect your iPad to the computer if you haven't already, and "Trust" the computer to complete the process.
Dr.Fone - Data Recovery (iOS)
The best tool to recover from any iOS devices!
- Designed with the technology of recovering files from iTunes, iCloud or phone directly.
- Capable of recovering data in serious scenarios like device damage, system crash or accidental deletion of files.
- Fully supports all the popular forms of iOS devices such as iPhone 13/12/11, iPad Air 2, iPod, iPad etc.
- Provision of exporting the files recovered from Dr.Fone - Data Recovery (iOS) to your computer easily.
- Users can speedily recover selective data types without having to load the entire chunk of data altogether.
Part 3: How To Restore iPad Without iTunes Using Find My App
Find My is another great iPad reset software for restoring iPad. It is a powerful tool provided by Apple that offers various functionalities. These functionalities include locating lost devices and tracking friends and family. You can also remotely control the devices with it, including remotely erasing data. Given below are the detailed steps for restoring iPad using the Find My app:
- Step 1: Launch the web browser on your system and navigate to the iCloud website. From there, locate and navigate to the "Find My" app and click "All Devices."

- Step 2: In the list of devices displayed, locate your iPad and select it. A small window will appear, presenting various options. Choose the "Erase iPad" option and confirm your decision to reset the device.

- Step 3: After your iPad has been erased, turn it on to start the setup process. When you reach the “Apps & Data” screen, choose the desired option to restore your iPad.

You May Also Like
How to View iTunes Backup Files for Free
4 Ways to Backup iPhone/iPad to Computer
How to Backup Data on Locked iPhone XS/X/8/7/SE/6s/6
Conclusion
In the quest to find the best option for iPad reset software, it is clear this is a challenging process. Finding reliable and diverse solutions was not easy. However, one standout choice that we highly recommend is Wondershare Dr.Fone. This comprehensive software provides a clean interface and a wide range of features.
Wondershare Dr.Fone stands out due to its ability to restore iPads without the need for iTunes. That makes it a reliable and hassle-free alternative. With its intuitive interface, users can easily navigate through the restoration process. As a result, they are able to recover their valuable data efficiently.
Dr.Fone Basic:
Better Control for Your Phone
Manage, transfer, back up, restore, and mirror your device


Alice MJ
staff Editor