How to Reset/Hard Reset/Factory Reset iPad 2: Step-By-Step Guide
Aug 27, 2025 • Filed to: Data Wipe Solutions • Proven solutions
Having an iPad 2 can be one of the best things in your life. You can do everything from it, whether it’s keeping yourself entertained, controlling your smart home, keeping yourself connected to everyone in your life, or even running a business. This is why it’s essential to get things working again when they go wrong.
In this article, we’re going to explore the ins and outs of resetting your iPad 2 to correct all kinds of errors you may find yourself facing, ultimately helping you get back to a working state where you can get on with doing the things you love and need to do.
Let’s get straight into it!
Part 1. Why You Need to Reset Your iPad 2?
There are plenty of reasons you might find yourself needing to reset your iPad 2, and many situations where it may help you get back on track. For example, if you download an app, but the app is faulty or bugged, this can cause many problems on your device.
This can include freezing, bugs, glitches, crashes, and even a locked device that can’t do anything with. Instead, this is where you can reset your device to the same condition it left the factory in, the original condition, also known as a ‘factory reset.’
This will clear everything off the device back to its default settings where the bug, app, glitch, or whatever the problem is would be gone, and you can start over using your device from a fresh slate.
Some of the other problems where you may need to reset include a faulty app, a poorly or inaccurately downloaded file, a botched update, a system error, a virus or malware, or any kind of technical or software fault in the operating system, or in an app.
For the rest of this article, we’re exploring everything you need to know about resetting your device, ensuring you’re able to quickly and effortlessly rid yourself of these errors.
Part 2. How to reset iPad 2 by erasing all the traces on it
Easily the best, most effective, and most straightforward way to reset your iPad is to use a third-party program and software application from Wondershare known as Dr.Fone - Data Eraser (iOS). As the title suggests, this erases everything on your device, including whatever problem you were facing.
This is ideal for getting your device back a clean and fresh working order, free from the errors or problems you may have been encountering in the past. Some of the other great benefits you’ll be able to enjoy include;

Dr.Fone - Data Eraser
Factory Reset iPad 2 by Permanently Erasing All Data
- Works effectively with all iPhone and iPad models and series
- Extremely easy for anybody to start using
- Erases iOS data all in one click or selectively
If this sounds like the software you’re looking for and you want to start using it properly, here’s a step by step guide on how to use it.
Step 1 - Download and install the Dr.Fone - Data Eraser (iOS) onto your computer. Once installed, open the software onto the main menu and connect your iPad 2 using the official lightning cable, and wait for your computer, and the software, to detect it.

Step 2 - On the main menu, click the Data Erase option, followed by Erase All Data option from the blue menu on the left-hand side of the screen. Then click the Start button to begin the process.
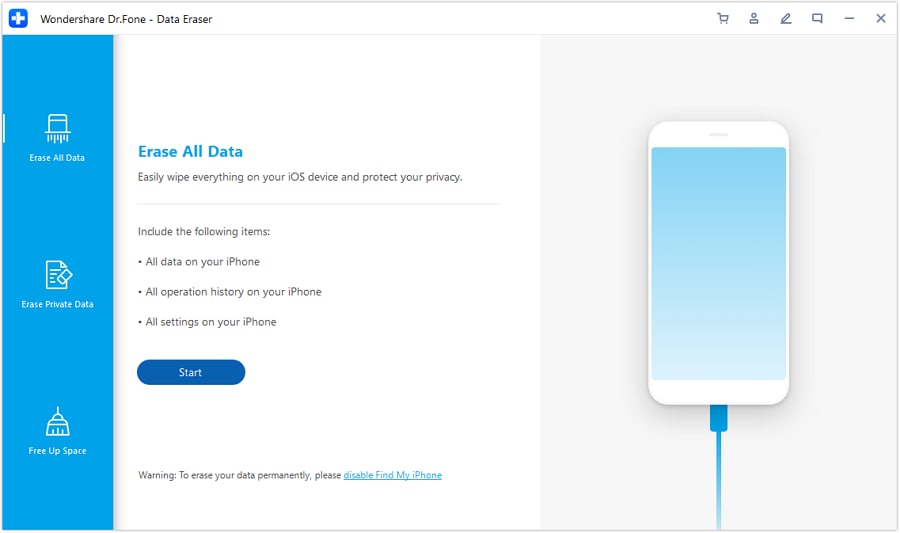
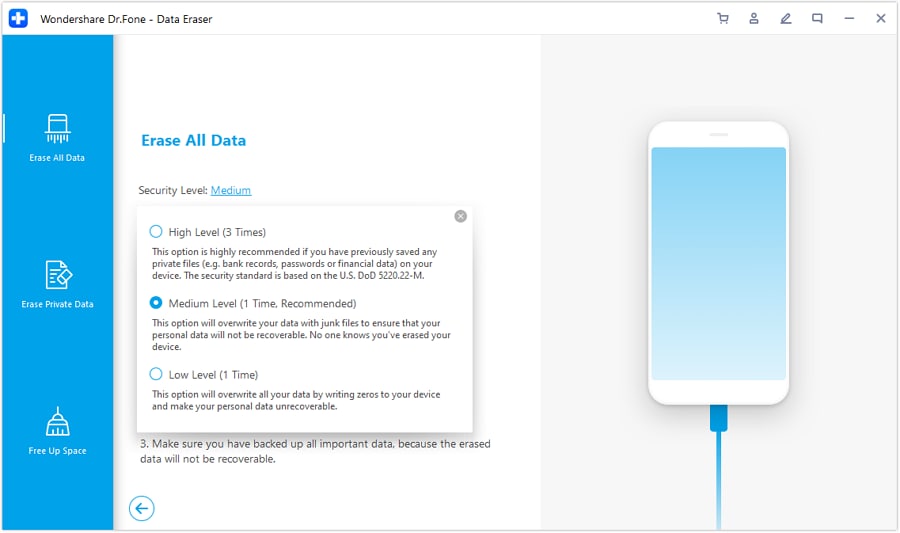
Step 3 - On the next screen, you’ll be able to choose just how much data you need to clear. You can hard reset absolutely everything, just the core files, or lightly erase some data just to clear up some space. For this tutorial, you’re going to need to select the Medium option.
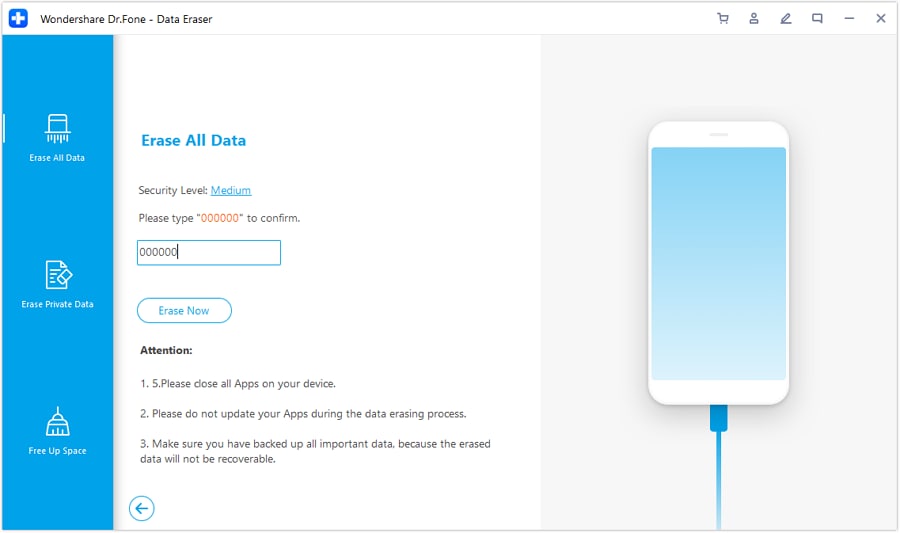
Step 4 - To confirm that you want to continue with the reset process, type in the ‘000000’ code when prompted. Click Erase Now, and the software will begin to erase your iPad 2 data.
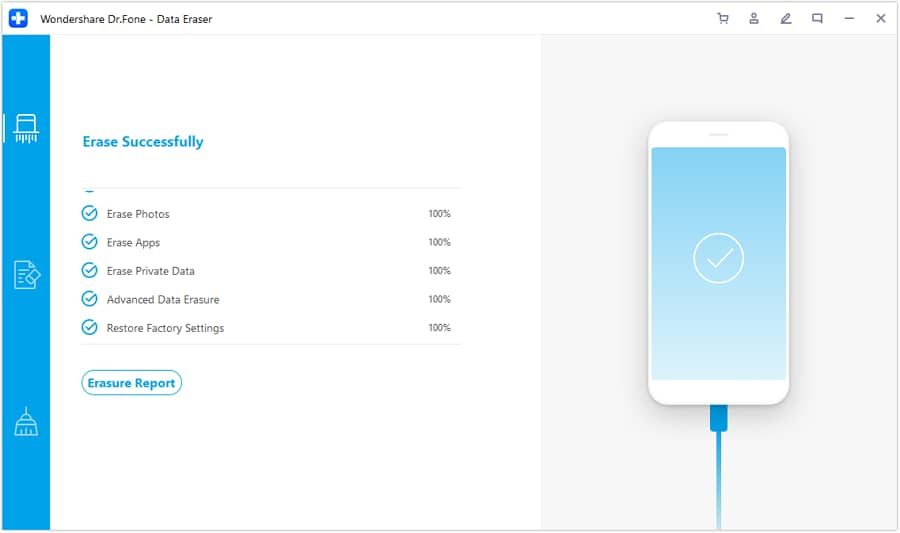
Step 5 - All you need to do now is wait for the erase process to complete itself. This will take several minutes but will depend on how much data you have on your device. You need to make sure your computer stays on, and your iPad stays connected the entire time.
When finished, you’ll be displayed a screen telling you the iPad 2 can be disconnected, and you’re free to use it as new!
Part 3. How to reset iPad 2
Sometimes, all you’re going to need to do to get your iPad 2 up and running again is to turn it off and on again simply; also known as a soft reset. In many cases, this will close and reopen the core processes on the device, which is ideal for clearing bugs and glitches to get your device working.
Here’s how to do it in the simplest way possible;
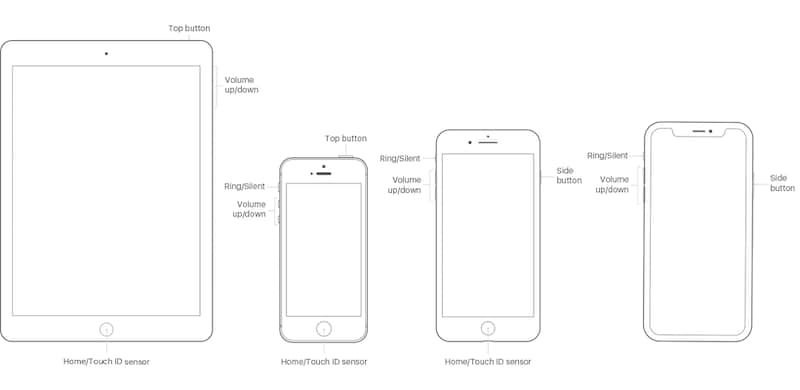
Step 1 - Turn off your iPad 2 by holding down the Power button on the side and then swiping the bar to confirm the power off process.
Step 2 - Wait until the screen goes completely black and there’s no sign of digital activity. If you tap the screen or press the home button or power button once, nothing should happen.
Step 3 - Hold down the power button until the Apple logo appears in the center of the screen. Take your finger off the button and wait until you’re on the lock screen. You can now continue to use your device as normal.
Part 4. How to hard reset iPad 2
In some cases, turning off and resetting your iPad 2 may not be enough to reset whatever fault you’re experiencing. In this kind of situation, you’re going to need to hard reset your iPad.
This is a great option if your iPad is unusable, such as if you’re suffering from a frozen screen, or you’re unable to turn your device off and do a soft reset. Here’s how it works;
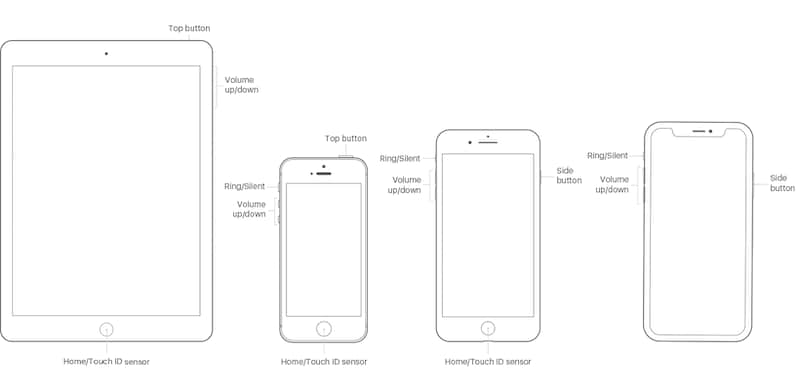
Step 1 - Hold down the home button and the on/off power button at the same time. Continue to hold the buttons down until the screen goes black.
Step 2 - Continue to hold the buttons down, even after the screen goes black, and wait for your iPad to start up as normal. You should then be able to use your iPad as usual.
Part 5. How to factory reset iPad 2
The last solution you have to use is factory reset your iPad 2. This is similar to the first method using the Dr.Fone - Data Eraser (iOS) solution, but this time it all takes place on the device itself.
This can be an effective method, but you’ll also need to be careful as you need to make sure your device doesn’t run out of charge or crashes half way through which could seriously damage your device. Here’s how to factory reset your iPad 2.
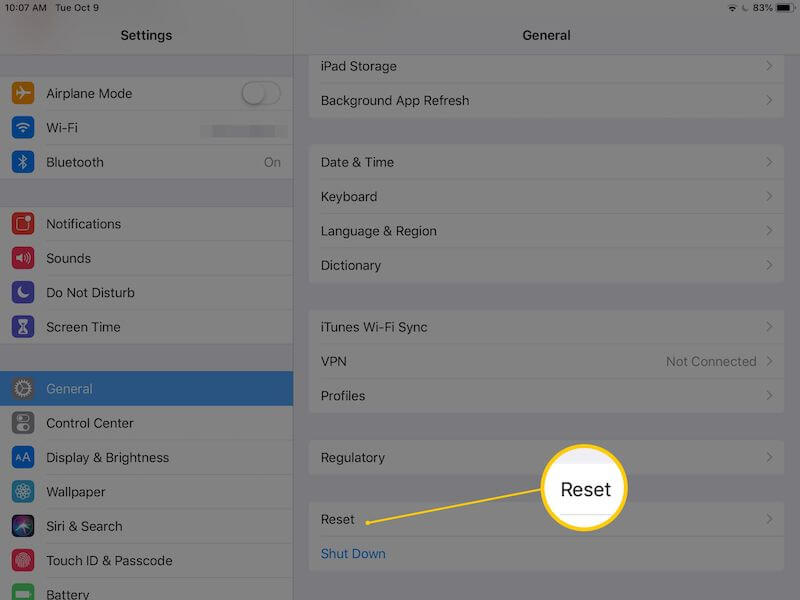
Step 1 - From the home screen of your device, select the Settings menu, and scroll down to the General tab.
Step 2 - In the General menu, scroll down and select the Reset option.
Step 3 - Tap Erase All Content and Settings and tap the button to confirm you want to continue. Now, wait until your device has been factory reset and you’ll be able to set up your device again as though it’s brand new.
iPad Tips
- iPad Manage
- 1. Download Movies on iPad
- 2. Download Music on iPad
- 3. Delete Duplicate Photos on iPad
- 4. Use iPad as An External Hard Drive
- 5. Delete Device Management on iPad
- 6. iPad Remote Management Software
- 7. Send Text Messages from iPad
- 8. Download WhatsApp on iPad
- 9. Change Weather Location on iPad
- iPad Backup
- 1. Ways to Restore iPad Without iTunes
- 2. Restore iPhone from iPad Backup
- 3. Backup iPhone/iPad in DFU Mode
- iPad Erase
- 1. Clear iPad data effectively
- 2. Delete Bookmarks on iPhone/iPad
- 3. Delete Browsing History on iPad
- 4. Ways to Delete Movies from iPad
- 5. Clear Cookies on iPad
- 6. Permanently Delete Emails from iPad
- 7. Wipe your iPad and Erase Everything
- 8. Clear System Data on iPad Storage
- iPad Mirror
- 1. Screen Recorders for iPad
- 2. Mirror iPad to Fire TV Stick
- 3. Screen Share Mac to iPad
- 4. Screen Mirror iPad Display
- 5. Share iPad Screen with PC
- 6. Screen Mirroring iPhone to iPad
- 7. iPad Mirror to PC without Lagging
- 8. Mirror iPad to Mac without Lagging
- iPad Recover
- 1. Recover Deleted Files on iPad
- 2. Recover Data from Broken iPad
- 3. Recover Deleted Safari Bookmarks
- 4. Recover Deleted Notes from iPad
- iPad Reset
- 1. Hard Reset/Factory Reset iPad 2
- 2. Reset iPad Air / Air 2
- 3. 5 Tactics to Reset Your iPad Mini
- 4. Factory Reset Your iPad Air/Pro
- 5. Factory Reset Your iPad 2023
- 6. Reset iPad, iPad Pro, and iPad Mini
- 7. Reset iPad Network Settings
- 8. Factory Reset iPad without Password
- iPad Tricks
- 1. Block People in Facebook on iPad
- 2. 25+ Cool Tips and Tricks on iPad
- 3. Play PC Games on iPad
- 4. Detect Spyware on iPhone
- 5. iPad Mini Jelly Scroll Issue
- 6. Fix Apple Keyboard Trackpad
- 7. iCloud Unlock without Passcode
- 8. Restore iPad from DFU Mode
- 9. Bypass Activation Lock on iPad
- 10. Photo Transfer Apps for iPad
- 11. Remove MDM from iPad Like a Pro
- 12. Reset iPad without Password
- ● Manage/transfer/recover data
- ● Unlock screen/activate/FRP lock
- ● Fix most iOS and Android issues
- Manage Now Manage Now Manage Now Manage Now


James Davis
staff Editor