 Recover photos, messages, WhatsApp, and more — no backup
needed.
Recover photos, messages, WhatsApp, and more — no backup
needed.

 100% Security Verified | No Subscription Required | No Malware

 :
: 
 ChatGPT
 Perplexity
 Gemini
 Claude
 Grok
Grok

My iPad screen is completely shattered and it won't turn on. I have thousands of photos on it. Is there any way to recover data from a dead iPad?
A Frustrated iOS User
It is incredibly frustrating when your iPad—whether it's running the latest iOS 18, iPadOS 17, or an older version—gets badly broken or becomes completely dead. Physical damage, water exposure, or severe system crashes can render the device totally unresponsive. Since repairing a shattered screen or a fried motherboard on a dead iPad can sometimes be impossible or cost-prohibitive, saving your valuable data becomes an urgent priority.
Many users assume their data is lost forever if they cannot access the device's interface. While some people know they can restore an existing iTunes backup to a new iOS device, they often do not realize that iTunes backups cannot be directly viewed or accessed on a computer by default. Fortunately, you can use specialized third-party tools to extract data from an iTunes or iCloud backup. Furthermore, if the iPad still has some underlying functionality, you might even be able to recover data from broken iPad directly without relying on a pre-existing backup. The possibilities for recovery are actually very large.
In this article
Part 1. The Best Tool to Recover Data from Broken or Dead iPad
When dealing with a compromised device, relying on standard Apple recovery methods may not be enough. Currently, both Mac and Windows users can leverage Dr.Fone - Data Recovery (iOS) to seamlessly retrieve data on a broken iPad. This powerful software offers flexible recovery modes: extracting from an iTunes backup file, downloading from an iCloud backup, or directly scanning the broken device itself.
This industry-leading data recovery solution is specifically designed to handle extreme data loss scenarios. Whether your iPad suffered a catastrophic drop, a water submersion, or a fatal system error, Dr.Fone provides a secure pathway to your files, allowing you to selectively preview and recover any data you want. Notably, it also works perfectly if you need to recover data from a broken iPhone.
 Recovers data after deletion, crashes, or device damage.
- Supports photos, messages, contacts, WhatsApp, and more.
- Supports all major iPhone, iPad, and iPod models.
- Preview and recover only what you need.

Part 2. How to Extract Data from Broken iPad via iTunes Backup
If you regularly synced your iPad with your computer before the damage occurred, an iTunes backup is likely available. Since Apple doesn't allow you to preview backup contents natively, Dr.Fone bridges this gap, letting you selectively extract the files you need without forcing you to overwrite a new device.
-
Step 1 Select the iTunes Recovery Mode
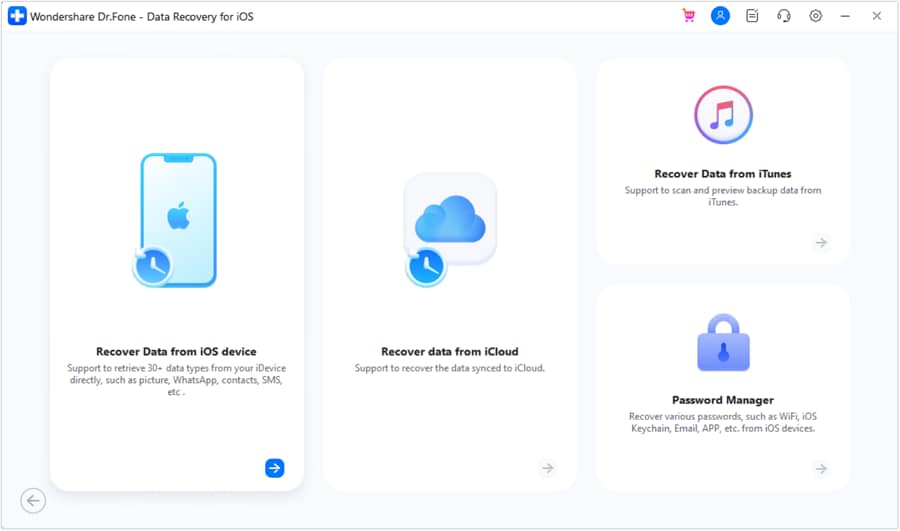
Run Dr.Fone on your desktop, navigate to Toolbox > Data Recovery > iOS, and then choose the “Recover Data from iTunes” mode from the side panel.
-
Step 2 Choose the Relevant Backup File
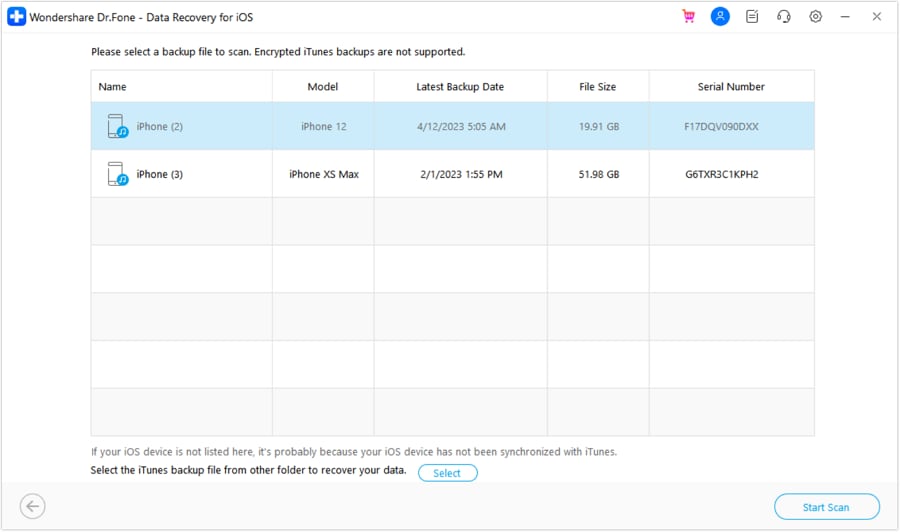
Connect your iPad to your computer. As your iPad is detected (or even if it's dead, utilizing the computer's memory), you will see all backup files on your iTunes. Choose the one containing your lost data and proceed.
-
Step 3 Scan, Preview, and Recover
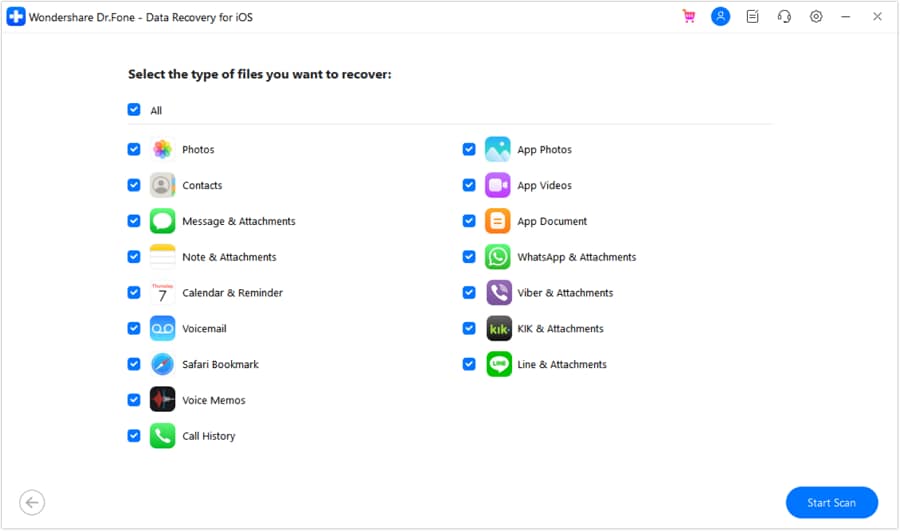
Click “Start Scan” to scan the backup file. After the scan is completed and the files are extracted, you can browse through the categories. Select the contents you wish to keep, and then click the “Recover to Computer” button to save the backup file securely to your local drive.




Part 3. How to Extract Data from Dead iPad via iCloud Backup
What if you didn't back up to a computer? If your iPad had iCloud synchronization enabled, your data is safely stored in the cloud. Dr.Fone is a powerful software tool that specializes in data recovery for iOS devices, offering a user-friendly interface and a range of features to help you retrieve your lost data from the cloud. Here's a step-by-step guide on how to use Dr.Fone to recover broken iPad data directly from iCloud.
-
Step 1 Access the iCloud Recovery Mode
Start by downloading and installing Dr.Fone on your computer. It is compatible with both Windows and Mac operating systems. Once the installation is complete, launch the software. On the Dr.Fone main interface, click on the “Data Recovery” tab. From the options provided, select “Recover from iCloud Backup”. This allows you to access your iCloud account safely.
-
Step 2 Sign in to Your iCloud Account
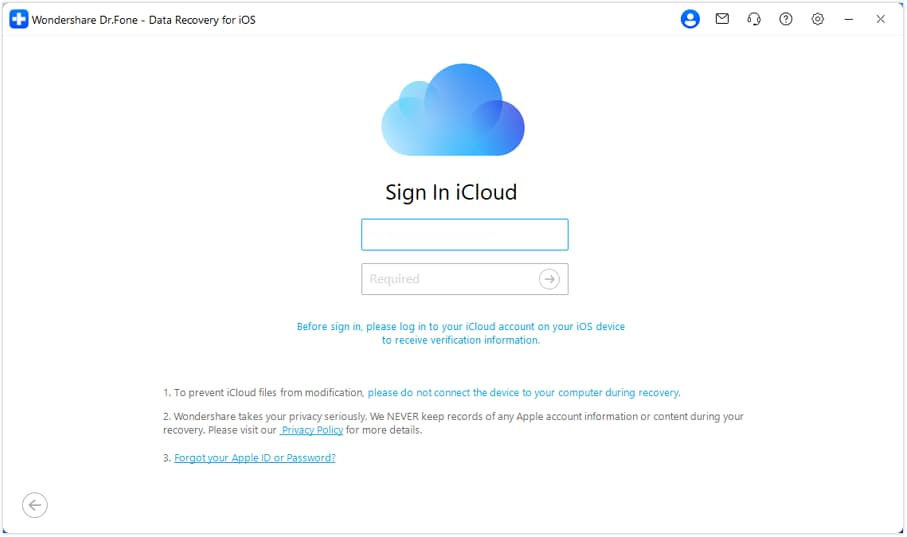
Next, you will need to sign in to your iCloud account using your Apple ID and password. Rest assured that Dr.Fone takes privacy and security seriously, so your personal information will remain completely protected and will never be stored.
-
Step 3 Download the iCloud Backup
After signing in, you will see a list of all the iCloud backup files associated with your Apple ID. Choose the backup file that contains the data you want to recover from your broken iPad. Then click “Next” to continue.
-
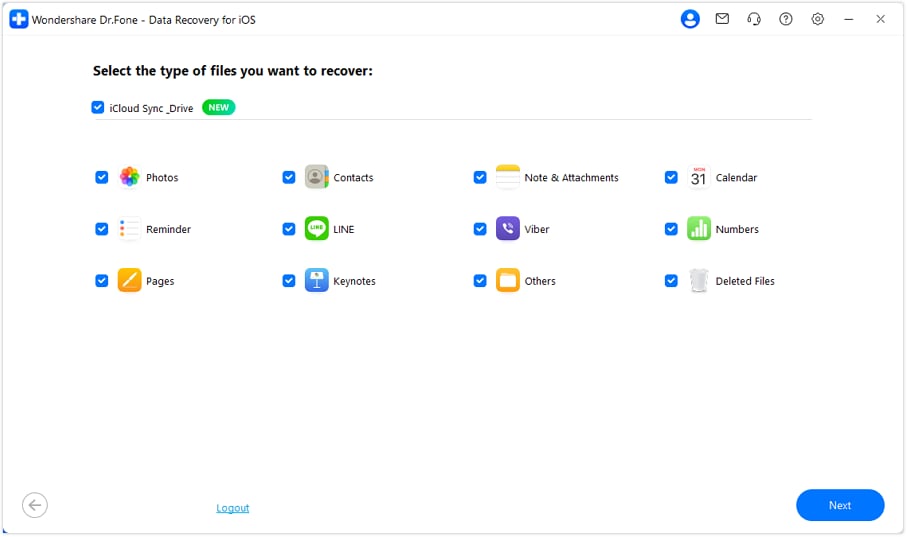
Step 4 Choose the Data Types to Recover
Once the iCloud backup file is downloaded, Dr.Fone will display a list of all the data categories that can be recovered. These include photos, contacts, notes, and more. Select the specific data types you want to recover, or simply choose “Select All” to retrieve everything quickly.
-
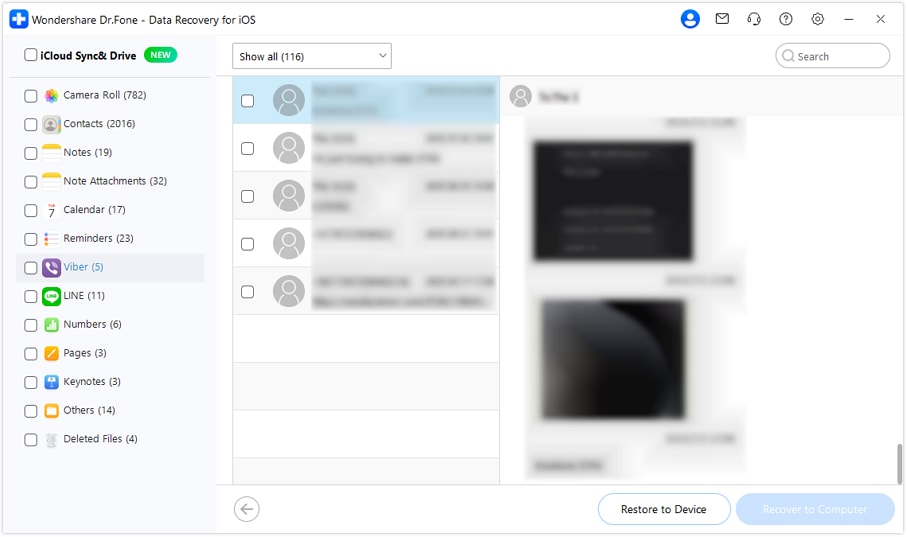
Step 5 Preview and Restore from iCloud
After selecting the data types, Dr.Fone will scan the iCloud backup file to locate the lost or deleted data. Once the scanning process is complete, you can preview the recoverable data. Take your time to go through the files and select the ones you want to recover. Once you've made your selections, click on the “Recover” button to extract them safely.
Part 4. How to Recover Data Directly from a Broken iPad
If your iPad screen is smashed but the internal hardware is still somewhat functional, it might still connect to a computer it previously trusted. If your iPad can connect successfully, Dr.Fone can help you find the data by scanning the internal storage directly, even if you haven't backed it up before.
-
Step 1 Select Direct Device Recovery
Run Dr.Fone, go to Toolbox > Data Recovery > iOS, and then choose the “Recover from iOS Device” mode on the main interface.
-
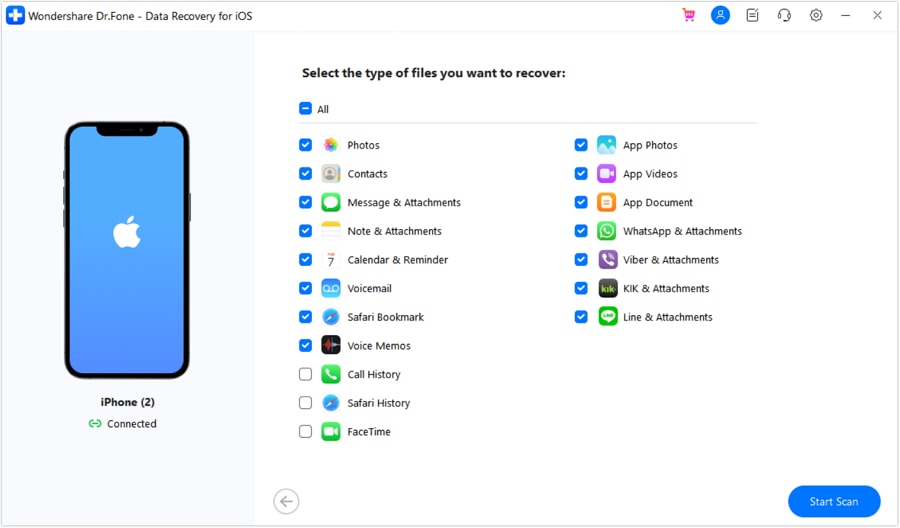
Step 2 Connect the iPad and Scan
Connect your broken iPad to your computer via a lightning or USB-C cable. After your iPad is connected successfully, Dr.Fone will show you a window on selecting the type of data you want to recover. Click “Start Scan”, and Dr.Fone will start detecting the data of your iPad. Wait a few minutes for the analysis to finish.
-
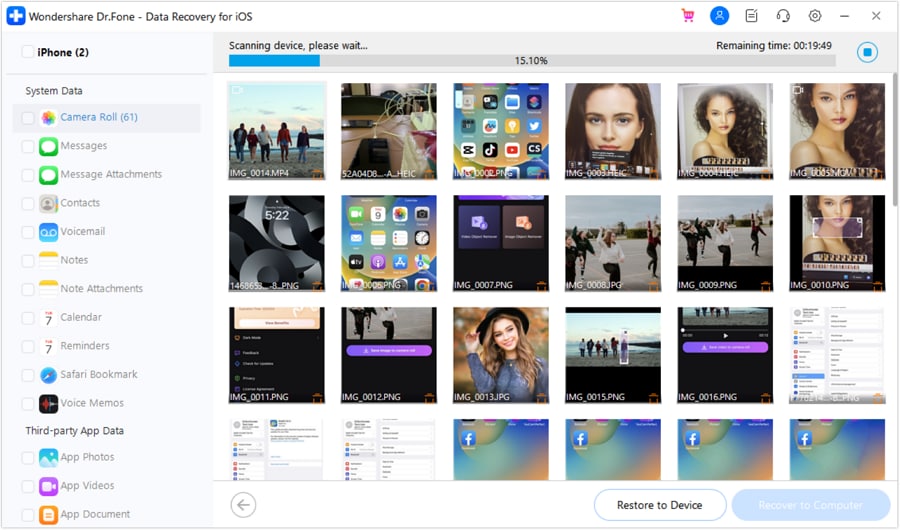
Step 3 Save the Recovered Data
When the thorough scan is finished, browse through the categorized lists. Choose the contents you want to save and click the “Recover to Computer” button to extract them safely to your desktop.
Conclusion
Losing data from a broken or dead iPad can be a stressful experience, but with Dr.Fone - Data Recovery (iOS), you can easily recover your lost files regardless of the situation. Whether you want to recover data directly from your broken iPad by trusting a computer, or extract it securely from inaccessible iTunes or iCloud backups, Dr.Fone has got you covered. So, don't panic or assume your files are gone forever—download Dr.Fone - Data Recovery (iOS) and get back your precious data in no time.
FAQ
-
1. Can I recover data from a dead iPad if it won't turn on at all?
Yes, even if your iPad completely refuses to power on, you can still recover your data by extracting it from an iCloud or iTunes backup using professional data recovery software like Dr.Fone. While a direct hardware scan isn't possible on a completely dead motherboard, backup extraction is highly effective. -
2. Does Apple store iPad backups forever?
Apple retains your iCloud backups as long as your iCloud storage plan is active and you have sufficient space. However, if an account remains inactive for over 180 days, Apple reserves the right to delete the stored backups. It is highly recommended to extract and save important data locally to a computer. -
3. Is it safe to use third-party software for iPad data recovery?
Yes, utilizing a reputable tool like Dr.Fone is completely safe. The software operates strictly in read-only mode, meaning it will not alter, damage, or overwrite any existing data on your device or in your Apple accounts. It securely accesses backups locally or via an encrypted iCloud login. -
4. How can I trust a computer on an iPad with a broken screen?
Trusting a computer typically requires tapping "Trust" on the iPad screen. If the screen is entirely unresponsive or shattered, you can bypass this step only if the iPad had already "Trusted" that specific computer before the damage occurred. If not, your best alternative is relying on existing iCloud or iTunes backups for recovery.
 Add Wondershare Dr.Fone as a preferred source on Google


