2026 Guide: How to Wipe an iPad and Erase Everything Before Selling It

Selena Lee
Selena Lee Originally published Jul 27, 2026, updated Aug 06, 2026
clock :
robot TL;DR:

To safely wipe your iPad before selling it and ensure your private data is completely unrecoverable, follow a strict process of backing up, signing out of Apple services, and securely erasing the device.

  • Backup First: Always secure your files using iTunes, iCloud, or third-party solutions like Dr.Fone before initiating any wiping process, as permanent deletion is irreversible.
  • Disable Activation Lock: Crucially, you must turn off "Find My iPad" and sign out of iCloud, iMessage, and the App Store to prevent the device from locking the new owner out.
  • Military-Grade Erasure: Instead of relying on a standard factory reset, utilize a professional tool like Dr.Fone - Data Eraser to overwrite your storage space, ensuring no data recovery software can ever retrieve your personal information.

Ask AI for a summary

douhao

I am upgrading to the newest iPad Pro and want to sell my old iPad Air. How do I completely wipe my iPad and erase everything so my personal data is totally unrecoverable?

Sarah J., Graphic Designer

Apple's iPad lineup, from the classic entry-level models to the powerful iPad Air and iPad Pro, remains highly sought after in the second-hand market. Because these devices are highly reliable and visually stunning, they hold exceptional resale value in 2026. However, before you hand your device over to a new owner, it is absolutely mandatory to understand how to wipe an iPad thoroughly.

We all store incredibly sensitive information on our tablets—ranging from personal photos and financial documents to saved passwords and professional emails. If you do not properly erase iPad data, you run the severe risk of identity theft and unauthorized access. Simply deleting files manually is never enough. In this comprehensive guide, we will walk you through the most secure, step-by-step methods on how to erase iPad data completely, ensuring your privacy remains intact before selling it.

In this article
  1. Part 1. How to Backup iPad Data Before Erasing Everything
  2. Part 2. How to Wipe an iPad Permanently with an iOS Data Eraser
  3. Part 3. Essential Account Disconnections Before Selling an iPad

Part 1. How to Backup iPad Data Before Erasing Everything

Before you learn how to wipe an iPad safely, your top priority must be securing a comprehensive backup of your important data. Once you erase the iPad securely, there is no turning back. Here are the most reliable methods to preserve your files in 2026.

1-1. Back Up Your iPad Using iTunes

For users who prefer a local backup, iTunes (or Finder on newer macOS versions) remains a highly secure option. It creates a complete replica of your iPad directly on your computer's hard drive.

  1. Step 1 Connect to Your Computer

    Launch iTunes on your PC or Mac. Use a certified lightning or USB-C cable to connect your iPad to the computer.

  2. Step 2 Locate Your Device

    Look for the small iPad-shaped icon in the top-left corner of the iTunes window. Click on that icon to access your device summary.

  3. Step 3 Initiate the Backup

    Under the Backups section, click on the "Back Up Now" button. Your iPad will now back up automatically. Allow a few minutes for the process to complete securely.
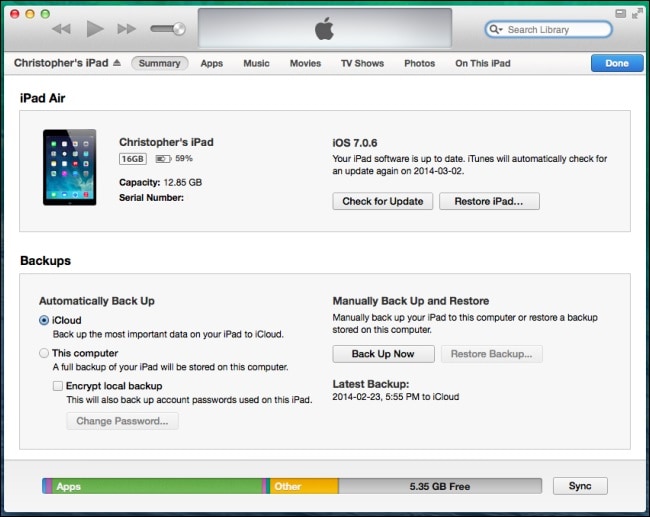
backup in itunes

1-2. Back Up Your iPad Using iCloud

If you prefer a wireless method, iCloud offers a seamless way to back up your iPad directly to Apple's cloud servers. Ensure you have enough iCloud storage space before proceeding.

  1. Step 1 Connect to Wi-Fi

    Ensure your device is connected to a strong, stable Wi-Fi network to avoid interruptions during the backup process.

  2. Step 2 Access iCloud Settings

    Navigate to Settings, tap your name at the top, and find iCloud. For iOS 7.0 and earlier, this menu will be labeled "Storage & Backup".

  3. Step 3 Trigger the Backup

    Turn on "iCloud Backup" and then tap "Back Up Now". This may take a considerable amount of time depending on your internet connection speed and total storage volume, so be patient.
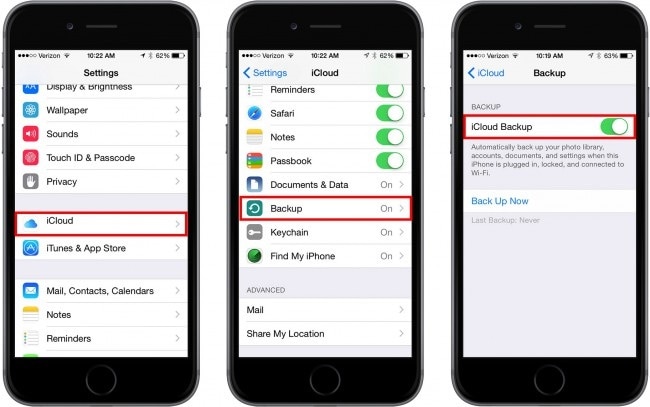
backup in icloud

1-3. Back Up Using Dr.Fone - iOS Data Backup & Restore

Dr.Fone Basic

Manage, Transfer, Backup & Mirror Your Devices
  • gouEffortlessly manage data through preview, delete, export, etc.
  • gouTransfer all data between devices.
  • gouRobust backup solutions for reliable data protection.
  • gouMirror screens to PC for meetings, teaching, and control.

Try It Free Try It Free Try It Free Try It Free
Dr.Fone Basic

If you want a hassle-free, flexible alternative to iTunes or iCloud, you can use the Dr.Fone toolkit - iOS Data Backup & Restore. This toolkit allows you to perform partial or complete backups without overwriting your existing backup files.

Unlike standard Apple methods, Dr.Fone's intuitive interface organizes your files by category (photos, contacts, messages, etc.), giving you a one-click restore option exactly when you need it. It offers incredible reliability and supports all iOS versions seamlessly. It’s an ideal solution before you begin the process to erase iPad memory.

google play button app store button

Part 2. How to Wipe an iPad Permanently with an iOS Data Eraser

Dr.Fone - Data Eraser

Erase iOS & Android Data Permanently
  • gouPermanently erase all data on iOS & Android — completely unrecoverable.
  • gouMilitary-grade wiping to fully protect your privacy.
  • gouGenerate verified erasure reports to boost device resale value.
  • gouSelectively erase private data and remove junk & large files.
Try It Free Try It Free Try It Free Try It Free
Dr.Fone Data Eraser

Now that your data is safely backed up, it is time to discuss how to wipe an iPad securely. When preparing an iPad for a new owner, a basic factory reset is not always enough. To ensure there is absolutely zero trace of your personal data left behind, we highly recommend using Dr.Fone - Data Eraser.

This powerful application implements military-grade data wiping technologies. Unlike traditional deletions, this software overwrites your system storage entirely, ensuring that no professional recovery software can ever retrieve your financial apps, emails, or personal photos. You can seamlessly access Dr.Fone - Data Eraser with a simple, click-through process, granting you absolute peace of mind.


style arrow up
Note: The data eraser tool is Windows and Mac compatible.

Let's take a closer look at the step-by-step process to erase iPad using this reliable software:

  1. Step 1 Launch Dr.Fone Toolkit

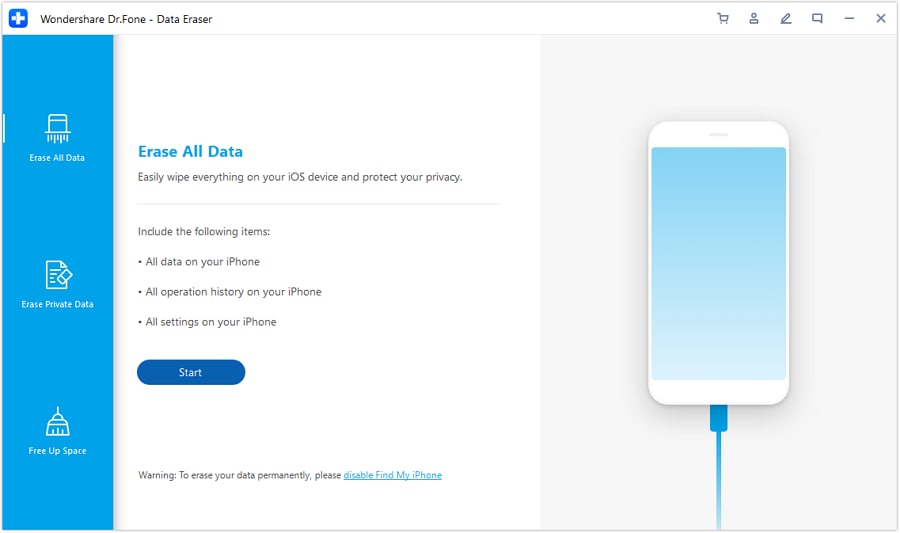
    First, download the Dr.Fone software from the official Wondershare website and install it on your PC or Mac. Once launched, you will see the primary dashboard. Click on the "Data Eraser" module to initiate the tool.

    launch drfone
  2. Step 2 Connect Your iPad

    Connect your iPad to the computer using a reliable cable. The software should detect your iPad automatically. On the next screen, you will need to select the "Erase All Data" tab on the left-side menu.

    connect your ipad
  3. Step 3 Confirm Data Deletion

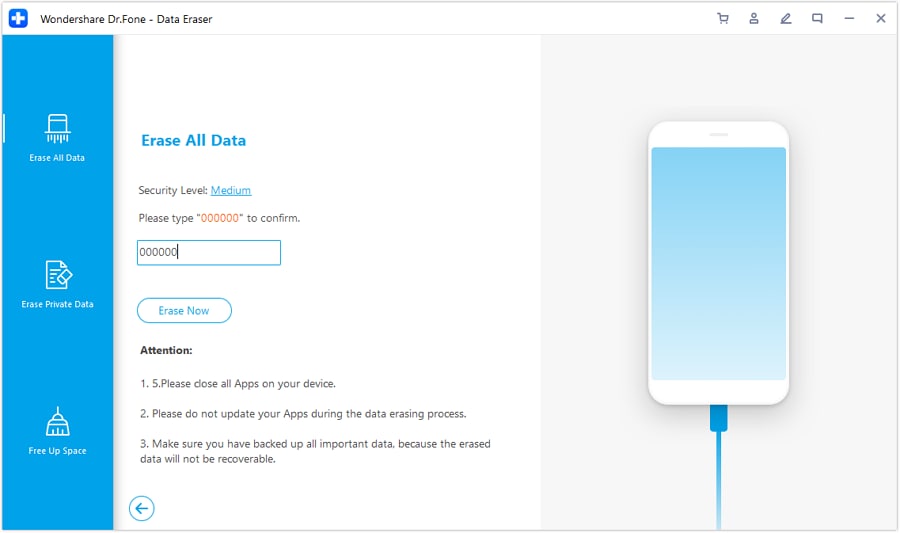
    Click on the "Start" or "Erase" button. Because this action is irreversible and permanently wipes the device, the software adds a safety check. You will be asked to manually type the word "delete" into a confirmation box to proceed.

    click on delete
  4. Step 4 Wait for the Wipe to Finish

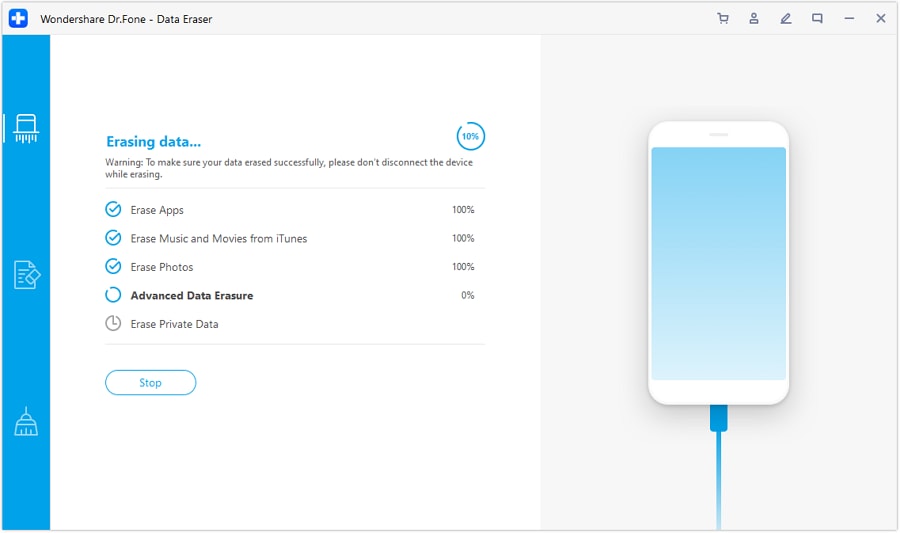
    Once confirmed, sit back and let the application work. It will deeply overwrite your iOS system. Do not disconnect your device during this critical phase.

    eraseing complete
google play button app store button

After a few minutes, you will receive an "Erase completely" notification on your screen. That’s it! This process has flawlessly shown you how to wipe an iPad thoroughly, making it 100% safe to sell.

Part 3. Essential Account Disconnections Before Selling an iPad

Wiping your physical storage is crucial, but detaching your Apple ID from the hardware is equally important. If you do not perform these sign-outs, the new owner may encounter an Activation Lock, making the device unusable. Follow these necessary steps before you officially hand over the iPad.

  • 1. Turn Off "Find My iPad" and Sign Out of iCloud

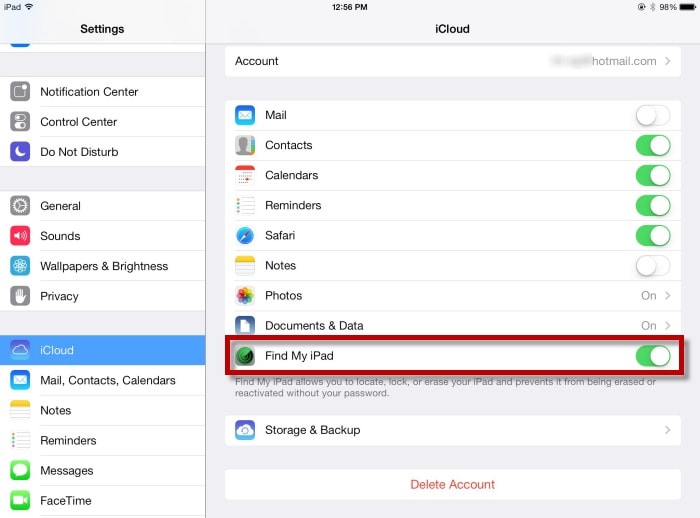
    To avoid locking the next buyer out, you must unlink your iCloud account. Navigate to your device's Settings, tap your Apple ID profile at the top, and find the "Find My" section. Turn the radio button off. Then, scroll down and tap "Sign Out" to remove the iCloud footprint entirely.

    delete icloud account
  • 2. Sign Out of iMessage and FaceTime

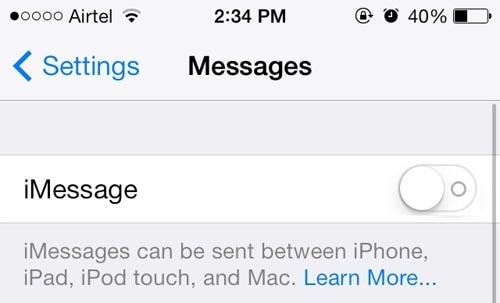
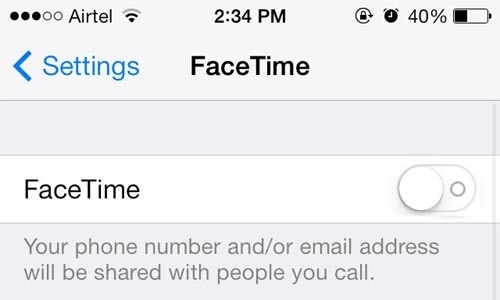
    Next, you must ensure your messages aren't accidentally routed to the old device. Open Settings and tap on Messages, then toggle iMessage off. Do the same for FaceTime by toggling its radio button off as well.

    turn off imessages

    turn off facetime
  • 3. Sign Out from the iTunes & App Store

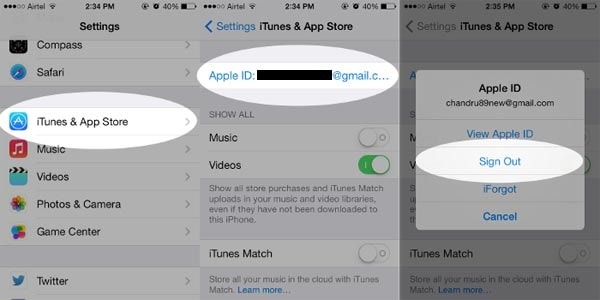
    You don't want anyone buying apps with your stored payment methods. Open Settings, tap your Apple ID profile, and access "Media & Purchases" (or "iTunes & App Store"). Tap your Apple ID and select "Sign Out".

    sign out apple id
  • 4. Disable Passcodes and Fingerprints

    Ensure that all Face ID, Touch ID, and alphanumeric passcodes are removed so the new buyer can set up the iPad seamlessly.

  • 5. Unpair Linked Devices

    If you have an Apple Watch or specific Bluetooth accessories intrinsically paired with this iPad, unpair them manually via the Bluetooth settings.

Conclusion

Understanding how to wipe an iPad thoroughly is not an optional step; it is a critical necessity before selling or trading in your Apple device. Neglecting to erase iPad data properly can lead to disastrous privacy leaks and identity theft. By following the comprehensive steps outlined in this guide—from creating secure backups to disabling "Find My"—you ensure a smooth transition for the new owner while safeguarding your own personal life.

For ultimate protection, we strongly recommend bypassing standard factory resets and utilizing a military-grade tool like Dr.Fone to erase iPad files permanently. It takes only a few minutes and guarantees your sensitive information can never be recovered.

FAQ

  • 1. Will a standard factory reset permanently erase my iPad data?
    While a factory reset removes the immediate pointers to your files, making the iPad appear empty, specialized data recovery tools can often retrieve fragments of this "deleted" data. To completely erase iPad files beyond any possibility of recovery, it is highly recommended to use professional data erasure software.
  • 2. How do I know if my iPad is fully erased and ready to sell?
    Your iPad is fully erased and ready when it reboots to the initial "Hello" setup screen in multiple languages. If you are prompted for a passcode or an Apple ID password, it means the device has not been properly wiped or Activation Lock is still enabled.
  • 3. Can I wipe my iPad remotely if I already sold it?
    Yes. If you forgot to wipe iPad data before selling it, you can log into iCloud.com, go to "Find My iPhone", select your iPad from the devices list, and click "Erase iPad". However, this only works if the device is connected to the internet and you hadn't removed it from your account yet.
  • 4. What happens if I don't sign out of iCloud before I erase the iPad?
    If you fail to sign out of iCloud before you erase the iPad, Apple's Activation Lock security feature remains active. The new owner will be permanently stuck on a screen asking for your original Apple ID and password, rendering the iPad useless to them.
OUR EXPERT
Selena Lee

Selena Lee

chief editor

Chief Editor of the Dr.Fone team since 2012, Selena is a veteran technology editor known for turning complex iOS and Android topics into clear, user-focused guidance.

Try It Free Try It Free