[2026] 4 Ways to Factory Reset iPad Air/Pro– Full Guide

May 22, 2026 • Filed to: Mobile Tips & Tactics • Proven solutions
 TL;DR:
You can factory reset your iPad Air or Pro to resolve persistent software glitches or prepare the device for sale by utilizing the device settings, iCloud, iTunes Recovery Mode, or third-party software depending on your access to credentials.
● Select the Erase All Content and Settings option directly on the iPad if you know the device passcode, or use the iCloud Find My website to remotely wipe the device if you have forgotten the screen passcode and the Find My feature is already enabled.
● Connect the iPad to a computer and use iTunes Recovery Mode if the device is disabled, which requires holding the Top button along with either the Home button or a volume button depending on your model until the recovery screen displays.
● Complete a full data backup prior to wiping the device, and use third-party applications like Dr.Fone-System Repair if you need to factory reset the iPad without knowing the active Apple ID or password.
Ask AI for a summary
 ChatGPT
 Perplexity
 Gemini
 Claude
 Grok
Grok
One of the most common situations you need to reset your iPad is when you've forgotten your password. Alternatively, if the iPad is disabled, your best option is to factory reset it.
After the operation, you may quickly restore this data and files if you regularly back up your iPad. You may need to restore your iPad to its factory settings to utilize your Apple ID.
To address your issue, we will outline simple techniques to factory reset iPad Pro in this article. So, if you're also worried about this issue, keep reading to learn how to factory reset for iPad Air.
Part 1: Main Reasons to Factory Reset iPad Air/Pro
- Try to sell it
You may safeguard any private information left on your iPad by wiping it clean and doing a factory reset before you give it away or sell it. You can save a lot of time and frustration by spending a few seconds on this.
- No enough storage
Your only choice if your internal storage is full is to better manage the capacity you already have by deleting useless apps and unnecessary data. Resetting your iPad may be the best option if it isn't working.
- Software glitches (frozen iPad/frequent force close…)
Occasionally, a factory reset for iPad Air/Pro can fix problems like iPad ghosting in unidentified situations or iPad running slowly. All data and tenacious bugs and problems can be eliminated from an iPad Pro, Air, or Mini with a factory reset. It can also correct software bugs.
Part 2: 3 Ways to Factory Reset iPad Air/Pro Completely
1.Erase All Content and Settings
The first option is to use Settings, which is often disregarded on iOS devices. You may use it to adjust the brightness, change the language on your iPad, modify the sound settings, and even figure out how to reset an iPad without an Apple ID.
You can reset your iPad using this method even if you don't have access to a computer. You may reset your iPad's settings from anywhere in a remote location. The steps you must take to factory reset iPad Pro are outlined below.
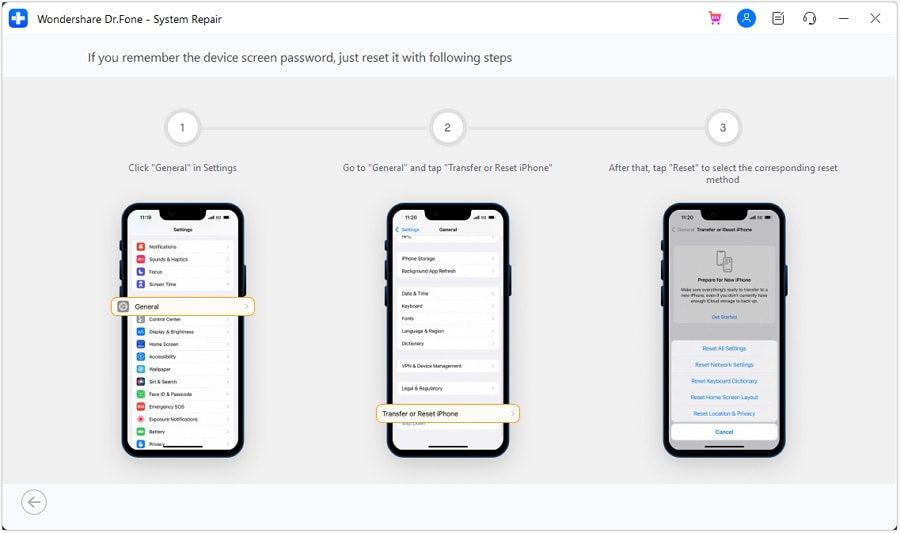
- On the iPad's home screen, tap the Settings icon.
- Go to the General settings menu and select Reset from the list of options there.
- To completely reset your iPad, choose the Erase All Content and Settings option on the following screen.
- When prompted, enter the passcode for your iPad to proceed with the process.
- Your iPad will soon be completely reset. If you want to accomplish that, link it to your Apple ID or any other one.

Reset options are available in the built-in "Settings" app, which includes options to reset your location settings, network settings, and factory settings for your iPad. Your device will prompt you to enter your iPad's passcode when you press this option on your iPad. Your device will reset its factory default settings once you enter the right passcode.
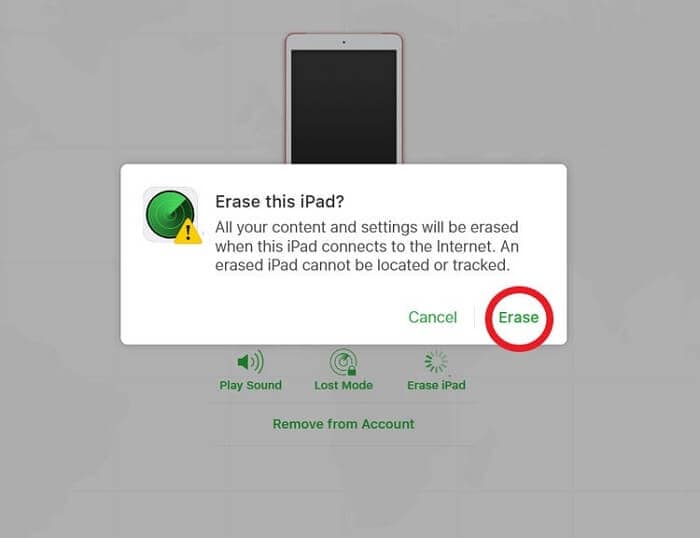
2.Erase iPad with iCloud-Find My
iCloud is another good option for resetting your iPad if the Find My function is enabled. Additionally, you can select it to resolve how to factory reset for iPad Air if you've forgotten your screen passcode. The detailed instructions for factory resetting on an iPad are below.
- Visit the iCloud website > Choose to Find My.
- Click All Devices. Locate and pick the iPad that has to be reset.
- Select Erase iPad, then confirm once more. After that, iCloud will reset your iPad. Wait with patience.
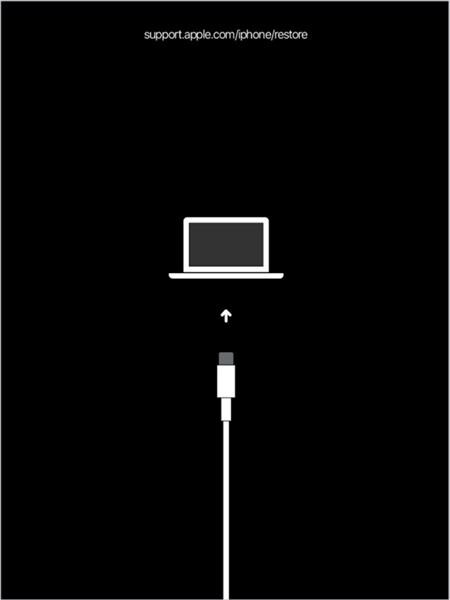
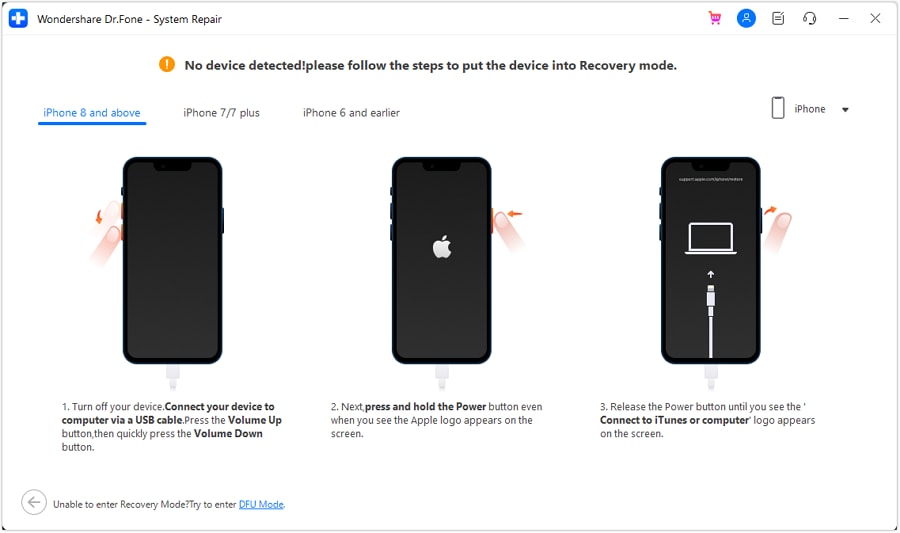
3.Restore your iPad with Recovery mode
iTunes is instructed to update or wipe the iPad in recovery mode. This procedure must be started before connecting the iPad to your computer. Attach the iPad's cable to your computer first; once recovery mode has begun, you can connect the iPad more quickly since you'll need to press a few buttons. Depending on the iPad model you have, the procedure differs a little.
iPad with Home button:
- Hold the Top or Side button on an iPad with the Home button until the Power Off slider shows on display.
- To turn off the iPad, move the slider.
- Once the iPad is connected to your computer, keep holding the Home button.
- Only once the recovery mode screen shows should you let go of the Home button.
iPad with Face ID:
- Press and hold the Top button and one of the volume buttons on an iPad with Face ID until the Power Off slider appears.
- To switch off your iPad, slide it.
- Connect your gadget to the computer while keeping the Top button depressed.
- Once you see the screen for recovery mode, you can release the Top button.
Reset the iPad to its default settings.
When the iPad enters recovery mode, iTunes should immediately start on your PC. You will have the choice of updating or restoring the iPad. To restore, click Restore. Restoring the iPad can take several minutes.
Bonus Tips: Easy and Free App to Factory Reset iPad Air/Pro
Your Apple ID and password are always required to reset an iPad. What if you are unaware of the Apple ID being used on your iPad or do not know its password? How can an iPad be factory reset iPad Air, then? Not to worry!
You may reset your iPad even without an Apple ID by using Dr.Fone-System Repair, a comprehensive iOS system repair toolkit, in just a few simple clicks. Additionally, you can use this program to unlock your iPhone or iPad even if you don't know the password for your Apple ID, iCloud account, iCloud Activation Lock, iTunes backup password, etc.
Furthermore, you don't need to worry about doing any difficult procedures. The only real work involved is connecting your iPad to your computer and clicking buttons. After that, Dr.Fone-System Repair will begin deleting the associated Apple ID from your iPad and performing a factory reset iPad Air.
Steps:
Step 1: The first step in resetting your iOS device is to navigate the System Repair window and select the "Toolbox Repair" option.

Step 2: To continue with the process, select "Reset Device" from the list of options in the next box.

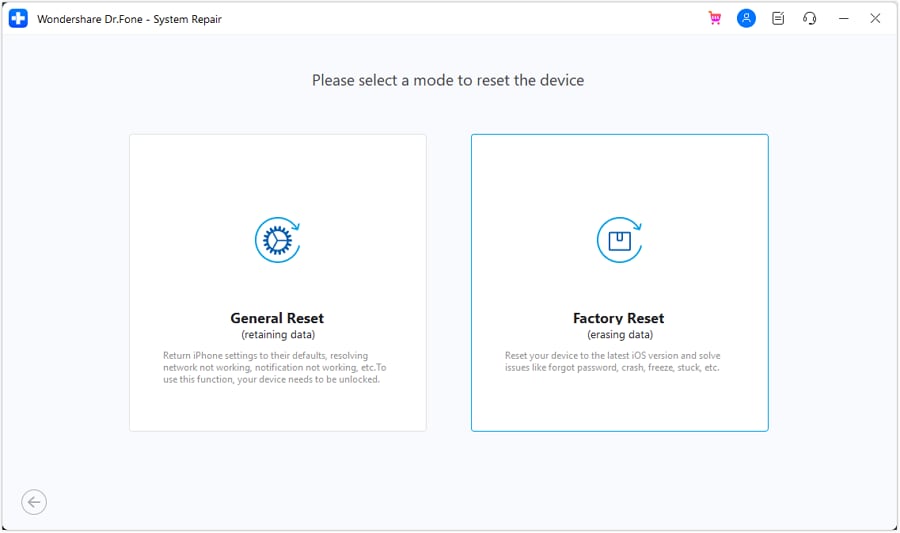
Step 3: You can choose the device's reset method. If you want to keep your phone's data, choose "General Reset".
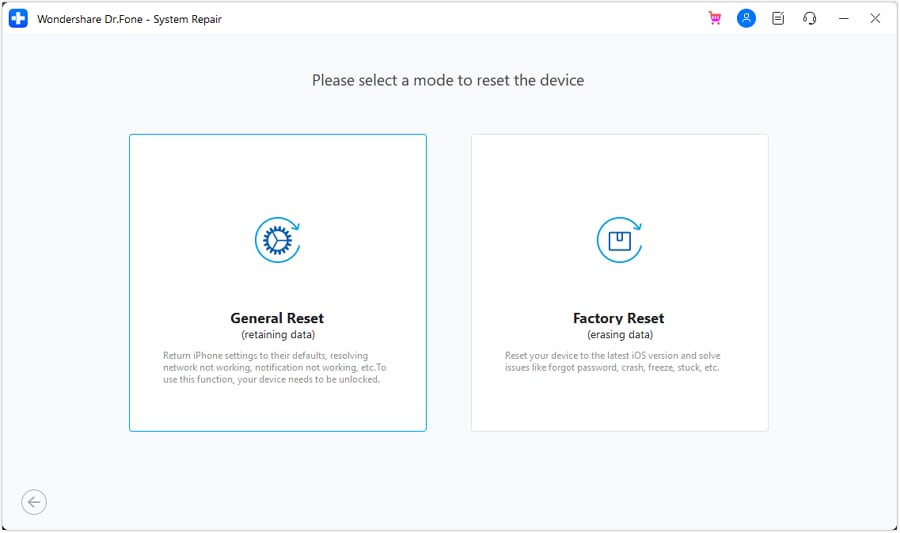
Step 4: If you choose it, reset your smartphone by following the on-screen directions.
Step 5: Try "Factory Reset" to reset the device and give it a brand-new appearance.
Depending on the model of your device, follow the on-screen directions to put your smartphone into recovery mode.
Part 3: Don't Forget to Back Up Your iPad Air/Pro Before Factory Reset
Now that Dr.Fone enables backing up and exporting data from iOS devices to computers directly, users may easily back up, export, print, and selectively restore backup data to their iOS devices.
Solution 1: Manually Back Up the Data
Step 1. Connect iOS Device to Computer
Once Dr.Fone has started running on your computer, choose "Phone Backup" from the tool list. Next, connect your iPhone, iPad, or iPod touch via a Lightning cable. Please click the "backup" option in this situation.

Step 2. Select File Types to Backup
Dr Fone will automatically identify and back up the file kinds on your device after you pick the "backup" button, and you can choose which file types to back up. Then select "Backup."
The backup process will take a short while, depending on the amount of data stored on your device. The supported data, including Photos & Videos, Messages & Call Logs, Contacts, Memos, and other data, will then be shown by Dr.Fone.

Solution 2: Automatically Back Up the Data
Step 1. Start Backup Automatically
Additionally, you can configure the automatic backup solution. You can configure the backup frequency and period when the automatic backup function is turned on. The default backup is utilised if no customised backups are defined.
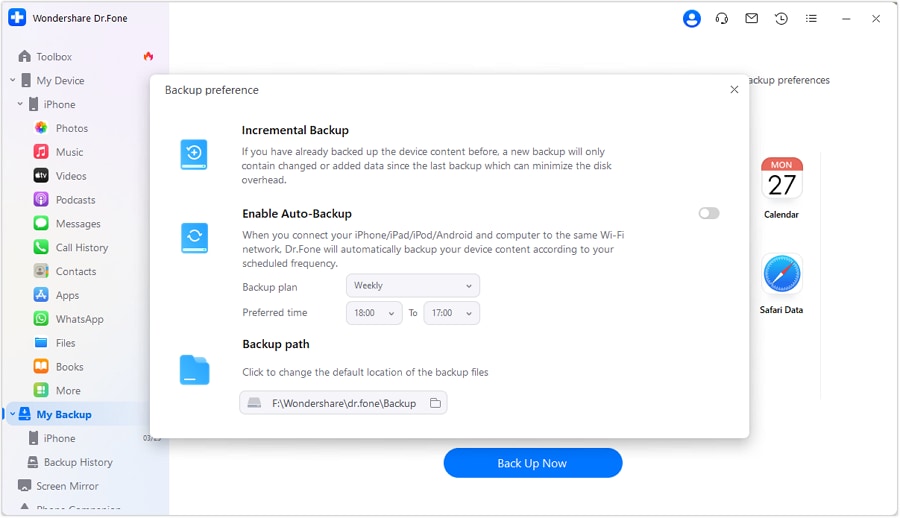
Step 2. Start Backup Automatically
The data can be automatically backed up to the computer after connecting your iOS device and PC to the same wifi. If the device has already been backed up, the next backup will only include newly added or updated files to minimise storage space.

Step 3. View What's Backed Up
You may view the history of all iOS device backups by selecting "View Backup History" when the backup is complete. To view the backup file's contents in categories, click the "View" option. You have the option of selecting one file or several files to print or export to your computer.

Conclusion
You can use the previously described approach for factory settings if you're looking for ways to factory reset iPad Air without an Apple ID or password. You should reset your iPad with Dr.Fone-System Repair if you cannot. If you find the extensive instructions in this post helpful, you can pass them along to other iPad owners.


iPad Tips
- iPad Manage
- 1. Download Movies on iPad
- 2. Download Music on iPad
- 3. Delete Duplicate Photos on iPad
- 4. Use iPad as An External Hard Drive
- 5. Delete Device Management on iPad
- 6. iPad Remote Management Software
- 7. Send Text Messages from iPad
- 8. Download WhatsApp on iPad
- 9. Change Weather Location on iPad
- iPad Backup
- 1. Ways to Restore iPad Without iTunes
- 2. Restore iPhone from iPad Backup
- 3. Backup iPhone/iPad in DFU Mode
- iPad Erase
- 1. Clear iPad data effectively
- 2. Delete Bookmarks on iPhone/iPad
- 3. Delete Browsing History on iPad
- 4. Ways to Delete Movies from iPad
- 5. Clear Cookies on iPad
- 6. Permanently Delete Emails from iPad
- 7. Wipe your iPad and Erase Everything
- 8. Clear System Data on iPad Storage
- iPad Mirror
- 1. Screen Recorders for iPad
- 2. Mirror iPad to Fire TV Stick
- 3. Screen Share Mac to iPad
- 4. Screen Mirror iPad Display
- 5. Share iPad Screen with PC
- 6. Screen Mirroring iPhone to iPad
- 7. iPad Mirror to PC without Lagging
- 8. Mirror iPad to Mac without Lagging
- iPad Recover
- 1. Recover Deleted Files on iPad
- 2. Recover Data from Broken iPad
- 3. Recover Deleted Safari Bookmarks
- 4. Recover Deleted Notes from iPad
- iPad Reset
- 1. Hard Reset/Factory Reset iPad 2
- 2. Reset iPad Air / Air 2
- 3. 5 Tactics to Reset Your iPad Mini
- 4. Factory Reset Your iPad Air/Pro
- 5. Factory Reset Your iPad 2023
- 6. Reset iPad, iPad Pro, and iPad Mini
- 7. Reset iPad Network Settings
- 8. Factory Reset iPad without Password
- iPad Tricks
- 1. Block People in Facebook on iPad
- 2. 25+ Cool Tips and Tricks on iPad
- 3. Play PC Games on iPad
- 4. Detect Spyware on iPhone
- 5. iPad Mini Jelly Scroll Issue
- 6. Fix Apple Keyboard Trackpad
- 7. iCloud Unlock without Passcode
- 8. Restore iPad from DFU Mode
- 9. Bypass Activation Lock on iPad
- 10. Photo Transfer Apps for iPad
- 11. Remove MDM from iPad Like a Pro
- 12. Reset iPad without Password
- ● Manage/transfer/recover data
- ● Unlock screen/activate/FRP lock
- ● Fix most iOS and Android issues
- Manage Now Manage Now Manage Now Manage Now


James Davis
staff Editor
Generally rated4.5(105participated)