100% Security Verified | No Subscription Required | No Malware

 :
: 
 ChatGPT
 Perplexity
 Gemini
 Claude
 Grok
Grok
My iPhone 15 Pro is stuck on a black screen and won't turn on. I think it's in DFU mode. How to restore iPhone from DFU mode without losing my photos?
Sarah Jenkins, Creative Director

DFU Mode (Device Firmware Upgrade) is the deepest type of restore you can perform on an iOS device. It allows the device to interface with software on your computer without loading the OS or bootloader. This is essential for troubleshooting major system failures or firmware corruption. If you're currently dealing with a device that is unresponsive, knowing how to perform a DFU mode restore is vital.
In this comprehensive 2026 guide, we will explore the two primary methods for an iPhone DFU restore. We will compare the official Apple method, which leads to a factory reset, against a professional alternative designed to protect your data. Whether you want to fix a software glitch or update your firmware, this walkthrough covers everything you need to know about entering and exiting DFU mode safely.
In this article
Part 1. Restore iPhone/iPad/iPod from DFU Mode with iTunes (Data Loss)
iTunes (or Finder on macOS Catalina and later) remains the default tool provided by Apple for managing iOS devices. When your device is stuck, an iTunes-based DFU restore is often the first step recommended by support. However, it is important to understand the consequences: this process will wipe your device completely to install a fresh version of iOS.

Step 1Connect to Computer
Ensure your computer is running the latest version of iTunes. Power off your iOS device and connect it to your PC or Mac using a certified USB cable.
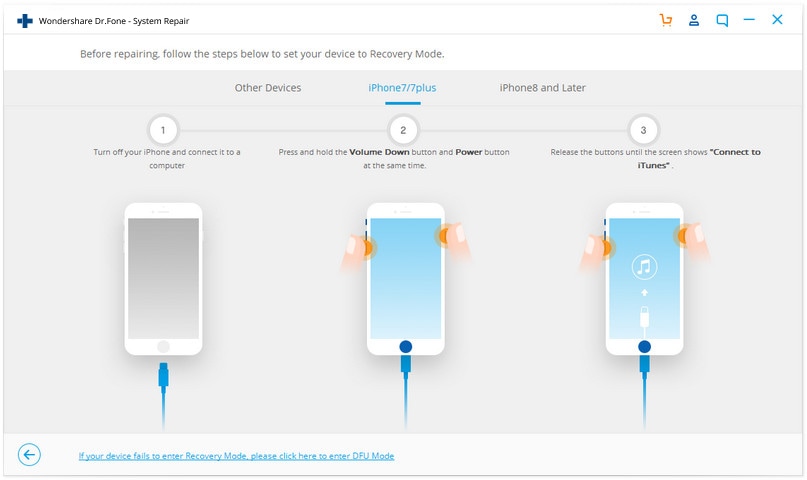
Step 2Enter DFU Mode
Follow the specific button combination for your model (usually holding the Power and Volume Down or Home buttons) until the screen remains black, indicating DFU mode has been engaged. Release the buttons once iTunes detects the device.
Step 3Initiate Restore
A popup will appear in iTunes stating that it has detected an iPhone in recovery mode. Click on "Restore iPhone" and confirm your choice to begin the firmware download and installation process.


Part 2. Restore iPhone/iPad/iPod from DFU Mode without iTunes (No Data Loss)
Many users want to avoid the total data wipe associated with standard Apple methods. If you are looking for a way to restore iPhone from DFU mode while keeping your photos, messages, and apps intact, Dr.Fone - System Repair (iOS) is the premier solution. It is specifically engineered to fix deep system errors, including devices stuck on the Apple logo, black screens, or DFU mode, without risking your local storage.
 Fix iOS issues, no data loss.
- One-click repair for all iOS problems.
- Solve recovery mode, Apple logo, black screen, etc.
- Upgrade or downgrade iOS without iTunes

The software offers an intuitive interface that guides you through the DFU mode restore process. It supports all modern iOS versions, including the latest iterations in 2026, and works seamlessly on both Windows and macOS. Follow these steps to recover your device:
Step 1Launch Dr.Fone
Open the Dr.Fone toolkit on your computer and select the "System Repair" module from the main dashboard.
Step 2Select Standard Mode
Connect your device via USB. To ensure your data remains safe, choose "Standard Mode" to fix the DFU issue without deletion.
Step 3Enter DFU Instructions
If your device is already in DFU mode, the software will automatically proceed. If not, follow the on-screen guide to enter DFU mode.
Step 4Download Firmware
The program will identify your device model. Verify the details and click "Download" to fetch the correct iOS firmware for your iPhone.
Step 5Monitor Progress
Wait for the firmware to download and verify. Do not disconnect the cable during this phase.
Step 6Repair System
Click "Repair Now" to start the restoration. This process reinstalls the firmware and fixes the DFU loop.
Step 7Completion
Once finished, your iPhone will reboot normally. All your data will still be accessible on the home screen.


Conclusion
Performing a DFU mode restore is a powerful way to breathe life back into an unresponsive iPhone or iPad. While iTunes offers a free, official solution, it comes at the cost of your personal data. For most users in 2026, using Dr.Fone - System Repair (iOS) is the preferred choice because it balances professional firmware restoration with absolute data safety. Don't let a system crash ruin your day—choose the method that fits your needs and get your device back in top shape.


FAQ
1. What is the difference between DFU mode and Recovery mode?
Recovery mode uses the iBoot bootloader to restore your phone, whereas DFU mode bypasses iBoot entirely to allow firmware downgrades and more advanced repairs. Recovery mode usually displays a "connect to computer" icon, while DFU mode shows a completely black screen.2. Can a DFU restore fix a hardware problem?
No, a DFU mode restore is a software and firmware-level repair. If your device's motherboard, battery, or display is physically damaged, restoring the firmware will not resolve the issue.3. How long does an iPhone DFU restore take?
The process typically takes between 15 to 30 minutes. This includes time for the computer to download the iOS firmware (approx. 5-7GB) and the actual installation time on the device.4. Why is my iPhone still not turning on after a DFU restore?
If a successful DFU restore doesn't fix the device, it likely indicates a hardware failure. In some cases, the battery may be too depleted to complete the reboot, or the logic board may have a short circuit.
 Add Wondershare Dr.Fone as a preferred source on Google