Issues with iPhone/Android Stuck in Recovery Mode

May 19, 2026 • Filed to: Phone Repair Solutions • Proven solutions
 TL;DR:
To fix an Android or iPhone stuck in Recovery Mode, verify physical button functionality to perform a hardware force restart, or execute an OS-specific system restore using iTunes, an Android factory reset, or Wondershare Dr.Fone.
● Ensure the Power, Volume, and Home buttons are fully functional before attempting any fixes, as unresponsive physical buttons will block the manual key combinations required to execute a force restart or navigate the recovery menus.
● For native software resolution, iPhone users can connect to iTunes to trigger a "Restore and Update" command, while Android users must use physical buttons to select "Wipe Data or Factory Reset", a last-resort step that resolves severe firmware conflicts but permanently erases all user data.
● If native methods fail, Wondershare Dr.Fone can perform a System Repair by downloading matching firmware; this process repairs iOS directly from its stuck state, but strictly requires Android users to manually transition their device into Download Mode first.
Ask AI for a summary
 ChatGPT
 Perplexity
 Gemini
 Claude
 Grok
Grok
In today's technologically advanced world, iOS and Android smartphones are essential companions. They have impressive capabilities and special features that make our lives so convenient. However, they are not immune to occasional glitches or unexpected snags. Recovery Mode is our lifeline in moments of technological distress. This safety feature helps resolve issues plaguing our devices and restore their smooth performance.
But what if your iPhone or Android is stuck in Recovery Mode? What are you going to do? This article will guide you on what to do when your Android and iPhone are stuck in Recovery Mode and won't restore.
Part 1. Understanding the Power of Recovery Mode for Android and iPhone
Recovery mode is a booting option in smartphone firmware, essential for troubleshooting and maintaining software-related issues. It is particularly useful when encountering critical software issues like system crashes, software update failures, app conflicts, or device unresponsiveness.
During recovery mode, users can revert the operating system to its factory default settings and reset the device to its original state. Follow the short guide below on how to enter and exit Recovery Mode.
Put Android Into Recovery Mode
- Step 1: Press the power button until the power menu appears. Select Power Off and wait for the device to shut down completely.

- Step 2: Simultaneously press the Volume (either Up or Down) button and the Power button.

- Step 3: Release the Power button while holding the Volume button.
- Step 4: In Recovery Mode, you can use the Volume buttons to navigate the options and the Power button to select an option.

Put iPhone Into Recovery Mode
- Step 1: Press and hold the Power button until the Power-off slider materializes on the screen. And then, drag it to the right to shut down the device completely.

- Step 2: Do the following steps very quickly and in chronological order. For iPhone 8 or newer models, touch and release the Volume Up button. Do the same thing with the Volume Down button. Lastly, hold the Power button until the Recovery Mode screen manifests. For iPhone 7, hold the Volume Down and the Power buttons together until the screen shows Recovery Mode. For other models, hold the Power and the Home buttons together.

Get Android Out of Recovery Mode
- Step 1: Hold the Power button for 10 to 15 seconds until your device restarts. Alternatively, navigate the Recovery Mode screen using the Volume buttons. Select Reboot System Now among the provided options.

Get iPhone Out of Recovery Mode
- Step 1: For iPhone 8 and newer models, touch and release the Volume Up button. Do the same thing with the Volume Down button. Hold the Power button until the Apple logo materializes on the screen. For iPhone 7, hold the Volume Down and the Power buttons together until the Apple logo comes into sight. For iPhone 6, hold the Power and the Home buttons together.

Part 2. How to Fix Android Phone or iPhone Stuck on Recovery Mode
Recovery Mode, meant to troubleshoot software issues, can occasionally backfire, leaving smartphones stuck in this state. Users may find it difficult to escape Recovery Mode due to glitches, incomplete updates, or hardware malfunctions. This situation can lead to frustration, data loss, and limited device functionality. Here are a few solutions to fix this issue:
Solution 1: Ensure That the Buttons are Working Fine (iPhone and Android)
One of the first steps to fix an iPhone or Android stuck in Recovery Mode is to ensure that the physical buttons on the device are working correctly. iPhone and Android use specific button combinations to enter and exit Recovery Mode. Thus, you’ll have difficulty getting out of this mode if any of them malfunctions. Check the Volume, Power, and Home buttons to see if they are all responsive to your input. Test them thoroughly until you’re convinced that these buttons are in good condition.
Solution 2: Force Restart Your Device (iPhone and Android)
Force restart is a simple yet powerful method to resolve many smartphone issues. In most instances, this method often works as well to exit iPhone or Android stuck in Recovery Mode. This process varies slightly between iPhone and Android devices. Refer to the guide below for your convenience.
For iPhone
- Step 1: For iPhone 8 or newer models, tap and release the Volume Up button and then the Volume Down button. Hold the Power button until the Apple logo manifests on the screen. For iPhone 7, tap and hold the Volume Down and the Power buttons simultaneously. For iPhone 6, tap and hold the Power and the Home buttons at once.

For Android
- Step 1: Hold the Power button until the device restarts. Keep holding it for at least 10 to 15 seconds.

Solution 3: Wipe Data under Recovery Mode (Android)
Wipe data or factory reset is an option in Recovery Mode for Android devices, restoring the device to its original factory state by erasing all user data and settings. This action is often used as a last resort when the device experiences severe software issues or is preparing to sell or give away. In Recovery Mode, use the Volume buttons to scroll through the options. Meanwhile, use the Power button to select an option. Follow the steps below.
Step 1: On the Recovery Mode screen, scroll down and find Wipe Data or Factory Reset. Click on it.

- Step 2: Confirm the procedure. Click Yes - - Delete All Users Data.
- Step 3: Wait while the process is ongoing. Normally, the device reboots itself and returns to its original state. If it doesn’t restart on its own, navigate to the Reboot System Now option and click on it.

Solution 4: Exit Recovery Mode Using iTunes (iPhone)
iTunes is always there for Apple users to save the day. When your iPhone is stuck in Recovery Mode and won’t restore, this tool can be of great help. It’s capable of assisting you with the Recovery Mode and restoring your device to its original state. Here’s how to use it in easy steps.
- Step 1: Launch iTunes on your desktop. Once it fully loads, connect your iPhone to your computer using a data cable.
- Step 2: iTunes will immediately recognize that your device is currently in Recovery Mode. A notification window will appear on your computer screen to inform you that restoring your iPhone is required at this point. From there, click OK.

- Step 3: Click Restore.
- Step 4: Lastly, click Restore and Update to proceed.

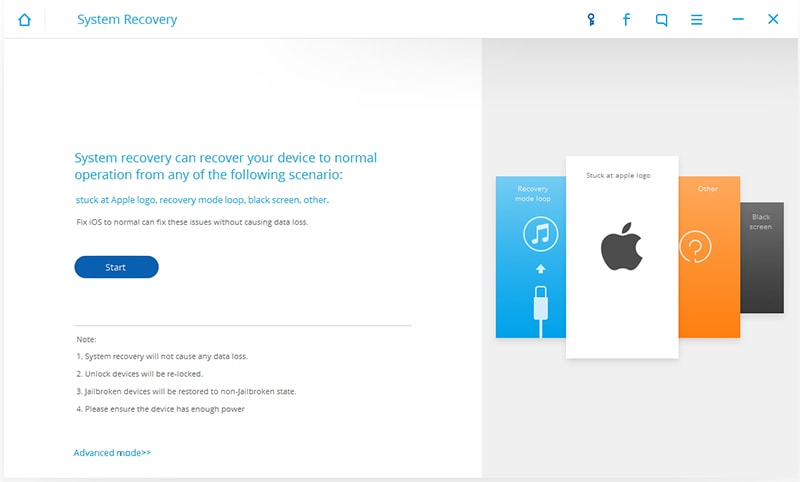
Solution 5: Exit Recovery Mode Using Wondershare Dr.Fone (iOS & Android)
When the first few solutions all fail, the next thing you can try is to use a third-party system recovery tool. Don’t worry. Wondershare Dr.Fone is at your service. It has a powerful system recovery feature that works both for Android and iPhone. Here’s how to restore iPhone or Android stuck in Recovery Mode using Wondershare Dr.Fone.
For iPhone
- Step 1: Download Wondershare Dr.Fone from its official website. Install it on your computer.
- Step 2: Launch the newly installed Wondershare Dr.Fone on your desktop. On the main dashboard, find and click System Repair.

- Step 3: Connect your iPhone to your computer using a data cable.
- Step 4: Click iOS.

- Step 5: Click iOS Repair among the given choices.

- Step 6: Click Standard Repair.

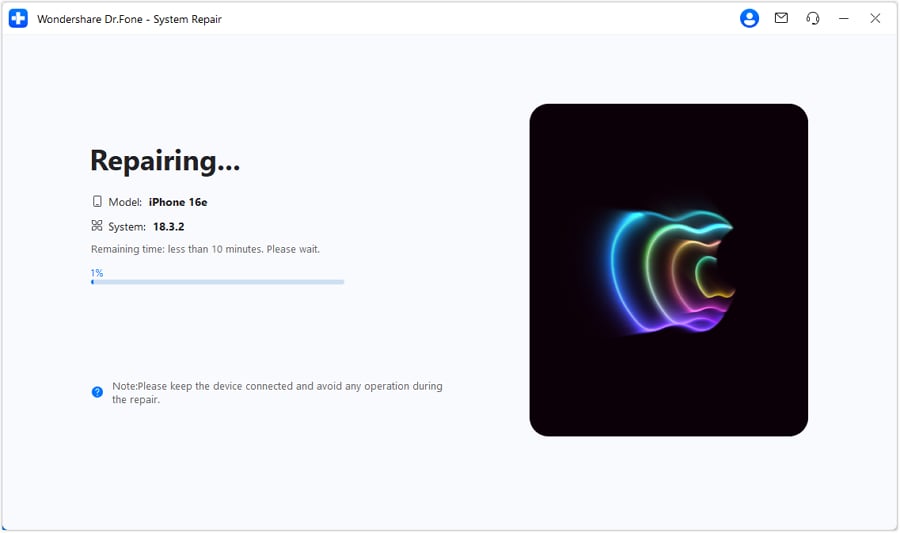
- Step 7: No need to put your iPhone into Recovery Mode since it’s already stuck in that settings. At this moment, choose the best firmware that matches your device’s specifications and model. Click the Download button next to it.

- Step 8: Wondershare Dr.Fone will start downloading the firmware. Don’t use your iPhone or your computer while this process is ongoing to avoid unnecessary interruptions.

- Step 9: After that, click Repair Now.

- Step 10: Wondershare Dr.Fone will begin repairing the iOS. Sit back and wait patiently.
- Step 11: A new window will appear on your computer screen to alert you that the procedure has been completed. From there, click Done to wrap it up.

For Android
- Step 1: Launch Wondershare Dr.Fone on your desktop and connect your smartphone to your computer using a data cable.
- Step 2: On the main dashboard, click System Repair.
- Step 3: Confirm your device. Click Android.
- Step 4: Click Start to proceed.
- Step 5: Wondershare Dr.Fone will automatically fetch your device information. Check the details carefully and modify them if necessary. After that, check the tickbox next to the agreement notice and then click Next.

- Step 5: At this juncture, you are required to put your smartphone into Download Mode. Press the Power button to shut down your device. And then, hold the Volume Down, Home, and Power buttons together. Alternatively, hold the Volume Down, Bixby, and Power buttons together if your smartphone doesn’t have a home button. Lastly, hold the Volume Up button until it enters the Download Mode.

- Step 6: After that, Wondershare Dr.Fone will automatically download the firmware that matches your device specifications. Don't interrupt the process.

- Step 7: Check the firmware details. Make sure it suits your device. Right after, click Fix Now.

- Step 8: Confirm your device. Type in the code on your computer screen and then click Confirm.

Step 9: Wait patiently as Wondershare Dr.Fone performs the repair procedure.

- Step 10: Wondershare Dr.Fone will let you know once the process has been completed. Click Done to wrap it up.

Part 3. The Importance of Backing Up Your Smartphone Regularly
In our fast-paced digital age, smartphones have become an indispensable part of our lives, seamlessly handling various tasks and storing precious memories. However, despite their advanced technology, we can never predict when problems might arise with these devices. They may suddenly get stuck in recovery mode, become inaccessible due to software glitches, or even experience hardware failures. Such unforeseen issues can lead to devastating consequences, resulting in the loss of valuable files, cherished photos, important documents, and irreplaceable memories.
Creating regular backups of your smartphone files is crucial to safeguard against these potential calamities. Backing up your data ensures that your files will be safely stored elsewhere, even if your smartphone encounters a major problem. Whether using cloud services, external hard drives, or dedicated backup applications, setting up a reliable backup system grants you the peace of mind that your data is protected. Emphasizing the importance of regular backups to family and friends can prevent heartache from losing invaluable information, enabling them to bounce back swiftly from smartphone-related setbacks and continue cherishing their digital lives confidently. Remember, it does not matter if problems will appear, but when, and being prepared is always the best course of action.
Backing up your iPhone and Android devices using Wondershare Dr.Fone is straightforward. Follow this short guide to create secure backups of your data:
- Step 1: Launch Wondershare Dr.Fone on your desktop.
- Step 2: Connect your iPhone or Android device to your computer using a compatible USB cable. Enable USB debugging if prompted.
- Step 3: Click My Backup from the left panel. Right after, head over to the main dashboard and then click Back Up Now.

- Step 4: Wait while Wondershare Dr.Fone is backing up your device. Avoid device disconnections during the process to avoid unnecessary interruptions.

- Step 5: Wondershare Dr.Fone will notify you once the process is completed. Click Open in Folder or View Backups to review your files.

Conclusion
Recovery Mode is a great booting option for troubleshooting software issues. However, it can sometimes backfire and become a problem. But don’t worry. The abovementioned solutions can help you fix your iPhone or Android stuck in Recovery Mode. Download Wondershare Dr.Fone for easily accessible assistance. This complete-package mobile solution can help you with system recovery and data backup.


iPhone Recovery
- Deleted Data Recover
- 1. Recover HEIC Photos on iPhone
- 2. Recover Deleted Calendar Event
- 3. Retrieve iPhone Deleted Reminders
- 4. Retrieve iPhone Deleted Voicemail
- 5. Recover iPhone Deleted Photos
- 6. Recover iPhone Deleted Note
- 7. Recover Call History from iPhone
- 8. Recover iPhone Deleted Contacts
- 9. Play GamePigeon 8 Ball on iMessage
- 10. Recover Deleted iOS Files
- iPhone Passwords Recover
- 1. Retrieve iPhone Email Password
- 2. See iPhone Saved Password
- 3. Access iPhone Password
- 4. Get iPhone Password Back
- 5. iPhone Passcode Requriement Pops
- 6. Find iPhone Wi-Fi Password
- iPhone WhatsApp Recover
- 1. Recover WhatsApp Messages Apps
- 2. Recover Deleted WhatsApp Messages
- 3. Recover WhatsApp Messages Online
- 4. Retrieve Deleted WhatsApp
- Recover from Stolen iPhone
- Recover from Broken iPhone
- 1. Recover Data from Broken iPhone
- 2. Fix iPhone Fell in Water
- 3. Water Damaged iPhone Data Recovery
- 4. Recover Data from Dead iPhone
- 5. Recover Photos From Broken iPhone
- iPhone Recovery Tips
- 1. GT Recovery Undelete Restore
- 2. Recover Data from Memory Card
- 3. Recover iPhone Lost Data
- 4. SD Card Recovery for Mac
- 5. Clear Safari History
- 6. Recover from iPhone in DFU Mode
- 7. iTunes Data Recovery
- 8. Recover iPhone Data Without iTunes
- iPhone Recovery Tools
- ● Manage/transfer/recover data
- ● Unlock screen/activate/FRP lock
- ● Fix most iOS and Android issues
- Free Download Free Download Free Download

Alice MJ
staff Editor