Complete Tutorial 2026: Sending Photos From iPhone to iPad

May 22, 2026 • Filed to: Data Transfer Solutions • Proven solutions
 TL;DR:
You can transfer photos from an iPhone to an iPad wirelessly using AirDrop or iCloud, manually via a computer with iTunes/Finder or Wondershare Dr.Fone, or in small batches using WhatsApp and email.
● Automatic synchronization via iCloud requires both devices to be logged into the same Apple ID, with transfer speeds strictly dependent on your internet connection and the volume of images.
● Desktop management using iTunes or Finder requires a two-step manual import to a PC or Mac before syncing, whereas software like Wondershare Dr.Fone allows direct device-to-device transfers when both are simultaneously connected to the computer.
● Utilizing Email or WhatsApp (accessed via WhatsApp Web on the iPad's Safari browser) is restricted by attachment size limits, making these platforms suitable only for low-volume transfers rather than bulk or high-resolution libraries.
Ask AI for a summary
 ChatGPT
 Perplexity
 Gemini
 Claude
 Grok
Grok
Among the array of iOS devices, the iPhone and iPad stand as popular companions for capturing and storing precious moments. However, navigating the process of transferring photos from iPhone to iPad can sometimes feel daunting. Fortunately, with the evolution of Apple's ecosystem, it has become a straightforward task.
Now, the process can be managed with various methods and tools available at your disposal. The guide aims to effortlessly transfer your photos from an iPhone to an iPad. From utilizing iCloud and AirDrop to exploring third-party applications, we'll cover step-by-step instructions.

- Part 1: How To Transfer Photos From iPhone to iPad Using AirDrop
- Part 2: How To Transfer Photos From iPhone to iPad Using iCloud Sync
- Part 3: One-Click Innovative Solution To Transfer Photos From iPhone to iPad

- Part 4: How to Transfer Photos from iPhone to iPad Using iTunes/Finder
- Part 5: How To Transfer Photos From iPhone to iPad Using Social Media Apps
- Part 6: How To Transfer Photos From iPhone to iPad Using Email
Part 1: How To Transfer Photos From iPhone to iPad Using AirDrop
AirDrop stands as one of the most convenient and straightforward methods. It can transfer photos between Apple devices wirelessly. This functionality employs Bluetooth and Wi-Fi to establish a direct link between your iPhone and iPad. That enables smooth photo sharing without requiring additional cables or an internet connection. Here's a detailed guide outlining the process of how to transfer photos from iPhone to iPad using AirDrop:
- Step 1. On your iPhone and iPad, swipe down from the top right corner to open the Control Center. Tap and hold the connectivity panel; within, press and hold the network connectivity box that includes AirDrop. Choose "Contacts Only" or "Everyone" to enable AirDrop visibility.

- Step 2. To begin, access the Photos app on your iPhone and pick the photos you'd like to transfer to your iPad. Afterward, select the "Share" icon within the app, and from the available options, opt for "AirDrop." Look for your iPad in the AirDrop panel displayed and tap on it to start the transfer process.

- Step 3. When your iPad receives the notification prompting you to accept the incoming photos from the iPhone, tap "Accept." The selected images will be saved to your iPad's Photos app.

Part 2: How To Transfer Photos From iPhone to iPad Using iCloud Sync
iCloud offers a smooth way to synchronize photos across your Apple devices. It ensures your photo library remains up-to-date without manual intervention. Enabling iCloud Photos automatically uploads your images to iCloud, allowing access from any device linked to the same Apple ID. Here's a guide to transfer photos from iPhone to iPad automatically via iCloud:
- Step 1. Begin by accessing your iPhone's Settings and tapping your name at the top. On the following screen, choose "iCloud" followed by "Photos" on the next window. Here, ensure that "Sync this iPhone" is toggled for iCloud Photos.

- Step 2. Now, move to iPad and ensure you are logged in with the same Apple ID. Then, go to “Settings,” tap the name, press "iCloud," and tap "Photos." Here, you need to toggle on the "Sync this iPad" option. Afterward, wait for some time to let the syncing process complete. The speed of synchronization depends on your internet connection and the number of photos being uploaded.

Part 3: One-Click Innovative Solution To Transfer Photos From iPhone to iPad
Wondershare Dr.Fone presents an innovative and user-friendly solution. It offers a comprehensive way to transfer photos between your iPhone and iPad. This software provides a straightforward method to transfer photos selectively or entirely. Moreover, when using it, you are no longer bound by the constraints of iCloud or AirDrop. The following are the detailed guides for transferring photos using Wondershare Dr.Fone:
3.1 Transfer Selective Photos from iPhone to iPad
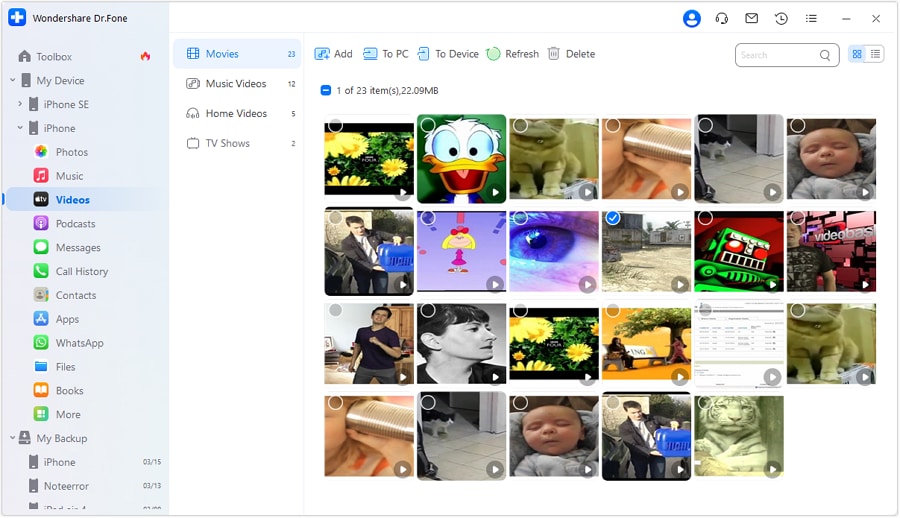
Wondershare Dr.Fone is an intelligent iPhone transfer and management solution. It is designed to streamline your data handling. With its array of functions, you can manage your data through importing, exporting, and deletion processes. This tool offers the convenience of quick file transfers by simply dragging and dropping files. Here is how to add photos from iPhone to iPad using Wondershare Dr.Fone:
- Step 1: Install and Open the Latest Wondershare Dr.Fone App
You can begin by installing the latest version of Wondershare Dr.Fone from its official website. Once installed, launch it and connect your iPhone and iPad to the computer. When the devices are detected by Dr.Fone, click on the "iPhone" name to expand it in the left panel.

- Step 2: Transfer the Photos to the iPad from the iPhone
From the expanded options, choose "Photos" to access your iPhone's photos. Here, select the files you want to transfer and click "To Device." Now, choose the "iPad" from the available options, and the photos will be transferred in no time. You can send as many as you like without any constraints.
3.2 Transfer All Photos From iPhone to iPad
When moving photos in bulk from iPhone to iPad, Wondershare Dr.Fone also got you covered. It offers a powerful phone transfer feature that can transfer over 18 types of data from one device to another. Dr.Fone simplifies the process of transferring data between phones with just one click. It facilitates the smooth transfer of various data types, like photos. You can follow these simplified steps to transfer photos from iPhone to iPad:
- Step 1: Navigate to Phone Transfer within Wondershare Dr.Fone
Once you have launched Wondershare Dr.Fone, connect the iPhone and iPad to the computer. Then, click "Toolbox" from the left side panel and tap the "Phone Transfer" option from the available choices. Then, you will be asked to position your devices correctly for data transfer.

- Step 2: Successfully Complete the Photos Transfer Process
When assigning positions, the iPhone will be the "Source" device. On the other hand, the iPad will become the "Destination" device. You can use the "Flip" to change the devices' positions. Afterward, select "Photos" from the data and click "Start Transfer" to initiate the process.

Part 4: How To Transfer Photos From iPhone to iPad Using iTunes/Finder
iTunes or Finder can also be used to transfer photos from your iPhone to your iPad. It is the official Apple software for music, media, and backup management. Yet, iTunes/Finder can assist in manually syncing photos between your iOS devices. The steps needed to transfer photos from iPhone to iPad automatically are given below:
- Step 1. Connect your iPhone to the PC or Mac and open the Photos app. In the Photos app, tap "Import," select your iPhone, and wait for the computer to load photos from the iPhone. Once they are loaded, choose to transfer the targeted to the computer.

- Step 2. When photos are moved to your computer, unplug the iPhone and link your iPad. Now run the latest version of iTunes/Finder on your PC/Mac and tap the device icon. Here, choose "Photos" from the left panel and check the box next to "Sync Photos."

- Step 3. Now, choose the folder where you moved photos from the iPhone in the drop-down box. After that, hit the "Apply" button and wait for the images to sync with the iPad.

Part 5: How To Transfer Photos From iPhone to iPad Using Social Media Apps
Social media apps can serve as a convenient platform for transferring photos. Numerous options are available for transferring pictures, and one of the widely used applications is WhatsApp. It is known for its communication features. Moreover, it enables users to share images and media files across various devices. Here's a guide on how to transfer photos from iPhone to iPad via WhatsApp:
- Step 1. After ensuring WhatsApp is running on both devices, open WhatsApp on iPhone. Tap the new chat icon to start a conversation with a WhatsApp account logged in on the iPad. Now, tap the "+" icon and choose either "Document," "Camera," or "Gallery" and pick the desired images. After selecting the photos, tap "Send" to transfer them to iPad.

- Step 2. Proceed to the iPad and launch the “WhatsApp Web” on Safari. Following this, access your conversations and download the images you received to complete the transfer process.

Part 6: How To Transfer Photos From iPhone to iPad Using Email
Utilizing email provides a direct and frequently used approach for transferring photos between your iPhone and iPad. However, it might not be suitable for larger quantities of high-resolution images due to attachment size limits. Nevertheless, it is effective for smaller batches of images. Here's a detailed guide on how to utilize email for transferring photos between your iPhone and iPad:
- Step 1. Access the email app on your iPhone and initiate a new email. Input your iPad email address in the recipient field. Next, tap on the "Attachment" icon to select the images you want to send.

- Step 2. Move to your iPad and on the "Mail" app there. Now navigate to "Inbox" and open the newly received email. Tap the attachments and save them to your device to complete the transfer process.

Conclusion
Transferring photos between your iPhone and iPad is an essential task for many users. Throughout this guide, we've explored various methods to transfer photos from iPhone to iPad. These ranged from native Apple services like AirDrop, iCloud, and iTunes/Finder to unconventional approaches such as social media apps and email. Each method offers its advantages.
Yet, considering factors like convenience, ease of use, and efficiency, one option stands out as a versatile and user-friendly solution: Wondershare Dr.Fone. This innovative third-party software provides a hassle-free way to transfer photos between iOS devices. It offers both selective and bulk transfer options with a straightforward interface.


iPhone Photos
- Convert HEIC to JPG
- 1. Convert HEIC to JPG on Linux
- 2. Convert HEIC to JPG Windows
- 3. Best HEIC Converter Online
- 4. Convert HEIC to JPG High Quality
- Export iPhone Photos
- 1. Upload iPhone Photos to Google Drive
- 2. Transfer Photo from iPhone to PC
- 3. Transfer Photo from iPhone to iPhone
- 4. Transfer from iPhone to iPhone
- 5. Transfer from iPhone to iPad
- 6. Move iPhone Photo to External Drive
- 7. Transfer from iPhone to Flash Drive
- 8. Extract Photos from iPhone
- 9. Download Photo from iPhone
- Import Photos to iPhone
- 1. Transfer from Laptop to iPhone
- 2. Transfer Photo from Camera to iPhone
- 3. Transfer Photo from Mac to iPhone
- 4. Transfer Photos from PC to iPhone
- 5. Transfer from iPhone to PC
- 6. Transfer from Android to iPhone
- 7. Transfer from Samsung to iPhone
- Manage iPhone Photos
- 1. Back up iPhone Photos
- 2. Get Photos off iPhone
- 3. Send Large Size Photos from iPhone
- 4. Photo/Video Compressor Apps
- 5. Delete Photos from iPhone/iPad
- 6. iPhone Photos Disappeared Suddenly
- 7. iPhone Photoshop Alternatives
- Recover iPhone Photos
- 1. Restore Deleted Photos from iPhone
- 2. Recover Photos from iPod Touch
- 3. Recover Deleted Picture from iPhone
- Transfer iPhone Photos to Mac
- Transfer iPhone Photos to PC
- 1. Transfer Data from iPhone to PC
- 2. Transfer Photo to Computer
- 3. Transfer Photo to PC without iTunes
- 4. Transfer Library to Computer
- 5. Send Photo from iPhone to Computer
- 6. Import Photo from iPhone to Windows
- 7. Transfer Photo to Windows
- Transfer Photos from Google Drive
- 1. Download from Google Drive to iPhone
- 2. Transfer from Google Photo to iPhone
- 3. Download from iCloud to iPhone
- Transfer Photos to Google Drive
- Image Convert Tips
- ● Manage/transfer/recover data
- ● Unlock screen/activate/FRP lock
- ● Fix most iOS and Android issues
- Free Download Free Download

Selena Lee
chief Editor