100% Security Verified | No Subscription Required | No Malware

 :
: 
 ChatGPT
 Perplexity
 Gemini
 Claude
 Grok
Grok
It can be frustrating when you've captured the perfect photo on a camera, edited it on your PC, and then struggle to move it to your iPhone. You might expect a simple drag-and-drop process, but transferring files between Windows and iOS isn't always straightforward. Due to different operating systems, you can't just copy and paste photos as you would between folders on your computer.
Fortunately, there are reliable methods to resolve this. This guide will walk you through two distinct approaches to transfer photos from a PC to your iPhone, including the latest models. We'll cover the official Apple method using iTunes and a more direct, user-friendly alternative that avoids common syncing issues. You'll learn how to make the process smooth and seamless.
Read More: How to Transfer Photos from iPhone to Windows PC?
In this article
Part 1. How to Transfer Photos from PC to iPhone Using iTunes
iTunes is Apple's traditional solution for managing media between your computer and iOS devices. It allows you to sync music, movies, and photos. While effective, the syncing process has specific rules you need to understand. When you sync photos from your PC to your iPhone via iTunes, it replaces any previously synced photo library on your device. Let's explore the step-by-step process.
-
Step 1 Connect Your iPhone and Launch iTunes
First, connect your iPhone to your PC using a USB cable. Open iTunes on your computer. It's crucial to ensure you have the latest version of iTunes installed to avoid compatibility issues.
-
Step 2 Navigate to the Photos Sync Panel
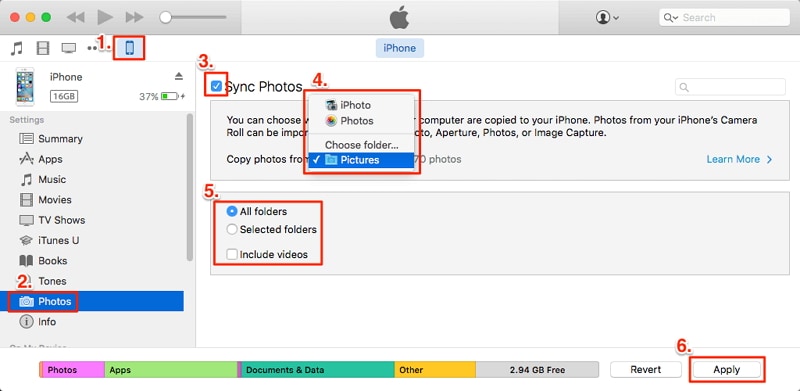
Once iTunes recognizes your iPhone, click the small device icon that appears near the top-left corner. In the left-hand sidebar under 'Settings', select the "Photos" tab. This will open the photo syncing options.
-
Step 3 Select the Folder to Sync
Check the box next to "Sync Photos." A dropdown menu will appear, allowing you to choose the application or folder from which to copy photos. Select "Choose folder..." and navigate to the folder on your PC that contains the pictures you want to transfer. You can choose to sync all folders or only selected ones.
-
Step 4 Apply Changes and Sync
After selecting your desired folders, click the "Apply" button in the bottom-right corner of the iTunes window. iTunes will then begin the syncing process, transferring the selected photos from your PC to your iPhone.

While this method works, many users find iTunes slow and prone to crashing. The risk of accidentally deleting existing photo albums can also be a significant drawback. If you're looking for a more straightforward solution, the next section details how to transfer photos from PC to iPhone without iTunes.
Part 2. How to Transfer Photos from PC to iPhone Without iTunes
As discussed, the iTunes syncing process can be restrictive and may lead to data loss. If you want a more flexible and safer way to manage your photos, using a dedicated phone management tool is the best alternative. We recommend Dr.Fone - Phone Manager (iOS), a powerful tool designed to handle all types of data transfer between your computer and iOS devices seamlessly.
 Effortlessly manage data through preview, delete, export, etc.
- Transfer all data between devices.
- Robust backup solutions for reliable data protection.
- Mirror screens to PC for meetings, teaching, and control.

Here’s how to copy photos from PC to iPhone using the intuitive interface of Dr.Fone - Phone Manager (iOS).
-
Step 1 Install and Launch Dr.Fone
First, download Dr.Fone from the official website and install it on your computer. Launch the application and select the "Phone Manager" module from the main dashboard.

-
Step 2 Connect Your iPhone
Connect your iPhone to the PC with its USB cable. The software will automatically detect your device. Once connected, you'll see your iPhone's information displayed on the screen.

-
Step 3 Go to the Photos Tab
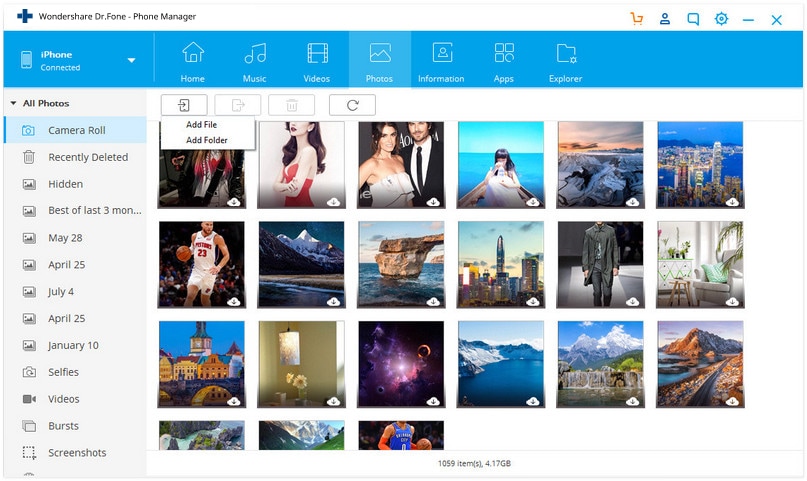
Navigate to the top menu bar and click on the "Photos" tab. This will display all the photo albums currently on your iPhone in the left panel.
-
Step 4 Add Photos from PC to iPhone
Click the "Add" icon (a plus symbol) and choose either "Add File" to select individual photos or "Add Folder" to transfer an entire folder of pictures. A file explorer window will open. Browse to the location of your photos on your PC, select them, and click "Open." Dr.Fone will immediately begin transferring the photos to your iPhone without overwriting any existing data.
This process is not only simpler but also much safer, as it doesn't risk your existing photo library. Dr.Fone works reliably every time, making it the ideal choice for users who frequently manage their photos.
Conclusion
Now you know two effective methods to import photos from your computer to your iPhone. If you only transfer photos occasionally and are comfortable with the iTunes ecosystem, the syncing method is a viable option. However, for most users who want a hassle-free, safe, and efficient transfer process, Dr.Fone - Phone Manager (iOS) is clearly the superior choice. It eliminates the risk of data loss, provides a much more intuitive user interface, and gives you greater control over your files. For a reliable solution to all your phone data management needs, we highly recommend giving Dr.Fone a try.
FAQ
-
1. Why can't I just drag and drop photos from my PC to my iPhone?
Apple's iOS has a closed file system for security and organization, which is different from Windows. It doesn't allow direct file access like a standard USB drive. Data must be transferred through specific protocols managed by software like iTunes or dedicated tools like Dr.Fone. -
2. Will transferring photos with iTunes delete my existing pictures?
Yes, it can. When you sync photos from a PC using iTunes, it replaces the current synced library on your iPhone. Any photos previously synced from a different computer or folder will be removed. However, photos in your Camera Roll (taken with the iPhone) will not be affected. -
3. Can I transfer photos from my PC to a specific album on my iPhone?
With Dr.Fone - Phone Manager, yes. You can select an existing album or create a new one on your iPhone directly within the software before transferring the photos. iTunes, on the other hand, syncs entire folders, and the album structure is based on the folder hierarchy on your PC. -
4. Is it safe to use third-party software like Dr.Fone to transfer photos?
Yes, reputable third-party tools like Dr.Fone are designed to be safe and secure. They simply facilitate the transfer of files and do not access or compromise your personal data. Unlike iTunes, Dr.Fone will not overwrite your existing data unless you explicitly choose to delete something.
 Add Wondershare Dr.Fone as a preferred source on Google