How to Transfer Photos from iPhone to Windows PC [6 Best Ways]
Oct 24, 2025 • Filed to: Device Data Management • Proven solutions
Dr.Fone Basic:
Better Control for Your Phone
Manage, transfer, back up, restore, and mirror your device
Is your photo library cluttered with pictures piling through the years? Do you want to remove them and free up your device’s storage? We can help with that!
Moving data between Mac and iPhone is simple. But the process is not as smooth if your computer is a Windows PC. But don’t worry!
This article offers a complete guide on how to transfer photos from an iPhone to a PC with Windows 10,11 and earlier. Whether you want to free up storage or create a backup, we’ll help you find the best way to achieve it!

- Part 1. Why Transfer Photos from an iPhone to a Windows PC
- Part 2. How to Transfer Photos from iPhone to Windows PC via USB Cable
- Option 1. Using Windows Photos App
- Option 2. Using File Explorer
- Option 3. Sync Photos Using iTunes for Windows
- Part 3. How to Import Photos from iPhone to Windows Without a USB Cable
- Part 4. Instantly Transfer Photos and Any Data from iPhone to Windows with Wondershare Dr.Fone
Part 1. Why Transfer Photos from an iPhone to a Windows PC
Before we talk about how to import photos from iPhone to PC with Windows 10, you might wonder how it can help you and why you do it. Here are some scenarios where you might need to transfer your photos:
- Freeing Up Storage: Your device may have limited internal storage. Transferring photos to a PC helps free up space for new apps, videos, or more photos.
- Creating a Backup: You may need to create a backup to protect your photos from accidental deletion, hardware failure, or device loss.
- Editing the Photos: Sometimes, you may need to edit photos using dedicated editing tools for Windows PCs. These offer more features than mobile apps.
- Organizing Photos in Folders: Windows lets you organize photos into folders. This makes managing large photo libraries easier than the iOS Photos app.
- Transfering Photos for Work: You may want to transfer photos to a PC for business-related purposes. These could be for presentations, portfolio updates, or online sharing.
Regardless of the reason, there are easy ways to move pictures from iPhone to Windows PC, including with and without a connecting cable.
Part 2. How to Transfer Photos from iPhone to Windows PC via USB Cable
A straightforward solution for moving your pictures to a PC is to use a USB cable. This lets you transfer files using a physical connection between the two devices. Once connected, you can transfer the images using the Photos app, File Explorer, or iTunes.
Option 1. Using Windows Photos App
The Photos app lets you import pictures directly from your iPhone to your computer. It automatically recognizes all photos and videos stored on your iDevice. You can select the specific images you want to import.
Here’s how to import photos from iPhone to PC using Windows 10.
Step 1. Link your iPhone to your computer and unlock it. Tap Allow and enter your screen passcode.
Step 2. Type Photos in the search bar on your Windows computer. Then, open the Photos app from the results.
Step 3. A Photos app window will appear. Click the “Import” button from the top right. Then, select your device name from the menu.

Step 4. Wait for your photos and videos to load. Then, choose the pictures you want to transfer and click “Add [number] items.”

Step 5. Select the folder from the popup where you want to store your files. Then click “Import.”

Option 2. Using File Explorer
Another way to send video from an iPhone to a Windows PC is through the File Explorer. This method allows you to transfer both pictures and videos. However, you can only transfer photos captured with your iPhone’s camera.
Here’s how to move pictures from iPhone to Windows with this method.
Step 1. Connect your phone to the computer via an authentic lightning cable.
Step 2. Unlock your device. Tap the “Trust” option to allow the connection. Then, enter your screen passcode.
Step 3. Open This PC on your computer’s desktop.
Step 4. Right-click your iPhone’s name to open the context menu. Then, select “Import pictures and videos.”

Step 5. Select the option to “Review, organize, and group items to import.” Then, tap “Next” to proceed.

Step 6. A new window will appear. Select the photos you need to transfer to your PC. Then, click “Import” at the bottom right.
Step 7. Wait for the process to complete. Then go to This PC and choose “Pictures.” Here, you will find all the folders with your pictures.

Option 3. Sync Photos Using iTunes for Windows
You can download iTunes for Windows to sync pictures between your iPhone and PC. This method requires you to turn on photo syncing in iTunes and turn off iCloud Photos.
Let’s see how to access iPhone photos on Windows using iTunes.
Step 1. Connect your iPhone with a USB cable. Launch iTunes once your computer detects your device.
Step 2. Click the Device icon at the top left of the window. Then click “Photos” from the left panel.
Step 3. Select “Sync Photos” on the new screen. Then, choose whether to sync all folders or selected folders.
Step 4. When choosing “Selected folders,” select the specific ones under the Folders section. Then click Apply.

Step 5. Choose the pictures you want to transfer from the folder. Then click “Import.”
That’s how to transfer photos from iPhone to PC with Windows 10 and beyond. While these methods are helpful, you may want a wireless solution to move your pictures to a PC faster. Keep reading to learn about these.
Part 3. How to Import Photos from iPhone to Windows Without a USB Cable
Don’t have a USB cable to transfer your photos? You can sync photos with cloud storage like iCloud or iTunes and access them on your Windows PC.
Option 1. Using the iCloud App
You can use the iCloud app on your Windows PC while logged in with your Apple ID. The app syncs your photos between your iPhone and the computer. Then, you can save the pictures on your computer’s storage.
Here’s how to access iPhone photos on Windows using iCloud.
Step 1. Set up iCloud on both devices. Use the same ID to sign in.
Step 2. Connect both your devices to a stable network connection.
Step 3. Go to your iPhone Settings and tap your name. Select “iCloud > Photos.” Then enable “Sync This iPhone” under iCloud Photos.

Step 4. On a Windows PC, install iCloud and sign in with your Apple ID. Select the options for iCloud Drive and Photos and click Apply.

Step 5. Go to This PC and choose iCloud Photos. You can find all your synced files here.

Option 2. Using the iCloud.com
Are you looking for a download-free way to use iCloud for data transfer? If so, you can access the iCloud website and download the photos to your computer.
Here’s how to transfer photos from an iPhone to a Windows computer with this method.
Step 1. Go to iCloud.com. Sign in with your Apple ID.
Step 2. Click Photos from the main page.
Step 3. Select the pictures you want to transfer.
Step 4. Click the Download icon in the top right. This will store the pictures in your device’s download folder.

That it! Now you know how to import photos from an iPhone to a Windows computer using iCloud. But what if there was a faster and more reliable way to transfer your data? Read on to learn all about it.
Part 4. Instantly Transfer Photos and Any Data from iPhone to Windows with Wondershare Dr.Fone
Built-in tools like File Explorer and iCloud are more accessible. However, these methods do not support large size of data transfer. They cannot transfer photos in batches.
The transfer speed for extensive photo libraries can also be slow. As for iTunes, it can overwrite previous data when syncing. How do you avoid these limitations to transfer photos safely and quickly?
Wondershare Dr.Fone can be your answer! It offers a one-stop solution for managing and transferring your iOS data across computers and other iOS devices.
With Dr.Fone, you can transfer all types of your iOS data at once. You can also choose to send photos, videos, audio, messages, or other file types individually. Best of all, the app is super easy to operate and completes the transfer in minutes.

Wondershare Dr.Fone
Instantly Transfer Photos and Any Data from iPhone to Windows!
- Transfer, manage, export/import your music, photos, videos, contacts, SMS, Apps, etc.
- Back up your music, photos, videos, contacts, SMS, Apps, etc., to the computer and restore them easily.
- Transfer music, photos, videos, contacts, messages, etc., from one smartphone to another.
- Transfer media files between iOS devices and iTunes.
- Fully compatible with the newest iOS system.
Here’s how to transfer photos from an iPhone to a Windows computer.
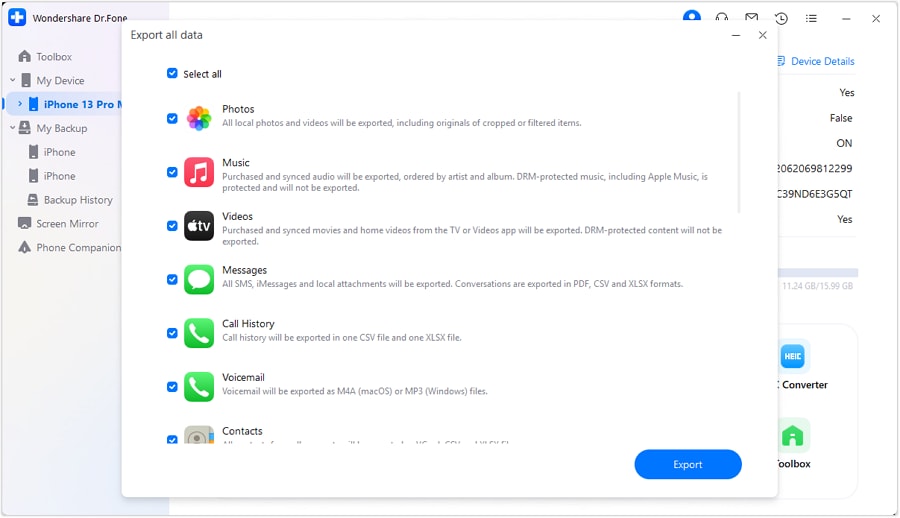
Step 1. Download and install Wondershare Dr.Fone. Connect your iDevice via a USB cable. Then, launch Dr.Fone and click the “Export all data” option under the Quick Start section.

Step 2. A new window will open. Select the file types you want to send. These can be photos, music, videos, messages, etc. Then, click “Export.”

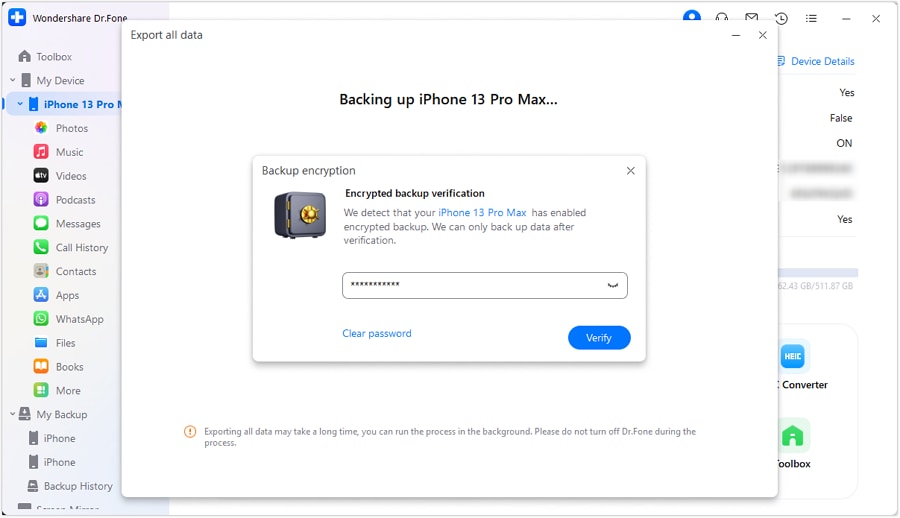
Step 3. Set an encrypted password to protect the data transfer. Verify it and click “Done” to start the process.

Step 4. Dr.Fone will back up the selected data to your computer. You can track the transfer using the progress bar on your screen.

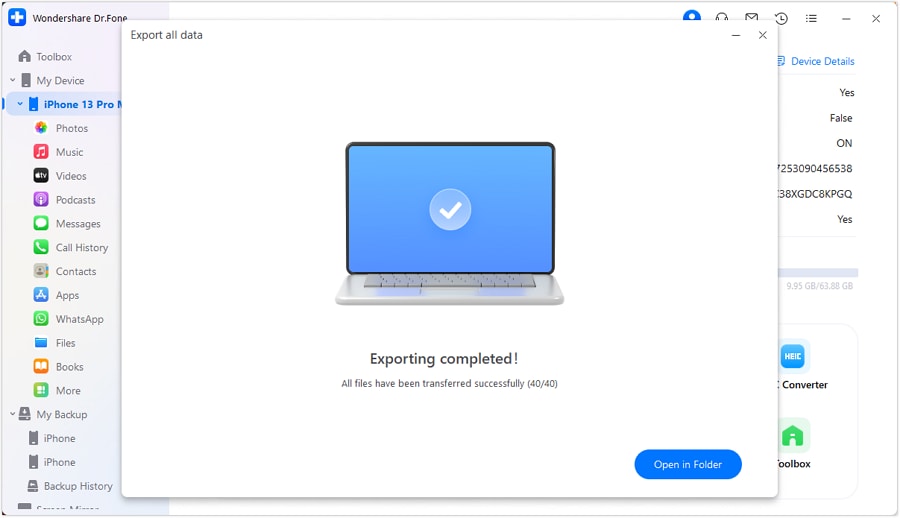
Step 5. Wait for the export to complete. Once it has, the “Exporting completed” message will appear. Then, click “Open in Folder” to view the files stored on your device.

You’re all done moving photos from your iOS device to a Windows computer! Dr.Fone makes the process quick and simple without requiring any technical skills on your part. This makes it an excellent iPhone data transfer tool for everyone.
Conclusion
That wraps up how to transfer photos from iPhone to PC with Windows 10, 11, and earlier. We have shared six easy and practical ways to move your pictures to a PC. Whether you want to back up the images, free your storage space, or edit the photos, you can find the best solution here!
If you want to avoid lengthy and complex transfers, try Wondershare Dr.Fone. With its powerful data management capabilities, you can rest assured that your photos are transferred hassle-free and without technical expertise.
FAQs
Dr.Fone Basic:
Better Control for Your Phone
Manage, transfer, back up, restore, and mirror your device
iPhone Photos
- Convert HEIC to JPG
- 1. Convert HEIC to JPG on Linux
- 2. Convert HEIC to JPG Windows
- 3. Best HEIC Converter Online
- 4. Convert HEIC to JPG High Quality
- Export iPhone Photos
- 1. Upload iPhone Photos to Google Drive
- 2. Transfer Photo from iPhone to PC
- 3. Transfer Photo from iPhone to iPhone
- 4. Transfer from iPhone to iPhone
- 5. Transfer from iPhone to iPad
- 6. Move iPhone Photo to External Drive
- 7. Transfer from iPhone to Flash Drive
- 8. Extract Photos from iPhone
- 9. Download Photo from iPhone
- Import Photos to iPhone
- 1. Transfer from Laptop to iPhone
- 2. Transfer Photo from Camera to iPhone
- 3. Transfer Photo from Mac to iPhone
- 4. Transfer Photos from PC to iPhone
- 5. Transfer from iPhone to PC
- 6. Transfer from Android to iPhone
- 7. Transfer from Samsung to iPhone
- Manage iPhone Photos
- 1. Back up iPhone Photos
- 2. Get Photos off iPhone
- 3. Send Large Size Photos from iPhone
- 4. Photo/Video Compressor Apps
- 5. Delete Photos from iPhone/iPad
- 6. iPhone Photos Disappeared Suddenly
- 7. iPhone Photoshop Alternatives
- Recover iPhone Photos
- 1. Restore Deleted Photos from iPhone
- 2. Recover Photos from iPod Touch
- 3. Recover Deleted Picture from iPhone
- Transfer iPhone Photos to Mac
- Transfer iPhone Photos to PC
- 1. Transfer Data from iPhone to PC
- 2. Transfer Photo to Computer
- 3. Transfer Photo to PC without iTunes
- 4. Transfer Library to Computer
- 5. Send Photo from iPhone to Computer
- 6. Import Photo from iPhone to Windows
- 7. Transfer Photo to Windows
- Transfer Photos from Google Drive
- 1. Download from Google Drive to iPhone
- 2. Transfer from Google Photo to iPhone
- 3. Download from iCloud to iPhone
- Transfer Photos to Google Drive
- Image Convert Tips
- ● Manage/transfer/recover data
- ● Unlock screen/activate/FRP lock
- ● Fix most iOS and Android issues
- Learn More Learn More


Alice MJ
staff Editor