No More Trouble Converting HEIC to JPG on Windows
Oct 24, 2025 • Filed to: Device Data Management • Proven solutions
Dr.Fone Basic:
Better Control for Your Phone
Manage, transfer, back up, restore, and mirror your device
The HEIC image format was introduced by Apple in iOS 11 and macOS High Sierra as a modern replacement for JPG. HEIC offers better compression and image quality than JPG. However, HEIC files have limited compatibility with Windows PCs. If you need to convert HEIC to JPG on Windows 10, 11, or 7, this guide will show you several methods using free online tools, downloadable converters, and built-in Windows conversion features.
Converting HEIC to the more compatible JPG format allows you to view, edit and share your photos easily on Windows. We'll cover the best options for batch converting HEIC images to JPG, including automated converters that can handle large HEIC photo libraries with just a few clicks. Whether you need to convert the occasional HEIC image or hundreds of photos, this guide has the Windows-compatible HEIC to JPG solutions you need.
- Part 1: What is HEIC?
- Part 2: Recommended – Convert HEIC To JPG Using Dr.Fone in Just Few Clicks
- Part 3: Convert HEIC To JPG On Windows Using Dr.Fone Online!

- Part 4: How To Convert HEIC To JPG On Windows Online
- Part 5: How To Convert HEIC To JPG On Windows Using HEIC Converter + App
- Part 6: How To Convert HEIC To JPG On Windows Using The Photos App
Part 1: What is HEIC?
HEIC (High-Efficiency Image Format) is an advanced image compression technology developed by Apple to replace the aging JPG format. Introduced in 2017 with iOS 11 and macOS High Sierra, HEIC became the new default image format for photos taken on newer iPhone and iPad models.
The goal with HEIC was to significantly improve compression ratios while retaining image quality. By using more complex compression algorithms, HEIC image files can be up to 2x smaller in file size than traditional JPGs. This allows for saving storage space on mobile devices while maintaining high-resolution images.

However, the downside is that HEIC has very limited compatibility with non-Apple devices and operating systems. Software support for HEIC is still sparse across Windows PCs, Android devices, web browsers, and image editing applications. This means that Windows users often run into errors trying to open HEIC photos from friends or family using iPhones.
Essentially, HEIC produces smaller files and better image quality but at the cost of device compatibility. It's an excellent format for Apple's closed ecosystem but causes headaches for Windows users trying to access photos. Converting HEIC to JPG can alleviate this problem by changing the format to something more universally supported across platforms and devices.
Part 2: Recommended – Convert HEIC To JPG Using Dr.Fone in Just Few Clicks
The HEIC photo format used by iPhones and iPads can cause headaches for Windows users. HEIC images won’t open or work properly on Windows PCs. To view and edit these photos, they need to be converted to a compatible format like JPG.
Manually converting each HEIC image is frustrating and time-consuming. Luckily, there is robust software available called Dr.Fone that automates HEIC to JPG conversion in bulk. Follow these steps to use Dr.Fone for seamless batch conversion of HEIC photo libraries:

Wondershare Dr.Fone
Convert HEIC To JPG in Few Clicks
- Convert multiple HEIC photos to JPG format without losing the quality
- Selectively backup Android or iOS data to the computer with one click.
- Transfer, manage, export/import your music, photos, videos, contacts, SMS, Apps, etc.
- Transfer media files between iOS devices and iTunes.
Step 1: Download and Install Dr.Fone
First, head to the official Dr.Fone website and download the program for Windows PCs. The free trial allows converting up to 10 photos. Once downloaded, run the installer and follow prompts to install Dr.Fone on your computer.
Step 2: Launch Dr.Fone and Connect iPhone
Open the Dr.Fone app on your Windows PC. Using a Lightning cable, connect your iPhone containing the HEIC images to your computer. Dr.Fone will automatically detect the phone.
Step 3: Access the HEIC Converter
In Dr.Fone, click on the 'Toolkit' icon in the top left. From here, select the 'HEIC Converter' module listed with other available phone utilities.

Step 4: Add HEIC Photos
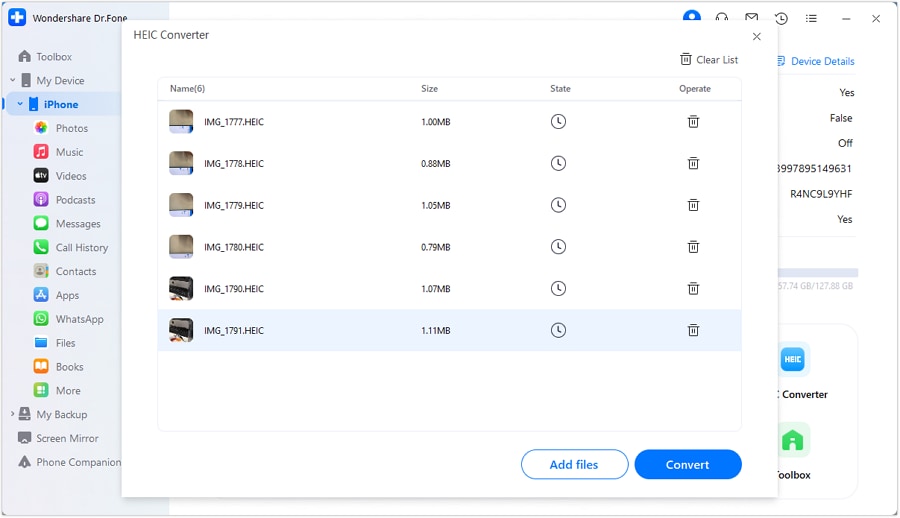
In the converter interface, click '+Add Files' and browse your iPhone images. Select all the HEIC photos you want to convert to JPG for use on Windows.

Step 5: Begin Conversion Process
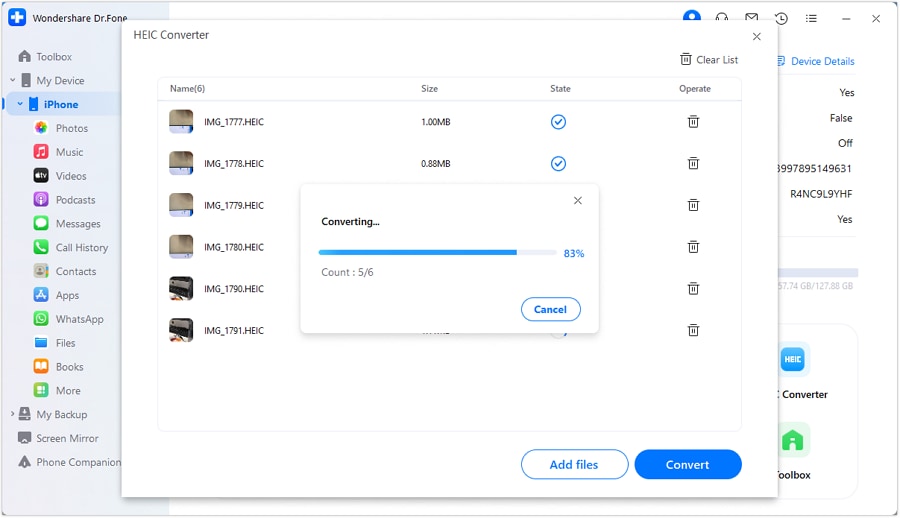
Once added, click 'Convert' to start the batch conversion process. A progress window tracks each HEIC photo as it is converted to JPG.

Step 6: Export & Save JPG Files
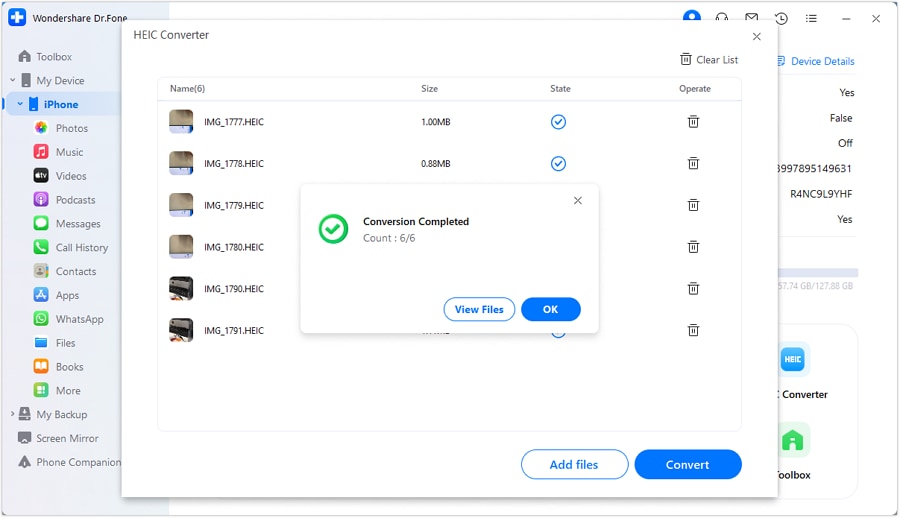
When finished, a success message will indicate conversion is complete. Click 'View Files' to access your new JPG images ready for Windows use.

Why Choose Dr.Fone for HEIC Conversion?
Dr.Fone provides the simplest solution for converting batches of HEIC images to JPG seamlessly on Windows. Here are key reasons to choose it over online tools or complex desktop software:
- Intuitive interface - Easy to add HEIC files & convert in 3 clicks
- Lossless quality - JPG files preserve all data & fidelity
- Retains metadata - Creation date, GPS, etc transferred to JPG
- Fast conversion - Processes hundreds of HEIC images in minutes
- Free trial - Test it yourself with 10 free conversions
For painless HEIC to JPG conversion on Windows, Dr.Fone is easy and reliable. Avoid the hassle of incompatible HEIC images and unlock access to iPhone photos. Download Dr.Fone and convert batches in just minutes!
Part 3: Convert HEIC To JPG On Windows Using Dr.Fone Online!
If you are looking for a reliable and efficient online solution to convert your HEIC photos to JPG format, Dr.Fone Online HEIC Converter is an excellent choice. With this tool, you can easily convert multiple HEIC photos to JPG format without losing the quality. Moreover, it is a user-friendly and free online tool that can be used on any web browser. Why not try Dr.Fone Online HEIC Converter to convert your HEIC photos to JPG format hassle-free? Check the easy-to-follow steps of this magic online tool:
Step 1: Add your HEIC Files
Click the "Add Files" button or drag and drop your HEIC files to upload them. Getting your files ready is the first easy thing to do.

Step 2: Let the Converter Do the Work
Once your files are added, Dr.Fone's converter will automatically start converting them from HEIC to JPG. No extra work required on your part!

Step 3: Download Your JPGs
When the conversion is complete, your new JPG versions of the photos will be ready. Just download them to your computer and you're all set!

Part 4: How To Convert HEIC To JPG On Windows Online

Sometimes you need to convert a handful of HEIC images to JPG all at once. While the Windows Photos app works great for a few photos, it can get tedious with dozens or hundreds. For huge batches, we recommend using the free online converter FreeConvert.
Step 1: Just open your web browser and go to the FreeConvert website. Look for the converter that says "HEIC to JPG" and click on it.

Source: FreeConvert
Step 2: Next, click the blue "Choose Files" button and select all the HEIC images you want to convert from your computer. You can pick as many as you want, but FreeConvert will only convert 25 per day on their free plan.

Source: FreeConvert
Step 3: Once your files are uploaded, double check that the output format is set to "JPG." If you selected multiple HEIC photos, it may say "Convert All to" instead - just set that to JPG.
Step 4: When ready, hit the big yellow "Convert" button. FreeConvert will start crunching through your HEIC images and converting them to JPG. With the free account, it can only process 5 files simultaneously, so you may need to hit "Convert" again until all images are finished.
Step 5: Finally, click the "Download All" button once everything is converted. This will give you a handy ZIP folder containing all your new JPG images. You can also download them individually if preferred.
Unzip the folder, and you’re done! You now have all your photos converted and ready to edit, print, and share freely. No more HEIC incompatibility issues.
So if you ever need to do mass conversion of HEIC files, FreeConvert is a lifesaver. It handles all the hard work automatically. Just upload, convert, download, and enjoy your photos!
Part 5: How To Convert HEIC To JPG On Windows Using HEIC Converter + App

Dealing with a massive pile of HEIC photos? You can now use the seamless JPEG conversions using the HEIC Converter + app. This handy tool takes the hassle out of batch converting your HEIC image library.
Step 1: First, head to the Microsoft Store and download the HEIC Converter + app on your Windows machine. Once installed, open it up and you'll see the simple interface.
Step 2: Click "Convert to JPG/PNG" at the top to start. Now you can either click the "Add files" button to select HEIC photos individually, or click "Add folder" to choose an entire folder full of images to convert in one go.
Step 3: Select all the HEIC files or folders you want to convert. When ready, hit "Open" and they'll queue up in the app's conversion list.
Step 4: Before converting, you can choose where to export the JPG versions and modify the image quality if needed. 100% quality is the default.
Step 5: When everything looks good, click the "Convert" button to start the magic. The app will rapidly process all your HEIC images and output fresh JPEGs.
Step 6: Once it finishes churning through your photo library, the app will automatically open your selected output folder in File Explorer. Now all your converted JPEGs are ready for action!
With HEIC Converter +, you can say goodbye to your HEIC woes. It takes the hassle out of converting stacks of incompatible Apple images to JPEG in one easy desktop app. No more online workarounds or manual conversions. Just simple, seamless, bulk photo conversion on your Windows machine.
Part 6: How To Convert HEIC To JPG On Windows Using The Photos App

Source: Freepik
Converting those HEIC photos to JPEG on your Windows PC doesn't have to be a headache. Luckily, Windows 10 has a built-in photos app that makes it super easy. Follow these simple steps:
Step 1: Find the HEIC image file on your computer and double click to open it in the Windows Photos app. This is the same app you use to view all your photos.

Step 2: Once the photo opens, click the "Edit & Create" button in the top right corner. A dropdown menu will appear – click the first option that says "Edit".
Step 3: Now you can make adjustments to the image if needed. Rotate, crop, add filters - customize to your heart's content!
Step 4: When you're ready, click the "Save a Copy" button to convert and save the photo as a new JPEG file.
Step 5: A window will pop up allowing you to choose where to save the new JPEG version. I recommend saving it to a separate folder from your original HEIC files to keep things organized.
And that's it! The Photos app does all the heavy lifting of actually converting the format from HEIC to JPEG. Now you can do whatever you need with that photo - print it, email it, edit it further in other apps.
The original HEIC file will remain untouched too. So you don't have to worry about accidentally overriding your originals. Converting to JPEG creates copies, leaving your HEIC files intact.
Conclusion
Converting HEIC images to a more compatible JPG format allows Windows users to easily access and edit photos. Wondershare Dr.Fone provides the simplest HEIC to JPG conversion solution with its intuitive interface, lossless quality preservation, and fast batch processing capabilities. By retaining all metadata when converting from HEIC, Dr.Fone ensures your JPG files are identical to the originals.
Dr.Fone Basic:
Better Control for Your Phone
Manage, transfer, back up, restore, and mirror your device
iPhone Photos
- Convert HEIC to JPG
- 1. Convert HEIC to JPG on Linux
- 2. Convert HEIC to JPG Windows
- 3. Best HEIC Converter Online
- 4. Convert HEIC to JPG High Quality
- Export iPhone Photos
- 1. Upload iPhone Photos to Google Drive
- 2. Transfer Photo from iPhone to PC
- 3. Transfer Photo from iPhone to iPhone
- 4. Transfer from iPhone to iPhone
- 5. Transfer from iPhone to iPad
- 6. Move iPhone Photo to External Drive
- 7. Transfer from iPhone to Flash Drive
- 8. Extract Photos from iPhone
- 9. Download Photo from iPhone
- Import Photos to iPhone
- 1. Transfer from Laptop to iPhone
- 2. Transfer Photo from Camera to iPhone
- 3. Transfer Photo from Mac to iPhone
- 4. Transfer Photos from PC to iPhone
- 5. Transfer from iPhone to PC
- 6. Transfer from Android to iPhone
- 7. Transfer from Samsung to iPhone
- Manage iPhone Photos
- 1. Back up iPhone Photos
- 2. Get Photos off iPhone
- 3. Send Large Size Photos from iPhone
- 4. Photo/Video Compressor Apps
- 5. Delete Photos from iPhone/iPad
- 6. iPhone Photos Disappeared Suddenly
- 7. iPhone Photoshop Alternatives
- Recover iPhone Photos
- 1. Restore Deleted Photos from iPhone
- 2. Recover Photos from iPod Touch
- 3. Recover Deleted Picture from iPhone
- Transfer iPhone Photos to Mac
- Transfer iPhone Photos to PC
- 1. Transfer Data from iPhone to PC
- 2. Transfer Photo to Computer
- 3. Transfer Photo to PC without iTunes
- 4. Transfer Library to Computer
- 5. Send Photo from iPhone to Computer
- 6. Import Photo from iPhone to Windows
- 7. Transfer Photo to Windows
- Transfer Photos from Google Drive
- 1. Download from Google Drive to iPhone
- 2. Transfer from Google Photo to iPhone
- 3. Download from iCloud to iPhone
- Transfer Photos to Google Drive
- Image Convert Tips
- ● Manage/transfer/recover data
- ● Unlock screen/activate/FRP lock
- ● Fix most iOS and Android issues
- Learn More Learn More


James Davis
staff Editor