100% Security Verified | No Subscription Required | No Malware

 :
: 
 ChatGPT
 Perplexity
 Gemini
 Claude
 Grok
Grok
With over a billion users globally, WhatsApp has become a primary channel for sharing memories through photos and videos. If you're an iPhone user, you've likely accumulated countless precious images in your chats. The challenge arises when you need to transfer these WhatsApp photos from your iPhone to a PC or Mac for safekeeping, printing, or freeing up storage.
Losing important photos is not an option. That's why creating a backup on your computer is a wise decision. This guide provides a detailed walkthrough of several effective methods to transfer WhatsApp data from an iPhone to your PC or Mac. We'll explore everything from automated tools to manual processes, ensuring you find the perfect solution for your needs.
In this article
Part 1. The Easiest Way to Transfer WhatsApp Photos from iPhone to PC/Mac
While manual methods exist, they are often time-consuming and lack flexibility. Manually sifting through backups can be a tedious task. The most straightforward and efficient solution is to use a dedicated software tool like Dr.Fone - WhatsApp Transfer. This application simplifies the entire process into a few clicks.
Dr.Fone offers a secure and reliable platform to not only transfer WhatsApp photos from your iPhone to a PC or Mac but also to manage all your WhatsApp data. It allows you to back up messages, videos, and attachments, and even transfer data between different phones. The software is compatible with all recent iOS and Android versions, making it a versatile tool for any device owner. You can preview your files before transferring, ensuring you only save what you need.
 Transfer WhatsApp across Android & iOS.
- Backup & restore WhatsApp to PC securely.
- Preview & export chats selectively.
- Works with all iPhone & Android models.
By using Dr.Fone - WhatsApp Transfer, you can move your photos quickly and selectively. Follow these steps to learn how to transfer WhatsApp data from your iPhone to your computer.
-
Step 1 Connect Your iPhone and Launch the Tool
First, download and install Dr.Fone on your computer. Launch the application and select “WhatsApp Transfer” from the main dashboard. Then, connect your iPhone to your computer using a USB cable and ensure it is recognized.

-
Step 2 Start the WhatsApp Backup Process
Navigate to the WhatsApp tab on the left-hand menu and choose “Backup WhatsApp messages”. The software will automatically detect your device and begin the backup process. You don't need to do anything else at this stage.

-
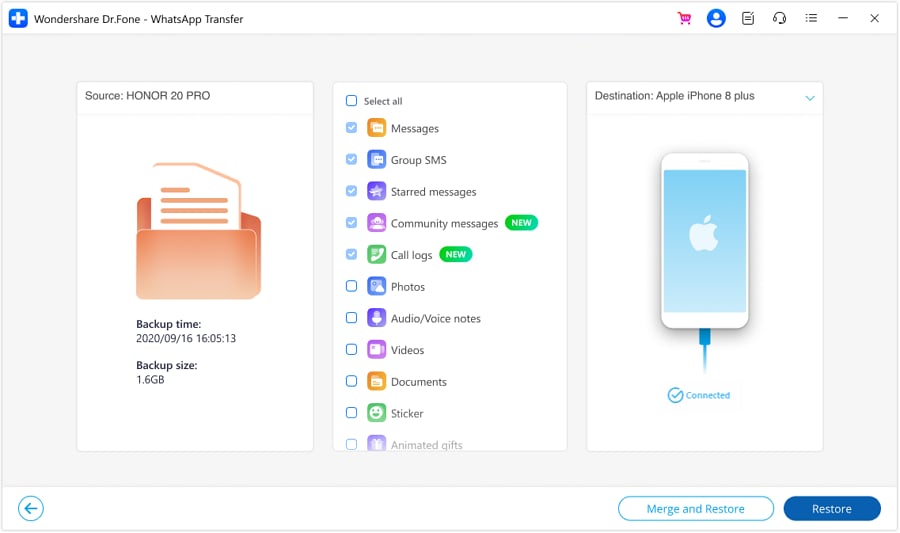
Step 3 Preview and Transfer Your Photos
Once the backup is complete, you will receive a notification. Click on the “View it” button to see the contents of the backup file. You can browse through your WhatsApp messages and attachments. To transfer photos, select the ones you want to save, and then click “Recover to Computer” to export them directly to your PC or Mac.
Part 2. Manual Methods to Transfer WhatsApp Photos from iPhone
If you prefer a manual approach or only need to transfer a few photos, there are other methods you can use. However, these techniques often come with limitations and may require more effort and time.
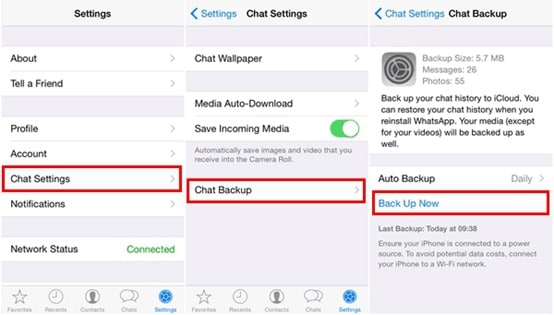
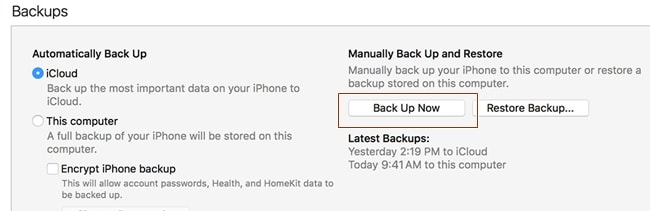
2.1. Using iCloud Backup
You can back up your WhatsApp chats, including photos, to iCloud. This ensures your data is safe in the cloud. To enable this, go to WhatsApp Settings > Chats > Chat Backup and tap “Back Up Now”. You can also set up automatic backups.
The main drawback is that you cannot directly download just the photos from the iCloud backup to your computer. You would need to restore the entire chat history to another iPhone to access them, which isn't ideal for simple photo transfers.
2.2. Using iTunes/Finder Backup
Another method is to use iTunes (on older PCs and Macs) or Finder (on macOS Catalina and newer) to create a full backup of your iPhone. Connect your iPhone to your computer, open iTunes or Finder, select your device, and click “Back Up Now” under the General tab.
This method saves all your iPhone data, including WhatsApp photos, to your computer. However, the backup file is encrypted and not directly accessible. You cannot browse it to extract specific photos without specialized third-party software.
2.3. Emailing WhatsApp Chats
For transferring a small number of photos from a specific chat, emailing the conversation is a quick fix. Open the WhatsApp chat you want to save, swipe left on it, tap “More,” and select “Email Chat.” You will be asked if you want to attach media; choose “Attach Media” to include the photos.
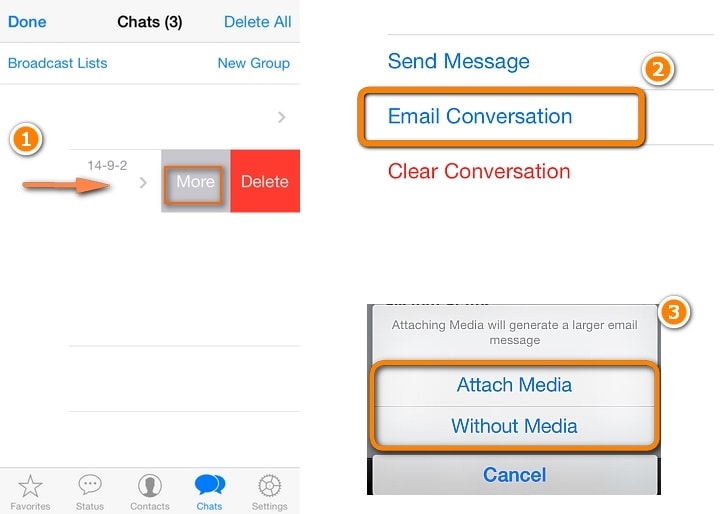
This creates an email with your chat history as a .txt file and your photos as attachments. You can send this email to yourself and download the photos on your computer. This method is impractical for bulk transfers due to email attachment size limits and the tediousness of repeating the process for multiple chats.
Part 3. Comparison of All Methods
To help you decide which method is best for you, here is a quick comparison of the options discussed for transferring WhatsApp photos from your iPhone to a computer.
| Feature | Dr.Fone - WhatsApp Transfer | iCloud Backup | iTunes/Finder Backup | Email Chat |
|---|---|---|---|---|
| Selective Transfer | (per chat) | |||
| Ease of Use | Very Easy | Easy (for backup), Hard (for export) | Easy (for backup), Hard (for export) | Easy, but repetitive |
| Speed | Fast | Slow (depends on internet speed) | Moderate to Fast | Slow for multiple chats |
| Direct Access to Photos | ||||
| Best For | Bulk and selective transfers | Cloud storage and device restore | Full device backup and restore | Transferring a few photos |
Conclusion
Now that you've explored various methods, you can confidently transfer your WhatsApp photos from an iPhone to a PC or Mac. While manual options like iCloud, iTunes, and email serve specific purposes, they often fall short when you need a flexible, efficient, and direct way to save your photos. For a hassle-free experience that gives you full control over your data, Dr.Fone - WhatsApp Transfer stands out as the superior choice. It simplifies the process, saves time, and ensures your precious memories are securely stored on your computer.


FAQ
-
1. Can I transfer only my WhatsApp photos without a full backup?
Yes, you can. Using a tool like Dr.Fone - WhatsApp Transfer allows you to create a backup and then preview all the data within it. You can select just the photos you want and export them to your computer, without having to transfer your entire chat history or other data. -
2. Is it safe to use third-party tools to transfer WhatsApp data?
It is safe as long as you use a reputable and trusted software provider like Wondershare Dr.Fone. These applications are designed to respect your privacy and handle your data securely. Always download software from the official website to avoid security risks. -
3. Does transferring WhatsApp photos to a PC delete them from my iPhone?
No, transferring your WhatsApp photos to a computer is a copying process. Your original photos and chats will remain on your iPhone untouched. The transfer simply creates a copy on your PC or Mac for backup or other purposes. -
4. Why can't I just find WhatsApp photos in my iPhone's Camera Roll?
By default, WhatsApp for iPhone may not automatically save incoming photos to your Camera Roll to save space. You can enable this feature in WhatsApp by going to Settings > Chats and turning on "Save to Camera Roll". However, if this setting was off, the photos only exist within the WhatsApp application, which is why a transfer tool is needed to extract them.
 Add Wondershare Dr.Fone as a preferred source on Google