Move contacts, messages, photos, videos, app data, and more between iOS and Android.

 100% Security Verified | No Subscription Required | No Malware

 :
: 
 ChatGPT
 Perplexity
 Gemini
 Claude
 Grok
Grok
It is widely agreed that the iPhone and Samsung Galaxy series stand out as the two undisputed flagship smartphone ecosystems in maximum demand across the globe today. Hence, it is completely understandable that you would want to figure out how to transfer photos from Samsung to iPhone models like the iPhone 15 or 16 series. Even though modern iPhones possess some of the most advanced mobile phone cameras in the world, your older Samsung device likely holds years of irreplaceable memories that you simply cannot leave behind.
The reasons for wanting to migrate this visual data can be numerous. You might be permanently moving from Samsung to iPhone as your daily driver, looking to keep a mirrored backup on a secondary handset, needing to share specific media with a colleague, or just wanting to keep your precious moments safe and accessible across both platforms in 2026. Regardless of the motivation, you need reliable, cross-platform solutions that prevent compression or data loss.
Today, we will be diving deep into how to transfer pictures from Samsung to iPhone using some of the fastest, safest, and most straightforward methods available in the current digital landscape.
In this article
- Part 1. How to transfer all photos from Samsung to iPhone in 1 click?
- Part 2. How to transfer photos from Samsung to iPhone selectively?
- Part 3. How to transfer photos from Samsung to iPhone using Move to iOS?
- Part 4. How to transfer photos from Samsung to iPhone using iTunes?
- Part 5. How to transfer photos from Samsung to iPhone using Dropbox?
Part 1. How to transfer all photos from Samsung to iPhone in 1 click?
If you are looking for the absolute most straightforward way to migrate your entire gallery without spending hours micro-managing folders, Dr.Fone - Phone Transfer can perfectly serve the purpose. This software empowers you to seamlessly transfer photos from Samsung to iPhone or any other mobile smartphone operating on Android and iOS architectures in just a single click.
Because of its exceptional speed and zero data loss guarantee, this method rightfully takes the front line amongst the list of top ways to transfer pictures from Samsung to iPhone models like the newer iPhone series. The robust software can be downloaded directly from the official Wondershare website for free, and it is just as easy and intuitive to install on your computer as any everyday utility tool. By leveraging direct USB connections, it bypasses network instabilities that often plague wireless transfers.
Below are the few simple steps required to transfer photos from Samsung to your new iPhone in a single click process.
 Move data between iOS to Android and vice versa.
- Transfer contacts, SMS, photos, videos, music, and more types.
- Available with all phones with Android and iOS versions.
- Simple, click-through process.
-
Step 1 Launch the Transfer Tool
To begin, launch the Dr.Fone software which has already been installed on your Mac or Windows computer. Once you arrive on the clean main interface, simply locate and click on the “Phone Transfer” (or “Switch”) module to proceed.

-
Step 2 Connect the Two Devices to Your Computer
Now, grab high-quality, durable, and fast USB cables for both of the devices you wish to transfer photos to and from—that is, your source Samsung phone and the destination iPhone. Dr.Fone will automatically detect the two smartphones, provided they have been securely connected to your personal computer.
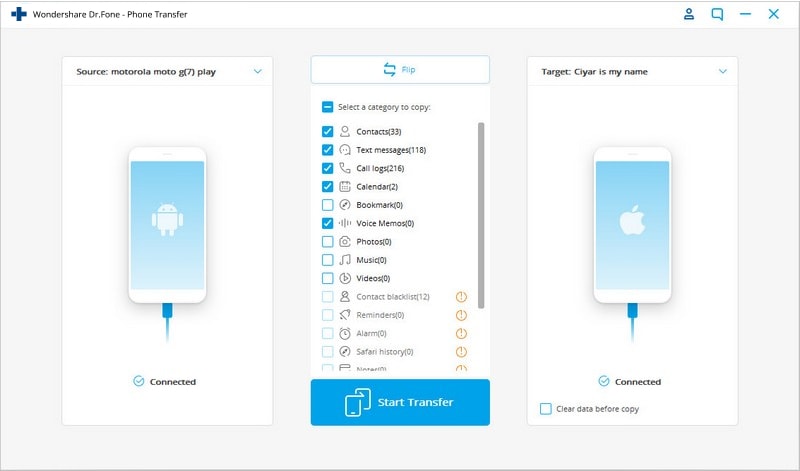
Now you should see both devices beautifully displayed on the dashboard alongside their specific model names. Ensure that the Source device (the Samsung phone) is located to the left side of the screen and the Destination device (the iPhone) is positioned to the right. If the order is different from what you intend, just hit the “Flip” button located at the top center of the page to swap their positions.
-
Step 3 Select the Photo Files to be Transferred
To specifically transfer pictures from Samsung to iPhone without moving unnecessary junk data, you will have to select the exact file types to be transferred—in this case, "Photos." To make your selection, simply check the corresponding box next to the file category name.
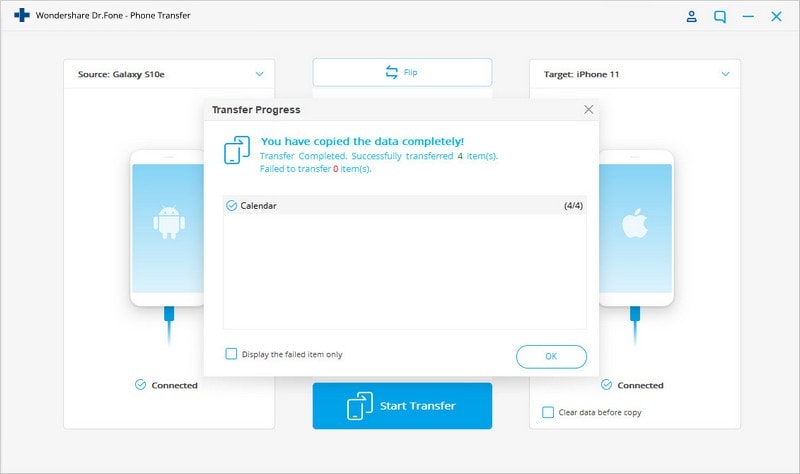
Now, here is where the magically easy part comes into play. You can simply click on the “Start Transfer” button. Immediately, the algorithm gets to work, and the already selected file types will be transferred in practically no time to the destination device (the iPhone). It is truly that effortless.
In just those few straightforward steps, you have successfully learned how to transfer photos from Samsung to iPhone without breaking a sweat.
Part 2. How to transfer photos from Samsung to iPhone selectively?
While bulk transferring is great for total device migration, there are often times when you only want to move specific memories—like a recent vacation album or an important screenshot folder. Another incredibly easy method that is very handy to selectively transfer pictures from Samsung to iPhone is using the dedicated management module within the Dr.Fone toolkit software, widely known in the industry as Dr.Fone - Phone Manager (Android).
This powerful function can also be utilized to securely transfer pictures from Samsung to iPhone, but this time it grants you granular control. You can visually preview each picture, select precisely the ones you want to send across, and easily deselect any unwanted blurry shots or duplicates.
-
Step 1 Connect your Samsung device to the PC
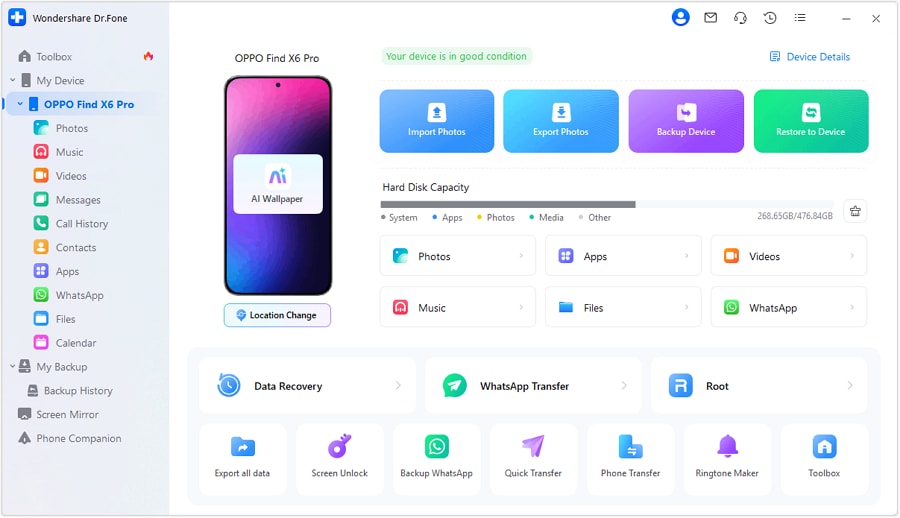
Connect your Android smartphone to your computer using a reliable data cable and launch the Dr.Fone software. On the home screen, click on the “Phone Manager” (or “Transfer”) option. You will quickly see your securely connected device rendered on the screen with several shortcut options listed. Click on the “Transfer Device Photos to PC” option if you wish to back them up first, or navigate to the Photos tab for direct manipulation.
-
Step 2 Select Files to be transferred individually
Once you open the Photos tab, the software will load all the images stored on your Samsung device. Here, from the list of highly visible image thumbnails, please select the desired photos selectively by ticking the small boxes on the pictures you wish to transfer.
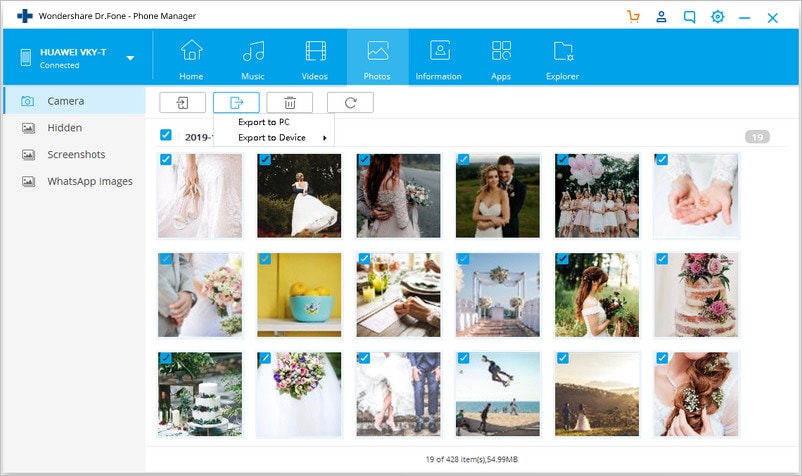
After successfully making your precise selection, connect your new iPhone to the computer using its lightning or USB-C cable. Next, click on the button located above the selected pictures, which is the “Export” button. From the drop-down menu, choose “Export to Device,” and then click directly on your recently connected iPhone (identified by its Device Name).
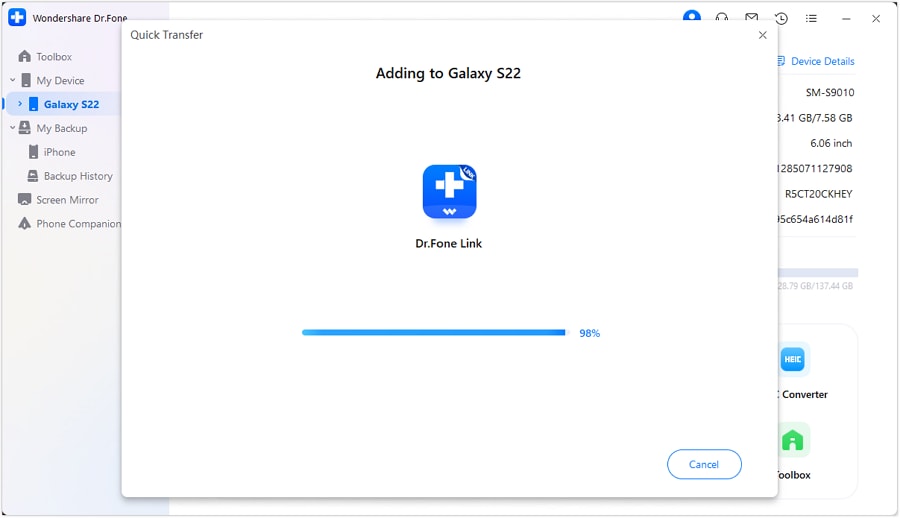
The selected high-resolution pictures will be immediately transferred directly to your iPhone's camera roll without deleting any existing files.




Part 3. How to transfer photos from Samsung to iPhone using Move to iOS?
In the endless quest to figure out how to transfer photos from Samsung to iPhone models like the iPhone 15 or 14, one of the most conventional and commonly discussed wireless methods available is the use of the "Move to iOS" application. Apple itself natively designed this utility app to reduce the formally accrued stress and technical barriers while making a permanent data transfer to an iOS device.
Although the app might not have completely taken away all troubleshooting troubles (due to Wi-Fi dropouts or pairing bugs), it generally helps non-technical users make a relatively smooth switch from Android to the Apple ecosystem.
Here are the detailed steps that comprehensively answer how to transfer pictures from Samsung to iOS utilizing the Move to iOS app.
-
Step 1 Download and Install Move to iOS
Move to iOS is an officially supported app that is readily available for Android devices on the Google Play Store. Head over to the Google Play Store on your Samsung device, tap the search bar, and look for “Move to iOS”. Then, confidently Download and Install the app directly onto your phone.
-
Step 2 Initiate the Settings on the iOS device
Now on your brand new iOS device, you will need to progress through the initial setup screens until you reach the “Apps & Data” screen. From there, choose the specific option labeled “Move Data from Android”. Next, proceed by tapping the “Continue” option. Doing so will generate and display a unique 6-10 digit connection code on your iPhone's screen.

-
Step 3 Launch the Move to iOS App on the Android device
Now, switch back to the Android device. Open the recently installed “Move to iOS” App, click Continue, agree to the standard Apple terms and conditions, and press the “Next” button on the Find Your Code screen.
When you do so, a new screen will prominently appear asking you to enter the security code. At this exact screen, you have to carefully enter the 6-10 digit code that just appeared on your iOS device (from the above step). Thereafter, wait patiently for a short while until both devices establish a direct Wi-Fi peer-to-peer connection.
Once the two devices have been successfully paired together, you can now check the boxes for the specific files you want to be transferred from your Samsung phone. From the available display options (which usually include Messages, Contacts, Camera Roll, Bookmarks, and Google accounts), ensure you select “Camera Roll”. Your transfer of photos from Samsung to iPhone should begin immediately after confirming.

Once the loading bar indicates that the wireless transfer is fully completed, press "Done" on your Android screen. You can then continue on your iPhone to finalize the remaining setup processes.

Part 4. How to transfer photos from Samsung to iPhone using iTunes?
iTunes is one of the most recognizable, self-created software platforms engineered by Apple. It was primarily meant to aid users in managing media and to transfer files from one source to another strictly on Apple products. While it is predominantly software built for Apple devices, PC users have relied on it for over a decade to manage local device backups.
Nonetheless, despite its iOS-centric design, it can still function as a bridge to transfer pictures from Samsung to iPhone if the following steps are followed meticulously in detail.
-
Step 1 Copy photos from your Samsung to your Personal Computer
Since iTunes absolutely cannot connect directly to an Android or Samsung device, the fundamental first step will be to connect your Samsung phone to your PC via a USB cable. You will then manually copy the photos you want to eventually have on your iPhone straight into a folder on your computer's hard drive.
Ensure that the Samsung phone is unlocked and set to "File Transfer" or "Media Transfer Mode" (MTP) for its internal contents to become visible on your PC's file explorer. Now, open the phone’s DCIM or Pictures storage folder, select the desired images, and drag the photos into a completely separate new folder on your desktop. You should probably rename the folder to something like "Samsung Photo Backup" for easier access during the next step.
-
Step 2 Sync those photos with your iPhone via iTunes
Now, launch the latest version of iTunes on your PC and physically connect your iPhone to the computer using an Apple-certified USB cable.
On the main iTunes interface, look for and click on the small smartphone device icon located at the top left side of the screen. This will open your device summary and move you onto the left-side settings pane of the screen.
Under the settings list, tap on the “Photos” option. Here, check the box next to “Sync Photos”. You will then be prompted to choose a specific directory to sync with the iPhone device. Click the dropdown menu, select "Choose folder...", and navigate to the exact desktop folder where you had previously copied the photos from your Samsung device.

Now, navigate to the bottom right corner of iTunes and click on the “Apply” or “Sync” button to officially begin synchronizing the selected folder's photos onto your connected iPhone.
Part 5. How to transfer photos from Samsung to iPhone using Dropbox?
If you prefer a strictly wireless and computer-free approach, utilizing cloud services is a fantastic alternative. Dropbox is widely regarded as one of the most common, secure, and reliable cloud storage platforms used as an online storage location. Beyond just backing up files, it can seamlessly act as a valid mediator to transfer photos from Samsung to iPhone models over an internet connection.
Follow these structured steps to efficiently transfer photos from Samsung to iPhone using the Dropbox application:
-
Step 1 Install Dropbox on both Devices and configure an account
Navigate directly to the respective application stores of both your devices (Google Play Store on the Samsung, and Apple App Store on the iPhone). Search for the official “Dropbox” App to securely download and install the app for free. After successfully downloading the app on your Samsung device, launch it and thoroughly create a new Dropbox account, or simply log in if you already possess an active account.
-
Step 2 Upload your selected pictures to the Cloud
Once you have securely logged into your Dropbox account on your Android, navigate back to your Samsung’s native gallery app. Select the desired pictures you intend to move, and then tap on the system “Share button”.
Select the “Add to Dropbox” icon out of the populated list of share options. Choose a designated folder within your cloud drive to start uploading the high-resolution pictures to Dropbox. Bear in mind that this might take some significant time depending strictly on your current Internet upload speed and the size of the image files.

-
Step 3 Download the uploaded pictures onto your iOS Device
Now, pick up your iPhone, launch the previously installed Dropbox app, and log into that exact same Dropbox account. Navigate to the specific folder where you just uploaded the media. Finally, you can select the images, tap the export menu, and choose "Save Images" to download the uploaded pictures straight into your iPhone's camera roll.
 Note: To use this specific cloud method effectively, it is highly advisable to be connected to a stable, unlimited Wi-Fi connection to completely avoid incurring huge cellular data charges.
| Method Name | Best Used For | Requires Internet | Risk of Data Erasing | Overall Speed |
|---|---|---|---|---|
| Dr.Fone - Phone Transfer | Bulk transferring everything instantly | No | No Data Loss | Very Fast |
| Dr.Fone - Phone Manager | Selective photo and album migration | No | No Data Loss | Fast |
| Move to iOS | Setting up a brand new iPhone | Yes (Wi-Fi Direct) | Yes (Requires Factory Reset) | Moderate |
| iTunes Sync | Users comfortable with desktop syncing | No | Can overwrite existing albums | Moderate |
| Dropbox / Cloud | Transferring a small handful of photos | Yes (High Bandwidth) | No Data Loss | Slow (Depends on Wi-Fi) |
Conclusion
To conclude, all the 5 excellent methods comprehensively listed above to transfer photos from Samsung to iPhone 15, 16, or any earlier Apple model are fully valid, functional, and highly effective in 2026. Choosing the right path simply depends on whether you have a computer available, your network speed, and whether your iPhone is brand new or already loaded with data.
However, if you want us to firmly vouch for the most reliable options out of the bunch, we would undoubtedly bet on Dr.Fone - Phone Transfer and Dr.Fone - Phone Manager (Android). This is fundamentally because these two premium desktop methods practically guarantee a zero data loss experience, bypass annoying Wi-Fi connectivity dropouts, and ensure zero hassle during cross-platform navigation. So go ahead, download these exclusive digital utilities today, and lock in the absolute best, most secure experience for your photo transfer process from Android to iOS.
FAQ
-
1. Will transferring photos from Samsung to iPhone reduce the picture quality?
No, as long as you use direct transfer methods like Dr.Fone desktop software or direct USB copy via computer, your photos will retain their original resolution and metadata. However, transferring via certain messaging apps or highly compressed cloud tiers might reduce the original quality. -
2. Can I transfer photos from Samsung to iPhone using standard Bluetooth?
No. Due to Apple's strict ecosystem limitations and differing Bluetooth protocol restrictions, Android devices and iPhones cannot directly pair to share media files like photos over a standard Bluetooth connection. You must use an app, a computer, or Wi-Fi Direct (like Move to iOS). -
3. What is the absolute fastest way to move thousands of photos between Android and iOS?
The fastest method for massive bulk transfers is using desktop software like Dr.Fone - Phone Transfer combined with high-speed USB cables. Because it relies on direct hardware connections rather than internet bandwidth or Wi-Fi stability, large data files migrate significantly faster. -
4. Will syncing photos via iTunes delete the current photos already on my iPhone?
It depends on how your iPhone is currently managed. If you sync a new photo folder via iTunes, it might overwrite previously synced iTunes photo albums on the device. To completely avoid this risk, using selective transfer tools like Dr.Fone - Phone Manager or cloud storage like Dropbox is highly recommended.
 Add Wondershare Dr.Fone as a preferred source on Google