2 Ways to Transfer Photos from iPhone to Flash Drive
Oct 24, 2025 • Filed to: Device Data Management • Proven solutions
Dr.Fone Basic:
Better Control for Your Phone
Manage, transfer, back up, restore, and mirror your device
We cannot transfer pictures directly from iPhone X/8/7/6S/6 (Plus) to flash drive because iPhone does not support the connection with a flash drive, whether you need to send to your flash drive as a backup before you upgrade your operating system, to share your pictures with your loved ones, or if you just want to free up your space, there are simple methods that require a few steps to get the job done. You can either transfer to your computer first and then to your flash drive, or you can transfer pictures from iPhone to flash drive straightaway.
Part 1: Transfer Pictures from iPhone X/8/7/6S/6 (Plus) to Flash Drive Straightaway
Dr.Fone - Phone Manager (iOS), copy camera roll, photos, albums, music, playlists, videos, contact, message among Apple devices, computer, flash drive, iTunes for backup without iTunes restrictions. You can move all your iPhone pictures and albums to flash drive just with 3 steps.

Dr.Fone - Phone Manager (iOS)
Transfer Photos from iPhone/iPad/iPod to Flash Drive without iTunes
- Display the data in your iOS devices on the computer and manage them.
- Backup your data in your iPhone/iPad/iPod to USB flash drive with ease.
- Support all kinds of data, including photos, videos, music, contacts, messages, etc.
- Work with iOS devices that are running iOS 7 and above.
How to Transfer Photos and Pictures from iPhone to Flash Drive Directly
Step 1. Download and install Dr.Fone - Phone Manager (iOS).
Download and install Dr.Fone transfer on your computer. After that, use a USB cable to connect your iPhone X/8/7/6S/6 (Plus) to your laptop and open the app. If it is accomplished effectively, your device will be detected and displayed in the main window.

Step 2. Connect the flash drive to PC/Mac to transfer pictures.
To transfer pictures from iPhone X/8/7/6S/6 (Plus) to flash drive, connect your flash drive to the computer. For Windows, it will appear under “My Computer”, while for Mac users, the USB flash drive will appear on your desktop. Making sure that the flash drive has enough memory for the photos you want to transfer. As a precaution, scan your flash drive for viruses to protect your PC.

Step 3. Transfer iPhone photos to flash drive.
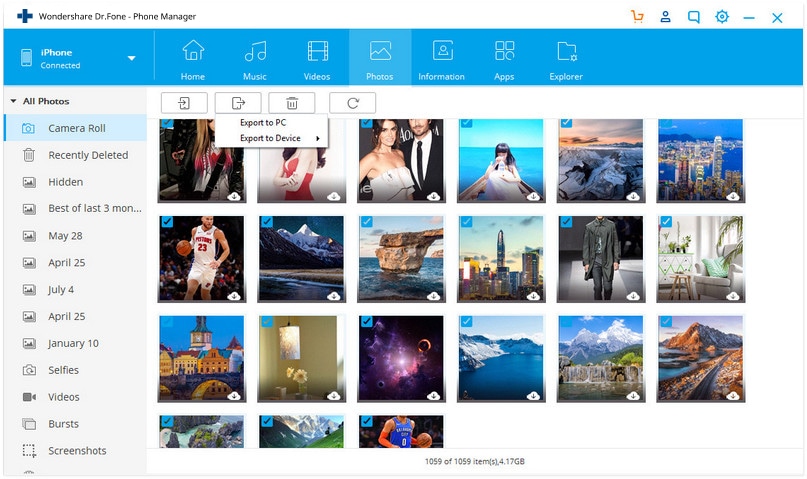
After your flash drive is connected to your computer, select “Photos”, which is at the top of Dr.Fone - Phone Manager (iOS) main window. iPhones will have their photos saved in folders: “Camera Roll”, “Photo Library”, "Photo Stream" and "Photo Shared".
- “Camera Roll” stores photos that you capture using your phone.
- “Photo Library” stores photos that you synced from iTunes. If you have created personal folders on your phone, they will also appear here.
- "Photo Stream" are the photos shared by the same iCloud ID.
- "Photo Shared" are the photos shared with different iCloud IDs.
Select the folder or the photos that you want to transfer to your flash drive, and then click the "Export" > “Export to PC” option, which is visible on the top bar. A pop-up window will appear, select your USB flash drive and click "Open" so that you can save the photos there. After you have made the backup to your flash drive, to save your iPhone space, you can delete the pictures which have backed up fast and easy with Dr.Fone - Phone Manager (iOS).

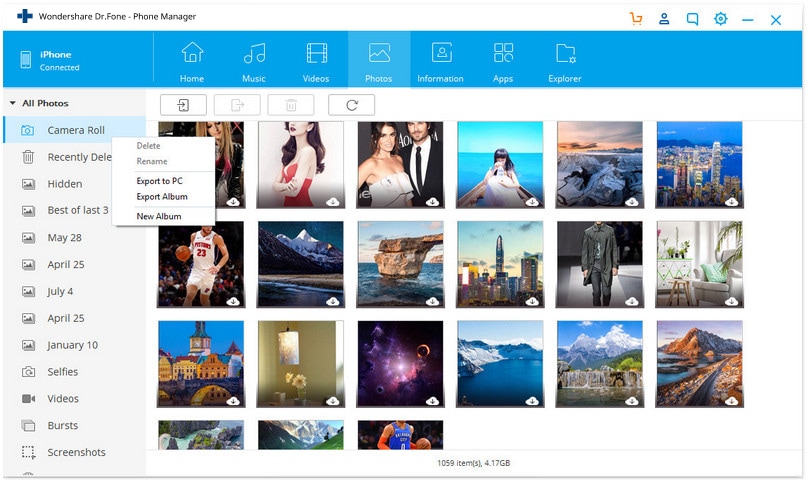
You can also transfer photos types/albums from iPhone X/8/7/6S/6 (Plus) to flash drive with one click. Select photo album and right-click, choose “Export to PC”. A pop-up window will appear, select your USB flash drive and click "Open" so that you can save the photos there.

The 1-Click Backup Photos to PC/Mac option could also help you transfer iPhone photos to flash drive easily and straightaway.
The iPhone Transfer tool could also help you transfer music from an external hard drive to the iPhone. Simply download and have a try.
Part 2: Transfer Pictures from iPhone to a computer first, and then Copy to Flash Drive
a. Transfer photos from iPhone X/8/7/6S/6 (Plus) to computer
Solution 1: Transfer photos from iPhone to computer using email
Step 1. Go to the photo application on your iPhone and launch it.
Step 2. Find the photos you want to transfer to your computer. Tap the Select button, and you can select more than one photo.
Step 3. You can send up to five photos at a time. On the pop-up, after you select Share, choose “Mail”, which will prompt the mail application to open a new message window with the photos you selected attached. Enter an email address to accept the photos.

Step 4. Access your email account on the computer. For Gmail users, your email will have thumbnails of the images at the bottom of your message. Click it to download the photo. For Yahoo users, the attachment download option is at the top, just click Download All to save all attachments at one time.


The images will be downloaded and stored in your Downloads Folder, which is located on the left side of your Windows Explorer.

Solution 2: Transfer photos from iPhone to Mac using the Photos app
If you are running an older version of the Mac operating system may not have the new Photos app, but the older iPhoto instead. Note that the steps are almost identical to import your iPhone or iPad photos to your Mac using iPhoto or the new Photos app.
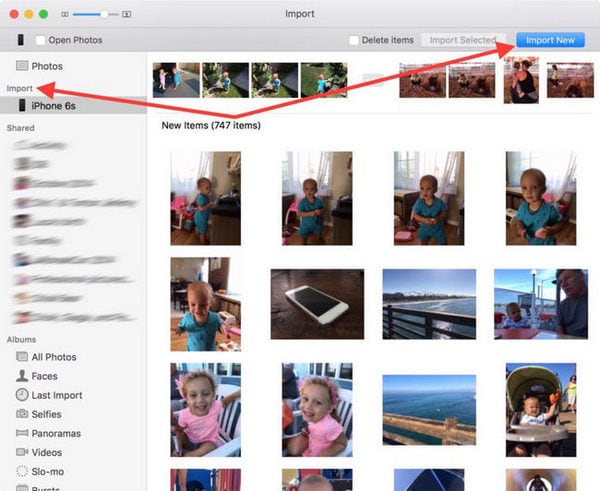
Step 1. Connect your iPhone to your Mac using the USB to iOS cable.
Step 2. The Photos app should open automatically, but if it doesn’t open the app.
Step 3. Pick up the photos you want to transfer from iPhone to your Mac, then click on “Import Selected,” (if you just want to transfer some photos) or select “Import New” (All New Items)

Once the process of transferring has been done, iPhoto will list all the Events and Photos on the screen in chronological order, and you can easily find some photos to watch or move them to some folder of your Mac. With iPhoto, you only can transfer Camera Roll photos from iPhone to Mac, if you also want to transfer photos in other albums like Photo Stream, Photo Library, you can move to Solution 1.
b. Transfer photos from PC to your Flash Drive
Step 1. To transfer pictures from iPhone to flash drive, connect your flash drive to your computer, make sure that the flash drive has enough space for the photos you want to import.

Step 2. Select the photos you imported from iPhone to your PC. Right-click and select Copy.
Step 3. Open your flash drive. Right-click on the white part of the window and select Paste to import all the photos you copied from your PC.

As you can see, to transfer iPhone X/8/7/6S/6 (Plus) photos to flash drive, Dr.Fone - Phone Manager (iOS) would be your best choice. Why not download it have a try? If this guide helps, don't forget to share it with your friends.
Dr.Fone Basic:
Better Control for Your Phone
Manage, transfer, back up, restore, and mirror your device
iPhone Photos
- Convert HEIC to JPG
- 1. Convert HEIC to JPG on Linux
- 2. Convert HEIC to JPG Windows
- 3. Best HEIC Converter Online
- 4. Convert HEIC to JPG High Quality
- Export iPhone Photos
- 1. Upload iPhone Photos to Google Drive
- 2. Transfer Photo from iPhone to PC
- 3. Transfer Photo from iPhone to iPhone
- 4. Transfer from iPhone to iPhone
- 5. Transfer from iPhone to iPad
- 6. Move iPhone Photo to External Drive
- 7. Transfer from iPhone to Flash Drive
- 8. Extract Photos from iPhone
- 9. Download Photo from iPhone
- Import Photos to iPhone
- 1. Transfer from Laptop to iPhone
- 2. Transfer Photo from Camera to iPhone
- 3. Transfer Photo from Mac to iPhone
- 4. Transfer Photos from PC to iPhone
- 5. Transfer from iPhone to PC
- 6. Transfer from Android to iPhone
- 7. Transfer from Samsung to iPhone
- Manage iPhone Photos
- 1. Back up iPhone Photos
- 2. Get Photos off iPhone
- 3. Send Large Size Photos from iPhone
- 4. Photo/Video Compressor Apps
- 5. Delete Photos from iPhone/iPad
- 6. iPhone Photos Disappeared Suddenly
- 7. iPhone Photoshop Alternatives
- Recover iPhone Photos
- 1. Restore Deleted Photos from iPhone
- 2. Recover Photos from iPod Touch
- 3. Recover Deleted Picture from iPhone
- Transfer iPhone Photos to Mac
- Transfer iPhone Photos to PC
- 1. Transfer Data from iPhone to PC
- 2. Transfer Photo to Computer
- 3. Transfer Photo to PC without iTunes
- 4. Transfer Library to Computer
- 5. Send Photo from iPhone to Computer
- 6. Import Photo from iPhone to Windows
- 7. Transfer Photo to Windows
- Transfer Photos from Google Drive
- 1. Download from Google Drive to iPhone
- 2. Transfer from Google Photo to iPhone
- 3. Download from iCloud to iPhone
- Transfer Photos to Google Drive
- Image Convert Tips
- ● Manage/transfer/recover data
- ● Unlock screen/activate/FRP lock
- ● Fix most iOS and Android issues
- Learn More Learn More


Daisy Raines
staff Editor