100% Security Verified | No Subscription Required | No Malware

 :
: 
 ChatGPT
 Perplexity
 Gemini
 Claude
 Grok
Grok
Losing cherished pictures from your phone can be a distressing experience, especially when those snapshots hold irreplaceable memories of loved ones, milestones, or important documents. In the modern digital era, the question of how to retrieve deleted images is incredibly common. Fortunately, recovering deleted photos is easier and more reliable nowadays than ever before, thanks to a combination of built-in Apple safety nets and sophisticated third-party data retrieval tools. Whether you are dealing with accidental deletion, unexpected system errors, failed iOS updates, or random device crashes, there is usually a viable path forward.
This comprehensive 2026 guide is designed to walk you through the most effective and proven techniques for how to recover deleted photos from your iPhone. We will explore native iOS features like the built-in recently deleted photos recovery mechanism, as well as highly advanced, dedicated recovery software capable of deep-scanning your device's internal memory storage. By following these step-by-step instructions and leveraging expert data-saving tips, you will be empowered to act quickly and effectively. Reclaim your precious memories with a stress-free image retrieval experience personalized for your exact data loss situation.
In this article
- Part 1. How to Recover Photos Deleted From Recently Deleted Folder?
- Part 2. How to Recover Permanently Deleted Photos iPhone via Dr.Fone?
- Part 3. How to Recover Erased Photos on iPhone Using iCloud Backup?
- Part 4. How to Find Deleted Photos on i Phone with iTunes/Finder Backup?
- Part 5. Helpful Tips to Prevent iPhone Photo Loss in the Future
Part 1. How to Recover Photos Deleted From Recently Deleted Folder?
When you accidentally delete a picture on an iOS device, Apple's operating system does not instantly wipe the file from your physical flash storage. Instead, the image is cleverly moved to a hidden directory known as the Recently Deleted album, serving as an automatic safety net for accidental taps. Your deleted media items safely remain in this temporary holding area for up to 30 days before being permanently removed from the system. If you act within this grace period, this is unequivocally the easiest and most effective method available.
This built-in feature is straightforward, but acting promptly is crucial to ensure the countdown hasn't expired. For iOS 16, 17, and up to the 2026 iOS versions, this folder requires biometric authentication to access, adding a layer of privacy. Follow these simple steps for how to recover photos deleted from recently deleted albums:
-
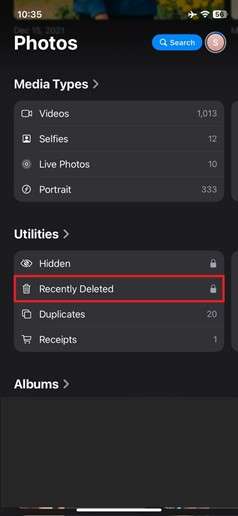
Step 1 Access the Utilities Section
On your iOS device, launch the native Photos app and tap the "Albums" tab at the bottom. Scroll all the way down to the "Utilities" section. Here, tap on "Recently Deleted" and seamlessly confirm your identity via Face ID, Touch ID, or your device passcode.
-
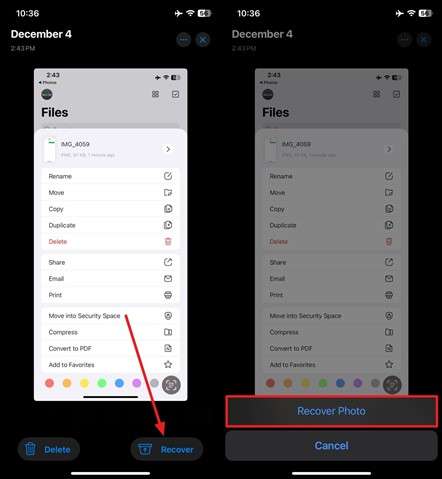
Step 2 Select and Restore Your Images
Within this locked album, carefully browse to find the photo or video you want to get back. Tap "Select" at the top right to choose multiple images, or simply tap a single photo. Tap "Recover" at the bottom right corner of the screen. Finally, confirm your intent by pressing "Recover Photo" to instantly restore it back to your primary camera roll.
Part 2. How to Recover Permanently Deleted Photos iPhone via Dr.Fone?
If your images have bypassed the 30-day waiting period, or if you manually emptied the trash bin, you will need to rely on a dedicated tool to retrieve your images. Once permanently removed from the standard mobile interface, the actual file data often still exists in the unallocated space of your iPhone's drive until it gets overwritten by new data. One of the most technologically advanced and reliable options in the industry is Dr.Fone - Data Recovery (iOS). This comprehensive software is explicitly designed to retrieve lost data from iOS devices, even in the most challenging and seemingly hopeless scenarios.
This powerful recovery engine offers an exceptionally high success rate in situations involving severe accidental deletion, catastrophic software glitches, water damage, or failed iOS firmware updates. Its dynamic, user-friendly interface ensures that even everyday users with absolutely no technical expertise can recover their files securely. Furthermore, it provides flexible, pinpoint recovery options for recently deleted photos without forcing you to reset your entire device. If you want to confidently recover deleted photos iphone, this versatile software allows you to preview the hidden sectors of your storage and selectively restore only the exact pictures you need, avoiding the clunky process of mass restoration.
 Recovers data after deletion, crashes, or device damage.
- Supports photos, messages, contacts, WhatsApp, and more.
- Supports all major iPhone, iPad, and iPod models.
- Preview and recover only what you need.

Quick Tutorial on How to Recover Permanently Deleted Photos via Dr.Fone
For a completely safe and non-destructive recovery experience, this software rigorously guarantees your current device files will not be overwritten or corrupted during the extraction process. Its logical layout makes deep data retrieval straightforward. If you are continually asking how do I recover deleted iPhone photos reliably, follow these robust instructions:
-
Step 1 Connect and Access the Data Recovery Menu
To commence, install and run the latest version of Dr.Fone on your computer and firmly attach the targeted iDevice via an original Apple-certified cable. Navigate to the "Toolbox" tab on the left menu and select the "Data Recovery" section. Choose iOS when prompted for your specific phone system. On the subsequent screen, tap "Recover Data from an iOS device" to instruct the software to scan the internal hardware directly.

-
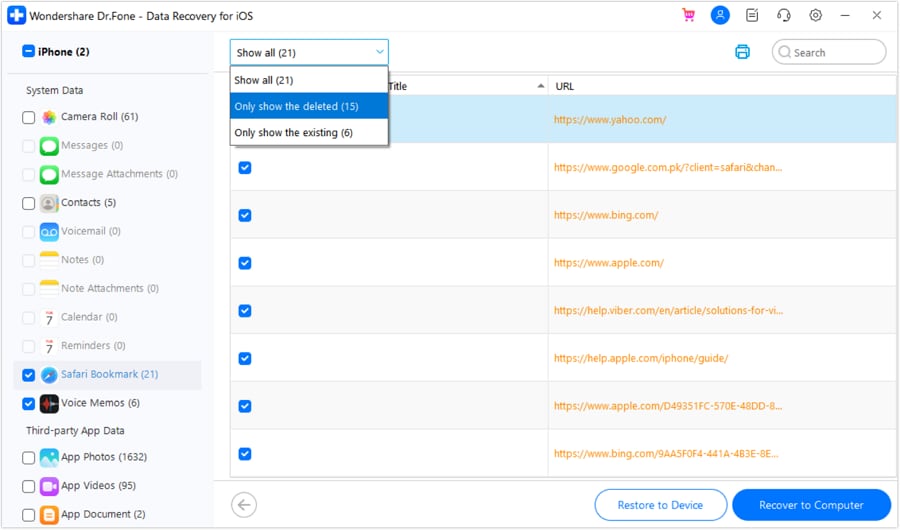
Step 2 Initiate the Deep Scan and Preview Images
Check the box for "Photos" along with any other targeted data categories, then click the vibrant "Start Scan" button. The application will immediately begin scanning the unallocated sectors of your iPhone to load the retrieved data. Once the scan completes, meticulously browse the populated gallery to find the picture you were looking for. You can preview it in full resolution to confirm its visual integrity.
-
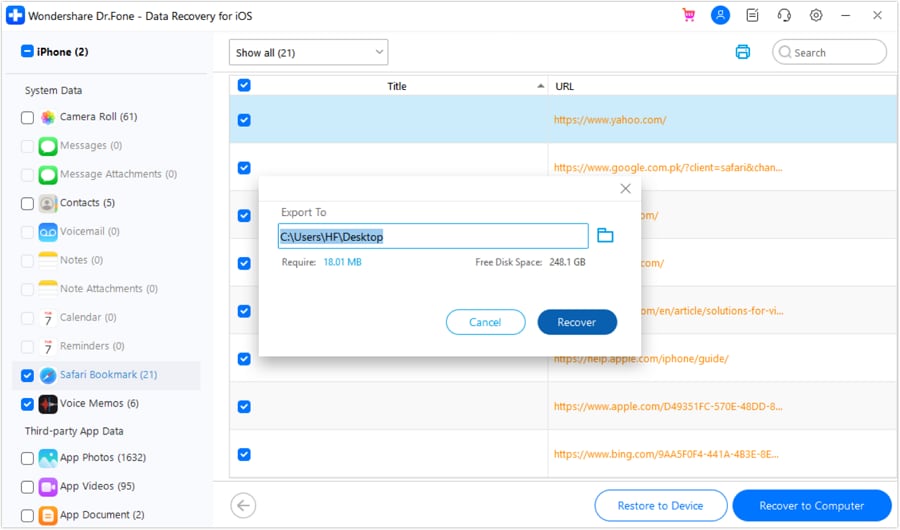
Step 3 Safely Restore the Newly Recovered Photos
Once you are satisfied with the preview, you have two primary extraction choices. You can tap "Restore to Device" to seamlessly place the image back onto your mobile phone (you may be prompted to temporarily disable Find My feature). Alternatively, and often safer to prevent any further data overwriting, tap "Recover to Computer." Define a secure local folder on your machine where you want to store the precious content, and hit "Recover" to finalize the extraction.


Part 3. How to Recover Erased Photos on iPhone Using iCloud Backup?
For users heavily integrated into the Apple ecosystem, iCloud quietly and automatically stores your critical data when your device is connected to Wi-Fi and power. This robust cloud synchronization ensures your photos, local settings, and app data are reliably preserved off-site. Hence, it can prove to be an exceptionally handy option for answering questions about how to recover erased photos on an iPhone if you lost them completely.
However, an essential caveat must be understood: this method works perfectly ONLY if the iCloud backup was generated prior to the deletion of the images. Furthermore, you cannot selectively extract a single photo from a standard iCloud backup using native Apple tools—you will be absolutely required to wipe and restore the entire device, which overwrites any new data accumulated since that backup date. Adhere to these instructions to execute a full restoration safely:
-
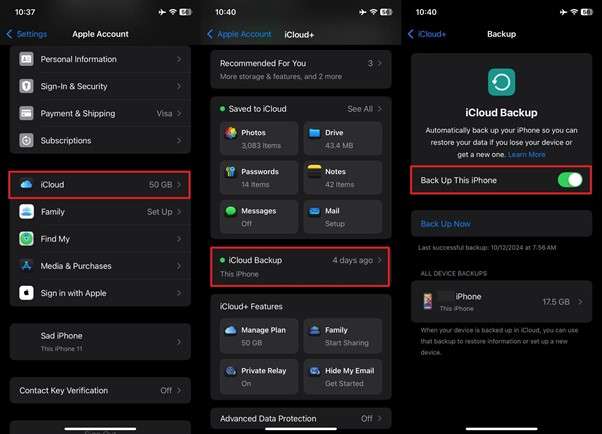
Step 1 Verify Your iCloud Backup Status
Begin by launching the Settings app, accessing your Apple ID banner at the top, and tapping the "iCloud" option. Here, press "iCloud Backup" to check the timestamp of your last successful sync. Ensure that the "Back Up This iPhone" option was toggled on and that the date predates the moment you deleted the photos.
-
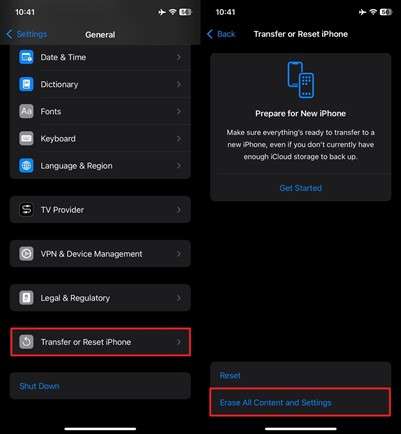
Step 2 Erase All Current Device Data
Since you must reset the device to trigger the backup restoration prompt, move back to the main Settings screen to access the "General" tab and scroll completely to the bottom. Press "Transfer or Reset iPhone" and follow it by selecting "Erase All Content and Settings" to securely factory reset the mobile.
-
Step 3 Complete Initial Device Setup
Once the secure wipe is complete, your iPhone will reboot to the classic "Hello" screen. Start setting it up from scratch. Follow the straightforward setup instructions, choosing your language, region, and establishing a stable Wi-Fi internet connection until you finally reach the critical "Transfer Your Apps & Data" screen.
-
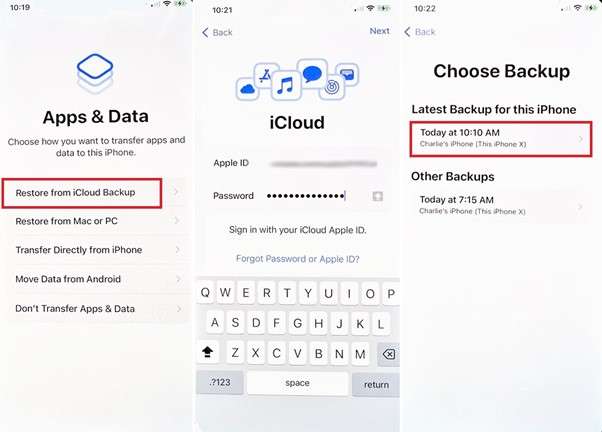
Step 4 Restore the iCloud Archive
At the data transfer prompt, deliberately opt for the "Restore from iCloud Backup" option. You will be asked to authenticate by logging in with your exact Apple ID credentials. Lastly, carefully review the list of available archives, choose the specific backup timestamp containing your deleted photos, and patiently wait for the restoration process to populate your gallery.
Part 4. How to Find Deleted Photos on i Phone with iTunes/Finder Backup?
If you prefer local storage over the cloud, the traditional, native way iOS users store their full phone data is by using a physical connection to a computer via iTunes (on Windows or older macOS) or Finder (on macOS Catalina and later). As long as you proactively created a hardwired backup containing the deleted images before the mishap occurred, you can push that archived snapshot back onto your phone.
Much like the iCloud method, it’s vitally important to note that this process entirely replaces the current data ecosystem on your device with the older backup content. Any messages received or photos taken after the backup date will be permanently wiped. If you accept this limitation, the steps needed to find deleted photos on i phone using local backups are as follows:
-
Step 1 Connect Your Device to the Computer
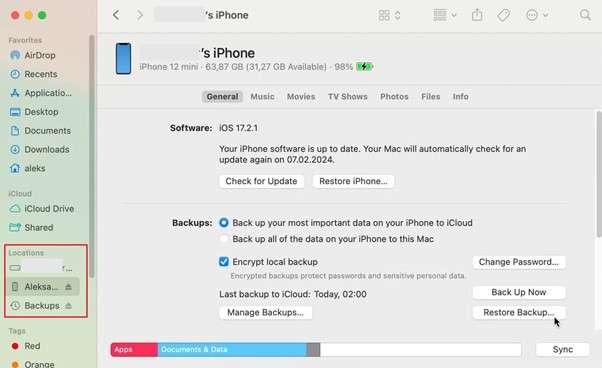
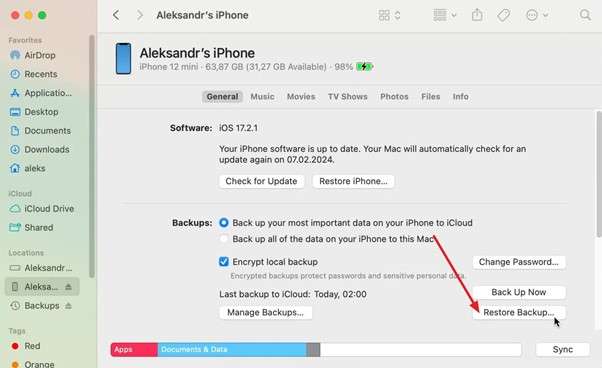
Get a high-quality, Apple-certified Lightning or USB-C cable to securely connect your iDevice to the exact Mac or Windows PC where you previously saved the backup. If you are using a modern Mac, open Finder and select your mobile device under the "Locations" section in the left sidebar. If you are utilizing a Windows PC, launch iTunes and click the small "Device" icon situated in the top-left corner of the interface.
-
Step 2 Initiate the Backup Restoration
Navigate to the General tab (Finder) or Summary tab (iTunes) and locate the Backups section. Click the prominent "Restore Backup..." button to view a detailed dropdown menu of available local backups. Select the specific timestamp created just before you tragically deleted the photos. Finally, confirm your authoritative choice by tapping "Restore" and maintain the physical cable connection as the system safely overwrites the device to complete the procedure.
Part 5. Helpful Tips to Prevent iPhone Photo Loss in the Future
After enduring the stress of successfully recovering your deleted images, it is paramount to ensure that you won’t have to suffer through this nerve-wracking process again. Preventing the devastating loss of precious photos requires establishing proactive measures and conducting regular digital maintenance. Here are the most effective, battle-tested practices you can immediately adopt to seamlessly safeguard your memories and dramatically minimize the risk of losing photos on your iPhone moving forward:
- Enable iCloud Photo Library Synchronization: This powerful native feature automatically uploads and syncs your high-resolution images and videos across all your registered Apple devices in real-time. By keeping this toggled on, your pictures remain secure against local device theft, sudden logic board failures, or accidental drops.
- Establish a Routine for Regular Backups: Make it a non-negotiable digital habit to consistently create full-system backups. Whether you prefer the wireless convenience of daily iCloud syncing or the offline security of weekly computer backups via Finder/iTunes, having historical data snapshots ensures a reliable fallback plan.
- Diversify with External Storage Solutions: Adhering to the classic 3-2-1 backup rule, it is always heavily recommended that users create localized offline copies of their most critical visual data. Periodically transfer your vital photos to external solid-state drives (SSDs) or secondary third-party cloud services like Google Drive, OneDrive, or Dropbox.
- Organize and Audit Unwanted Photos Wisely: While your core gallery holds immense emotional value, digital hoarding often leads to chaotic storage management and panicked mass deletions. Periodically declutter your photo library, but always double-check folders to avoid the accidental removal of important hidden images.
- Activate the “Optimize iPhone Storage” Feature: Running dangerously low on internal free space is the single biggest catalyst for device crashes and data corruption on smartphones. Navigate to your iCloud Photos settings and enable this feature to smartly offload full-resolution files while keeping lightweight thumbnails locally.
- Exercise Extreme Caution with Third-Party Editing Apps: Advanced image manipulation often requires external editing applications. Be highly cautious when granting read/write gallery access to obscure apps from unknown developers, as poorly coded software can inadvertently scramble, permanently delete, or severely corrupt your source files.
- Keep a Professional Recovery Tool on Standby: Having a robust emergency toolkit immediately at hand ensures that you are always ready for any unexpected data disaster. Trusted, industry-leading software like Dr.Fone - Data Recovery (iOS) should ideally be installed on your computer as a necessary precautionary measure.
- Consistently Keep Your iOS Firmware Updated: Regularly upgrade the operating system of your mobile device to its latest stable 2026 iteration to immediately patch known system bugs that could trigger random file deletion. Doing so will also introduce advanced security protocols and modernized storage frameworks.
Conclusion
In summary, fully understanding how to retrieve deleted photos on an iPhone can prove to be a tremendous lifesaver in a multitude of stressful digital scenarios. From quickly utilizing built-in safety nets like the Recently Deleted album to restoring massive historical archives from iCloud or Finder backups, there are several highly effective methods readily available. However, for a fully reliable, non-destructive, and exceptionally comprehensive solution, Dr.Fone - Data Recovery (iOS) heavily stands out as the ultimate versatile tool for users prioritizing total peace of mind.
This powerful application dramatically simplifies the technical burden of data recovery, easily handling even the most challenging storage corruption situations with an industry-leading success rate. By intelligently combining these advanced recovery techniques with diligent, proactive preventive measures like regular cloud syncing and careful gallery management, you can effortlessly safeguard your precious photos and ensure they remain permanently accessible. Take control of your digital memories today and equip yourself with the absolute best resources available.
FAQ
-
1. Are permanently deleted photos gone forever from an iPhone?
Not necessarily. Even after photos are permanently deleted from the visible albums or after the 30-day window expires, the underlying raw data often remains physically inscribed in the iPhone's unallocated storage sectors. Until that exact sector is forcefully overwritten by new incoming data (like saving a new video or app), highly specialized software like Dr.Fone can scan the flash memory and safely extract those hidden images. -
2. How to find deleted photos on i phone if they are not in the Recently Deleted folder?
If your missing photos are nowhere to be found inside the Recently Deleted utility folder, your primary native recourse is to check your iCloud, iTunes, or Finder backups to see if a historical snapshot contains the images. If you do not have a viable backup, or if you refuse to factory reset your device to restore one, your only guaranteed alternative is to utilize a professional third-party iOS data recovery software to scan the device's internal memory immediately. -
3. Does restoring an iCloud backup delete my current iPhone data?
Yes, absolutely. Restoring a native iCloud or iTunes backup is an all-or-nothing process. To load the older archived data onto your device, Apple requires you to perform a complete factory wipe (Erase All Content and Settings). This means any new text messages, recently taken photos, altered settings, or fresh application data accumulated after the date of that specific backup will be permanently erased and replaced by the older snapshot. -
4. Can I selectively recover deleted photos without restoring my entire device?
Using official Apple methods, you cannot selectively extract a handful of photos from an iCloud or iTunes backup without executing a full device restoration. However, by using professional data management tools and dedicated iOS recovery software, you can effectively bypass this rigid limitation. These tools allow you to deep-scan your existing backups or the device hardware directly, preview the exact missing images, and export only the chosen photos directly to your computer.
 Add Wondershare Dr.Fone as a preferred source on Google