How Can I Transfer Photos From Mac to iPhone: Full Guide [iPhone 17 Supported]

Jun 30, 2026 • Filed to: Device Data Management • Proven solutions
 TL;DR:
You can transfer photos from a Mac to an iPhone, including the iPhone 17, by utilizing iCloud Photos for automatic cloud syncing, AirDrop for quick wireless sharing, or a USB connection with Finder or Wondershare Dr.Fone for large bulk transfers.
● iCloud Photos automatically syncs image libraries over Wi-Fi but is restricted by a 5GB free storage limit, while AirDrop is best suited for small, rapid wireless exchanges as it can occasionally disrupt large file transfers.
● Finder provides a native, unlimited offline transfer method via USB cable, though this approach relies on specific macOS versions and may fail on older Mac setups.
● Wondershare Dr.Fone serves as a third-party USB alternative for bypassing cloud storage limits during massive bulk transfers, and along with iCloud and AirDrop, it fully preserves Live Photo effects across devices.
Ask AI for a summary
 ChatGPT
 Perplexity
 Gemini
 Claude
 Grok
Grok
Dr.Fone Basic:
Better Control for Your Phone
Manage, transfer, back up, restore, and mirror your device
How can I transfer photos from Mac to iPhone?
Many iOS users often wonder how to transfer photos from MacBook to iPhone, whether it’s a single memory or their entire photo library. Since most pictures are stored on a MacBook, getting them onto an iPhone becomes necessary for quick access or sharing on the go. With the release of the latest iPhone 17, seamless photo transfer is even more important to take full advantage of its upgraded display and storage. The good news is there are multiple reliable methods available. In this guide, we’ll cover four proven ways to move your photos from MacBook to iPhone—quickly, safely, and without compromising quality.
We will show you three conventional methods. However, the Wondershare Dr.Fone is a killer tool. It can transfer large amounts of photos in mere seconds.

Let's get started!
Part 1. Why Transfer Photos from Mac to iPhone?
Before we discuss the details of the transfer method, let's consider the top reasons for using these methods.
- Free up space on your Mac.
Shifting photos to your iPhone frees up significant space. However, a growing photo library can eat up storage faster than you think.
- Access photos Everywhere
Transferring pictures on an iPhone ensures you can revisit your favorite moments anytime.
- Share photos with friends & family.
Having photos readily available on your iPhone makes sharing easy.
- Backup Photos
By storing images on multiple devices, you create an extra backup layer. If your Mac runs into trouble, your photos are safely tucked away on your iPhone.
Now, let's move. We'll now show you how to get photos from mac to iphone.
Part 2. Proven Ways to Transfer Photos from Mac to iPhone
There are so many ways to transfer photos from Mac to iPhone.
You can sync Mac photos to iPhone with iCloud. The Finder and USB cord methods provide a cloud-free way to transfer things. AirDrop's wireless transfer is a lifesaver if you only need a few photos. Lastly, Dr.Fone allows bulk photo transfer with advanced organizational features.
Let's take a closer look:
Method 1: Using the Photos App (iCloud Photos)
iCloud Photos is the simplest way to ensure your photos are available across all your devices. This method uses cloud storage to keep your photo library updated automatically. However, there is only 5GB of free storage in iCloud.
How to Copy Pictures From Mac to iPhone Using Photos App
Step 1: Go to the Apple Menu and open System Settings on your Mac. Go to Apple ID and ensure you’re logged in with the same account as on your iPhone.

Step 2: Under iCloud, select Photos on both iOS devices. Toggle on the iCloud Photos. It will enable the syncing of photos.

Step 3: Open the Photos application on Mac. The application usually rests in the bottom toolbar.

Step 4: Press Photos at the top left. After that, click on settings.

Step 5: In the iCloud, check the box for iCloud Photos and connect your devices to Wi-Fi. It will automatically start syncing.

Then, all images in the Photo app will be automatically visible on your iPhone at the end of this procedure.
Now, let's see how to put pictures from Mac to iPhone with AirDrop.
Method 2: Using AirDrop
AirDrop is Apple's in-built treasure for sharing files, photos, and videos between devices. It uses Bluetooth to connect the devices and Wi-Fi for the transfer. The AirDrop method is perfectly suited for small, rapid exchanges.
AirDrop is primarily appealing due to its wireless convenience. There's no need for cables, apps, or complicated setups involved. However, AirDrop remains exclusive to Apple devices only and has been known to sometimes mess up large files.
How to Export Photos to iPhone from Mac With the AirDrop
Step 1: Select Go in the menu bar at the top of your screen. Now click on AirDrop.

Step 2: When AirDrop opens, turn on the Bluetooth.

Step 3: In the AirDrop window, select whether your Mac should be visible to Everyone or Contacts Only. Similarly, go to Settings > General > AirDrop on iPhone. Here, select Everyone.

Step 4: Swipe down from the top right to open the Control Center on your iPhone. Click the AirDrop icon so that your device is discovered. Pair with the AirDrop of your Mac.

Step 5: Launch Photos or go to a folder of the pictures you wish to send. Drag the images and then add them in AirDrop.

Step 6: A prompt will appear on your iPhone. Tap Accept to start the transfer.

Once accepted, your photos will automatically land in your iPhone’s Photos app. They are ready to view, edit, or share.
Now, let's show you a specialized photo transfer tool for iOS. We show you how to import pics from Mac to iPhone with Dr.Fone.
Method 3: Using Specialized Software - Wondershare Dr.Fone
Wondershare Dr. Fone is a popular tool for transferring photos from your Mac to your iPhone. It can also exchange audio, videos, applications, and even your social media account data.Dr.Fone is a toolkit for managing any iOS device. The transfer files feature easily connects two iOS devices and transfers any file minimally. There is no need to worry about your mega photo collection exceeding cloud storage limits.
How to Transfer Photo From Macbook to iPhone with Dr.Fone
Wondershare Dr.Fone
Transfer Photos from Mac to iPhone in Clicks.
- Transfer, manage, export/import your music, photos, videos, contacts, SMS, Apps, etc.
- Back up your music, photos, videos, contacts, SMS, Apps, etc., to the computer and restore them easily.
- Transfer music, photos, videos, contacts, messages, etc., from one smartphone to another.
- Transfer media files between iOS devices and iTunes.
- Fully compatible with the newest iOS system.


Check a detailed stepwise guide:
Step 1: Launch Wondershare Dr.Fone on your Mac and connect your iPhone with a USB cable. Once your iPhone is recognized, tap the Quick Transfer button from the home screen.

Step 2: A window will appear. You’ll see a “Select Files.” Click on it to select the photos for transfer. Alternatively, you can drop files directly into Dr.Fone.

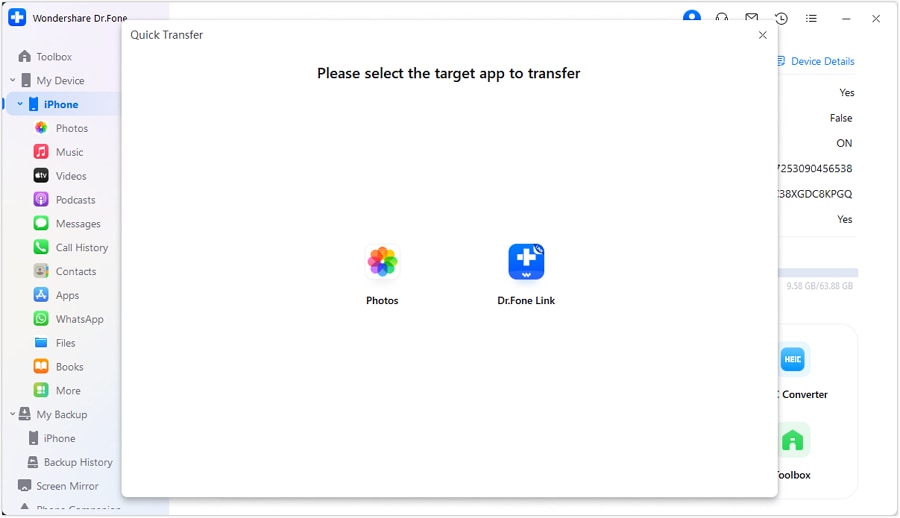
Step 3: Dr.Fone will automatically ask you to choose the target app where you will want to store the photos. Select Photos or any other app of your choice.
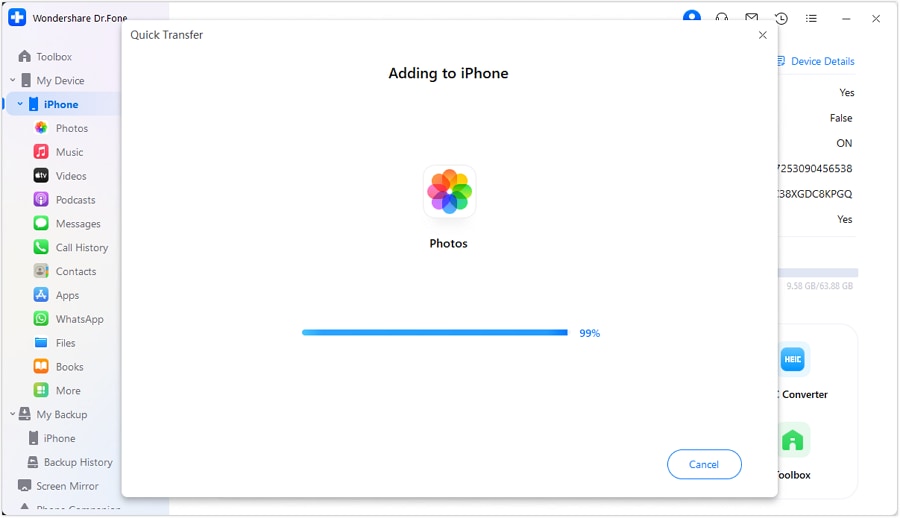
Step 4: A progress bar will pop up so that you may keep track of the transfer.
Step 5: Once the transfer is complete, a confirmation message will appear. Click on the "i" icon to confirm the location of the transferred photos on your iPhone.

Dr.Fone provides unparalleled speed, accuracy, and flexibility.
Now, let's show you how to export photos to iPhone from Mac with the in-built Mac app, Finder.
Method 4: Using the Finder
This is our last method. Using Finder to transfer photos is also easy. With this method, you can transfer unlimited photos of any size. The only real barriers are the cords and the macOS version. You’ll need that trusty USB cable on hand. This method also fails if your Mac is a little older or missing some Finder features.
How to Import Mac Photos to iPhone with Finder
Step 1: Connect your iPhone to your Mac with a USB cable.

Step 2: Next, open Finder on your Mac. It's located on the bottom toolbar.

Step 3: On the left sidebar of Finder, look for and click on your iPhone listed under Locations. Open the Photos tab and check the box in this window to sync photos.

Step 4: You’ll be given a choice. Sync all your photos or selectively choose albums and folders. After all that, click on Apply.
Step 5: The syncing process will be initiated, and you may monitor the progress. When this transfer is complete, disconnect your iPhone.

Conclusion
We have explored many ways to answer the question, "How can I transfer photos from Mac to iPhone? " You can use any of these methods to transfer your photos. They are all proven and trusted methods.
But if you're looking for speed and efficiency, You can transfer large batches of photos with Wondershare Dr.Fone. It features a clean, intuitive interface with lightning-fast transfer speeds.
FAQs
Dr.Fone Basic:
Better Control for Your Phone
Manage, transfer, back up, restore, and mirror your device


iPhone Photos
- Convert HEIC to JPG
- 1. Convert HEIC to JPG on Linux
- 2. Convert HEIC to JPG Windows
- 3. Best HEIC Converter Online
- 4. Convert HEIC to JPG High Quality
- Export iPhone Photos
- 1. Upload iPhone Photos to Google Drive
- 2. Transfer Photo from iPhone to PC
- 3. Transfer Photo from iPhone to iPhone
- 4. Transfer from iPhone to iPhone
- 5. Transfer from iPhone to iPad
- 6. Move iPhone Photo to External Drive
- 7. Transfer from iPhone to Flash Drive
- 8. Extract Photos from iPhone
- 9. Download Photo from iPhone
- Import Photos to iPhone
- 1. Transfer from Laptop to iPhone
- 2. Transfer Photo from Camera to iPhone
- 3. Transfer Photo from Mac to iPhone
- 4. Transfer Photos from PC to iPhone
- 5. Transfer from iPhone to PC
- 6. Transfer from Android to iPhone
- 7. Transfer from Samsung to iPhone
- Manage iPhone Photos
- 1. Back up iPhone Photos
- 2. Get Photos off iPhone
- 3. Send Large Size Photos from iPhone
- 4. Photo/Video Compressor Apps
- 5. Delete Photos from iPhone/iPad
- 6. iPhone Photos Disappeared Suddenly
- 7. iPhone Photoshop Alternatives
- Recover iPhone Photos
- 1. Restore Deleted Photos from iPhone
- 2. Recover Photos from iPod Touch
- 3. Recover Deleted Picture from iPhone
- Transfer iPhone Photos to Mac
- Transfer iPhone Photos to PC
- 1. Transfer Data from iPhone to PC
- 2. Transfer Photo to Computer
- 3. Transfer Photo to PC without iTunes
- 4. Transfer Library to Computer
- 5. Send Photo from iPhone to Computer
- 6. Import Photo from iPhone to Windows
- 7. Transfer Photo to Windows
- Transfer Photos from Google Drive
- 1. Download from Google Drive to iPhone
- 2. Transfer from Google Photo to iPhone
- 3. Download from iCloud to iPhone
- Transfer Photos to Google Drive
- Image Convert Tips
- ● Manage/transfer/recover data
- ● Unlock screen/activate/FRP lock
- ● Fix most iOS and Android issues
- Free Download Free Download


Bhavya Kaushik
contributor Editor