
The Ultimate Guide to Retrieving Lost Photos from Your iPod Touch
Aug 27, 2025 • Filed to: Data Recovery Solutions • Proven solutions
What do you do when you suddenly discover that some photos on your iPod Touch are missing? For most people this a panic moment that quickly turns into sadness, especially when the pictures in question are of sentimental value. If you have recently lost some photos on your device, worry not. This article will provide you with a solution that will help.
Part 1: Can you Recover Deleted Photos from iPod Touch?
Under certain circumstances, the deleted photos can be recovered. This is despite the fact that your iPod doesn't come with a recycle bin. If you had a backup of the photos, you can recover them if you restore from the iTunes or iCloud backup. If you don't have a backup of the photos, as long as you don't overwrite them, you can recover them using a good data recovery tool.
In order to avoid overwriting the photos, stop using the device as soon as you discover that the photos are missing. In fact, you should refrain from using the device until you can recover the photos.
Part 2: How to Recover Deleted Photos from Your iPod Touch?
Like we mentioned before, you can recover your deleted photos in one of three ways. Let's look at all three of them.
1. Recover from iTunes
In order to recover your lost photos via iTunes, you must have included them in a recent iTunes backup. If you had, then all you have to do is restore the backup and your photos will be recovered. Here's how to do it.
- Step 1: Launch iTunes on your computer and then connect the iPod using USB cables. Select the iPod when it appears.
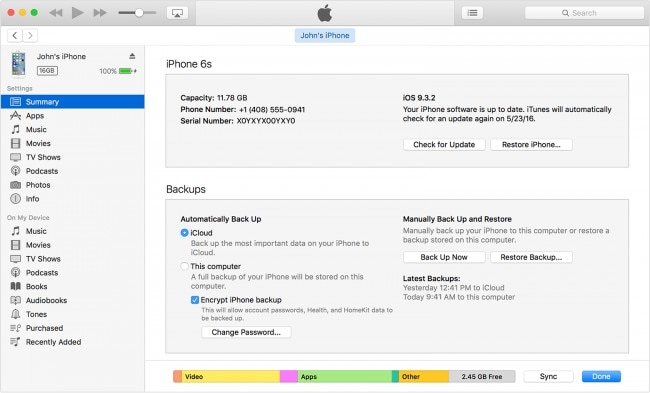
- Step 2: Select “Restore Backup in iTunes” and then select the most relevant backup. Click “Restore” and wait for the process to finish.
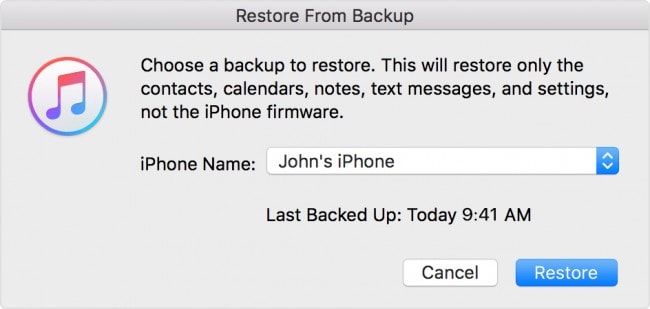
- Step 3: Keep the device connected to the computer after it restarts and wait for it to sync with your computer.
2. Recover using iCloud
You can also choose to recover the photos by restoring from an iCloud backup. Again, this is only possible if you had backed up the device via iCloud. Here's how to do it.
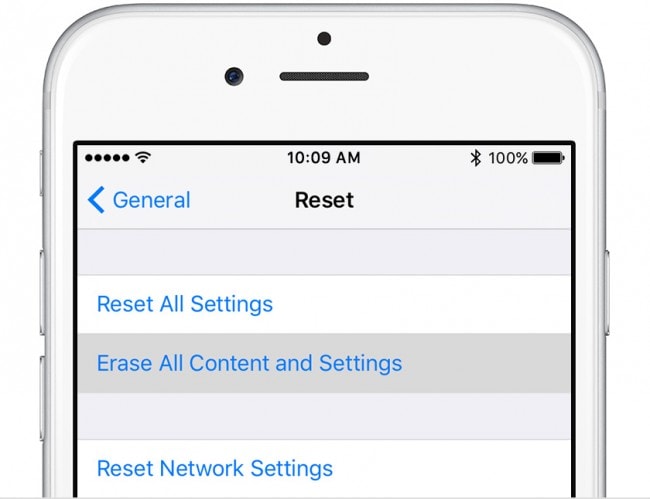
- Step 1: To restore from an iCloud backup, you firstly need to erase all the data on your device. To do this, go to Settings > General > Reset > Erase All Contents. You may need to enter your passcode to complete the process.
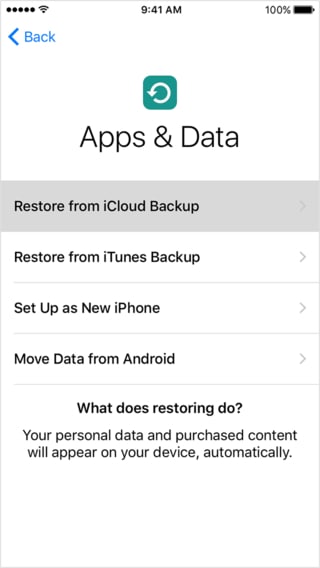
- Step 2: Once all the data has been erased, your device will go back to the Set-up Screen. Follow the on-screen prompts until you get to the Apps & Data Screen, and then tap “Restore from iCloud Backup”.
- Step 3: You may be requested to sign in with your Apple ID. Wait for the backup to complete, and your lost photos should be restored on your device.

3. Using a Data Recovery Tool
The best data recovery tool to use in this situation is Dr.Fone - Data Recovery (iOS). This program, provides you with three easy ways to recover data from your iOS device. Some of the features that make it the best include;

Dr.Fone - Data Recovery (iOS)
Recover Deleted Photos from iPod Touch
- Recover lost data types of data including photos, contacts, videos, messages, call logs, notes and many more.
- Original quality will all be reserved after getting the lost files.
- Recover data lost under any and all circumstances, including data that has been accidentally deleted, from a lost or stolen device and from a device that is unresponsive among many others.
- User-friendly interface and detailed guide. No technical skills required.
- No need to erase all data from your device to recover the lost data.
How to use Dr.Fone to recover data from your iPod Touch?
You can use one of the following ways to recover the photos from your iPod. Before you start to use this tool, you should know that the types of data can be divided to two. And if you have not backed up the data before, it will be difficult to restore all the media contents from iPod directly.
Text Contents: Messages (SMS, iMessages & MMS), Contacts, Call history, Calendar, Notes, Reminder, Safari bookmark, App document (like Kindle, Keynote, WhatsApp history), etc.
Media Contents: Camera Roll (video & photo), Photo Stream, Photo Library, Message attachment, WhatsApp attachment, Voice memo, Voicemail, App photos/video (like iMovie, iPhotos, Flickr), etc.
1). Recover from the iPod Touch
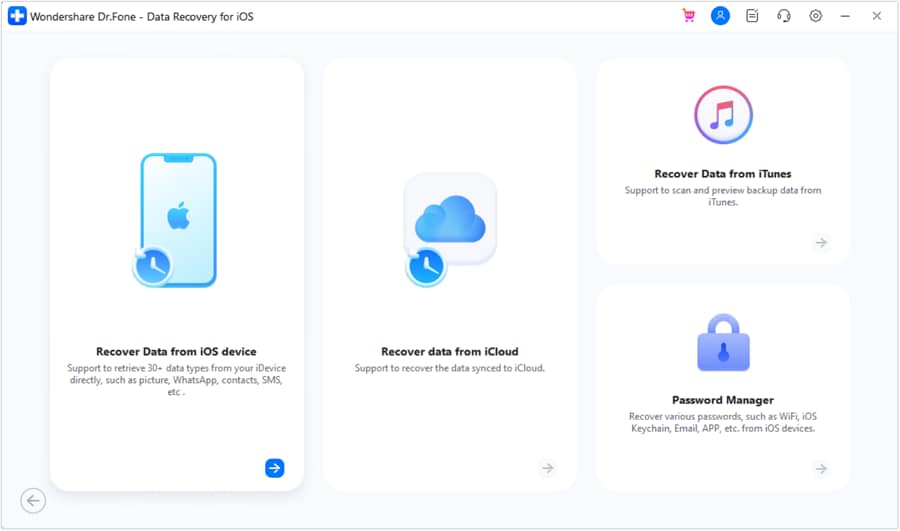
- Step 1: Click “download” button below as your first step to commence. Connect the iPod Touch using USB cables and the program will detect the device and open “Recover Data from iOS Device”.
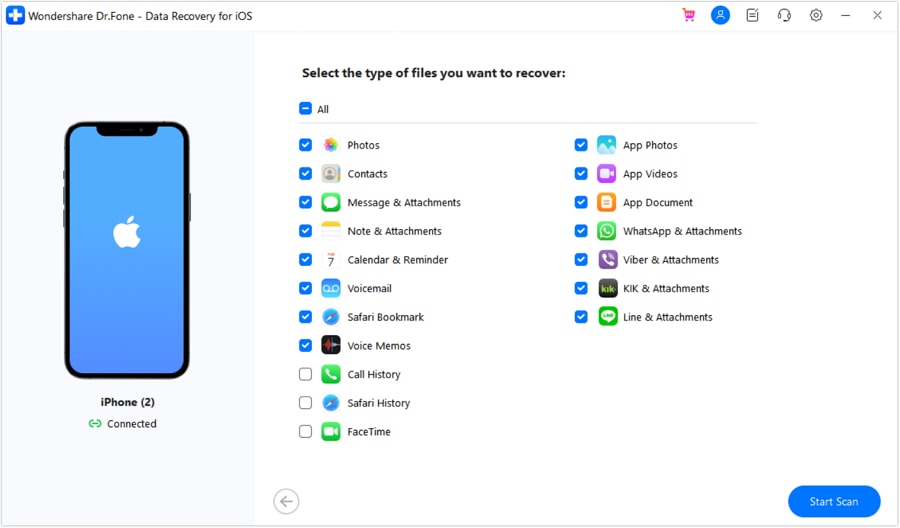
- Step 2: Scanning your iPod for detecting the lost data by tapping the “Start Scan” button.
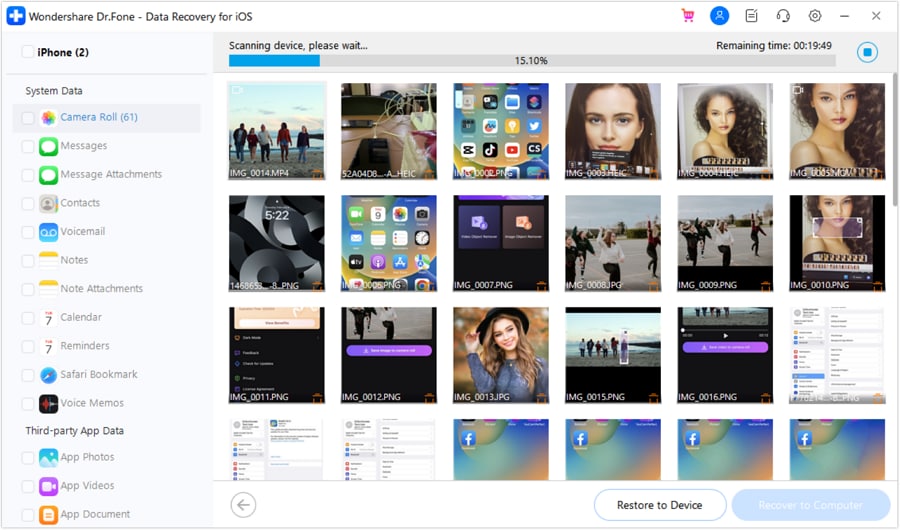
- Step 3: All your lost data will be showed on the next window after the process finished. Select the types of files you would like to recover and then click on “Recover to Device” or “Recover to Computer”.
2). Recover from Your iTunes Backup Files
If you regularly backed up your iPod Touch via iTunes, you can recover data from the iTunes backup files. Here's how.
- Step 1: Go back to the home interface and click “Data Recover” to launch this tool. Select “Recover Data from iTunes” from the options. All the iTunes backup files on the computer will be displayed in the next window.
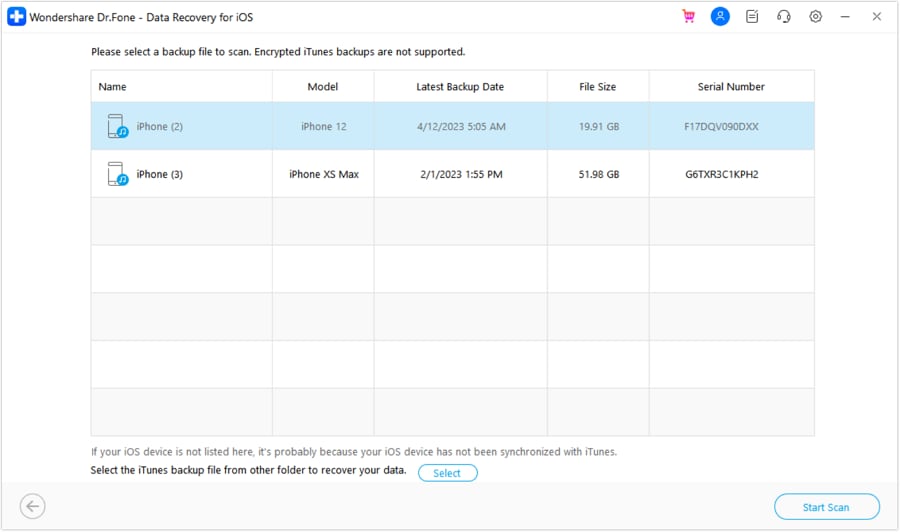
- Step 2: Select the iTunes backup file that contains the data you want to recover and click “Start Scan”. Once the scan is complete, select the lost photos and choose either “Recover to Device” or “Recover to Computer”.
3) Recover from Your iCloud Backup Files
You can also recover the photos from your iCloud backup files. To do that, follow these very simple steps.
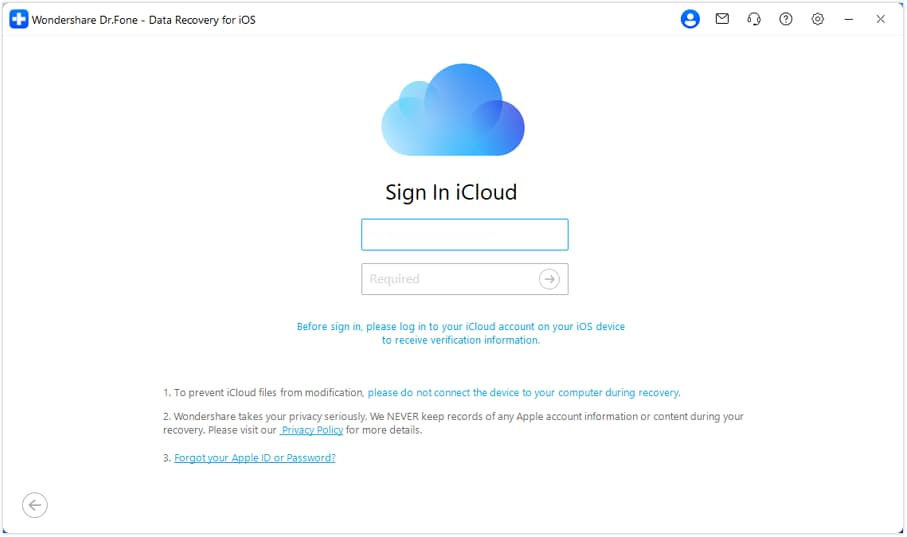
- Step 1: Launch Dr.Fone on your computer and then select “Recover Data from iCloud”. Enter your Apple ID and password to log in to your iCloud account.
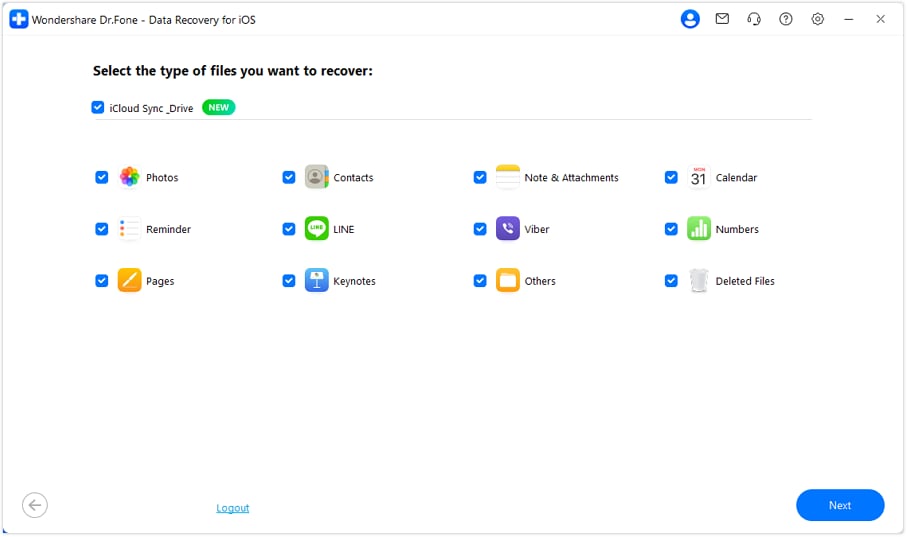
- Step 2: You should see all the iCloud backup files. Select the one that contains the lost photos and then click “Next”.
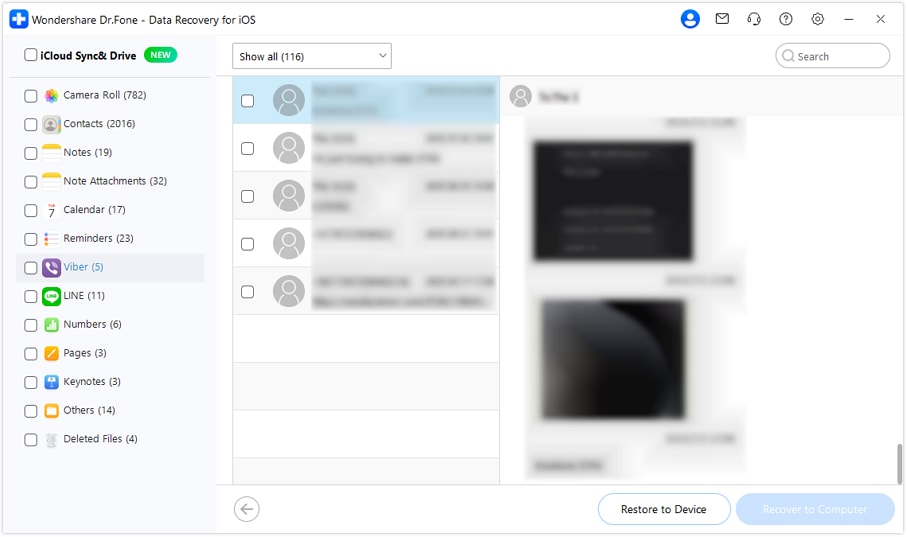
- Step 3: Once the scan is complete, preview the data and then select the missing photos. Choose to “Recover to Computer” or “Recover to Device”.
Dr.Fone is by far the easiest and most convenient way to get your deleted photos back. It is definitely worth a try.
iPhone Photos
- Convert HEIC to JPG
- 1. Convert HEIC to JPG on Linux
- 2. Convert HEIC to JPG Windows
- 3. Best HEIC Converter Online
- 4. Convert HEIC to JPG High Quality
- Export iPhone Photos
- 1. Upload iPhone Photos to Google Drive
- 2. Transfer Photo from iPhone to PC
- 3. Transfer Photo from iPhone to iPhone
- 4. Transfer from iPhone to iPhone
- 5. Transfer from iPhone to iPad
- 6. Move iPhone Photo to External Drive
- 7. Transfer from iPhone to Flash Drive
- 8. Extract Photos from iPhone
- 9. Download Photo from iPhone
- Import Photos to iPhone
- 1. Transfer from Laptop to iPhone
- 2. Transfer Photo from Camera to iPhone
- 3. Transfer Photo from Mac to iPhone
- 4. Transfer Photos from PC to iPhone
- 5. Transfer from iPhone to PC
- 6. Transfer from Android to iPhone
- 7. Transfer from Samsung to iPhone
- Manage iPhone Photos
- 1. Back up iPhone Photos
- 2. Get Photos off iPhone
- 3. Send Large Size Photos from iPhone
- 4. Photo/Video Compressor Apps
- 5. Delete Photos from iPhone/iPad
- 6. iPhone Photos Disappeared Suddenly
- 7. iPhone Photoshop Alternatives
- Recover iPhone Photos
- 1. Restore Deleted Photos from iPhone
- 2. Recover Photos from iPod Touch
- 3. Recover Deleted Picture from iPhone
- Transfer iPhone Photos to Mac
- Transfer iPhone Photos to PC
- 1. Transfer Data from iPhone to PC
- 2. Transfer Photo to Computer
- 3. Transfer Photo to PC without iTunes
- 4. Transfer Library to Computer
- 5. Send Photo from iPhone to Computer
- 6. Import Photo from iPhone to Windows
- 7. Transfer Photo to Windows
- Transfer Photos from Google Drive
- 1. Download from Google Drive to iPhone
- 2. Transfer from Google Photo to iPhone
- 3. Download from iCloud to iPhone
- Transfer Photos to Google Drive
- Image Convert Tips
- ● Manage/transfer/recover data
- ● Unlock screen/activate/FRP lock
- ● Fix most iOS and Android issues
- Learn More Learn More




Selena Lee
chief Editor