3 Ways to Transfer Photos from iPhone to Laptop (Win&Mac)
Oct 24, 2025 • Filed to: Device Data Management • Proven solutions
Dr.Fone Basic:
Better Control for Your Phone
Manage, transfer, back up, restore, and mirror your device
Have you ever wondered about the process which can make you transfer your iPhone photos to your laptop easily and comfortably? Or transfer the videos from the iPhone to a laptop? Does the event want to transfer the video from the laptop back to the iPhone? If yes, then this article is for you. Here we are providing you three ways to complete the process of transferring photos from iPhone to the laptop. There are many reasons which may lead you to transfer photos from iPhone to Laptop/PC, such as:
- 1: In search of privacy
- 2: Storage issues
- 3: To create a backup
- 4: Additional space required to save some important files etc.
Whatever be your concern, we are here to help you with this detailed step-by-step guide about how to import photos from iPhone to the laptop. And help you understand this good iPhone to PC transfer software. Follow the guide mentioned and transfer them with ease. Just keep your device ready to initiate the transfer process.
- Part 1: How to transfer photos from iPhone to laptop with Dr.Fone - Phone Manager (iOS)?
- Part 2: How to Download photos from iPhone to laptop with Windows AutoPlay?
- Part 3: How to Download Pictures from iPhone to Laptop(Mac) with iPhoto?
You may be interested in: How to Transfer Photos from Phone to Laptop Without USB?
Part 1: How to transfer photos from iPhone to laptop with Dr.Fone - Phone Manager (iOS)?
Let us start the transfer guide with the easiest and the most convenient method using Dr.Fone - Phone Manager (iOS). With the help of this tool, you can transfer your iPhone photo to your laptop in simple steps. This toolkit is equipped with all the necessary tools to make your system up-to-date using its transfer facility for iOS, Laptop, Mac, PC, etc. So, without delaying anymore, start the process with the following steps.

Dr.Fone - Phone Manager (iOS)
Transfer Photos from iPhone to Laptop without iTunes
- Transfer, manage, export/import your music, photos, videos, contacts, SMS, Apps, etc.
- Back up your music, photos, videos, contacts, SMS, Apps, etc., to the computer and restore them easily.
- Transfer music, photos, videos, contacts, messages, etc., from one smartphone to another.
- Transfer media files between iOS devices and iTunes.
- Fully compatible with iOS 7, iOS 8, iOS 9, iOS 10, iOS 11 and iPod.
1. First, please download Dr.Fone, and install it on your computer. Then connect your iPhone to your laptop and choose "Phone Manager" from the interface.

2. A new window will appear. Click on the "Transfer Device Photos to PC" option, and you will then be able to save all photos on your iPhone to your laptop.

3. Also, we can transfer iPhone photos to the laptop selectively with Dr.Fone. From the main page of the software, choose the Photos tab. You will see all the available photos. From there, select the ones you wish to transfer photos from iPhone to a laptop. After that, click on the Export option,> then Export to PC.
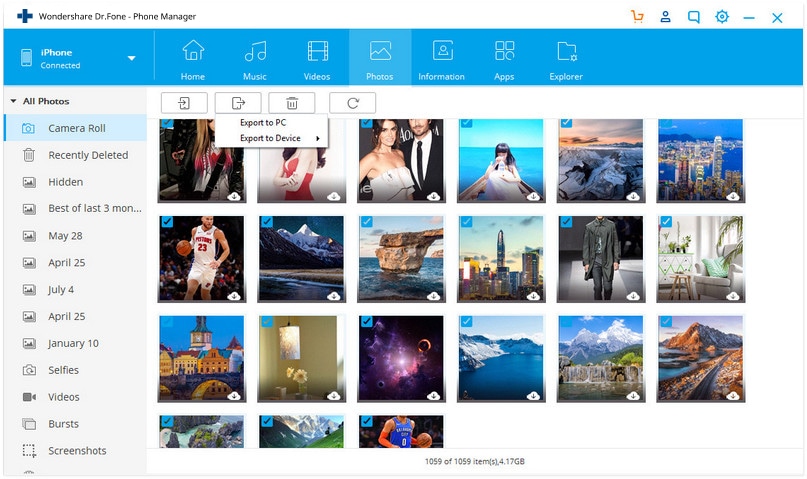
A dialog box with destination folder selection will appear. Select the folder to keep your photos safe on your laptop> then click on OK. Thus, all your concerns over how to import photos from the iPhone to the laptop will get resolved using the above method.
Now your photos will get transferred to Laptop. Following the above simple steps with the help of Dr.Fone iOS transfer toolkit, your photos will get transfer safely, securely at fast pace.
Part 2: How to Download photos from iPhone to laptop with Windows AutoPlay?
In this part, our main focus will be on downloading photos from iPhone to a laptop with Windows OS that is the Autoplay service. Autoplay is an inbuilt system for windows laptop/PC. So, if you are a Windows user and looking for transfer steps using Autoplay then, keep reading below:
Step 1: Make Connection between iPhone and Windows Laptop
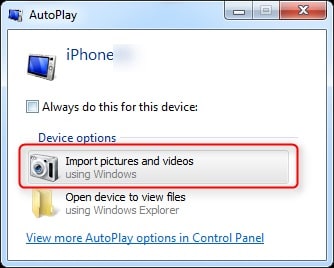
In the very first step, you need to create a connection between iPhone and Windows laptops. Doing so will prompt Autoplay window appearance> from there, you need to select import photos from iPhone to PC, as mentioned in the screenshot.
Step 2: Processing timing dialog box
Once you have chosen the importing option, autoplay will start detecting the pictures from iPhone, which you are supposed to transfer. Wait a while till the searching process gets finished. This will not take much time.
Step 3: Transfer photos
After the search process comes to an end, you need to select the Import button. However, if you wish to make some settings also, you can use the more option. This option is to customize the location, direction, or other options. After making the necessary settings, press OK to finish the transfer process.
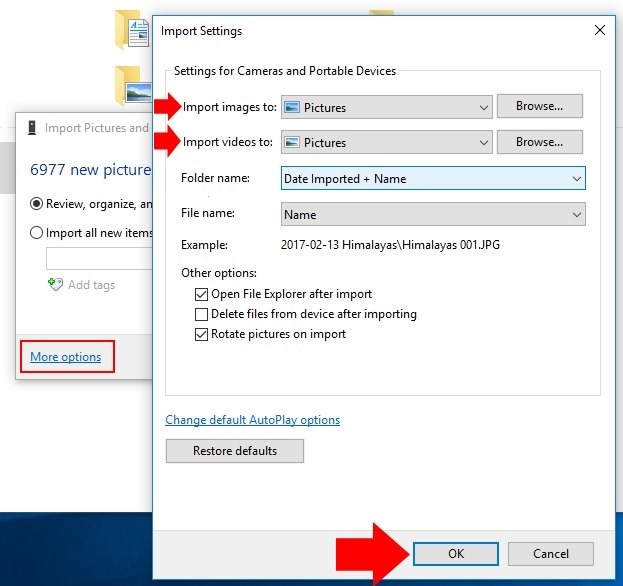
For Windows laptops, this is an easy and quick way to accomplish the task and know how to download pictures from the iPhone to the laptop.
Part 3: How to Download Pictures from iPhone to Laptop(Mac) with iPhoto?
Next, we move to the Mac Laptop. If you are a Mac user, you certainly want to know how to download pictures from iPhone to laptop to keep a backup or for any other reason. Mac has a powerful though a lesser-known feature that can help you transfer the photos from iPhone to Mac Laptop, using iPhoto inbuilt service to Mac Operating system. For that required, the steps are as follows:
There are two methods with which you can proceed to transfer iPhone images to Mac Laptop using the iPhoto service. They are as follows:
Method A:
Under this, first, connect iPhone to Mac Laptop using USB> iPhoto will launch automatically, if not open iPhoto app> after that Select Photos> click on import> then choose Import Selected> OK. Soon, your selected photos will get transfer to the Mac system.

Method B:
Hereunder the second method, the required steps are:
Here you need to connect your Mac laptop with iPhone the help of a USB wire>. Doing so will activate the iPhoto, and its window will appear automatically. If not, then open the Applications in your system> from there, click on the iPhoto app and open it directly.
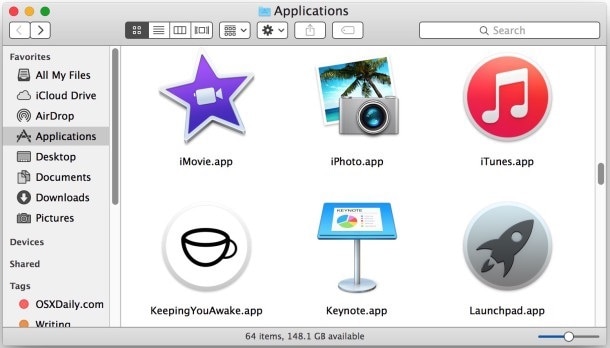
After that, under the iPhoto window> select the photos you wish to transfer>and then go to the File menu> then click on Export option> here you can define the specifications in terms of kind, size, JPEG quality, name, etc.
After making the necessary settings, now click on the Export option present at the end of the dialog box, as shown in the image,
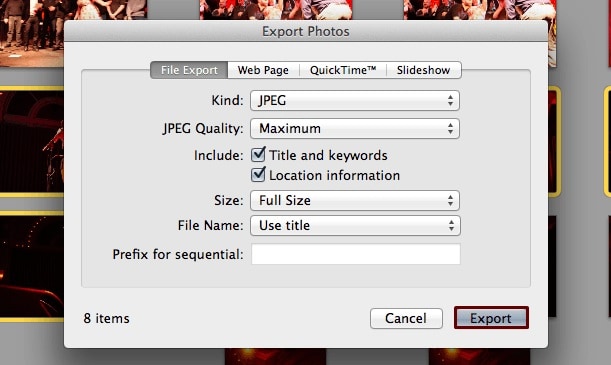
After pressing the Export button, a new dialog box will appear, asking for the final save location. Under save as dialog box, select the location on your Mac laptop where you want to save the selected photos and press OK.
Note: Select the method as per your convenience and answer how to transfer photos from iPhone to the laptop.
The Bottom Line
Now, as you have covered the details provided in the article, I hope that all of your issues related to transferring photos from iPhone to Laptop will get resolved. Follow the details given above, and in the future transfer process, you will be equipped with a well-organized method in terms of Dr.Fone - Phone Manager (iOS) toolkit. You may also choose any one of the other methods for your windows and Mac system. In the article, we made sincere efforts to assist you in the process. You need to go through them, follow them to save photos to the system of your choice.
Dr.Fone Basic:
Better Control for Your Phone
Manage, transfer, back up, restore, and mirror your device
iPhone Photos
- Convert HEIC to JPG
- 1. Convert HEIC to JPG on Linux
- 2. Convert HEIC to JPG Windows
- 3. Best HEIC Converter Online
- 4. Convert HEIC to JPG High Quality
- Export iPhone Photos
- 1. Upload iPhone Photos to Google Drive
- 2. Transfer Photo from iPhone to PC
- 3. Transfer Photo from iPhone to iPhone
- 4. Transfer from iPhone to iPhone
- 5. Transfer from iPhone to iPad
- 6. Move iPhone Photo to External Drive
- 7. Transfer from iPhone to Flash Drive
- 8. Extract Photos from iPhone
- 9. Download Photo from iPhone
- Import Photos to iPhone
- 1. Transfer from Laptop to iPhone
- 2. Transfer Photo from Camera to iPhone
- 3. Transfer Photo from Mac to iPhone
- 4. Transfer Photos from PC to iPhone
- 5. Transfer from iPhone to PC
- 6. Transfer from Android to iPhone
- 7. Transfer from Samsung to iPhone
- Manage iPhone Photos
- 1. Back up iPhone Photos
- 2. Get Photos off iPhone
- 3. Send Large Size Photos from iPhone
- 4. Photo/Video Compressor Apps
- 5. Delete Photos from iPhone/iPad
- 6. iPhone Photos Disappeared Suddenly
- 7. iPhone Photoshop Alternatives
- Recover iPhone Photos
- 1. Restore Deleted Photos from iPhone
- 2. Recover Photos from iPod Touch
- 3. Recover Deleted Picture from iPhone
- Transfer iPhone Photos to Mac
- Transfer iPhone Photos to PC
- 1. Transfer Data from iPhone to PC
- 2. Transfer Photo to Computer
- 3. Transfer Photo to PC without iTunes
- 4. Transfer Library to Computer
- 5. Send Photo from iPhone to Computer
- 6. Import Photo from iPhone to Windows
- 7. Transfer Photo to Windows
- Transfer Photos from Google Drive
- 1. Download from Google Drive to iPhone
- 2. Transfer from Google Photo to iPhone
- 3. Download from iCloud to iPhone
- Transfer Photos to Google Drive
- Image Convert Tips
- ● Manage/transfer/recover data
- ● Unlock screen/activate/FRP lock
- ● Fix most iOS and Android issues
- Learn More Learn More


Bhavya Kaushik
contributor Editor