[Detailed Guide] Solutions to Transfer Data from iPhone 13 to PC?

Oct 24, 2025 • Filed to: Device Data Management • Proven solutions
Dr.Fone Basic:
Better Control for Your Phone
Manage, transfer, back up, restore, and mirror your device
Are you an iPhone user? If you are then you would surely know that it is the highly awaited launch of every year. The iPhone is an ideal option for everybody in this generation because of its enhanced features and easy-to-use nature. People love to make enjoyable videos on iPhone as well as listening to music gives pleasure. Whereas all amusement is possible when there is huge data storage in your iPhone. Still, there will always be shortage of storage at some point, so you need to learn how to transfer data from iPhone 13 to PC.
Why is there a need to transfer data from iPhone 13 to PC? Whenever your iPhone is out of storage then you can't save anything additional. So, there are two options to follow: either transfer all the data to your PC or delete it. I am quite sure that no one wants to lose data so the choice left behind is to transfer the data. Remove all stuff from iPhone after transferring it to PC, then you will get complete space. In this article, we are discussing the concerns of people regarding the transfer of data from iPhone 13 to PC.
Solution 1: Transfer data from iPhone 13 to PC with iTunes
Apple has iTunes for iOS device owners to regulate their device information in a perfect way. Knowing about iTunes is very common if you are familiar with the iPhone or an iPhone user. Moreover, it can help to transfer data from iPhone 13 to PC. Tune with us to learn as the process is here for you.
Step 1: First you need to launch the iTunes app on your computer. You must make sure that you have the latest version of iTunes on the PC.
Step 2: Next you need to connect the iPhone 13 to your PC by using a lightning USB cable. You will then see a device icon under the Connected Devices option appearing on the iTunes interface.
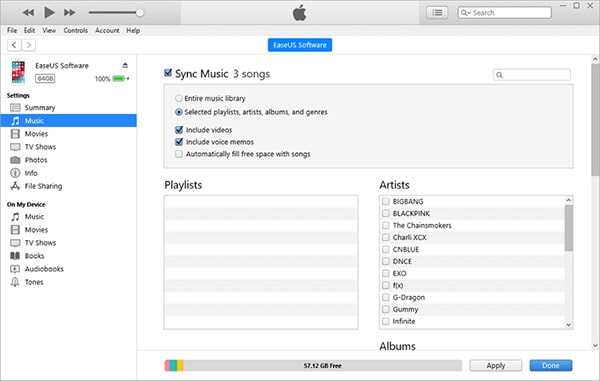
Step 3: You can click on that device icon and then click on the Settings option from the left side of iTunes screen. This will reveal all the types of content that you can transfer or sync.
Step 4: Now just select any category of the content you want, and then click on the Sync button.
Step 5: Finally after selecting the data, just click on the Apply button from the lower right corner of the window. This will start the syncing process automatically. Now every time when you connect the iPhone 13 via USB and open the iTunes app, the device will sync automatically.
Solution 2: [1 Click] Transfer data from iPhone 13 to PC without iTunes
There are various ways to transfer the data without using iTunes but we will discuss the best of all. If you are not comfortable while using iTunes then I suggest you to go for Dr.Fone - Phone Manager. It's certified by the makers of this tool as it's one of the major amazing ways to transfer data such as photos, videos, audiotape and videotapes, documents, or any other files. Without any doubt, this tool is a classic iPhone 13 to PC transfer app, which works on both Mac and Windows. Also this software is completely well-suited with different Apple devices to transfer data.
Features:
- Best way to transfer various data including photos, music, Playlist, video, Audiobooks, contacts, SMS, documents, ringtones, podcasts etc. from iPhone 13 to PC.
- It can manage all of your iPhone device data by adding, deleting or exporting them.
- There is no need for iTunes if you want to transfer data between iPhone, iPad, and computers.
- Allows users to convert media files into a supported format when transferring to the target device.
- Completely supports iOS 14 and all of the iOS devices, so there is no hassle.
Steps to Transfer Data from iPhone 13 to PC:
Step 1: First you need to connect your iphone 13 to the computer using a lightning USB cable.
Step 2: Next you need to download and install the Dr.Fone – Phone Manager (iOS) to your computer. Launch the program and you will get the home interface window in your screen.

Step 3: From the home interface of the program, click on the Phone Manager option. Now the program will detect and display the iPhone 13 device name on the left menu bar. Select the device option to proceed forward.
Step 4: Now you should get an interface like below where you need to select Transfer Device Photos to PC option. Dr.Fone – Phone Manager will take some time to display a list all the data available on your iPhone.

Alternatively, if you don't want to transfer all data at once, just go to any of the respected tab available at the top of the interface. There are options to select Music, Videos, Photos, Information, and Apps etc.
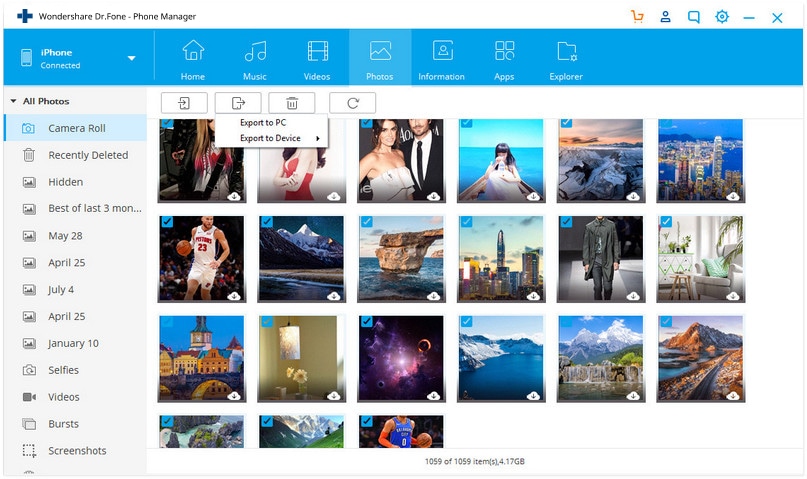
Step 5: Finally, you can preview and select whatever file type you want to transfer, then select “Export to PC” option to start the transfer process.
Solution 3: Transfer data from iPhone 13 to PC with iCloud
The iCloud is found in every Apple device such as the iPhone 13. You can use iCloud for a safe transfer of data from iPhone 13 to PC. Stay here to know the process so you won't have any difficulty while using iCloud.
Step 1: Install the latest iCloud app from the Apple Store on your PC. Start the iCloud app and sign in with your iCloud credentials.
Step 2: For enabling yourself to transfer photos using this iCloud app, go to Settings menu from your iPhone 13 device first then tap on your user profile to select iCloud. Then you need to scroll down and enable the iCloud Drive option.
Step 3: Now you need to open the Files app of your iPhone 13 and select Browse option to go to the iCloud Drive option. Then you can look for the files that you need to transfer and directly upload them into the iCloud Drive.
Step 4: The transferred photos will be preserved in the iCloud Photos folder on your pc. Or you can simply access https://www.icloud.com website from your computer browser, sign in using Apple ID and download the photos from iCloud Drive folder.

Solution 4: Transfer data from iPhone 13 to PC with Windows Autoplay
Windows autopay is another choice to move data from iPhone 13 to PC. Undoubtedly, it is an excellent feature to transfer data from one device to another. The steps are here for you, make sure to follow them thoroughly –
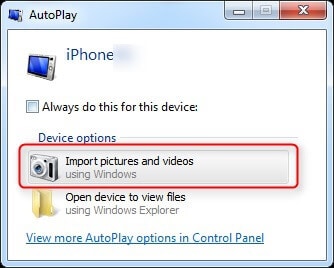
Step 1: First, you need to connect your iPhone 13 to the computer by using a USB cable. You'll see the small AutoPlay window or notification immediately on the screen.
Step 2: Now you need to select the Import Pictures and Videos option and then tap on the More Options to select the folder where you want to transfer the files.
Step 3: If needed, you can create a new folder for photos. And click on the Ok button, then select Next.
Step 4: After setting up everything, start the transfer process by selecting the Import button.
Conclusion:
There are several methods available to transfer data from iPhone 13 to PC and it seems quite simple if you have proper guideline to follow. One of the prime transferring tools available in the market is Dr.Fone – Phone Manager (iOS). It works perfectly for iPhone 13 device and looks like it is designed for almost all the iOS devices. You can transfer your data through any method suitable to you from this article but the recommended one is definitely Dr.Fone – Phone Manager.
Dr.Fone Basic:
Better Control for Your Phone
Manage, transfer, back up, restore, and mirror your device


iPhone Photos
- Convert HEIC to JPG
- 1. Convert HEIC to JPG on Linux
- 2. Convert HEIC to JPG Windows
- 3. Best HEIC Converter Online
- 4. Convert HEIC to JPG High Quality
- Export iPhone Photos
- 1. Upload iPhone Photos to Google Drive
- 2. Transfer Photo from iPhone to PC
- 3. Transfer Photo from iPhone to iPhone
- 4. Transfer from iPhone to iPhone
- 5. Transfer from iPhone to iPad
- 6. Move iPhone Photo to External Drive
- 7. Transfer from iPhone to Flash Drive
- 8. Extract Photos from iPhone
- 9. Download Photo from iPhone
- Import Photos to iPhone
- 1. Transfer from Laptop to iPhone
- 2. Transfer Photo from Camera to iPhone
- 3. Transfer Photo from Mac to iPhone
- 4. Transfer Photos from PC to iPhone
- 5. Transfer from iPhone to PC
- 6. Transfer from Android to iPhone
- 7. Transfer from Samsung to iPhone
- Manage iPhone Photos
- 1. Back up iPhone Photos
- 2. Get Photos off iPhone
- 3. Send Large Size Photos from iPhone
- 4. Photo/Video Compressor Apps
- 5. Delete Photos from iPhone/iPad
- 6. iPhone Photos Disappeared Suddenly
- 7. iPhone Photoshop Alternatives
- Recover iPhone Photos
- 1. Restore Deleted Photos from iPhone
- 2. Recover Photos from iPod Touch
- 3. Recover Deleted Picture from iPhone
- Transfer iPhone Photos to Mac
- Transfer iPhone Photos to PC
- 1. Transfer Data from iPhone to PC
- 2. Transfer Photo to Computer
- 3. Transfer Photo to PC without iTunes
- 4. Transfer Library to Computer
- 5. Send Photo from iPhone to Computer
- 6. Import Photo from iPhone to Windows
- 7. Transfer Photo to Windows
- Transfer Photos from Google Drive
- 1. Download from Google Drive to iPhone
- 2. Transfer from Google Photo to iPhone
- 3. Download from iCloud to iPhone
- Transfer Photos to Google Drive
- Image Convert Tips
- ● Manage/transfer/recover data
- ● Unlock screen/activate/FRP lock
- ● Fix most iOS and Android issues
- Learn More Learn More


James Davis
staff Editor