Today, amazing photos do not necessarily need a professional camera or many years of experience in photography. Owing to the rapid development of smartphone cameras, all of us can take great pictures as well. But how do you make the most of that camera to capture shots that truly stand out? This article covers the essentials for how to take good photos with your phone — from framing and lighting to simple editing techniques. And if you’re a beginner just learning photography basics, you’re in for a treat! With the help of Dr.Fone’s AI Photo Enhancer, you can elevate your images with professional-grade color, volume, and detail. Now, let's dive into the tips that will help you improve your mobile photography.
In this article
Part 1: The Basics of Phone Photography
- Steady Hands for Sharp Shots

Photos that are not clear are many times due to an unsteady hand. It is important to keep your phone as steady as possible, especially during dark scenes, so that the photo will be clear. This is how to keep your hands still in order to get sharp shots:
- Hold Your Phone Securely: Mastery of utilizing both hands to hold the phone. This grip allows it to maintain stability and also prevents blurriness that hand tremors may cause.
- Brace Your Arms: Hold your elbows close to your body for added stability. Alternatively, lean on a wall or a solid surface to minimize movement.
- Consider a Mini Tripod: Portable tripods for phones are inexpensive and can make a huge difference in the quality of your photos, especially if you’re taking long exposures or night shots.
- Use a Timer or Remote Shutter: Many smartphones offer a timer feature to reduce shake from pressing the capture button. If you have a Bluetooth remote, even better—it allows you to take photos hands-free.
Pro Tip: Set your phone’s shutter speed to a faster setting (if your camera app allows) to minimize blur further.
- Natural Light is Key

Lighting is one of the most important factors in photography, and natural light is often the most flattering and versatile option. Here’s how to make natural light work for you:
- Avoid Harsh Midday Light: Bright sunlight can cause unwanted shadows. Instead, aim for soft, even lighting by shooting in the morning or late afternoon.
- Golden Hour Glow: The “golden hour” occurs shortly after sunrise and just before sunset, providing a warm, soft light that flatters your subject and gives a beautiful, natural look.
- Positioning Matters: For portraits, have your subject face a light source like a window or the sun, avoiding backlighting (where the light is behind the subject) to prevent shadows. For landscapes, try experimenting with different angles and light directions to add depth to your shots.
- Use the Rule of Thirds for Balanced Composition

The rule of thirds is a tried-and-true composition rule that can elevate your photos.The frame is split into 3 vertical and 3 horizontal lines which make a 3x3 grid and suggests placing the points of interest where the lines cross. To further illustrate this, consider the following:
- Turn On the Grid Setting: In your phone’s camera settings, enable the 3x3 grid. This overlay helps you align key parts of your scene along these lines.
- Place Your Subject Off-Center: If you want to make your photograph more interesting, avoid placing your subject in the center of the frame. Instead, try balancing it by either placing it vertically to one side or at the intersection points of lines.
- Use Negative Space: It is practical to include some breathing space around the area of focus so that the composition does not feel full or overbearing.
Part 2: Enhancing Photos with AI Tools
Even with great composition and lighting, a bit of editing can make a photo truly stand out. AI-enhanced tools, like Dr.Fone - AI Photo Enhancer, offer beginner-friendly ways to bring out the best in your photos. Here’s what Dr.Fone’s AI-enhancement features can do:
- Color Correction: Adjusts hues to create vivid, balanced colors that make photos look fresh and vibrant. AI-enhanced color correction ensures natural-looking tones that don’t appear overly edited.
- Sharpness Boost: Refines details to make textures like fabric, hair, and landscapes pop, making your photos look crisper and more defined.
- Noise Reduction: Removes the grainy “noise” often found in low-light shots, creating a smoother, professional-quality look. With these automatic adjustments, Dr.Fone’s AI tools allow you to enhance your photos without needing advanced editing skills. These are ideal for beginners who are looking to transform good photos into great ones within several taps.
Dr.Fone App (iOS) & Dr.Fone App (Android)
Your One-Stop Expert for Screen Unlock, Smart Clean, Data Recovery, and Phone Management of Mobile Devices!
- Effortlessly unlock various locks on your device.
- Instantly free up storage space by smart clean.
- Rapidly recover different kinds of lost phone data and information.
- Easily manage cluttered and private device content.
- Supports both iOS and Android devices.
Part 3: How to Take Good Photos with Phone: Using Dr.Fone App- AI Enhancer
If you’re ready to bring out the best in your phone photos, Dr.Fone’s AI Photo Enhancer is an intuitive tool designed for beginners.
Here’s a quick 4-step guide to enhancing your photos using Dr.Fone:
Step 1 Open the Dr.Fone App

First of all, please download and then launch the Dr.Fone application via your iOS or Android device. Thanks to its ‘user-friendly’ interface, this application is intuitive to navigate.
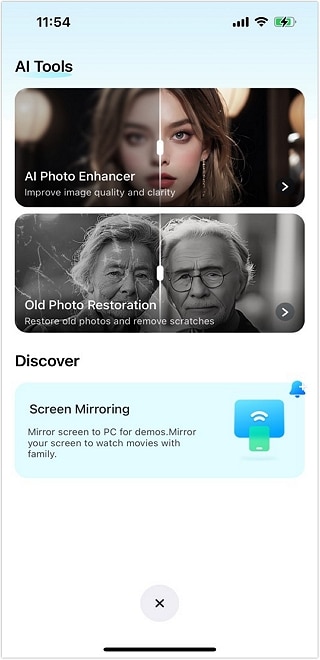
Step 2 Select the AI Photo Enhancer Tool

From the app’s main page, look for the AI Tools Page and tap on AI Photo Enhancer. This utility will improve the extra features of your photo like color, sharpness, and clarity in a more automatic manner.
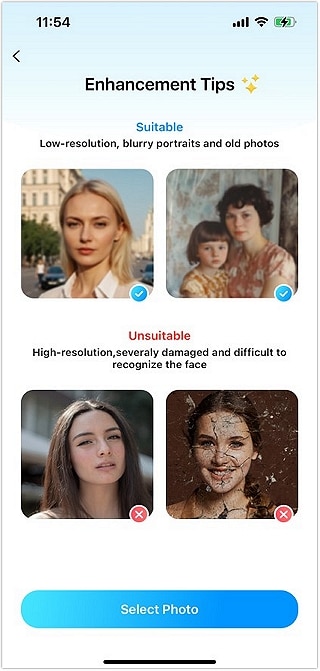
Step 3 Upload Your Photo and Choose Enhance

Choose a photo from your gallery to edit. Dr.Fone’s AI engine will analyze your image and make adjustments to color, sharpness, and noise reduction for optimal quality.
Step 4 Save the Enhanced Photo

Once the adjustments are applied, tap “Save” to store your improved image in your gallery. Now your photo is ready for social media, framing, or even printing.
Dr.Fone’s AI-powered features make photo enhancement quick, easy, and accessible for everyone, from beginners to experienced photographers.
Conclusion
Snapping stunning pictures with the phone does not have to be a complex affair. By applying a few straightforward techniques—like keeping your hands steady, taking advantage of natural light, and using the rule of thirds—you can take attractive pictures with ease. As for the editing part, Dr.Fone’s AI Photo Enhancer should be fine for making your shots more appealing rather quickly. It has something for everyone – great colors, sharpened details, noise blockage, and so many more qualities that create an appealing professional image.
If you’re ready to level up your mobile photography, try the Dr.Fone AI Photo Enhancer today and experience the difference for yourself!
FAQ
-
Q: Can I use Dr.Fone’s AI Photo Enhancer on both iOS and Android devices?
A: Yes, the Dr.Fone app is available on both iOS and Android platforms, and the enhancement process is identical for each.
-
Q: What specific improvements does Dr.Fone’s AI Photo Enhancer make?
A: Dr. Fone fixes images by automatically correcting the colors for a balanced effect, increasing the sharpness for better definition, and minimizing noise especially in dark illumination conditions.
-
Q: Do I need photography experience to use Dr.Fone’s AI Photo Enhancer?
A: No. Dr.Fone is designed with a simple interface, making it easy for beginners to enhance photos without any technical skills.
-
Q: Can Dr.Fone’s AI Enhancer improve low-light photos?
A: Yes. The noise reduction feature is especially helpful for low-light photos, as it reduces grain and smoothens the image.
-
Q: Is there a cost to use Dr.Fone’s AI Photo Enhancer?
A: Dr.Fone offers both free and premium features. While the free account of AI Photo Enhancer may come with some restrictions, purchasing the premium version will show more outstanding performance of course.


Nicola Massimo
staff Editor
Generally rated4.5(105participated)