Android Not Connecting to Wi-Fi? 12 Quick Ways to Fix!

Jun 11, 2026 • Filed to: Phone Repair Solutions • Proven solutions
 TL;DR:
To fix an Android device failing to connect to Wi-Fi, systematically isolate whether the problem stems from the router network, corrupted system settings, or disruptive third-party applications.
● Booting the Android device in Safe Mode determines if a recently installed third-party app is blocking the connection, while testing the Wi-Fi on a secondary device immediately confirms if the router itself is malfunctioning.
● Clearing the partition cache via Android System Recovery mode deletes corrupted temporary network data without affecting personal files, whereas executing a factory reset permanently erases all user data and necessitates a prior backup.
● Repairing underlying OS firmware bugs using Dr.Fone - System Repair (Android) specifically requires connecting the device to a Windows computer via USB and manually placing the phone into Download Mode before the automated repair can begin.
Ask AI for a summary
 ChatGPT
 Perplexity
 Gemini
 Claude
 Grok
Grok
Nowadays, it’s pretty much essential to have your Android device or smartphone connected to the internet. Whether you’re watching videos, looking something up, or using any kind of app, you need the internet for these applications to function correctly.
This is why it can so annoying when it gets to a point where the internet connection isn’t working. However, the problem of a web page not loading correctly is just the tip of the iceberg.
There are plenty of problems you could experience, whether it’s the Wi-Fi network keeps disconnecting on its own without any warning, perhaps a security issue where the passcode or IP address isn’t being registered properly, or even if the connection is just being super slow, even if there’s no reason too.
Luckily, despite there being so many problems out there, there are also many solutions. Today, we’re going to share with you the complete definitive guide to help you get your Android device connected and free from problems and issues.
- Part 1: Restart your Android device
- Part 2: Turn on Airplane mode and turn off
- Part 3. Check Wi-Fi Router settings
- Part 4. Boot your Android in safe mode
- Part 5. Check the Android Wi-Fi adapter
- Part 6. Check SSID and IP address on Android
- Part 7. Fix Android system issues in one click (recommended)

- Part 8. Check the Wi-Fi connectivity on another phone
- Part 9. Change the password of the Wi-Fi
- Part 10. Reset network settings on Android
- Part 11. Clear partition cache in recovery mode
- Part 12. Reset factory settings


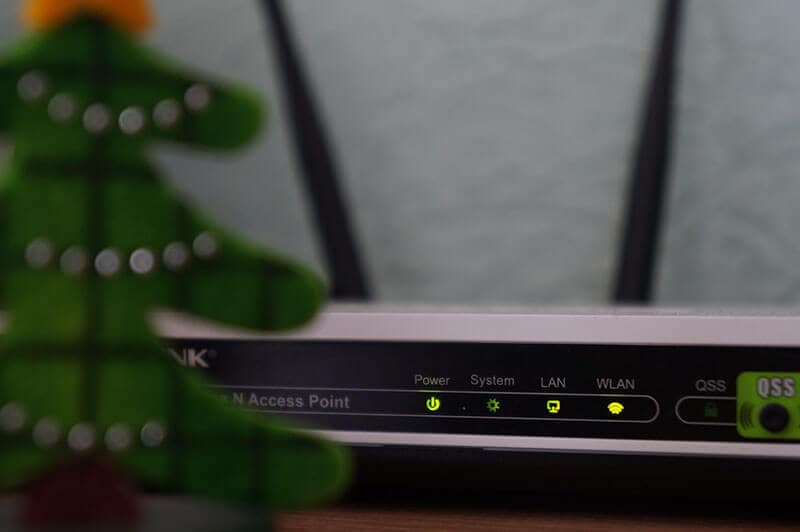
Part 3. Check Wi-Fi Router settings
The third step you’ll want to take is making sure the internet router in your house is working properly and is actually sending internet data to your Android device. Of course, if you have other internet-enabled devices connected to the same router and they’re working fine, you know this isn’t the problem.
However, if you’ve got a problem with Wi-Fi not working on your Android and other devices in your home or office, you know you’ve got a router problem. Here’s how to solve it.
- Go to your internet router and check the indicator lights
- While this depends on your device, a green or blue light will mean the connection is good, whereas a red light indicates a problem
- Press the Restart button on your router and wait ten minutes before reconnecting your device and connecting again
- Call up your internet provider to see if there’s an internet connection issue in your area
- Open your web browser and log into your router settings to ensure your Android device is connected to the Wi-Fi network and is allowed to send and receive data
Part 4. Boot your Android in safe mode
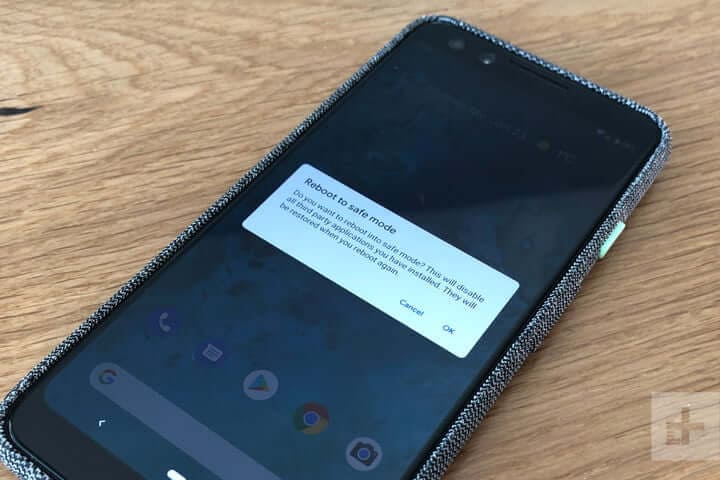
If you’re unable to connect to the internet, but other devices have no issues, you may find the issues is coming from within your Android device itself. Fortunately, there are ways you can see whether this is the problem.
The best way to do this is to boot your device in Safe Mode. The process for doing this will depend on the make and model of your Android device, but the basic process goes as follows;
- Turn off your Android device by holding down the Power button and tapping Power Off. Wait a few minutes to ensure the device is completely off
- Press and hold the Power button to turn your phone on, but the press and hold both the volume up and volume down buttons at the same time
- You will see the words ‘Safe Mode’ appear on your screen as the device loads
- Now you will be booted in Safe Mode. Try connecting to the internet again to see if it works
If your device connects to the internet while in Safe Mode, you’ll know you have a problem with an app or service that’s running on your device. If this is the case, you’ll need to go through your apps and delete them and then reinstall them one at a time until you find the app or service that is causing your internet problems.
Part 5. Check the Android Wi-Fi adapter
If you’re using a Wi-Fi adapter on your device to connect to the internet, you’ll need to make sure this is working. This could be an adapter on your Android device itself, especially if you’re using an older device, or if you’re using an adapter to boost the ranger of your router network.
You need to check both of these to make sure your connection is working properly.
- If using an Android Wi-Fi adapter, make sure all the device drivers are up to date, and if you’re using an app, make sure the app is updated, and all the settings allow an internet connection
- If you’re using a router adapter, make sure it’s set up properly, and your Android device is connected to the adapter using the correct passwords. Try connecting another device to see if the internet connection is working on there
- Whichever method you’re using, try disconnecting your Android device and forgetting the network, and then reconnecting and entering the right password to refresh the connection
Part 6. Check SSID and IP address on Android
To make a Wi-Fi connection work, your Android device needs to match two codes that connect and relate to your router to establish the connection and work correctly. These are known as the SSID and the IP address.
Every wireless device will have its own codes and making sure they’re matched to the network you’re connecting to is crucial to ensuring the internet is working on your Android device. Here’s how to check on your Android device to make sure everything is correct.
- Tap the Settings menu option, followed by Wi-Fi on your Android device
- Turn on your Wi-Fi network and connect it to your router
- Find the router name (SSID) and make sure it’s exactly the same as the SSID written on your router
- Once connected, tap the Wi-Fi network and you will see the IP address. Check both your phone and the router codes to make sure this number matches
When these numbers are matching, if your Android is still not connecting to wifi, you’ll know this wasn’t the problem.
Part 7. Fix Android system issues in one click
If none of the solutions above are working, this could indicate a real problem with the firmware and operating system of your Android device. Fortunately, a fast solution to get everything working again is to completely repair the software of your phone.
You can do this easily using powerful Android recovery software known as Dr.Fone - System Repair (Android). This is the leading repair tool on the market and is designed to fix and repair any firmware and software problems you may be having.
Dr.Fone - System Repair (Android)
A one-click tool to fix Wi-Fi not working on Android
- Can repair Android from any problem including the black screen of death
- A trusted software application used by 50+ million people around the world
- The most user-friendly mobile repair application available right now
- Supports over 1,000+ Android models and devices
- A world-class customer support team to help you whenever you need them


To help you have the best and the most accurate experience when using the Dr.Fone - System Repair (Android) application, here’s a complete step-by-step guide on how to use it.
Step One Make your way over to the Wondershare website and download the Dr.Fone - System Repair (Android) software. Install it onto your computer by following the on-screen instructions.
Once installed, connect your Android device to your computer using a USB cable, and open the software, click "System Repair".

Step Two Click the "Android" option in the menu and then click "Start" to begin the Repair process.

Step Three On the next screen, go through the options and use the drop-down menus to make sure the information is correct for your individual device. Accept the terms and conditions of the software, and then click the "Next" button.

Step Four Confirm you want the software to carry out the repair process by typing the ‘000000’ code into the pop-up box and pressing Confirm. Make sure you read everything displayed in this box beforehand to know what’s happening.

Step Five Now put your phone into Download Mode by following the on-screen instructions, so your device is ready for the repair process. The method for getting your phone into Download Mode will vary depending on your device, so make sure you’re following the right instructions.

Step Six Once the software has detected your device in Download Mode, it will automatically begin the repair process. You need to make sure your device stays connected throughout this time, and your computer stays on.

The whole process is automatic, so you won’t need to do anything until it’s finished. Once completed, you can disconnect your phone and start connecting it to the internet as normal!

Part 8. Check the Wi-Fi connectivity on another phone

When experiencing problems with your Wi-Fi network, it’s worth noting the problem might not be with your phone, but rather the Wi-Fi network itself. This is why it’s important to make sure you check the connection on another device.
Of course, if you’re already using another phone on your Wi-Fi network, you know this isn’t the case. However, if you’re not sure, here’s what you need to do;
- Get another Android or iOS phone or tablet
- Open the Settings menu and connect to the Wi-Fi network you’re having problems with
- Enter the password and connect to the network
- Open a web browser on the phone and try loading a web page
- If the page loads, you know the Wi-Fi network isn’t the problem
- If the page doesn’t load, you know you’ve got a problem with your Wi-Fi network
Part 9. Change the password of the Wi-Fi

Each Wi-Fi network router will give the opportunity to choose and change the password you have to let devices connect to your network. It’s important you try changing this because you never know if someone else has accessed your network and could be blocking your device. Here’s how it works;
- Log onto your computer and open your Wi-Fi settings
- Depending on the brand and method of your individual router, navigate to the Wi-Fi password settings menu
- Change the password to something complicated using all available digits and characters
- Save the password and restart the router to disconnect all devices
- Now connect your Android device to the router using the new password
Part 10. Reset network settings on Android
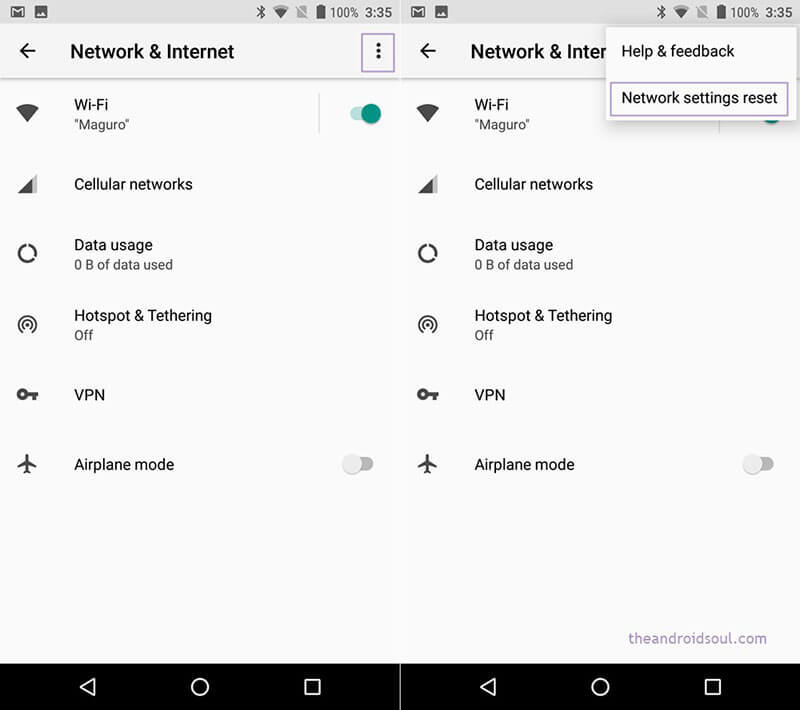
Just like the method above where you’ll be effectively resetting the network settings on your router, if this hasn’t worked, you’ll be able to reset the network settings on your Android device, hopefully removing the bugs and allowing you to connect.
Here’s how you can do this easily on your Android device;
- From the home screen of your Android device, open the Settings menu
- Tap the Backup & Reset option
- Tap the Reset Network Settings option
- Tap the Reset Network option
- If you need to, enter the PIN number or passcode for the Android device, and the device will confirm the reset has taken place
- Reconnect your device to your Wi-Fi network for the changes to take effect
Part 11. Clear partition cache in recovery mode
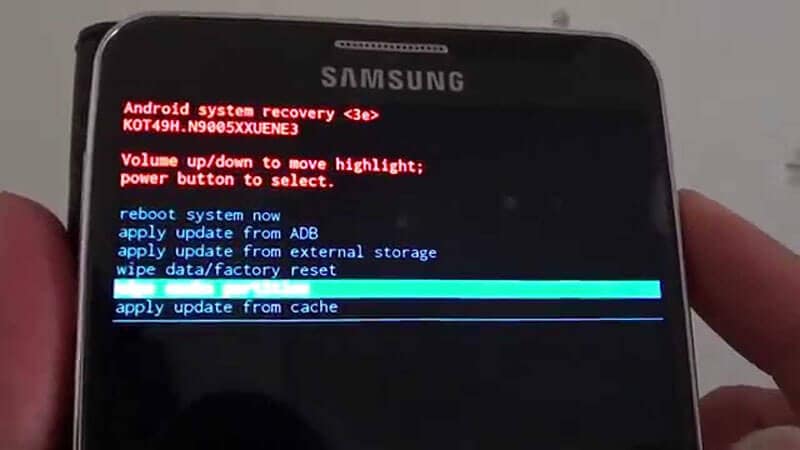
As you continue to use your Android device, the partition cache will fill up with data your device needs and doesn’t need. However, by clearing your device’s partition cache, you can make clear up some space which should help your device have enough memory to connect to the internet.
- Turn off your Android device
- Turn it on by holding down the power button, volume button, and home button
- When your phone vibrates, let go of the Power button, but continue to hold the volume button
- When a menu is displayed, use the volume buttons to navigate the menu
- Select the Android System Recovery option, followed by Wipe Cache Partition
- Restart your device and connect to the internet
Part 12. Reset factory settings

If worse comes to worst, another option you have is to factory reset your Android device. As we’ve spoken about above, while using your phone from the day you started using it, your device will fill up with files and data which can become messy and causes bugs.
However, by factory resetting your device, you can start again from the factory default from which you first received it, ultimately clearing the bugs. Make sure you back up your device before proceeding because it will erase your personal files.
- Open the Settings menu on your Android device
- Navigate to System > Advanced > Reset Options
- Tap the Reset phone option, and enter your PIN code if required
- Tap Erase Everything
- Wait for your phone to complete the process
- Restart your device and connect to the internet


Android Stopped
- Apps Keep Stopping
- 1. Make Instagram Work Properly
- 2. Fix App Has Stopped Error
- 3. Fixe Gmail Not Working on Android
- 4. Fixe Spotify Keeps Crashing
- 5. Fix Chrome Crashes on Android
- 6. Fix Snapchat has Stopped
- 7. Fix TouchWiz has stopped
- 8. Fix WhatsApp has stopped
- 9. Solve YouTube App Crashing
- 10. Fix Apps Keep Crashing on Android
- 11.Fix Android App Not Installed
- 12.Fix WhatsApp issues on Android
- 13.Fix App Won't Open on Android
- Google Services Crash
- 1. Uninstall Google Play Service
- 2. Fix Google Maps Not Working
- 3. Fix Google Services Has Stopped
- 4. Fix Google Services Won't Update
- 5. Fix Google Play Store Not Working
- 6. Fix Play Store Stuck on Downloading
- Android Services Fail
- 1. Fix Phone Keep Disconnecting
- 2. Fix Android SystemUI Has Stopped
- 3. Fix Process Acore Has Stopped
- 4. Fix Process Media Has Stopped
- 5. the .com.android.phone Has Stopped
- 6. Fix Android Not Receiving Texts
- 7. Fix Bluetooth Not Working
- 8. Fix Home Button Not Working
- 9. Fix SIM not provisioned MM#2 Error
- 10.Fix Phone Has Stopped on Samsung
- 11.Fix Settings Has Stopped on Android
- 12.Fix Video Not Playing on Android
- 13.Fix Wi-Fi Not Working on Android
- 14.Fix Contacts Has Stopped Error
- 15.Fix Android System Crash Issue
- 16.Fix Process System Isn't Responding
- 17.Fix GPS Signal Not Found
- ● Manage/transfer/recover data
- ● Unlock screen/activate/FRP lock
- ● Fix most iOS and Android issues
- Free Download Free Download Free Download


Alice MJ
staff Editor
Generally rated4.5(105participated)