[Learning Guide] Wipe Out Cache on Your Samsung Smartphone

Jul 12, 2024 • Filed to: Data Wipe Solutions • Proven solutions
Samsung is known for providing state-of-the-art Android smartphones. Nonetheless, even the most sophisticated devices encounter performance issues. One common resolving step to tackle these issues is clearing the cache. The cache on a Samsung smartphone collects temporary files, cookies, and data from apps and the OS. It enhances user experience by speeding up processes and reducing data usage.
An overloaded or corrupted cache can sometimes have the opposite effect. This comprehensive guide aims to explore the process of wiping cache Samsung devices. Understanding how to manage the cache efficiently can significantly improve your device's performance.
- Part 1: What Is the Purpose of Having Cache Partition in Samsung?
- Part 2: The Difference Between App Cache and Cache Partition in Androids
- Part 3: A Simple Guide To Wipe Cache Partition From Your Samsung
- Part 4: Wondershare Dr.Fone – Alternative To Delete Cache and Erase Data

- Part 5: Bonus: The Simple Way of Deleting Cache Memory in Samsung
Part 1: What Is the Purpose of Having Cache Partition in Samsung?
Want to know how to delete the cache on Samsung? The cache partition in Samsung smartphones serves several crucial purposes. These contribute to the device's performance and efficiency. Here's a detailed overview, divided into points, to help users understand its significance:
1. Temporary Data Storage
The cache partition acts as temporary storage for frequently accessed data and files. This storage speeds up processes by providing quick access to info. When opening an app that has been accessed, the cache partition stores that app's data. It does that without repeatedly fetching it from the device's primary storage.
2. Enhanced Performance
The cache partition optimizes the device's performance by storing commonly used data. It allows for quicker retrieval of information. That leads to smoother app launches, quicker loading times, and overall snappier performance.
3. Reduced Data Usage
Caching data helps reduce the amount of data required to be fetched from servers. This reduction in data retrieval translates to minimized data usage. That benefits users with limited data plans and speeding up data-heavy operations. Streaming apps like Netflix or YouTube use the cache partition to store parts of videos.
4. System Stability
Cache partitions contribute to system stability by storing critical system files and data. This helps in ensuring that apps and the operating system run efficiently. System updates often utilize the cache partition to store temporary installation files. It ensures a smoother and error-free update process.
5. App Functionality
Individual apps utilize the cache partition to store temporary data, improving functionality. This can include storing login information, preferences, or recently accessed content. Social media apps like Facebook or Instagram use the cache partition. They store images and profiles for quicker access during later visits.
Part 2: The Difference Between App Cache and Cache Partition in Androids
Besides the cache partition, there's another storage section called the "App Cache." It adds to the confusion due to their similar-sounding names. Android smartphones feature various storage sections. Each has its significance in managing data and enhancing device performance.
The two primary sections we'll explore are the "App Cache" and the "Cache Partition." Let's delve into these differences before going for how to clear the app's cache on Samsung.
Differentiating App Cache and Cache Partition
| Differentiation Factor | App Cache | Cache Partition |
| Scope | Individual applications | Manage app-specific storage. The entire OS and apps use a dedicated system storage area. |
| Contents | Stores specific data related to an app's functionality. The examples include images, preferences, or temporary files. | Contains system data, temporary system files, and cached data from apps and the OS itself. |
| Control and Management | Managed and controlled by each app separately. Users can often clear app caches individually within app settings. | This is managed at a system level and requires specific procedures or tools to clear it. It's not typically user-accessible without certain technical knowledge. |
The primary difference between the two lies in their scope and management. App Cache refers to the temporary storage within individual apps. Meanwhile, the Cache Partition represents a dedicated system storage area utilized by the entire OS and all installed apps.
Part 3: A Simple Guide To Wipe Cache Partition From Your Samsung
Deleting cache partitions on Samsung smartphones can help resolve various performance issues. Here's a step-by-step guide focusing on wiping the cache partition on Samsung devices:
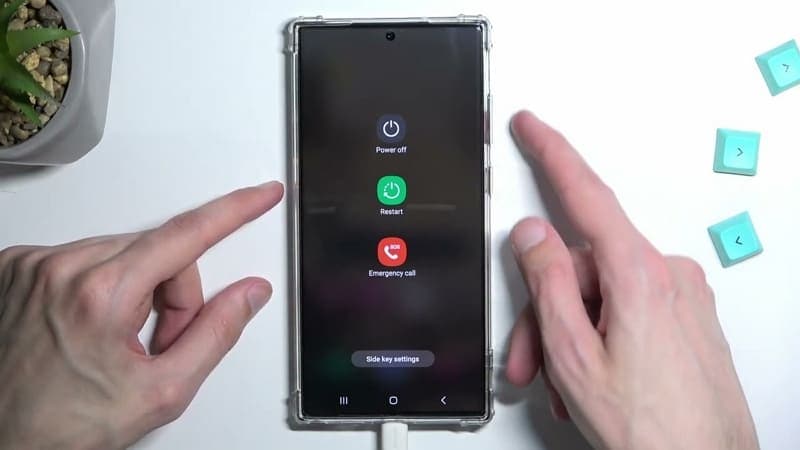
- Step 1. You will need to begin by putting your Samsung device into Recovery Mode. To do that, turn off your device and press and hold the "Volume Up" and "Power" keys simultaneously.
- Step 2. Release the buttons once your device transitions into Recovery Mode. Use the volume keys to navigate to the "Wipe cache partition" and select it with the "Power" key.
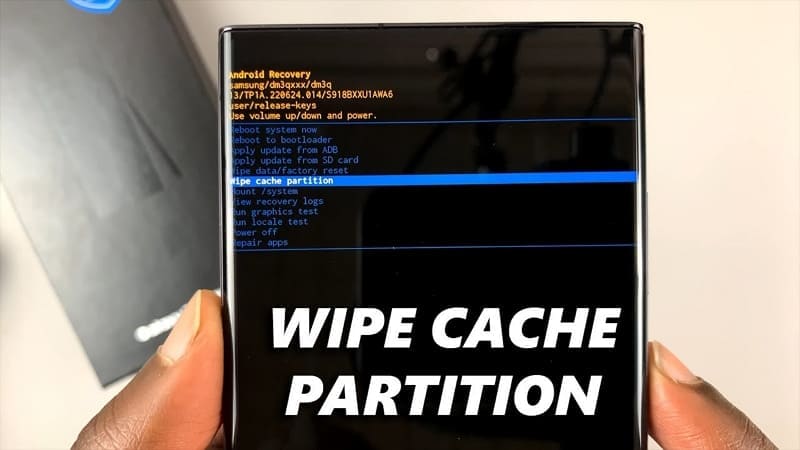
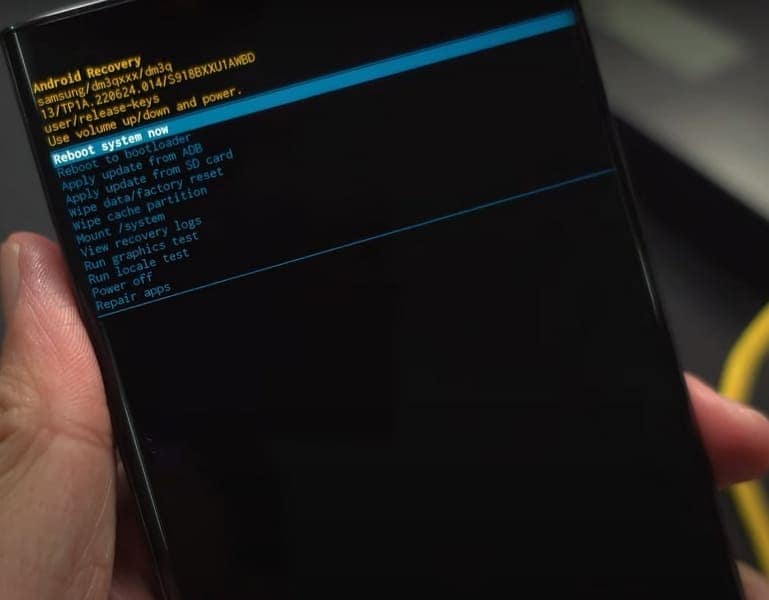
- Step 3. On the following screen, select "Yes" to confirm and commence the cache-wiping process. Once complete, use "Reboot System Now" to exit Recovery Mode.
Part 4: Wondershare Dr.Fone - Alternative To Delete Cache and Erase Data
Some users may seek a comprehensive method to clear their phones entirely. Deleting each element can be a big hassle. In such cases, Wondershare Dr.Fone offers an effective solution by erasing the cache and wiping out all data from the device. It proves beneficial, especially considering that data remnants often persist. This is even the case after performing a factory reset on Android devices.
Wondershare Dr.Fone – Data Eraser is designed to ensure the permanent erasure of all data. With this tool, users can completely wipe their Android phones. Notably, the software goes beyond mere deletion. Dr.Fone offers a method that maximizes the phone's resale value. It does that by providing a detailed data erasure report. Another helpful feature of Dr.Fone is its compatibility with all Android devices.
Key Features of Wondershare Dr.Fone
- Once data is erased, it is permanently removed and cannot be retrieved by anyone.
- It supports previewing each data before erasing.
- This data eraser software liberates space and enhances the device's speed.
Steps To Erase Data Permanently on Your Device Using Dr.Fone
Here is how you can permanently remove your sensitive data with the help of Wondershare Dr.Fone. Look through the steps to learn more about how to delete cache on Samsung with ease:
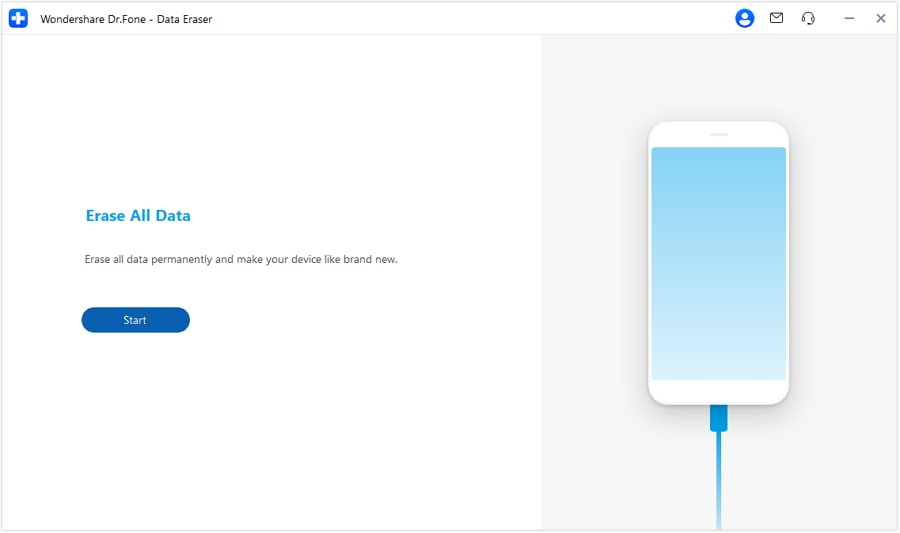
- Step 1: Choose Data Eraser in Wondershare Dr.Fone
Once you have launched Wondershare Dr.Fone, click "Toolbox" from the left panel. It will take you to the main interface, where you need to choose "Data Eraser." Now connect your Samsung device to the computer and click "Start."
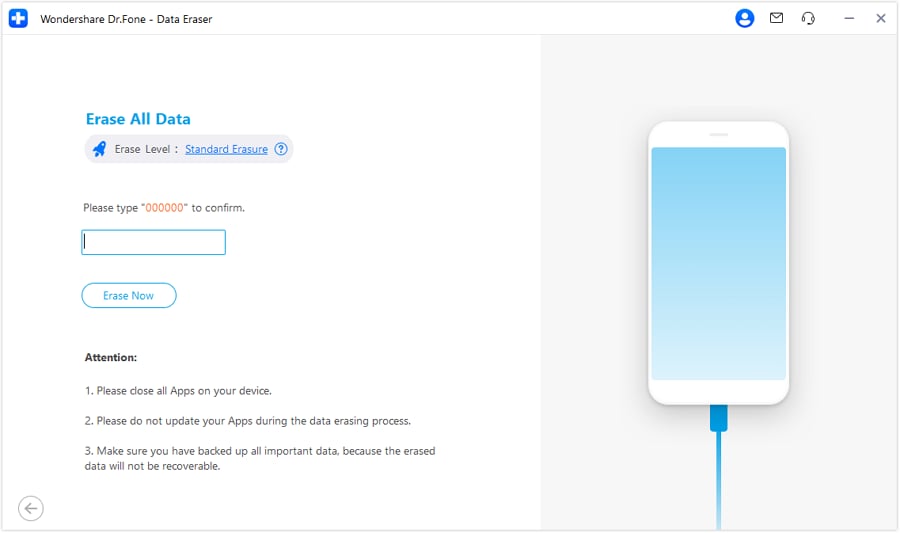
- Step 2: Complete the Data Eraser Process
You need to confirm the action on the following screen by typing in the "000000." It is to give your consent to the data-erasing process. After entering the code, click "Erase Now" to kickstart the data-wiping process.
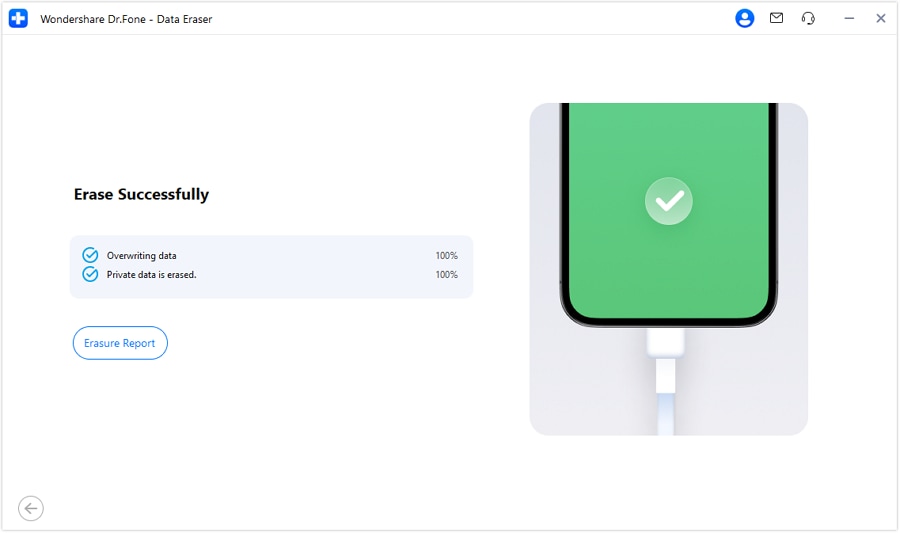
- Step 3: Get the Erasure Report
Once you erase the data from your Android smartphone, a message will be prompted on the screen. Select the "Erasure Report" to view all types of data that have been removed.
Part 5: Bonus: The Simple Way of Deleting Cache Memory in Samsung
Differentiating between the cache partition and the app cache remains crucial. The system-level storage area contains temporary system files and cached data. On the other hand, an app cache stores data related to an app's functionality. Following this, we will now learn how to clear the app cache of Samsung of a particular application:
Steps To Delete App Cache on Samsung Smartphones
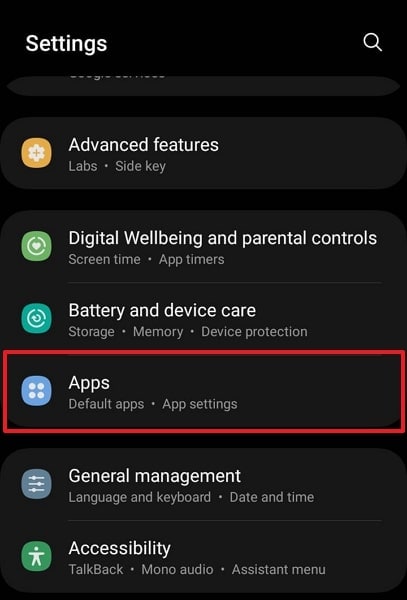
- Step 1. Unlock your Samsung smartphone and access the "Settings" app from the home screen. Now scroll down to find and tap the "Apps" option. On the following screen, choose the targeted app.
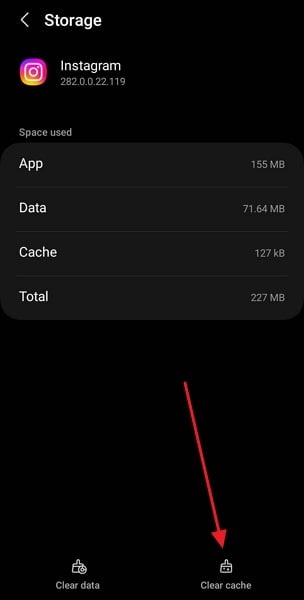
- Step 2. In the app information window, look for and press “Storage.” Afterward, tap “Clear Cache” from the bottom right corner to wipe the app’s cache.
More Topic About Samsung:
List of Samsung Secret Codes for 9 Common Problems
Conclusion
In conclusion, this comprehensive guide explored managing cache on Samsung smartphones. It went through the distinctions between the cache partition and the app cache. Clearing the cache partition through Recovery Mode offers a systemic approach. You can delete Samsung's cache to resolve broader system-related issues. On the other hand, deleting app caches targets specific app performance.
Regarding data erasure and wiping the cache partition, Wondershare Dr.Fone is an exceptional solution. It offers a comprehensive suite of features to optimize device performance efficiently. Its user-friendly interface and powerful functionalities make it a top choice.


Android Erase
- Android Diagnostics
- 1. Fix Android Microphone Issues
- 2. Test NFC on Android Device
- 3. Check Android Device in Minutes
- 4. Apps For Sensor Check Android
- 5. Apps for Testing Device's Hardware
- 6. Tools for Conducting Screen Tests
- 7. Ways to Check Phone's Vibrations
- 8. Check Mobile Signal Strength
- 9.Realme Touch Screen Test Codes
- 10.Android Codes To Test Touch Screen
- 11.Phone Processor Speed Tests
- Erase Android
- 1. Delete Browsing History on Android
- 2. Clear App Data and Cache on Android
- 3. Delete Photos from Android
- 4. Wipe Android When It's Lost
- 5. Wipe Cache Partition on Android
- 6. Delete Text Messages on Android
- 7. Delete WhatsApp Backup
- 8. Wipe Data or Factory Reset
- 9. Erase Android Data Before Selling
- 10. Delete Contacts on Android
- 11.Delete Multiple Contacts on Android
- 12.Wipe Android Phone before Selling
- 13.Delete Photos on Android
- 14.Remove Pre-installed Apps
- 15.Delete Apps on Android
- 16. Access Trash on Android
- Android Reset
- 1. Restart Phone without Power Button
- 2. Reset Phone without Volume Buttons
- 3. Factory Reset Android Phone
- 4. Hard Reset Android Phone Using PC
- 5. Hard Reset Locked Infinix Phone
- 6. Factory Reset Lenovo Phone
- 7. Factory Reset Android Tablets
- 8. Factory Reset Lenovo Tablets
- 9. Format Your Android Phone
- 10. Hard Reset Android Phones
- 11.Reset Android Without Home Button
- 12.Restart Your Android Phone
- 13.Soft Reset Android Devices
- 14.Reset Android without Losing Data
- 15.Ways to Hard Reset Tecno Spark
- 16.Updated Android Factory Reset Code
- Data Erase Apps
- 1. Speed Booster for Android
- 2. Android Cleaners to Boost Device
- 3. Data Erase Apps to Protect Privacy
- 4. Data Eraser Apps to Wipe Android
- 5. 15 Best Cleaning Apps for Android
- Sell Old Android
Daisy Raines
staff Editor