How to Transfer Voice Memos from iPhone to Computer Promptly
Oct 24, 2025 • Filed to: Device Data Management • Proven solutions
Dr.Fone Basic:
Better Control for Your Phone
Manage, transfer, back up, restore, and mirror your device
Voice memos on your iPhone can hold important ideas, personal notes, or essential recordings. But what if you need to save them on your computer for backup or sharing? Many users ask, how to transfer voice memos from iPhone to computer without losing quality or spending too much time.
This guide provides simple solutions to help you move voice memos from iPhone to PC easily. From iCloud to iTunes, we’ll explore the best methods step by step.
As a bonus, we’ll introduce Wondershare Dr.Fone, a professional tool that makes the process seamless. This article will show you all the options you need, whether you want a fast USB transfer or a wireless one. Let’s dive in and get your voice memos safely transferred.
Method 1: Sync Voice Memos to PC Using iCloud
iCloud Drive enables file sharing across devices via Wi-Fi. However, you’ll need to add each voice memo manually to iCloud Drive, making it more suitable for transferring a few recordings.
Steps to transfer a recording from iPhone to computer via iCloud:
- Open Settings on your iPhone. Navigate to your name and select iCloud. Enable the Voice Memos option.
- On your PC, use a web browser to sign in with the same Apple ID used on your iPhone.
- Select Voice Memos to view your synced audio files.
- Download your voice memos to your PC.

Method 2: Share Voice Memos via AirDrop
AirDrop is a quick way to move voice memos from iPhone to Mac. This feature transfers files wirelessly between Apple devices.
How to import voice memos from iPhone to Mac using AirDrop:
Step 1. Open the Voice Memos app on your iPhone.
Step 2. Select the desired recording, tap the three dots, and choose Share.
Step 3. On your Mac, enable AirDrop by opening Finder, selecting AirDrop in the sidebar, and turning on Bluetooth.

Step 4. Tap your Mac’s name in the AirDrop menu on your iPhone. The selected voice memo will transfer to your Mac.

Step 5. Check the Downloads folder on your Mac to access the transferred memo.
Method 3: Use iTunes to Sync Voice Memos
If you’re looking to download voice recordings from iPhone to computer in bulk, iTunes is a reliable option. Ensure you have the latest version of iTunes installed before proceeding.
Steps to move voice memos from iPhone to PC or Mac using iTunes:
Step 1. Connect your iPhone to your computer using a USB cable.
Step 2. Launch iTunes on your PC or Mac.
Step 3. Click the device icon at the top-left corner of iTunes.
Step 4. Select Music from the sidebar and check the Sync Voice Memos option.
Step 5. Click Include Voice Memos.
Step 6. Hit Apply to start syncing your recordings.
Step 7. Locate the synced memos in the Voice Memos folder on your computer.

Method 4: Email Voice Memos for Easy Transfer
Email is a straightforward way to copy a voice memo from an iPhone to a PC when transferring just a few recordings.
How to pull voice memos off iPhone via email:
Step 1. Open the Voice Memos app on your iPhone.
Step 2. Select a memo, tap the three dots, and choose the Share option.

Step 3. Select Mail from the sharing menu.

Step 4. Enter your email address in the To field and tap Send.
Step 5. Access your email on your computer to download the attached voice memo.
Method 5: Export Voice Memos Using the Share Feature
The Voice Memos app provides a built-in Share option that allows you to send files to platforms like Google Drive, OneNote, or Gmail. You can also transfer files to AirDrop-supported devices.
Steps to export voice memos from iPhone:
Step 1. Open the Voice Memos app and select the recording you want to export.
Step 2. Tap the More icon and choose Share.
Step 3. Choose a service like Email, Google Drive, or AirDrop to send your memo.
Step 4. Access the voice memo on the target device by signing into your selected service or accepting the AirDrop transfer.

Method 6: Transfer Voice Memo With Dr.Fone (Recommended)
An expert tool is what you need if you want to export voice memos from iphone in the best way possible. The best tool to transfer voice memos from iphone to computer is Wondershare Dr.Fone. It's a full set of tools that has all the features you might need to use an iPhone. This tool has several different transfer ways so that you can pick the best one for your needs.
Besides letting you transfer voice recordings from iphone to computer, Dr.Fone has a lot of other features that make life easier for iPhone users. It manages both your phone and your files. With this great tool, you can even move friends, podcasts, apps, and books.
Features:
- This program lets you convert iPhone images from the unpopular HEIC format to the more widely used JPG format.
- Through the use of Fone, you can move media between your iTunes collection and other devices, and vice versa.
- This tool provides a comprehensive report on your iPhone's health, including details on the battery life, iOS version, IMEI, verification report, and more.
- Additionally, it comes with a ringtone creator that lets you easily make ringtones from songs on your computer or iPhone.

Dr.Fone - Phone Manager (iOS)
Move Voice Memos from iPhone to Computer Effortlessly!
- Transfer, manage, export/import your music, photos, videos, contacts, SMS, Apps, etc.
- Back up your music, photos, videos, contacts, SMS, Apps, etc., to the computer and restore them easily.
- Transfer music, photos, videos, contacts, messages, etc., from one smartphone to another.
- Transfer media files between iOS devices and iTunes.
- Fully compatible with the newest iOS system.
Steps To Transfer Voice Memos With Dr.Fone
Step 1 Connect Your iPhone to Begin the Process
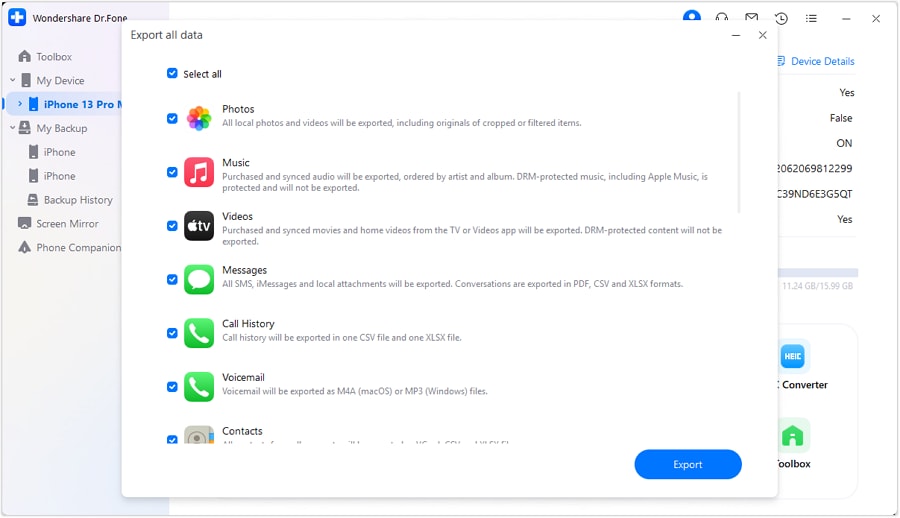
Start by linking your iPhone to the computer using a USB cable. Once the device is recognized, its details will appear on the main screen. Choose the Export All Data option from the Quick Start section to proceed.

Step 2 Choose the Data Types for Export
A new window will appear, prompting you to select the file types for export. Mark the data categories you want to transfer, then click Export at the bottom of the screen. Choose a destination folder to save your exported data.

Step 3 Create a Password for the Backup File
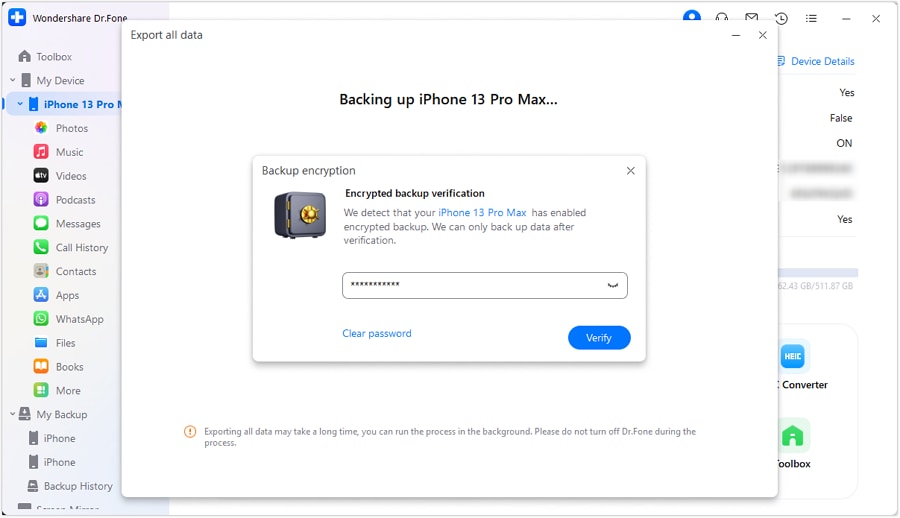
Next, you will need to set an encryption password for the backup file that will be stored on your computer. Input and confirm the password, then select Done to proceed with the process.

Step 4 Monitor the Export Progress
The software will now begin transferring the data from your iPhone to your computer. The progress of this operation will be displayed on the screen, allowing you to track its status.

Step 5 Access the Successfully Exported Data
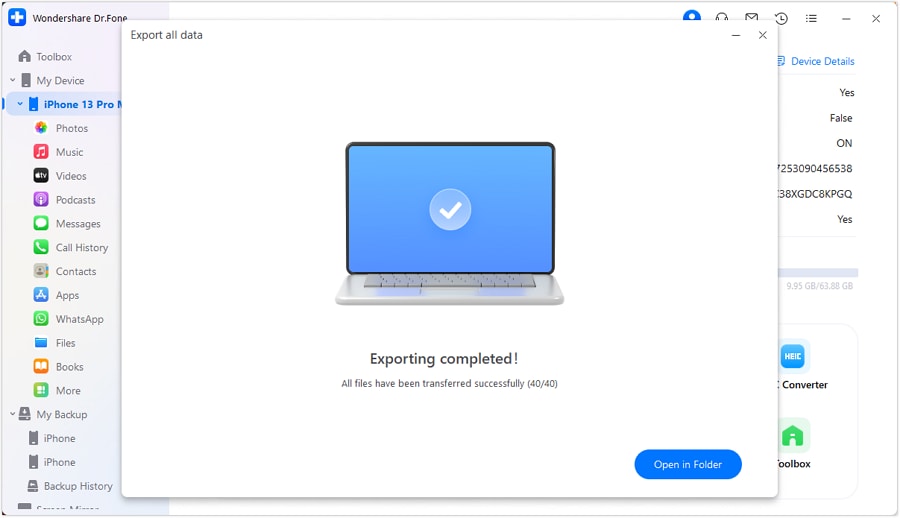
Once the transfer is complete, a notification will appear on your computer. Select Open to access the exported files in the folder you specified earlier.

Conclusion:
One of the main reasons you will want to transfer voice memos from your iPhone to your computer is for safekeeping and making important recordings more accessible. The following article has guided you through different techniques, including using iCloud, iTunes, and AirDrop to email or the built-in sharing features. It also depends on the number of files you are transferring from a single file to multiple recordings.
With Wondershare Dr.Fone, which has advanced tools to transfer and manage your files without any hurdles, the progress is always in smooth waters. This multi-all-in-one solution differs from others as it stands out to be the ultimate iPhone manager. Choose any of the methods that best suit you and ensure your voice memos are always backed up safely.
FAQs
Dr.Fone Basic:
Better Control for Your Phone
Manage, transfer, back up, restore, and mirror your device
iPhone Transfer
- Data Transfer
- 1. Video from iPhone to External Drive
- 2. Transfer MP4 to iPhone
- 3. Put Wallpapers on iPhone
- 4. Move Photos to SD Card
- 5. Best Apps to Transfer from iPhone to Android
- iPhone to PC
- 1. Transfer Pictures From iPhone to PC
- 2. Transfer From iPhone to Computer
- 3. Transfer Album from iPhone to PC
- 4. Transfer Data from iPhone to PC
- 5. Copy Voice Memo from iPhone to PC
- 6. iPhone Camera Roll to Computer
- 7. Podcasts from iPhone to Computer
- 8. Transfer Notes from iPhone
- 9. Techniques Used in Mobile Phone Forensics
- 10. Facing Please Unlock iPhone Photos Error
- iPhone to Mac
- 1. Voice memos from iPhone to Mac
- 2. Synce Notes from iPhone to Mac
- 3. Export iBooks to PC and Mac
- 4. Transfer Photos from iPhone to Mac
- 5. Transfer Music from iPhone to Mac
- Computer to iPhone
- 1. AirDrop From Mac to iPhone
- 2. Use AirDrop from Mac to iPhone
- 3. Transfer Data from PC to iPhone
- 4. Transfer Videos from PC to iPhone
- 5. Unsync iPhone from Computer
- 6. Sync iPhone with Multiple Computers
- Transfer to iPhone
- 1. Switch Cards Between iPhones
- 2. Facetime for Android to iPhone
- 3. Transfer Data from Motorola to iPhone
- 4. Samsung to iPhone Transfer
- 5. Transfer iPhone Apps to iPhone
- 6. Clone iPhone/iPad to iPhone
- Transfer from iPhone
- 1. Transfer Video from iPhone to Laptop
- 2. Transfer Data from iPhone to Laptop
- 3. Transfer Notes from iPhone to iPad
- 4. Transfer Data from iPhone to Android
- 5. Switch from iPhone to Google Pixel
- 6. Switch from iPhone to Samsung S10
- 7. Switch from iPhone to Samsung
- 8. Transfer from iPhone to Samsung S20
- iPhone Transfer Tips
- 1. Ford Sync iPhone
- 2. Sync iCal with iPhone
- 3. iPhone Calendar Not Syncing
- 4. iPhone Transfer Software
- WhatsApp Transfer
- 1. WhatsApp from iPhone to iPhone
- 2. WhatsApp from iPhone to Android
- 3. WhatsApp from iPhone to Samsung S10
- 4. WhatsApp Messages to iPhone
- 5. WhatsApp from iPhone to Samsung S9
- iTunes Transfer
- ● Manage/transfer/recover data
- ● Unlock screen/activate/FRP lock
- ● Fix most iOS and Android issues
- Transfer Now Transfer Now Transfer Now


James Davis
staff Editor