An Easy Guide on How to Transfer Video From PC to iPad with and without iTunes[2026]
Dec 31, 2025 • Filed to: Device Data Management • Proven solutions
Dr.Fone Basic:
Better Control for Your Phone
Manage, transfer, back up, restore, and mirror your device
Do you want to enjoy movies and videos on your iPad? Are you looking for a way to transfer videos from PC to iPad? If yes, then we have got you covered!
No doubt, the iPad is a great device for entertainment. You can play games, listen to music, watch movies, and more. However, many users face challenges when it comes to transferring files from PC to iPad.
But don't worry! In this article, we will explore how to transfer videos from PC to iPad easily. We will walk through various methods with their step-by-step guides. Let's get started!
- Part 1. How to Transfer a Video From Computer to iPad With iTunes
- Part 2. How to Transfer Videos From PC to iPad Without iTunes

- Method 1. Transfer Video From PC to iPad Using Google Drive
- Method 2. Transfer Video From Computer to iPad Using iCloud Drive
- Method 3. Transfer Video From Computer to iPad With OneDrive
- Method 4. Transfer Video From PC to iPad Via Email
- Part 3. Transfer Videos From PC to iPad With Dr.Fone in One Click
Part 1. How to Transfer a Video From Computer to iPad With iTunes
iTunes is the standard method for users to transfer files between PC and iOS devices. It is helpful in different ways. You can sync and watch the videos that are in your iTunes library directly from your iPad. Otherwise, you can transfer videos from PC to iPad without syncing.
Here is how to transfer a video from PC to iPad with iTunes:
Step 1: Connect your iPad to your PC using a USB cable. Then, open the iTunes app on your PC. Unlock your iPad and click “Trust.”

Step 2: Click the device icon on the top left corner and select "Movies" in the settings menu. Enable the "Sync Movies" option.

Step 3: Now, select the movies or videos that you want to transfer and then click "Apply" Your movies/videos will be transferred to your iPad.
Part 2. How to Transfer Videos From PC to iPad Without iTunes
In this section, we will explore various methods to transfer video to iPad without iTunes. You can follow the step-by-step guide of each method and get it done.
Method 1. Transfer Video From PC to iPad Using Google Drive
Google Drive is one of the most popular cloud storage services available. It also allows you to transfer or sync media, including photos, videos, music, or other files, from PC to iPad. You can use up to 15 GB of space for free.

You can follow the steps given below to transfer videos from PC to iPad using Google Drive:
Step 1: Go to the official site of Google Drive from your PC’s browser.
Step 2: Click “New” on the top left side of the Google Drive homepage.

Step 3: Click “File Upload” and select the files or videos that you want to transfer. You can also select the “Folder Upload” to upload the whole folder.

Step 4: Once the uploading is completed, you can see the files in your Google Drive.
Step 5: Now, open the Google Drive app on your iPad and log in with the same credentials. If you don’t have its app, you can download it from the App Store.
After logging in, you can see the files that you uploaded from your computer. This method is simple and easy to transfer movie from PC to iPad. However, the storage limit can be an issue sometimes. If your Google Drive is full, you can try the next method.
Method 2. Transfer Video From Computer to iPad Using iCloud Drive
iCloud Drive is another Cloud storage service for iOS devices only. You can sync photos, videos, music, and other files across iOS devices using iCloud. However, this method might take longer than other methods. Plus, you need an internet connection while transferring files. You can still have a look at how to transfer videos from PC to iPad with iCloud.

You can follow the instructions given below to transfer files using iCloud:
Step 1: Open "Settings" on your iPad and click [Your Name].
Step 2: Now click "iCloud" > "Photos" and turn on the "iCloud Photos" toggle.

Step 3: If you have Windows OS, you need to download iCloud and sign in with the same Apple ID. Otherwise, you can visit www.icloud.com and sign in.

Step 4: After signing in, you will see the below interface. Scroll down and click "Photos" on the iCloud homepage.

Step 5: Now, click on the "Upload" icon and select the videos or any other file that you want to transfer.

Once the uploading is completed, you can see the videos on your iPad. This method is also convenient to transfer video from PC to iPad. However, most of the time, users don't know their iCloud password. In that case, you can try the next method.
Method 3. Transfer Video From Computer to iPad With OneDrive
Like other Cloud services, OneDrive is also a Cloud-based service. It is designed and developed for Microsoft users. It can allow you to transfer movies from computer to iPad. You can upload all kinds of files, including photos, videos, documents, and more. However, it doesn't support the CON, COMO, AUX, LPT9, and LPT0 files.
Here is how you can transfer files from computer to iPad with OneDrive:
Step 1: Download the OneDrive app on your desktop and sign in with your Microsoft account.

Note: You can also use OneDrive online. But it is suitable for small files. Whereas the app supports an uploading limit of up to 35GB.
Step 2: Move the videos that you wish to transfer to the OneDrive folder.
Step 3: Install and open the OneDrive app on your iPad and you will see the videos.
Method 4. Transfer Video From PC to iPad Via Email
Email is also a simple way to transfer movies from computer to iPad. You can also send other types of files via email. However, the only drawback is that it doesn't support large files. For instance, if your video is of high quality it can take a long to send and download it. But if you want to send small video clips, you can consider email.
You can follow the instructions given below to transfer videos from PC to iPad via email:
Step 1: Log in to your email account. You can use Gmail for this purpose.
Step 2: Click “Compose” on the left side of the Gmail homepage.

Step 3: Now, click the "Attachment" icon from the below menu bar and select the video you want to send. You can send it to your iCloud mail address or any other Gmail logged on your iPad.

Step 4: Now, you can open that email on your iPad and download the video you sent.
So, these are the methods to transfer videos from computer to iPad. But they have daunting steps and sometimes don’t work. But don’t worry! We have a solution for you. In the next section, let us introduce you to something amazing. It will transfer all your files in one click.
Part 3. Transfer Videos From PC to iPad With Dr.Fone in One Click
Wondershare Dr.Fone is the most reliable and hassle-free way to transfer videos from PC to iPad. It supports data transfer between iOS, Android, Windows, and Mac OS. No matter if you are a tech expert or not, you can easily use Dr.Fone and transfer data in just a few clicks.
You must be amazed by the amazing features that Wondershare Dr.Fone has to offer. Well, let's move forward and see how easy it is to transfer videos from computer to iPad with this tool.

Dr.Fone - Phone Manager (iOS)
Transfer Photos from Computer to iPod/iPhone/iPad without iTunes
- Transfer, manage, export/import your music, photos, videos, contacts, SMS, Apps, etc.
- Back up your music, photos, videos, contacts, SMS, Apps, etc., to the computer and restore them easily.
- Transfer music, photos, videos, contacts, messages, etc., from one smartphone to another.
- Transfer media files between iOS devices and iTunes.
- Fully compatible with the newest iOS system.
Before getting to the steps, make sure to download and install the Dr.Fone app on your PC. Then, follow the instructions given below:
Step 1: Launch the Dr.Fone app and connect your iOS device to the computer via a USB cable. After it is recognized, proceed and select the "Quick Transfer" option at the bottom of the home screen.

Step 2: You will see the interface as shown below. Now click the "Select Files" button to transfer the files or videos to your iOS device. You can also drag and drop the files.

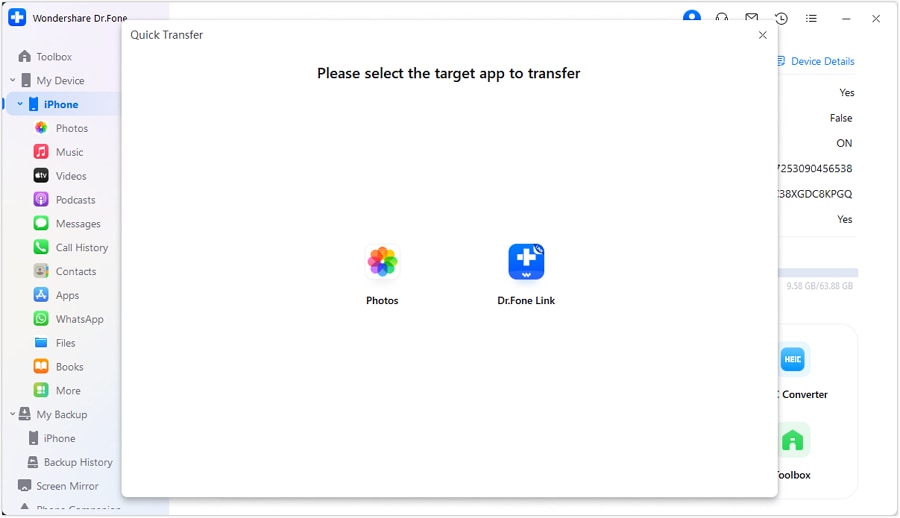
Step 3: Dr.Fone might show the option of selecting a target app where you want to store the videos or other data. Select one and proceed.

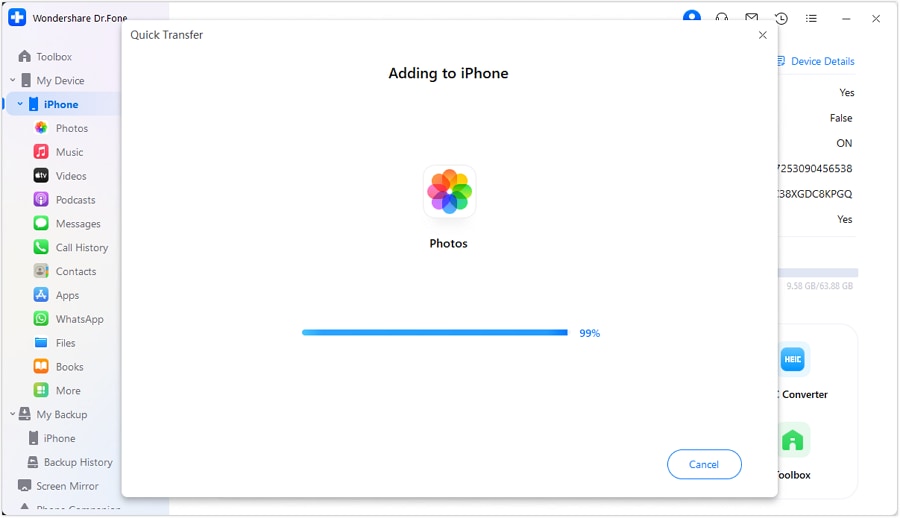
Step 4: Now you can see the completion of the process with a progress bar. Click the "Cancel" button to stop the process if needed.

Step 5: Once done, you will see the below interface with a small indication icon. You can click it and check the location of the transferred data.

Did you see it? How helpful and easy Dr.Fone is in managing your data. With iTunes, there is a fear of losing the existing data when transferring new. But Dr.Fone won't delete or replace your existing data and let you transfer whatever you want.
FAQs
Conclusion
That's a wrap for how to transfer videos from PC to iPad. We have discussed various methods to transfer video files. Each method has its limitations. Some offer limited storage spaces, while some don't support transferring large files.
However, one method that wins all the crowns is using Dr.Fone. It is not only an easy way but also ensures a smooth transfer of large files as well. So, download it today and start managing your phone for better performance.
Dr.Fone Basic:
Better Control for Your Phone
Manage, transfer, back up, restore, and mirror your device
iPad Tips & Tricks
- Make Use of iPad
- iPad Tips and Tricks
- Smart Keyboard Folio VS. Magic Keyboard
- iPad Photo Transfer
- Transfer Music from iPad to iTunes
- Transfer Purchased Items from iPad to iTunes
- Delete iPad Duplicate Photos
- Download Music on iPad
- Use iPad as External Drive
- Transfer Data to iPad
- Transfer Photos from Computer to iPad
- Transfer MP4 to iPad
- Transfer Files from PC to iPad
- Transfer Photos from Mac to iPad
- Transfer Apps from iPad to iPad/iPhone
- Transfer Videos to iPad without iTunes
- Transfer Notes from iPhone to iPad
- Transfer Photos from Android to iPad
- Transfer iPad Data to PC/Mac
- Transfer Photos from iPad to Mac
- Transfer Photos from iPad to PC
- Transfer Books from iPad to Computer
- Transfer Apps from iPad to Computer
- Transfer Music from iPad to Computer
- Transfer PDF from iPad to PC
- Transfer Notes from iPad to Computer
- Transfer Files from iPad to PC
- Transfer Videos from iPad to Mac
- Transfer Videos from iPad to PC
- Sync iPad to New Computer
- Transfer iPad Data to External Storage


James Davis
staff Editor