How to Solve iPhone Quick Start Not Working?

Jun 11, 2026 • Filed to: Phone Repair Solutions • Proven solutions
 TL;DR:
Resolving iPhone Quick Start failures requires verifying both devices run iOS 11 or later, enabling both Bluetooth and Wi-Fi, and keeping the phones within 30 cm of each other during setup.
● If the setup prompt fails to appear or gets stuck searching for devices, restart both iPhones and confirm that wireless connections are not restricted by Screen Time settings.
● When wireless transfers freeze midway, switch to a direct wired connection using an Apple MFi-certified cable or use Dr.Fone - Phone Transfer to migrate data via USB without relying on Bluetooth or Wi-Fi.
● For persistent system loops that prevent migration, use Dr.Fone - System Repair to reinstall the firmware, noting that this process will update your device to iOS 26 and remove any active jailbreaks.
Ask AI for a summary
 ChatGPT
 Perplexity
 Gemini
 Claude
 Grok
Grok
Apple's iPhone Quick Start is one of the most convenient ways to set up a new iPhone—it lets you wirelessly transfer all your data, settings, and apps from your old device in just a few minutes. You can also transfer all data from an old iPhone to a new one seamlessly, or restore the majority of your data and content from your iCloud backup on the new phone.
However, many users run into frustrating problems during the setup process. The most common complaints include: Quick Start not showing up on new iPhone, the new iPhone not finding the nearby device, the "bring your current iPhone near this iPhone" prompt not responding, and the entire Quick Start transfer not working midway through the process. These issues can occur on any model—from iPhone 11 to iPhone 16—running iOS 26 or earlier.
The good news is that most iPhone Quick Start not working issues are caused by a small set of fixable problems: Bluetooth or Wi-Fi being disabled, outdated iOS versions, physical proximity issues, cable faults, or deeper iOS system errors. This guide walks you through exactly how to use Quick Start correctly and provides 7 tested troubleshooting solutions to resolve every known Quick Start failure—covering Apple Quick Start troubleshooting for 2026 and iOS 26 compatibility. Follow the steps in order for the fastest resolution.
Part 1: What is Quick Start? How to Use It?
Quick Start is Apple's built-in device migration feature, available on iPhones and iPads running iOS 11 or later. It uses a combination of Bluetooth (for device discovery) and Wi-Fi (for high-speed data transfer) to migrate your complete iPhone setup—including apps, photos, contacts, messages, passwords, and Apple Pay—to a brand-new device with minimal effort. Both devices must be physically close to each other, charged to at least 50%, and connected to a power source during a large transfer.
If you are setting up a new iPhone and are unsure how to trigger Quick Start, follow the complete step-by-step guide below. If Quick Start is not appearing or not finding your device, skip to Part 2 for troubleshooting.
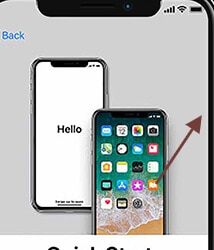
Step 1: Turn on your new iPhone and place it next to your current iPhone (running iOS 11 or later). The Quick Start screen will appear automatically on the current iPhone, displaying your Apple ID and a prompt to set up the new device. If the screen does not appear, make sure Bluetooth is enabled on your current iPhone.

Step 2: On your current iPhone, tap Continue when the "Set Up New iPhone" prompt appears. This confirms that you want to use Quick Start to transfer your data and settings to the new device using your existing Apple ID.
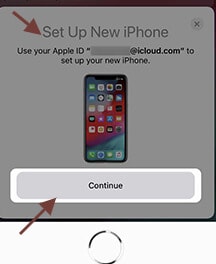
Point to note: If the Continue option does not appear on your current device, Bluetooth may be turned off. Go to Settings > Bluetooth and enable it before proceeding.
Step 3: Your new iPhone will display a unique animated pattern. Hold your current iPhone above the new device and align the animation within the camera viewfinder on your current phone. This securely pairs the two devices using encrypted visual authentication.
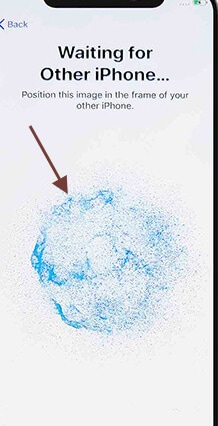
Point to note: If your current iPhone's camera is not functional, tap Authenticate Manually and enter a 6-digit code to complete the pairing step manually.
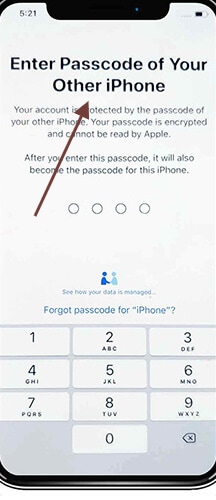
Step 4: On your new iPhone, enter the passcode from your current (old) iPhone when prompted. This verifies your identity and authorizes the data transfer.
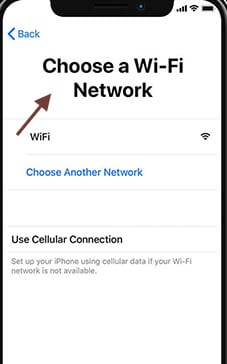
Step 5: On the new iPhone, select your preferred Wi-Fi network, enter the password, and tap Join. A stable Wi-Fi connection is required for fast data migration—using cellular data or a slow network can significantly increase transfer time or cause the process to stall.
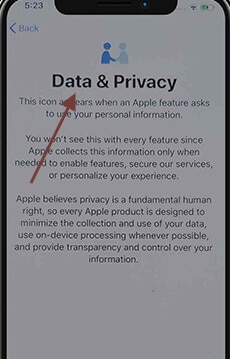
Step 6: Review the Data & Privacy information screen on your new iPhone. Tap Continue to acknowledge Apple's data handling policy and proceed to the next setup stage.
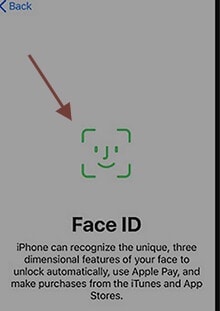
Step 7: Follow the on-screen prompts to configure Face ID or Touch ID on the new device using your face or fingerprint. This step sets up biometric authentication for the new iPhone independently of the old device.
Step 8: Enter your Apple ID password on the new iPhone to sign in to your iCloud account. If you use multiple Apple IDs (for example, one for iCloud and one for the App Store), you may be prompted to enter each password separately.

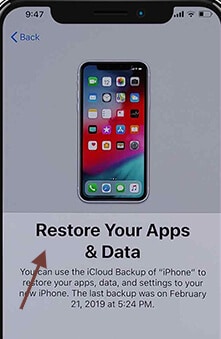
Step 9: Choose your data restoration method. You can restore from a recent iCloud backup, create a fresh backup from your current iPhone right now and restore from it, or transfer data directly from device to device. After selecting a backup, you will also be prompted to migrate settings such as Apple Pay, Siri voice data, and privacy preferences.
Step 10: Review and agree to the Terms and Conditions for iOS and any Apple services (such as iCloud, Siri, and App Analytics). Tap Agree to finalize the setup and begin the data transfer process.

Point to Note: Keep your new iPhone connected to Wi-Fi and plugged into a power source throughout the transfer. Large libraries of photos, videos, and apps can take 30–90 minutes to migrate fully. If any content appears missing after setup, check whether additional data needs to be transferred from third-party cloud services (such as Google Photos or Verizon Cloud) using their respective apps from the App Store.
Part 2: How to Fix iPhone Quick Start Not Working
Despite its convenience, Apple Quick Start not working is a widely reported issue—especially after a major iOS update or when switching to a significantly newer iPhone model. Before diving into individual fixes, it helps to understand the three most common failure patterns so you can target the right solution immediately:
- Quick Start not showing up on new iPhone / set up new iPhone not appearing: The Quick Start screen never appears on the old device, even when both phones are held next to each other. Most often caused by Bluetooth being disabled or iOS version incompatibility.
- Apple Quick Start not finding device / "looking for nearby devices" stuck: Quick Start launches but the two iPhones cannot detect each other. Usually caused by interference, insufficient proximity, or a temporary software glitch requiring a restart.
- Quick Start transfer not working midway: The process begins but freezes, fails, or loops during data migration. Typically caused by Wi-Fi instability, a faulty USB cable, or an iOS system error that requires a firmware-level repair.
Work through the seven fixes below in order. The first three solutions resolve the majority of iPhone Quick Start not working cases and take under five minutes each.
Fix 2.1: Ensure Both iPhones Support Quick Start
Quick Start requires both the source (old) iPhone and the destination (new) iPhone to run iOS 11 or later. If either device runs iOS 10 or an older version, Quick Start will not be available and the setup screen simply will not appear—which is one of the most common reasons for quick start not showing up on new iPhone. Additionally, for optimal compatibility and performance, both devices should ideally run the same major iOS version.
Here is how to check and update the iOS version on each device:
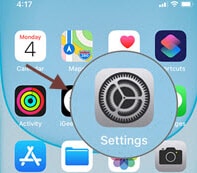
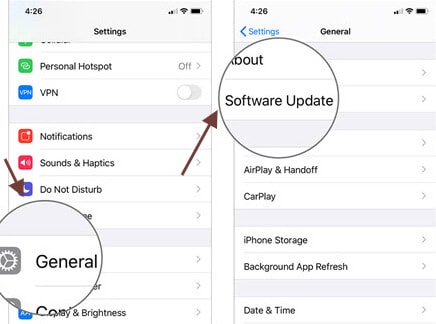
Step 1: On the iPhone you want to check, open Settings and scroll down to General.
Step 2: Tap Software Update. If an update is available, tap Download and Install to upgrade to the latest iOS version. Repeat this process on both iPhones. Once both devices are running iOS 11 or later—ideally iOS 26 for the best 2026 compatibility—attempt Quick Start again by placing them side by side.
Note: If your old iPhone cannot be updated beyond iOS 10 due to hardware limitations (e.g., iPhone 5 or earlier), Quick Start cannot be used. In that case, skip to Fix 2.5 for the best alternative transfer method.
Fix 2.2: Enable Bluetooth and Wi-Fi on Both iPhones
Quick Start relies on Bluetooth for device discovery and Wi-Fi for high-speed data transfer. If either of these is disabled on either device, Quick Start will either fail to detect the nearby iPhone or stall during the transfer phase. This is the single most common cause of Apple Quick Start not finding device and the "quickly set up iPhone not finding device" error.
Follow these steps to enable Bluetooth and Wi-Fi on both iPhones:
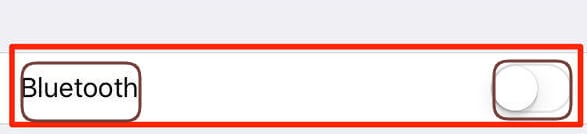
Step 1: On each iPhone, open Settings.
Step 2: Tap Bluetooth and toggle it ON (the toggle turns green). Then go back to Settings, tap Wi-Fi, and toggle it ON as well. Ensure both devices are connected to the same Wi-Fi network or that Wi-Fi is at minimum enabled—even if not connected—so Quick Start can create its own direct peer-to-peer wireless link.
Additional tips:
- Make sure neither device has Bluetooth or Wi-Fi disabled via Screen Time restrictions.
- If you previously used Control Center to "disable" Bluetooth or Wi-Fi, note that this only disconnects active connections—it does not fully turn off the radios. Go to Settings directly to confirm both are genuinely enabled.
- Keep the two iPhones within 30 cm (about 1 foot) of each other during the discovery phase for the strongest Bluetooth signal.
Fix 2.3: Restart Both of Your iPhones
If Bluetooth and Wi-Fi are both enabled but your iPhones are still not detecting each other—showing "Looking for Nearby Devices" without progress—a temporary Bluetooth or Wi-Fi stack error may be preventing communication. Restarting both devices clears these cached errors and reinitializes all wireless radios, resolving the "bring your current iPhone near this iPhone not working" issue in the majority of cases.
Restart instructions vary by model:
For iPhone X, 11, 12, 13, 14, 15, 16, and 17 (no Home Button):
- Press and hold the Side button and either Volume Up or Volume Down simultaneously for about 3 seconds.
- Release when the "slide to power off" slider appears on screen.
- Drag the slider from left to right to turn off the device.
- After the screen goes fully black, wait 30 seconds, then press and hold the Side button until the Apple logo appears.
For iPhone SE (1st gen), iPhone 8, 7, and 6s (with Home Button):
- Press and hold the Top or Side (Power/Wake) button until the power slider appears.
- Drag the slider to turn off the device.
- Once fully powered down, press and hold the Power button again until the Apple logo reappears.
After both iPhones have restarted, place them next to each other again and check whether the Quick Start screen now appears. In most cases, this resolves the iPhone looking for nearby devices not working issue without any further steps.
If you have to restart an iPad or iPod touch, press and hold the top or side button, then drag the power slider exactly as you would on an iPhone.
Fix 2.4: Try a Different USB Cable or Switch to Wired Transfer
If wireless Quick Start continues to fail after the steps above, switching to a wired USB connection is often the most reliable workaround. Apple supports wired device-to-device migration during the initial iPhone setup process, and this method bypasses all Bluetooth and Wi-Fi dependency entirely—making it a strong solution when Quick Start iPhone transfer not working wirelessly.
Here is how to troubleshoot and switch to a wired connection:
- Inspect the USB cable: Check the Lightning or USB-C cable for visible damage such as fraying, bent connectors, or discoloration near the plug. A damaged cable can cause intermittent connections that interrupt the migration process.
- Use an Apple-certified (MFi) cable: Third-party cables that are not MFi-certified can fail silently during data transfers. If possible, use the cable that came in the box with either iPhone, or purchase an Apple-branded replacement.
- Check the port: Lint and debris in the Lightning or USB-C port can prevent a secure connection. Use a dry toothpick or soft brush to gently clear the port before inserting the cable.
- Use a Lightning to USB Camera Adapter (for older models): If you are connecting a Lightning iPhone to a USB-C Mac or PC, ensure you are using the correct adapter. An incompatible adapter can prevent the devices from recognizing each other during setup.
- Try a different USB port on your computer: If migrating via a computer, switch to a different USB port—particularly from a USB 2.0 port to a USB 3.0 port (usually identified by a blue color inside the port).
How to set up your iPhone manually using Dr.Fone:
If the wired connection still does not resolve the iphone quick setup not finding phone issue, you can transfer all data manually and reliably using Dr.Fone - Phone Transfer. See Fix 2.5 below for the complete guide.
Fix 2.5: Use a Quick Start Alternative to Transfer Data to New iPhone
If Quick Start remains unavailable or consistently fails—whether due to an incompatible iOS version, persistent wireless issues, or a hardware limitation—Dr.Fone - Phone Transfer is the most capable alternative. It performs a complete, one-click transfer of all data types between iPhones using a USB connection, with no dependency on Bluetooth, Wi-Fi, or iCloud. It is particularly valuable when quickly set up iPhone not working and you need a reliable fallback method that does not risk data loss.
What Dr.Fone - Phone Transfer can move:
- Contacts, call history, messages (SMS and iMessage), and voicemails
- Photos, videos, and camera roll albums
- Music, playlists, and podcasts
- App data and documents (for supported apps)
- Calendar events and notes
Follow the step-by-step guide below to transfer data from your old iPhone to your new iPhone using Dr.Fone:
Step 1: Click the button below to download Dr.Fone for free. Install it on your Windows PC or Mac and launch the application.

Step 2: On the Dr.Fone main screen, select "Phone Transfer". Use USB cables to connect both your old iPhone (source) and new iPhone (destination) to the computer simultaneously. Wait for Dr.Fone to detect and display both devices on screen.

Step 3: Verify that your old iPhone is set as the Source and your new iPhone is set as the Destination. Use the Flip button if they are reversed. Select the data categories you want to transfer (or check Select All for a complete migration), then click "Start Transfer". Keep both iPhones connected throughout the process.

Step 4: The transfer will complete in a few minutes depending on the total amount of data. A progress bar will indicate the status. Do not disconnect either device until the completion confirmation screen appears.

Fix 2.6: Repair the iOS System on Your Device
If Quick Start fails to complete—particularly if the transfer starts but loops, freezes, or terminates with an error message—a corrupted iOS system file is likely the root cause. This type of issue cannot be resolved by restarting or re-enabling wireless features. It requires reinstalling the iOS firmware to clear the underlying system error.
Dr.Fone – System Repair (iOS) is designed specifically for these scenarios. It detects corrupted firmware, downloads the correct iOS version for your device model, and performs a clean repair without erasing your personal data. It is compatible with all iPhone models (including the latest iPhone 17) and fully supports iOS 26—making it one of the most effective solutions for Apple Quick Start troubleshooting in 2026 when standard methods fail.
Key capabilities:
- Transfer data between mobile devices across multiple operating systems.
- Move contacts, messages, photos, music, and more between devices.
- Single-click data transfer with an intuitive interface requiring no technical expertise.
- Fully compatible with iOS 26 and Android 14 and later.
Important note: Using System Repair will upgrade your device to the latest compatible iOS version. If your iPhone has been jailbroken, the repair process will remove the jailbreak and restore it to a standard, non-jailbroken state. If your device was previously unlocked by a third party, it may re-lock after repair.
Dr.Fone - System Repair
Repair system errors to fix iPhone quick start not working. No iTunes is Needed.
- Downgrade iOS without data loss.
- Fix various iOS system issues stuck in recovery mode, white Apple logo, black screen, looping on start, etc.
- Fix all iOS system issues in just a few clicks.
- Works for all models of iPhone, iPad, and iPod touch.
- Fully compatible with the latest iOS version.


Follow these steps to repair your iOS system and resolve the Quick Start failure:
Step 1: Launch the Dr.Fone application on your Windows PC or Mac.
Step 2: From the main module, select "System Repair", then choose "iPhone" followed by "iOS Repair".
Step 3: Connect your iPhone to the computer using a USB cable. Dr.Fone will detect your device and present two repair options: Standard Repair (no data loss, recommended for most users) and Advanced Repair (for severe system corruption—this option erases the device). Choose Standard Repair first.

Step 4: Put your iPhone into Recovery Mode by following the on-screen instructions. Dr.Fone will automatically detect your device model and display the available iOS firmware versions. Select the latest compatible version (iOS 26) and click "Download" to begin downloading the firmware.

Step 5: The iOS firmware will download automatically. Download time varies based on your internet speed—typically 5–20 minutes for an iOS 26 firmware file.

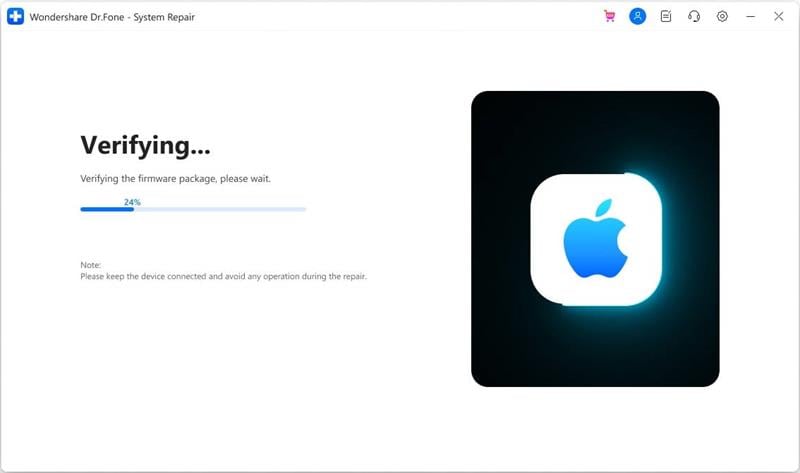
Step 6: Once the download completes, Dr.Fone automatically verifies the firmware integrity to ensure the file is not corrupted before installation.
Step 7: When verification passes, click "Repair Now" to begin the iOS repair. Keep your iPhone connected and do not lock the screen or close Dr.Fone during this stage.

Step 8: The repair process takes approximately 3–8 minutes. Once complete, your iPhone will restart automatically. After rebooting, attempt Quick Start again—the iPhone Quick Start not working issue should now be resolved.

Fix iPhone quick start not working with one click! Have a try!
Fix 2.7: Contact Apple Support for Further Help
If all seven fixes above have been attempted and Apple Quick Start is still not working, the issue may involve a hardware fault—such as a defective Bluetooth or Wi-Fi antenna—or a device-specific software conflict that requires hands-on Apple diagnostic tools. In these cases, contacting Apple Support directly is the recommended next step.
Here is how to get support efficiently:
- Online: Visit support.apple.com and navigate to iPhone > Set Up & Transfer > Quick Start. Apple's support portal offers live chat, phone callbacks, and remote diagnostic tools.
- Apple Genius Bar: Book an appointment at your nearest Apple Store for in-person diagnosis. Apple technicians can run hardware diagnostic tests to determine whether a Bluetooth or Wi-Fi component is at fault.
- Apple Authorized Service Provider: If you do not have an Apple Store nearby, an authorized service provider can perform the same diagnostics and hardware repairs.
- What to tell Apple Support: Mention which iPhone models are involved, the iOS versions on both devices, which fixes you have already tried, and the exact error message or behavior you are seeing (e.g., "Quick Start not showing up," "stuck on Looking for Nearby Devices," or "transfer failed at X%").
Conclusion
Apple Quick Start is an excellent feature when it works—but iPhone Quick Start not working is a frustratingly common problem that can stop your new device setup completely. The good news is that nearly every case is fixable with the right approach. Here is a quick reference to match your symptom with the best solution:
- Quick Start not showing up on new iPhone: Check that both devices run iOS 11 or later (Fix 2.1) and that Bluetooth is enabled on the old iPhone (Fix 2.2).
- Apple Quick Start not finding device / "looking for nearby devices" stuck: Enable Bluetooth and Wi-Fi on both phones (Fix 2.2) and restart both devices (Fix 2.3).
- "Bring your current iPhone near this iPhone" not working: Restart both iPhones (Fix 2.3) and ensure they are within 30 cm of each other.
- Quick Start transfer not working or freezing: Switch to a wired USB connection with an Apple-certified cable (Fix 2.4) or use Dr.Fone - Phone Transfer as a reliable alternative (Fix 2.5).
- Nothing works after trying all of the above: Use Dr.Fone - System Repair (iOS) to fix corrupted firmware (Fix 2.6), or contact Apple Support for hardware diagnosis (Fix 2.7).
All solutions in this guide are fully compatible with iOS 26 and every iPhone model currently in use. Whether you are performing Apple Quick Start troubleshooting in 2026 on a brand-new iPhone 17 or migrating data from an older iPhone 12, these fixes cover every known scenario. If one method does not work, move to the next—most users resolve the issue within the first three fixes.
FAQs


iPhone Problems
- iPhone Hardware Problems
- iPhone Home Button Problems
- iPhone Keyboard Problems
- iPhone Headphone Problems
- iPhone Touch ID Not Working
- iPhone Overheating
- iPhone Flashlight Not Working
- iPhone Silent Switch Not Working
- iPhone Sim Not Supported
- iPhone Call Volume Low
- iPhone Software Problems
- iPhone Passcode Not Working
- Google Maps Not Working
- iPhone Screenshot Not Working
- iPhone Vibrate Not Working
- Apps Disappeared From iPhone
- iPhone Emergency Alerts Not Working
- iPhone Battery Percentage Not Showing
- iPhone App Not Updating
- Google Calendar not Syncing
- Health App Not Tracking Steps
- iPhone Auto Lock Not Working
- iPhone Screen Recorder No Sound
- Find My iPhone Not Sharing Location
- iPhone Battery Problems
- iPhone Media Problems
- iPhone Echo Problem
- iPhone Camera Black
- iPhone Won't Play Music
- iOS Video Bug
- iPhone Calling Problem
- iPhone Ringer Problem
- iPhone Camera Problem
- iPhone Front Camera Problem
- iPhone Not Ringing
- iPhone Not Sound
- iPhone Mail Problems
- Reset Voicemail Password
- iPhone Email Problems
- iPhone Email Disappeared
- iPhone Voicemail Not Working
- iPhone Can't get Mail connection
- Gmail Not Working
- Yahoo Mail Not Working
- iPhone Update Problems
- iPhone Stuck at the Apple Logo
- Software Update Failed
- iPhone Verifying Update
- Software Update Server Couldn't Be Contacted
- iOS update Problem
- iPhone Won't Update
- iPhone Connection/Network Problems


Alice MJ
staff Editor
Generally rated4.5(105participated)