How to Put iPhone and iPad in Recovery Mode

May 27, 2025 • Filed to: Mobile Repair Solutions • Proven solutions
Sometimes, while updating your iPhone or iPad or trying to restore it, your iOS device might become unresponsive. In this case, no matter what buttons you press, nothing seems to work. This is when you need to put iPhone/iPad in recovery mode. It is a bit difficult to put iPhone/iPad in recovery mode; however, after reading this article, you will surely know how to enter and exit from recovery mode.
So read on to find out how to put iPhone/iPad in recovery mode.

- Part 1: How to Put iPhone/iPad in Recovery Mode
- Part 2: How to Exit iPhone Recovery Mode
- Part 3: For More iPhone Recovery Strategies
Part 1: How to Put iPhone/iPad in Recovery Mode
How to Put iPhone in Recovery Mode (iPhone 6s and earlier):
- Make sure you have the latest version of iTunes.
- Connect your iPhone to your computer using a cable and then put it on iTunes.
- Force restart your iPhone: Press the Sleep/Wake and the Home buttons. Don't let them go, and keep holding on till you see the Recovery screen.

- On iTunes, you'll receive a message with 'Restore' or 'Update' options. It is up to you which function you'd like to perform now. You've successfully put the iPhone in recovery mode.
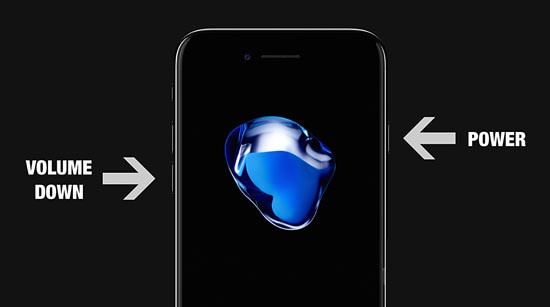
How to Put iPhone 7 and later in Recovery Mode:
The process to put iPhone 7 and later in recovery mode is the same as the one given above, with one minor change. In iPhone 7 and later, the Home button is replaced by a 3D touchpad for longer lifespan. As such, instead of pressing down the Sleep/Wake and Home buttons, you need to press the Sleep/Wake and Volume down buttons to put the iPhone in recovery mode. The rest of the process remains the same.

How to put iPad in Recovery Mode:
The process to put the iPad in recovery mode is also the same as the process mentioned earlier. However, it bears mentioning that the Sleep/Wake button is on the top right corner of the iPad. As such, you need to press that Sleep/Wake button along with the Home button at the bottom center while keeping the iPad connected to the computer.

So now that you know how to put iPhone/iPad in recovery mode, you can read the next part to find out how to exit recovery mode.
Part 2: How to Exit iPhone Recovery Mode
How to Exit iPhone Recovery Mode (iPhone 6s and earlier):
- If you're in recovery mode, then disconnect the iPhone from the computer.
- Now, press down the Sleep/Wake and Home buttons simultaneously until you see the Apple logo come back on.
- After you see the logo, release the buttons and let your iPhone boot up normally.

How to exit iPhone 7 and later recovery mode:
This is the same process as for the iPhone 6s and earlier. However, instead of pressing the Home button, you need to press the Volume Down button because in iPhone 7 and later, the Home button is rendered into a 3D touchpad.
Part 3: For More iPhone Recovery Strategies
Using the previously given methods should help you restore or update your iPhone and fix it if it's stuck. However, if it doesn't work, don't worry just yet because all hope isn't lost. There are still two other solutions left to try.
Dr.Fone - System Repair
Dr.Fone - System Repair is a third-party tool that Wondershare softwares have rolled out. Now I understand that many people are hesitant about using third-party tools with their Apple devices, however rest assured that Wondershare is an internationally acclaimed company with millions of rave reviews from happy users. iOS System Recovery is a great option to go for if Recovery Mode doesn't work because it can scan your entire iOS device for flaws or errors and fix it all in one go. It doesn't even lead to any data loss.
Dr.Fone - System Repair
Fix your iPhone problems without data loss!
- Safe, easy, and reliable.
- Fix various iOS system issues like stuck in recovery mode, white Apple logo, black screen, looping on start, etc.
- Fix iTunes and iPhone errors, such as iPhone error 14, error 50, error 1009, error 4005, error 27, and more.
- Work for all models of iPhone, iPad, and iPod touch.


You can read up on how to use Dr.Fone - System Repair here >>

DFU Mode:
DFU Mode stands for Device Firmware Update, and it is a great function to help you out when your iPhone is experiencing some serious problems. It is one of the most effective solutions out there, however it completely wipes out all your data.

Before entering DFU mode however, you should backup iPhone in iTunes, iCloud, or backup using Dr.Fone - iOS Data Backup and Restore. This will help you recover your data after DFU mode wipes your iPhone clean.
If you find that your iPhone is stuck in recovery mode, you can read this article: How to Fix iPhone Stuck in Recovery Mode
And you could watch this YouTube video for an in-depth tutorial.
Conclusion
So now you know how to put iPhone/iPad in recovery mode and then exit iPhone/iPad from recovery mode. You also know the alternatives you can look into in case recovery mode doesn't work out. Both Dr.Fone - System Repair and DFU mode have their advantages, it's up to you which one you're most comfortable with. But if you use DFU mode, be certain to backup beforehand so that you don't suffer data loss. We're here to help! Et us know in the comments whether our guide helped you out and any other questions.


iPhone Reset
- iPhone Recovery Mode
- 1. Exit iPhone Recovery Mode Loop
- 2. iPhone in Recovery Mode
- 3. iPhone Recovery Mode
- 5. Get Data from iPhone in Recover Mode
- 6. Put iPhone in Recovery Mode
- 7. Recuva Data Recovery Review
- 8. DFU Mode vs Recovery Mode
- iPhone DFU Mode
- 1. Put iPhone in DFU Mode
- 2. Enter and Exit DFU Mode
- 3. Get Data from iPhone in DFU Mode
- 4. Tools for iPhone to Enter DFU mode
- 5. Enter/Exit DFU Mode on iPhone X
- 6. Enter/Exit DFU Mode on iPhone SE
- 7. DFU Mode Works on iPhones
- 8. Enter DFU Mode on iPod Touch
- iPhone Factory Reset
- 1. Factory Reset iPhone
- 2. Factory Reset iPhone without iTunes
- 3. Reset iPhone without Passcode
- 4. Reset iPhone Without Apple ID
- iPhone Hard Reset
- 1. Hard Reset VS Soft Reset iPhone
- 2. Hard Reset Without Computer
- 3. Force Restart iPhone
- 4. Restart or Force Restart iPhone
- 5. Hard/Soft/Factory Reset iPhone 8
- iPhone Reset Tips
- 1. Soft Reset iPhone
- 2. Restart or Reboot iPhone
- 3. iPhone Reset All Settings
- 4. Reset iPhone Battery
- 5. Reset iPhone without Apple ID
- 6. Reset Jaibroken iPhone
- 7. Reset Network Settings On iPhone
- 8. Reset Restriction Passcode iPhone
- 9. Restart iPhone Without Power Button
- 10. Turn Off iPhone Without Home Button
- 9. Turn off iPhone without Screen
- 10. Reset Disabled iPhone


James Davis
staff Editor