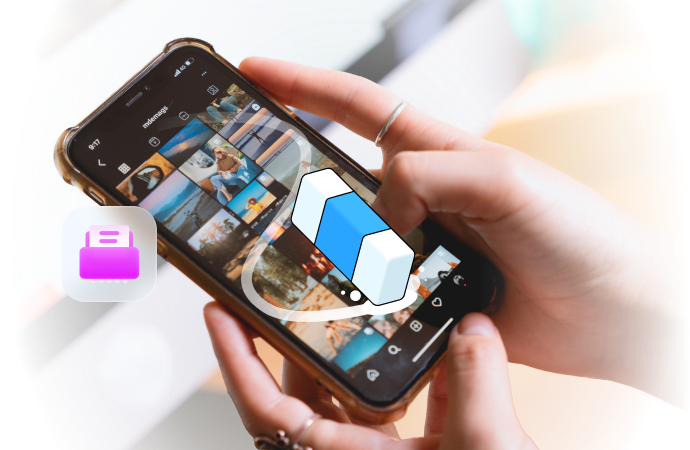
How to Delete a Google Account in Android

Jun 11, 2026 • Filed to: Data Wipe Solutions • Proven solutions
 TL;DR:
To disconnect a Google account from an Android device without permanently deleting the account from Google servers, navigate to the device Settings, access Passwords and accounts, select the targeted Google profile, and tap Remove account.
● For users preparing a device for resale, utilizing the Wondershare Dr.Fone Data Eraser software via a Windows or Mac computer provides a thorough device wipe that irreversibly removes all personal data instead of merely unlinking the profile.
● The standard Android removal method strictly requires identity verification via a device password, PIN, or pattern, meaning you must use Google's official recovery options if you have forgotten the login credentials.
● The account removal process can be blocked entirely if the Android device is company-managed or currently protected by active device administrator applications and enterprise settings.
Ask AI for a summary
 ChatGPT
 Perplexity
 Gemini
 Claude
 Grok
Grok
Need to remove a Google account from an Android phone? The fastest and safest way is to open your phone's account settings, choose the Google account you want to remove, and tap Remove account. If you are selling the device and want stronger privacy protection, you can also use a full-device wipe tool to erase personal data before handing the phone over.

Many users search for ways to remove Google account from Android because they are switching accounts, fixing sync issues, separating work and personal use, or preparing a phone for resale. In most cases, you can remove a Google account from Android directly in Settings. What matters is choosing the right method for your goal: removing one account from the device, or securely erasing the whole phone before it changes hands.
In this guide, you'll learn how to delete a Google account in Android, how to remove a Google account from an Android phone safely, what happens to synced data, and what to do if you no longer remember the password.
The instructions below are written in simple language, but they are also detailed enough to help users compare methods and avoid common mistakes.
- Part 1: Why Delete a Google Account From Android?
- Part 2: How to Delete a Google Account in Android
- Method 1: Use Wondershare Dr.Fone Data Eraser Feature

- Method 2: How to Remove Phone From Google Account Manually
- Part 3: Tips and Tricks: How to Remove Google Account in Android
Part 1: Why Delete a Google Account From Android?
Removing a Google account from Android means disconnecting that account from the device. This is useful when you want to stop syncing Gmail, Contacts, Calendar, Drive, Photos, and other Google services to that phone. It does not automatically delete the Google account itself from Google's servers.
Users usually remove a Google account from an Android phone for one of these reasons:
- Protecting privacy before selling a device: If you plan to resell, trade in, or give away your phone, removing your Google account helps prevent the next user from accessing your synced data.
- Switching to a different Google account: You may want to sign out of an old account and keep only your current email, files, and backup settings active on the device.
- Fixing Android sync or sign-in problems: In some cases, removing and re-adding the account resolves account sync issues, Play Store problems, or repeated sign-in errors.
- Separating work and personal use: Some users remove one account to keep notifications, calendars, and files better organized.
- Reducing unnecessary account access: If an old Google account is no longer needed on the device, removing it reduces exposure and simplifies account management.
Before you remove a Google account from Android, it is important to understand the difference between these two actions:
- Remove the account from the phone: The account stops syncing to that Android device, but the Google account still exists and can be used elsewhere.
- Delete the Google account permanently: This is a separate action done through Google Account settings in a browser and can affect Gmail, Drive, Photos, and other Google services permanently.
If your goal is simply to remove Google account from phone, the built-in Android method is usually enough. If your goal is to clear all private data before resale, a complete device wipe is the safer option.
Part 2: How to Delete a Google Account in Android
There are two practical ways to handle Android Google account removal. The first is a privacy-focused option that erases the device and removes account-related data at the same time. The second is the standard manual method inside Android Settings.
Choose the method that matches your situation:
- Use Method 1 if you are selling the phone, recycling it, or want to erase personal data more thoroughly.
- Use Method 2 if you only want to remove one Google account from your Android phone and continue using the device normally.
Method 1: Use Wondershare Dr.Fone Data Eraser Feature
Wondershare Dr.Fone's Data Eraser feature is designed for users who want more than a basic account removal. Instead of only disconnecting the Google account from the phone, this method helps erase private data across the device, which is especially useful before resale or transfer.
This option is best for users who want a more complete privacy workflow. If your concern is not just how to remove Google account from Android phone, but also how to make old personal data harder to recover, a full erase solution is the stronger choice.
Dr.Fone - Data Eraser
Fully Erase Everything on Android and Protect Your Privacy
- Simple, click-through process.
- Wipe your Android completely and permanently.
- Erase photos, contacts, messages, call logs, and all private data.
- Supports all Android devices available in the market.


Important Note: The data eraser function of Dr.Fone can erase all data on the device irreversibly. It is strongly recommended that users use Dr.Fone Phone Backup to back up their important data in advance.
Before starting, make sure you have:
- Backed up photos, contacts, chats, and files you still need.
- Enough battery power on the Android phone.
- A stable USB connection to prevent interruptions during erasure.
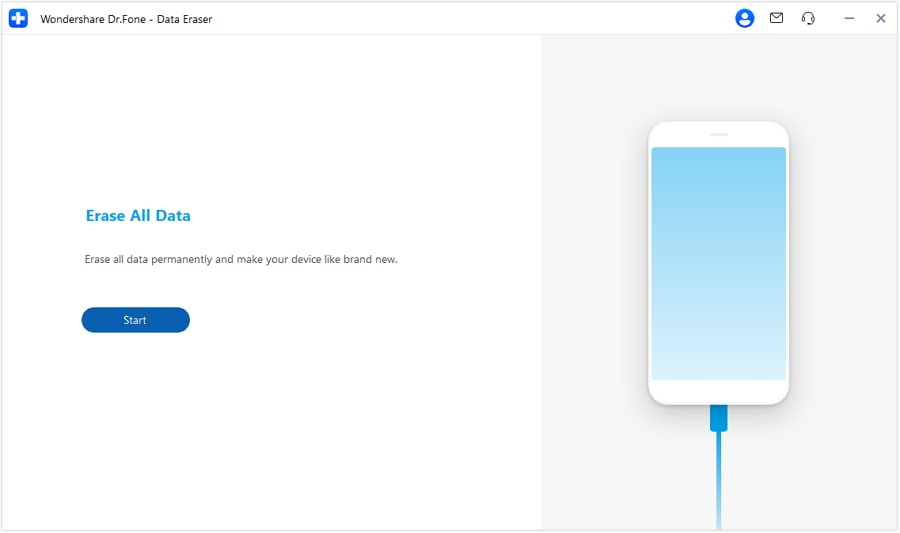
Step 1: Visit the official Wondershare website and download the Dr.Fone software suitable for your computer's operating system. Install the program following the on-screen instructions. With a USB lightning cable. connect your Android phone to your PC. Launch Dr.Fone and select the "Data Eraser" option from the main interface.

Step 2: As a new window launches for the particular tool, hit the “Start” button.
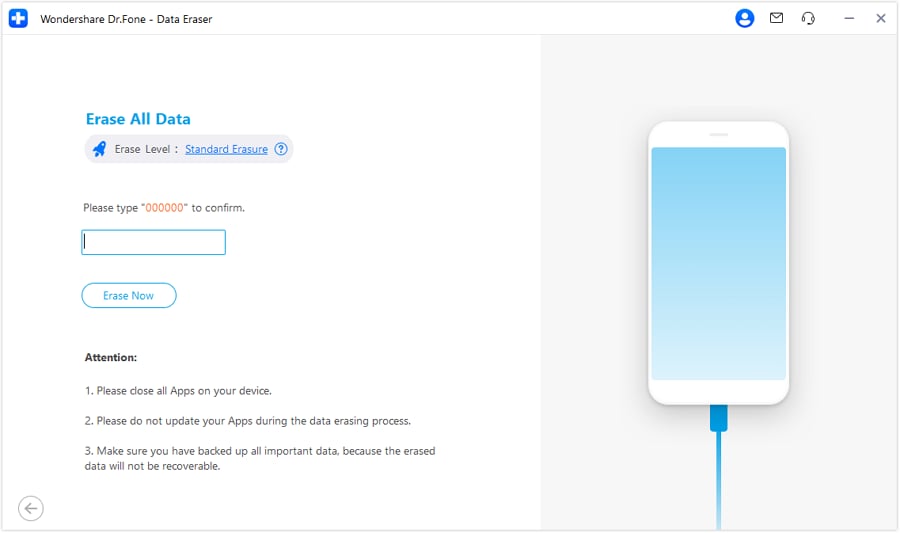
Step 3: To erase all data, you have to confirm the process by typing in the code that will be used to execute the process. On typing the code, click Erase Now.
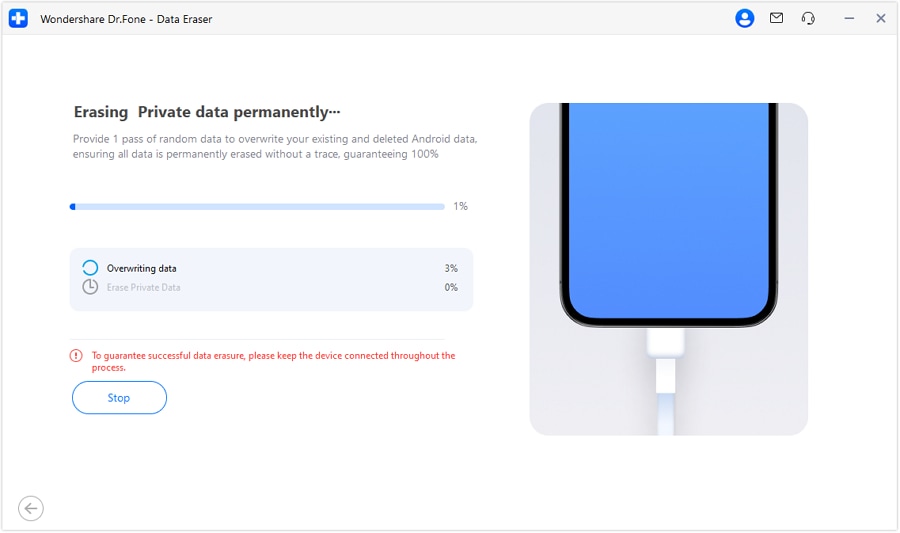
Step 4: The next screen displays the entire completion process, which updates as it concludes a portion of the process. If you wish to hold off the process, click Stop.
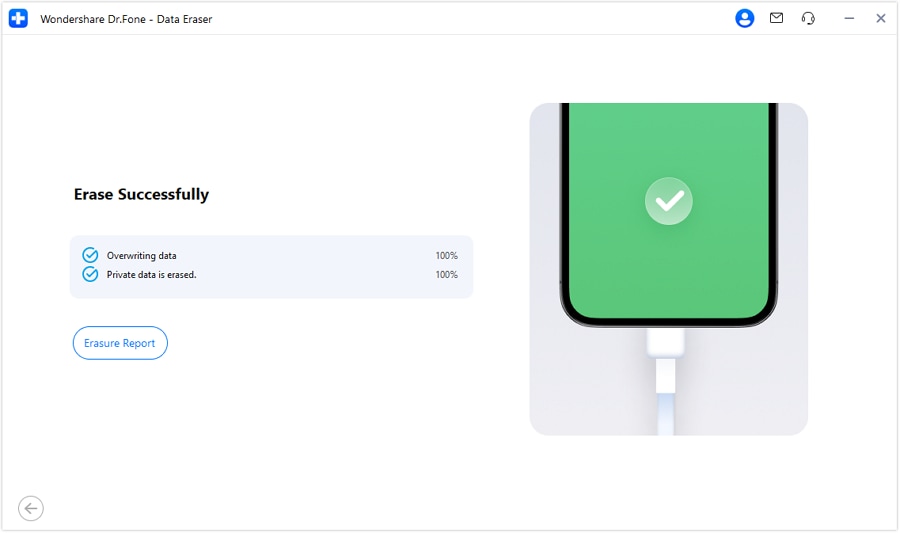
Step 5: Once the data is erased, the window appears with the appropriate message. Click Erasure Report to check what data types have been erased.
Dr.Fone's Data Eraser tool is useful when you want a stronger privacy reset than standard Android account removal. It can help remove traces of personal data after you stop using a Google account on the device.
For users searching for android remove google account or android delete google account because they are preparing a phone for another owner, this method gives a clearer privacy advantage than simply signing the account out.
Method 2: How to Remove Phone From Google Account Manually
If you want to keep using the phone and only remove one Google profile, the built-in Android method is the easiest solution. This is the standard answer for searches such as remove google account from android, remove google account from phone, and how to remove google account from phone.
This process removes the Google account from the device, but it does not permanently delete the Google account itself. Your Gmail, Drive, Photos, and other Google data remain available when you sign in on another device or on the web.
Before you begin, keep these points in mind:
- If this is your primary account, some synced data will disappear from the phone after removal.
- If the device is company-managed or protected by device admin tools, account removal may be restricted.
- Menu names can vary by Android brand and version, but the path is usually under Accounts, Users & accounts, or Passwords & accounts.
Here's how to delete a Google account in Android manually via Settings.
- Open Settings. Scroll down and tap Password and Accounts or Users & accounts, depending on your Android version and device manufacturer.

- Select Google. In the list of accounts, tap Google. If your phone has multiple Google accounts, choose the one you want to remove.

- Tap Remove Account. Look for the Remove Account option and tap it.
- Verify your identity. For security reasons, Android may ask for your phone password, PIN, or pattern before it completes the action.
After confirmation, your Android device will remove the selected Google account and the synced local data connected to it.
What usually happens after removal:
- Gmail messages, contacts, calendar items, and app data linked to that account stop syncing to the phone.
- Google Play purchases and app access tied to another account may not be affected, but the removed account itself will no longer be active on that device.
- If you later add the same account again, synced Google data can return.
It is important to note that removing your Google account from your Android device does not delete the Google account permanently. If you want to delete your Google account entirely, you must do that separately from Google Account settings in a web browser.
Part 3: Tips and Tricks: How to Remove Google Account in Android
To remove a Google account from Android successfully, it helps to know the most common problems users face. The tips below make the process smoother and also answer several long-tail search questions users often have before they remove an account.
- Back up important data first: If the account still contains photos, contacts, notes, or app data you need, back them up before removing it. Account removal is easy, but forgotten data is harder to recover later.
- Know the difference between remove and reset: Removing an account disconnects it from the phone. A factory reset wipes the device. These are not the same action.
- Remove the account from specific apps first if needed: If you only want Gmail or another app to stop using the account, check that app's settings before removing the account from the whole device.
- Use Safe Mode for troubleshooting: If third-party apps are interfering with account settings, Safe Mode may help you remove the account more easily.
- Check for device administrator apps: Security tools, parental controls, MDM software, or enterprise settings can block account removal until those permissions are changed.
- Keep Android updated: An outdated Android version may cause unusual account-management errors or missing menu labels.
- Use Google's Account Recovery Options if you forgot the password: If you are searching for how to delete google account without password or how to delete google account from phone permanently without password, the safest answer is to recover the account first. In standard Android use, you usually cannot remove a protected Google account without verifying ownership.
- Factory reset only as a last resort: If you are locked out of the phone or cannot access account settings, a reset may remove device data, but it should only be used after you understand the consequences.
- Review account access after removal: If the device is old or shared, sign in to your Google account on another device and review recent devices and security settings for peace of mind.
These tips help users who search for android remove account, android google account remove, and other variations because they are usually trying to solve a practical problem, not just follow a basic menu path.
Conclusion
Knowing how to delete a Google account in Android is useful for privacy, troubleshooting, and device preparation. In most situations, the simplest way to remove a Google account from an Android phone is through Settings, where you can select the account and tap Remove account.
If you are keeping the device, the manual Android method is usually enough. If you are selling, donating, or recycling the phone and want stronger privacy protection, Wondershare Dr.Fone Data Eraser can be a better fit because it focuses on removing personal data more thoroughly.
The most important takeaway is this: removing an account from a phone is different from deleting the Google account permanently. Once you understand that difference, it becomes much easier to choose the right method, protect your data, and prepare the device the right way.
FAQs


Android Erase
- Android Diagnostics
- 1. Fix Android Microphone Issues
- 2. Test NFC on Android Device
- 3. Check Android Device in Minutes
- 4. Apps For Sensor Check Android
- 5. Apps for Testing Device's Hardware
- 6. Tools for Conducting Screen Tests
- 7. Ways to Check Phone's Vibrations
- 8. Check Mobile Signal Strength
- 9.Realme Touch Screen Test Codes
- 10.Android Codes To Test Touch Screen
- 11.Phone Processor Speed Tests
- Erase Android
- 1. Delete Browsing History on Android
- 2. Clear App Data and Cache on Android
- 3. Delete Photos from Android
- 4. Wipe Android When It's Lost
- 5. Wipe Cache Partition on Android
- 6. Delete Text Messages on Android
- 7. Delete WhatsApp Backup
- 8. Wipe Data or Factory Reset
- 9. Erase Android Data Before Selling
- 10. Delete Contacts on Android
- 11.Delete Multiple Contacts on Android
- 12.Wipe Android Phone before Selling
- 13.Delete Photos on Android
- 14.Remove Pre-installed Apps
- 15.Delete Apps on Android
- 16. Access Trash on Android
- Android Reset
- 1. Restart Phone without Power Button
- 2. Reset Phone without Volume Buttons
- 3. Factory Reset Android Phone
- 4. Hard Reset Android Phone Using PC
- 5. Hard Reset Locked Infinix Phone
- 6. Factory Reset Lenovo Phone
- 7. Factory Reset Android Tablets
- 8. Factory Reset Lenovo Tablets
- 9. Format Your Android Phone
- 10. Hard Reset Android Phones
- 11.Reset Android Without Home Button
- 12.Restart Your Android Phone
- 13.Soft Reset Android Devices
- 14.Reset Android without Losing Data
- 15.Ways to Hard Reset Tecno Spark
- 16.Updated Android Factory Reset Code
- Data Erase Apps
- 1. Speed Booster for Android
- 2. Android Cleaners to Boost Device
- 3. Data Erase Apps to Protect Privacy
- 4. Data Eraser Apps to Wipe Android
- 5. 15 Best Cleaning Apps for Android
- Sell Old Android
- ● Manage/transfer/recover data
- ● Unlock screen/activate/FRP lock
- ● Fix most iOS and Android issues
- Free Download Free Download Free Download


Julia Becker
staff Editor